Many times standard SAP BI Integrated Planning functions are limited in scope and do not achieve the desired results when complex calculations or company-specific logic are involved. In such cases, exit functions are a tool that can take care of almost any kind of complex logic.
Key Concept
Exit functions are custom planning functions, based on a custom function type that is developed using a custom ABAP class. These functions provide flexibility to restrict the processing of data based on different parameters, arrange selected reference data including an actual date, and build your own logic for critical situations. For example, you can combine actual and planned data. You can use standard interfaces provided by SAP to build the base custom classes. Once the function type is designed, you can use it in several planning functions.
Every company has its own planning strategy based on its business model and experience. For example, media companies can have a planning interface to budget and forecast their marketing campaigns. In the media industry, unlike other industries, the products are sold or dispatched as a part of a subscription on a periodic basis.
From a planning perspective, the forecasted marketing campaigns are unrealized campaigns. The data for all unrealized campaigns comes from customer relationship management campaign master data. The planner calculates the revenue, response, gross margins based on the estimated customer base, attrition rate, sales, and cost. Once the campaign is realized, the actual data starts building up in SAP ERP Central Component (ECC).
At a given time, it may happen that you have actual data coming from ECC for the delivered subscriptions and planned data for subscriptions that are yet to be dispatched. To fine-tune the forecasting process, the actual data needs to be considered while determining key performance indicators (KPIs). The challenge is to combine the actual and planned data for calculations while restricting the write access only to the future plan data. For example, Campaign ABC is targeted to start in the next month. Table 1 shows the data planned in this month.
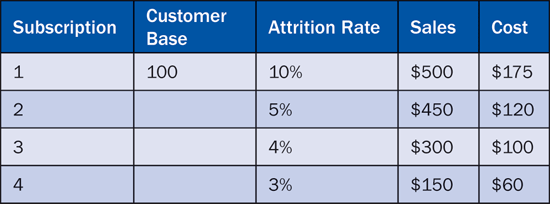
Table 1
Plan data
Table 2 shows the result derived by performing simple calculations only on the planned data.
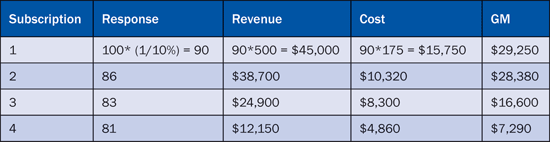
Table 2
Calculations made on the planned data
As the next month starts, the campaign is realized and actual data starts building up, as shown in Table 3.

Table 3
Actual data
The actual data now needs to be calculated in the results along with the planned data for unrealized subscriptions (Table 4).
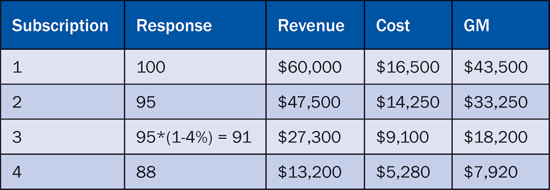
Table 4
Results of actual and planned data
In this step-by-step guide, I show how to design exit functions to get the reference data from plan and actuals and to perform the necessary calculations combining both. I also explain how to pass additional user parameters to this function if required. Finally, I show how to debug the custom function. I’ve taken this scenario as an example to demonstrate how you can build the exit functions. You can use this concept in almost any scenario when you cannot achieve the desired functionality using standard planning functions.
How to Start
Before starting any exit function, you should answer these three questions:
- What level of granularity of the data is necessary? This helps you identify or build the desired aggregation level.
- What is the data I need to change? This determines the parameters and restrictions to be applied in the filter and defines the write access to any function using this filter.
- Do I need any reference data? If yes, what data do I need as a reference to get the desired KPIs? This is a backbone of the exit function. Reference data is the data necessary to perform the calculations to get desired results but you are not changing this data, just using it.
Using the above example, here are the answers to these questions:
- Here I need to consider the data per subscription per campaign. Thus, the lowest level of granularity would be the subscription.
- I need to change the data for a particular campaign from the planning cube. Thus, I restrict by campaign and InfoProvider in the filter (Figure 1) using transaction code RSPLAN.
- Yes, once the campaign is realized, I need the actual subscription data as a reference data to perform the calculations.
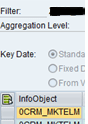
Figure 1
Planning filter
SAP offers two standard interfaces: IF_RSPLFA_SRVTYPE_IMP_EXEC (without reference data) and IF_RSPLFA_SRVTYPE_IMP_EXEC_REF (with reference data). You can use these interfaces as a reference. You need to write your own logic in the methods of custom class based on these to get the desired results. In my example, I need the reference data as explained in point 3. Therefore, I instantiate the class with reference data (Figure 2).

Figure 2
Methods available in interface IF_RSPLFA_SRVTYPE_IMP_EXEC_REF
Two main methods are necessary to achieve the final results (Table 4).
GET_REF_DATA_SEL (Determine Selection for Reference) determines the restrictions to the selection parameters necessary to get the reference data (Figure 3). Input parameter I_T_DATA_CHARSEL is by default populated by the parameters and restrictions defined in filters. Output parameter E_T_REF_CHARSEL is populated with the necessary parameters and restrictions to get reference data. You can add or delete parameters to E_T_REF_CHARSEL in the code.

Figure 3
Method GET_REF_DATA_SEL
Figure 4 shows the code for the method shown in Figure 3. You can download a copy of this code by clicking this link.
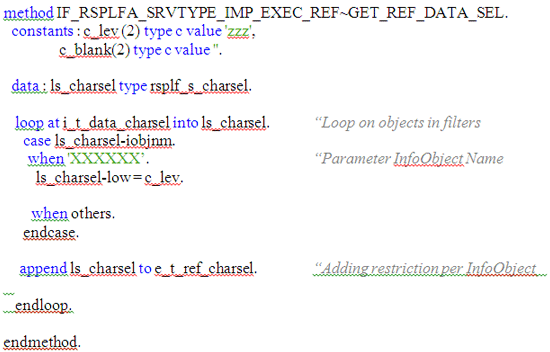
Figure 4
Code in method GET_REF_DATA_SEL
EXECUTE (Execution) is the second method. Here, you specify the actual logic to be performed (Figure 5). Input table I_TH_REF_DATA stores the reference data based on the parameters restrictions passed in Figure 2. In reference to my example, the content of this would be Tables 1 and 3. It will also have an additional column named InfoProvider to distinguish between the two sets of data. Table C_TH_DATA stores the data based on the restrictions applied in the filter. This table is empty if the function has never executed before. This table is also the output table at the end of method. The final calculation result is stored in this table (Table 2 or Table 4 depending on the time of execution). If the method is executed for the first time in the current month when the campaign is not realized, then you have only planned data. Thus the table is empty at the start and would be the same as Table 2 at the end. When you execute the method again in the next month, the table content at the start would be that of Table 2 but at end it would be same as Table 4. Also note the table is based on the restrictions of filters, and the data in this table has write access.

Figure 5
Method EXECUTE
Figure 6 shows the code for method shown in Figure 5. You can download a copy of this code by clicking this link.
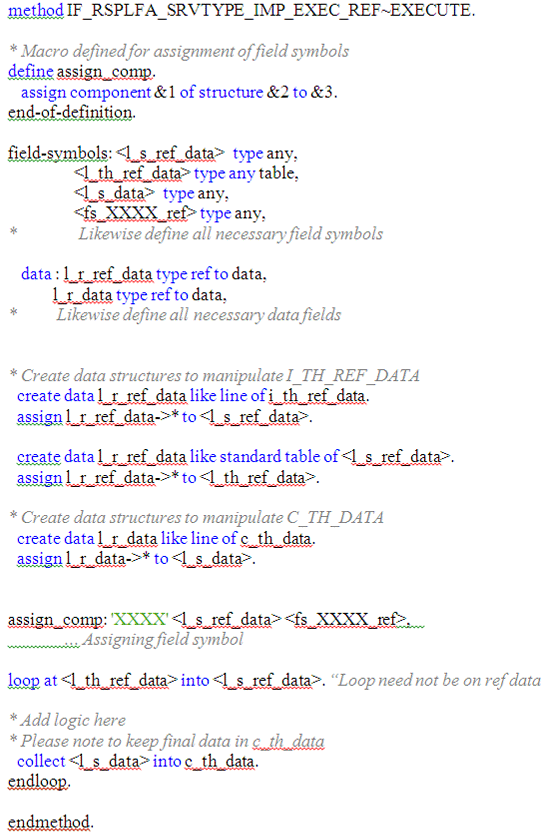
Figure 6
Code in method EXECUTE
A custom function type is defined on the top of a class using transaction code RSPLAN (Figure 7). To define a planning function, you need to define the type first. You should select the Reference Data check box depending on the class definition. As explained earlier, you should check or uncheck it depending on whether you used IF_RSPLFA_SRVTYPE_IMP_EXEC (without reference data) or IF_RSPLFA_SRVTYPE_IMP_EXEC_REF (with reference data). The Without Blocks check box can be checked depending on your need. In my example I need to check it when I want all the data necessary for the calculation to be considered in one block.
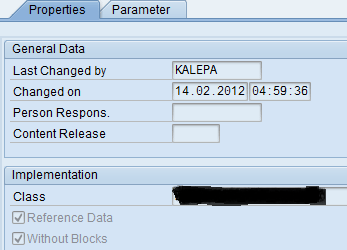
Figure 7
Function type
If you want to pass any parameters from a user to the function, you can define it on the Parameter tab (Figure 8). Right-click the parameter and you see a prompt asking on which object you want to define the parameter. I do not need it in my current example but you can think of it as being similar to a formula variable.
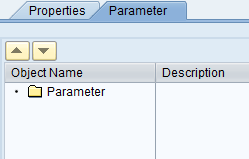
Figure 8
Function type parameter
Finally, you define the planning function (Figure 9) based on the custom function type in the planning modeler. If you have defined a parameter, it appears here. You can assign it to a constant or a variable (in case you need user input). When you execute the function it prompts the variable to the user and the value entered into this variable is passed on to the parameter value.
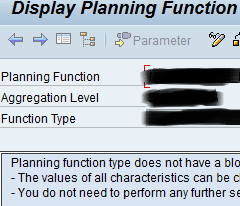
Figure 9
Planning function
To test the planning function, define a planning sequence (Figure 10) using the above planning filter (Figure 1) and function. Create a variant by clicking the variables icon based on a test case (i.e., pass such selections in a variant so that you get the necessary test data, which in my example is a specific campaign). Add a breakpoint on any line in the class method. Now, you are all set for debugging to confirm if your code is working correctly.

Figure 10
Planning sequence
Execute program RSPLS_PLSEQ_EXECUTE using transaction code SE38 (Figure 11). It prompts you to enter the Planning Sequence and the corresponding variant. Uncheck the Save Data check box as you are testing the function and do not want to save data. Once you click the execute icon, the debugger starts and you can check the data into the input table I_TH_REF_DATA and output table C_TH_DATA, as explained in EXECUTE method. You can then verify the contents of the table (Table 4 in my example).
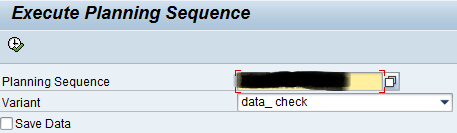
Figure 11
Execute program RSPLS_PLSEQ_EXECUTE
Pallavi Kale
Pallavi Kale is an SAP-certified BI consultant with more than seven years of experience covering all aspects of SAP NetWeaver BW, from extraction to reporting. She is an expert in Integrated Planning and possesses working knowledge of other SAP BusinessObjects tools, such as Crystal Reports, Web Intelligence, Xcelsius (now known as BusinessObjects Dashboards), and SAP Planning and Consolidation. She has helped companies to implement complex data warehouses in the fast-moving consumer goods, manufacturing, networking, and media industries.
To contact the author, click here: Pallavi Kale. If you have comments about this article or would like to submit an article idea, please contact the BI editor.
If you have comments about this article or publication, or would like to submit an article idea, please contact the editor.


