Proxy classes for use in Web applications can be automatically generated by ActionScript, an SAP NetWeaver plug-in, integrated with Adobe Flex Builder 2 or via a wizard in Adobe Flex Builder 3. How the proxy classes are created isn’t as important as your understanding the proxy class structure. Learn how to deal with generated proxy classes to develop code in Flex applications that consume enterprise services.
Key Concept
A proxy class shields the client from the complexity involved in invoking each Web service in an enterprise service. A proxy class contains all the methods and objects that a Web service exposes. These methods handle the marshalling of the parameters into SOAP, sending the SOAP request over HTTP, receiving the response from the Web service, and un-marshalling the return value. The proxy class allows the client program to call a Web service as if the Web service were a local component.
With service-oriented architecture (SOA), the traditional Web development era is changing dramatically to adopt Web services as a primary element of Web development. With mature development technologies such as SAP Web Dynpro for ABAP or Java and Adobe Flex, it is matter of some clicks and a few lines of codes to consume a simple Web service in a Web application. The picture changes as you integrate more sophisticated Web services or enterprise services (a combination of related Web services). Coding complexity increases as you relate and bind nested, complex structures of Web service elements, which is the typical case for an enterprise service.
One standard and proven development approach is integrating an enterprise service via a proxy class. Adobe Flex Builder 2 does not provide standard functionality for generating proxy classes and depends solely on the MXML Web service component that the SDK provides. Although Flex Builder 3 provides a wizard to generate proxy classes, I decided to use Flex Builder 2 and ActionScript to explain how the classes are generated and how you can modify them to develop Web applications that consume multiple Web services found in enterprise services.
What you learn here you can apply to the later versions of Flex Builder. You should have a basic understanding of enterprise Web services and beginner-level knowledge of Adobe Flex. If you are familiar with the SAP Web Dynpro development platform and the adaptive Web service model, you can quickly grasp the development technique I explain.
I will discuss the link between generated proxy classes of Web service operations, related messages, elements, and type definitions. I will also show you how to design and develop Web service consumption coding in Adobe Flex technology. I provide some ready-to-use code to get you productive quickly. This source code can act as a template for Web service integration into an Adobe Flex Web application that uses proxy class implementation.
Build a Flex Application That Invokes an Enterprise Service
By building a simple Web application that invokes an enterprise service, you will learn what the minimum requirements for this type of application are and what tools you need to build it. The purpose of the application is to produce a material list that is based on selection criteria provided by a user. The application needs an input box that accepts the user input in the form of a character string with or without wild characters. It also needs a button on the screen to invoke the Web service and a table control that displays the results that match the selection criteria. The application screen also displays the result status and any error information in a text area. Figure 1 shows the final application screen.
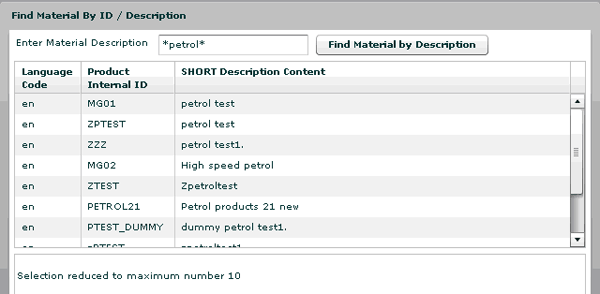
Figure 1
Sample Adobe Flex application
I have chosen the Find Material By ID / Description Web service of the enterprise (ES) bundle available-to-promise (ATP) as the example for this article. The technical name of this Web service is MaterialSimpleByIDAndDescriptionQueryResponse_In. The Web service operations are described through its three main message types: input message, output message, and error or fault message. In this article, the application you are building is designed to work with the material description search criteria only. Technically, this Web service can search for a material using the material ID and material description parameters.
To build the sample Flex application, you need to complete these four steps:
Step 1. Create and set up an Adobe Flex project
Step 2. Lay out the user interface (UI) for the screen
Step 3. Generate ActionScript proxy classes
Step 4. Develop ActionScript functions
Step 1. Create and Set Up an Adobe Flex Project
To begin a Flex project in Adobe Flex Builder 2, create a new Flex project named ATP_Find_material with the basic access data option. Flex Builder automatically creates a project folder with the name of the project, and the file extension for the project defaults to MXML (Figure 2). The bin and html-template folders and files are also automatically created. To see the code that is generated automatically when you create the project, click the Source button in the right pane.

Figure 2
Create a new Flex project
You need to download the SAP ActionScript proxy generator plug-in available at the SAP Community Network and extract the runtime.zip file into a separate Windows folder (typically C:/ or a network drive). Next, you need to copy the com folder from Windows Explorer (located under runtimeruntime folder) and paste the folder into the Flex Builder 2 project folder. The com folder contains the ActionScript classes and SAP-provided UI classes. Expand the com folder to display its contents (Figure 3).

Figure 3
The com folder structure
For the scenario in this article, you need to modify the nl variable in the CallContext.as file, changing it from rn to a blank string. This handles the SOAP output without line feeds and carriage returns, as shown Figure 4.

Figure 4
Change the CallContext.as file to handle SOAP output without line feeds or carriage returns
This completes the initial setup, so you are now ready to start programming in Flex.
Step 2. Lay Out the UI for the Screen
Figure 5 shows you the screen layout for the sample application. The screen contains the following UI components:
- Text input field (labeled Enter Material Description). The user enters search criteria, which can be a full or partial material description, to request a Web service. The search criteria can include wild characters, such as an asterisk (*).
- Data grid (labeled SHORT Description Content). This is the UI element that displays the search results (i.e., the material records that match the search criteria).
- Text area (no label). This UL element displays the log information that the Web service produces after execution of a Web service.
- Button (labeled Find Material by Description). The user clicks this button to execute the selected Web service.
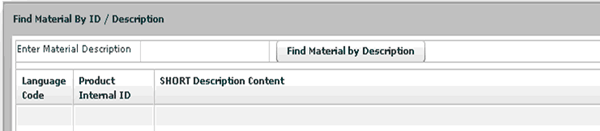
Figure 5
Sample UI screen layout
Figure 6 provides the Flex code that generates the screen in Figure 5. Apart from defining the screen UI components, the code also uses MXML controls, such as Panel, VBox, HBox, and Canvas that affect the layout of the screen.
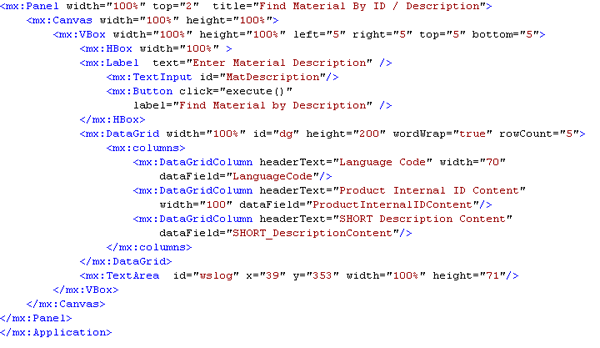
Figure 6
Screen layout code
Note
The code shown in Figure 6 continues to undergo changes as you bind the Web service request and response to the UI component. The final code is available at the end of article.
Step 3. Generate ActionScript Proxy Classes
Using a proxy class generator, you can avoid a majority of coding obstacles (e.g., misspellings or incomplete loops). The ActionScript proxy generator generates many classes for services operations, messages, and types defined in WSDL, so you need to understand how these classes are organized to efficiently and accurately invoke Web service consumption in your Web applications. With a focus on these proxy classes, I have formulated a development approach and techniques for the seamless integration of an enterprise service in a Flex development environment.
Here is my simple three-step process for generating the proxy classes using the ActionScript plug-in.
Step 1. Right-click the project root node in the Project navigator view and select Generate ActionScript proxies from WSDL from the context menu.
Step 2. In the pop-up window, enter the WSDL local file path or URL for the Web service (Figure 7). Enter a name for action script package (in the example, MAT). Next, select the Create getters and setters for data fields option. With this option enabled, the generated classes use getter and setter methods to help extract values from operation message nested parameter structure. To generate proxy classes click the Generate button.

Figure 7
Generate the ActionScript proxy class from the WSDL URL
Step 3. If the WSDL or URL requires authentication, you are prompted to enter this information. The ActionScript plug-in creates a folder structure along with a set of ActionScript files. For example, the help-docs folder contains the complete documentation for the generated classes that represent the operations and data types defined by the Web service. This documentation is a good reference for developers to help them quickly develop code. The most important folder is the MAT folder, which contains the ActionScript proxy classes for the invocation of the Web service represented by the WSDL. The plug-in generates the classes that represent data types, operations, port, and services defined by the WSDL.
Step 4. Develop ActionScript Functions
As mentioned earlier, you can call the Web service with the proxy classes in ActionScript as opposed to by the <MX: WEBSERVICE> MXML component in Adobe Flex. For an ActionScript-centric application, you can take a standard approach and create an instance of the Web service in the program. Next, you add the result and fault event listener that the Web service operation calls.
To easily follow the process I just described, I planned three ActionScript functions:
1. Execute the Web service ActionScript function. This ActionScript function includes the following coding of activities and sequences:
- Create an instance of the request message
- Set the required input parameters for the request message instance
- Create an instance of the result message
- Create an instance of a Web service
- Create an instance of the fault message
- Invoke the Web service instance operation by supplying the operation name, request instance object, result object, fault instance object, fault handling function name, and result the handling function name
2. Use the result-handling ActionScript function. This ActionScript function includes the following coding sequences:
- Evaluate the result object as the importing parameter for this function
- Simplify and bind the Web service request and response to the UI component
3. Use the fault handling ActionScript function. This ActionScript function generally covers the following coding sequences:
- Evaluate the fault object as the importing parameter for this function
- Simplify and bind the Web service request and response to the UI component
The three message types for the Find Material by ID and Web Service Description are:
- InputMessage (MaterialSimpleByIDAndDescriptionQuery_sync)
- OutputMessage (MaterialSimpleByIDAndDescriptionResponse_sync)
- FaultMessage (StandardFaultMessage)
Figures 8 and 9 provide information on the Web navigator test screen and its results for the Web service.
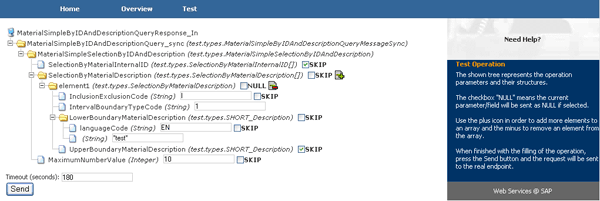
Figure 8
Test input parameter for Web service Find material by ID and Description
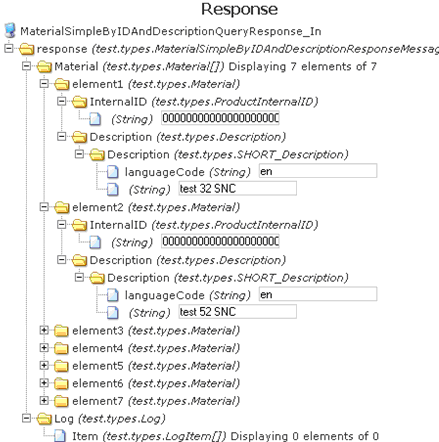
Figure 9
Result of the Web service test
Note
I explain the Web service parameter design details and runtime behavior in my article linked above.
Now you are ready to start coding the three ActionScript functions. You need to import the classes that are prerequisite for the code, as shown Figure 10. You can use this code as a start template for your next Flex application in which your selected Web service is consumed via proxy classes.

Figure 10
ActionScript code template
The code snippet includes comments regarding the execute(), onResult, and onFault functions. Using the Flex Builder code assistance (dot notation), you can see all the related methods and properties of the instance variables for input, output (result), fault, and service messages. Let’s take closer look at the ActionScript functions in the code in Figure 10.
Function Execute ()
The following steps guide you in defining a complete code for the execute() function. Each step shows incremental code lines and wherever is required with the related Web service operation parameter structure elements.
Step 1. Create an instance of the operation input message by entering the code in Figure 11 under the comment line.

Figure 11
Code for the operation input message
Step 2. Set the parameter values for the input message instance by entering the code in Figure 12 under the comment line.

Figure 12
The parameter values for the input message
Step 3. Create a new instance for MaterialSimpleSelectionByIDAndDescription by entering the code in Figure 13 under the code in Figure 12.

Figure 13
Code for the new instance of the input message
The MaterialSimpleSelectionByIDAndDescription code requires three parameters:
- SelectionByMaterialInternalID: Array type instance
- SelectionByMaterialDescription: Array type instance
- MaximumNumberValue: Integer value
Instantiate the two array types and one integer value under MaterialSimpleSelection-ByIDAndDescription as shown in Figure 14.

Figure 14
Instantiate the two array types and one integer value
Step 4. Create the array elements as an instance of the type SelectionByMaterial-InternalID variable and as an instance of the type SelectionByMaterialDescription variable by entering the code in Figure 15.

Figure 15
Create the array elements
The SelectionByMaterialInternalID element requires the following four parameters:
- InclusionExclusionCode: Set the value to I
- IntervalBoundryTypeCode: Set the value to 1
- LowerBoundryMaterialInternalID: Defined further as ProductInternalID
- UpperBoundryMaterialInternalID: Defined further as ProductInternalID
Next, define the two instances and set the values for InclusionExclusionCode and IntervalBoundryTypeCode under SelectionByMaterialInternalID by entering the code in Figure 16.
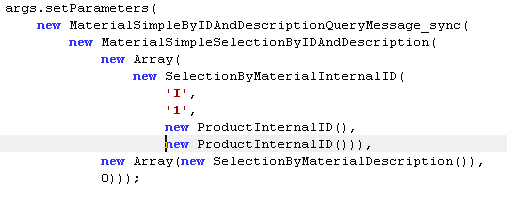
Figure 16
Define the two instances and set the values for InclusionExclusionCode and IntervalBoundryTypeCode
ProductInternalID requires three additional parameters, which are all string type variables:
- SchemeAgencyID
- SchemeID
- Material ID
The Web service operation is designed to search for material based on the material ID as well as the material description. However, this sample application focuses on functionality searches for a material using its description only. Figure 17 shows how to fill in the blank value for the ProducInternalID instance.

Figure 17
Add the values for the ProducInternalID instance
Step 5. The SelectionByMaterialDescription parameter requires four additional values:
- InclusionExclusionCode: Set to I
- IntervalBoundryTypeCode: Set to 1
- LowerBoundryMaterialDescription: Enter SHORT_Description
- UpperBoundryMaterialDescription: Enter SHORT_Description
Define two instances and set values for the InclusionExclusionCode and IntervalBoundryTypeCode under SelectionByMaterialDescription (Figure 18).

Figure 18
Define InclusionExclusionCode and IntervalBoundryTypeCode
SHORT_Description requires two additional parameters: LanguageCode and string. Bind the UI element MatDescription text property and define EN for LanguageCode (Figure 19).
Figure 19
Add the two parameters for SHORT_Description
Finally, create an instance of the result message, create an instance of the Web service, and add the final ActionScript execute() function code (Figure 20).
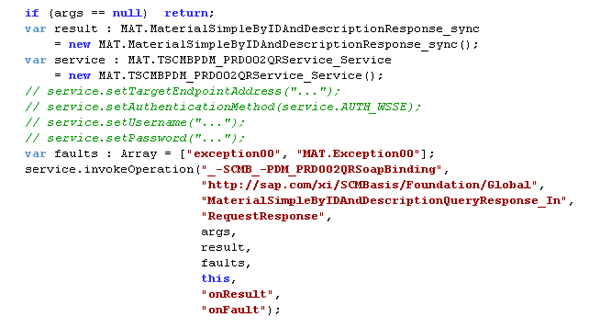
Figure 20
Finish the code for the for the execute() function
Function onResult
Up until this point, I have focused on defining and mapping ActionScript proxy classes. In the next part of the process, you add code for when nothing but the output message is received from the Web service. Unlike the execute() ActionScript, onResult includes a result type of importing parameter, MAT.MaterialSimpleByIDAndDescriptionResponse-_sync. In this case, you do not need to instantiate a specific variable to obtain the result values. You can fetch the response values by using the result parameter itself. The following steps guide you to construct the code for the onResult function.
Step1. In screen layout design in Figure 5, the datagrid UI displays the search result response, which includes just the material records that match the search criteria. To populate the datagrid, define the ArrayCollection object dgDS, which you then bind to the UI datagrid dataProvider property. dgDS consists of three elements:
- LanguageCode: Parameter mapping (Figure 21)
- ProductInternalIDContent: Parameter mapping (Figure 22)
- SHORT_DescriptionContent: Parameter mapping (Figure 23)
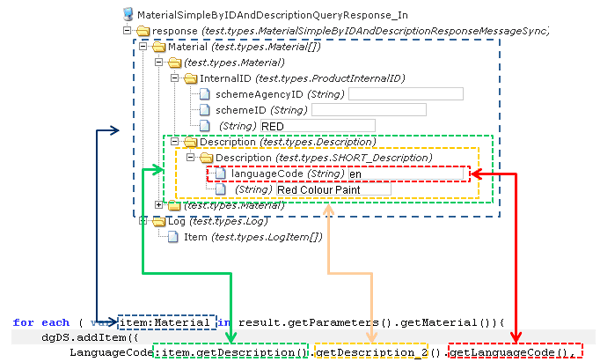
Figure 21
LanguageCode element data population
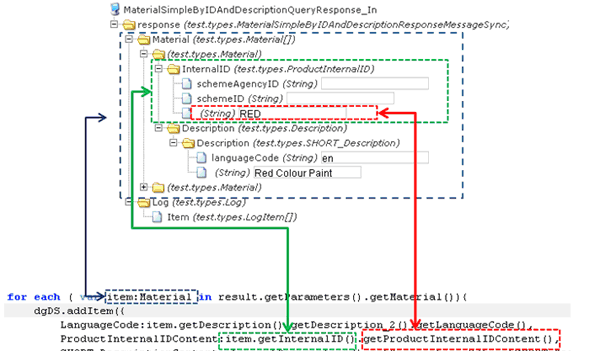
Figure 22
ProductInternalIDContent element data population

Figure 23
SHORT_DescriptionContent element data population
As you can see, you must define each loop that is executed, depending on the material available in the result object.
Step 2. The result object also contains a log of information that is shown in the text area UI of the screen. Figure 24 shows the code for this.
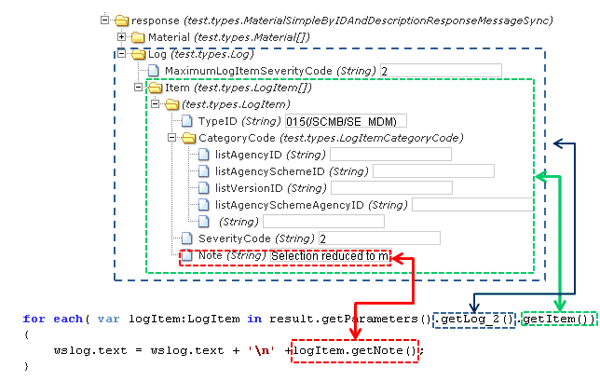
Figure 24
The getLog element data population in the text area UI
Figure 25 shows the complete code for onResult.
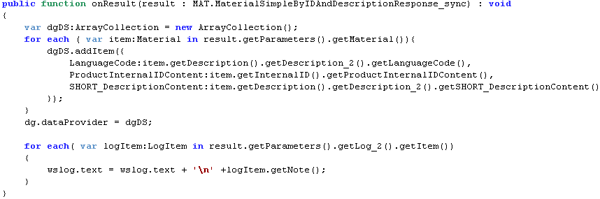
Figure 25
The complete code for onResult
Function onFault
The onFault function coding appears in Figure 26. You can download a complete view of the entire application code in the Downloads section at the end of the article.

Figure 26
Code for the onFault function
Although I focused on the Flex development methodology for enterprise services, the strength of the Flex technology lies in the development of complex Web services. I did not cover the componentization aspect of Flex technology. However, for any given Web service, you can build Flex components that you can reuse in composite applications to address any business process. You should consider componentization in early stage of your development process. Reuse of software components allows for a faster development cycle and reduces expenses.
Sandesh Darne
Sandesh Darne is a senior lead for the Consulting ERP Practice at L&T Infotech, India. He leads a group of senior consultants whose primarily focus is on SAP upgrades and SAP usability consulting services. He also directs the SAP NetWeaver Portal and the SAP Center of Excellence, which focuses on excellent practices in organizations. He is certified in SAP NetWeaver Business Warehouse 3.5. He has also worked in the product development department of L&T Infotech where products such as ZoomUP, eALPS, and CodeReview were built and used as accelerators for SAP upgrade projects.
You may contact the author at sandesh.darne@lntinfotech.com.
If you have comments about this article or publication, or would like to submit an article idea, please contact the editor.