See a two-phased process to build an interface between your SAP ERP HCM and SAP GRC Global Trade Services systems. By setting up communication between the two systems and using Application Link Enabling to transfer the data, you can improve your employee screening in SAP ERP HCM.
Key Concept
Application Link Enabling (ALE) is a technology that SAP delivers to transfer data between SAP systems in a distributed model. It connects distributed systems through application, distribution model, and communication (synchronous and non-synchronous). It uses IDocs with messages types for defining data that you want to transfer between systems.
Companies often deal with international or domestic clients, customers, or employees without knowing details about their backgrounds or legal status. These companies must monitor their business proceedings carefully to ensure they comply with government regulations — for example, the Denied Persons List (DPL) in the U.S., which lists individuals and organizations banned from export transactions. Companies that do not comply with these types of regulations run the risk of audits or fines.
Fortunately, if you have SAP GRC Global Trade Services 7.0 or higher, you can avoid these potential difficulties by performing a Sanctioned Party List (SPL) screening against your SAP ERP HCM employee data. SPL screening is part of the SAP GRC Global Trade Services component for compliance management. With SAP E-Recruiting implemented in SAP ERP HCM, you can interface with SAP GRC Global Trade Services to streamline the screening of your employees or an individual you are considering hiring.
I’ll outline the functionality offered with SAP ERP HCM integration with SAP GRC Global Trade Services. I’ll also provide details on setup and configuration within both SAP GRC Global Trade Services and SAP ERP HCM. I will then show you how Application Link Enabling (ALE) allows you to distribute the data between these two applications.
To perform the steps I outline below, you need to implement SAP ERP HCM with the master data of your employees. You also need SAP NetWeaver Application (SAP NetWeaver AS) Server 6.4 or higher and SAP GRC Global Trade Services 7.0 or higher.
Set Up System Communication
Step 1. Define the logical system.
The logical system comprises the sender system that sends the data and the receiving system that receives the data. You can use transaction SALE or transaction SPRO and follow menu path SAP Implementation Guide > SAP NetWeaver > Application Server > IDOC Interface/Application Link Enabling (ALE) > Basic Setting > Logical Systems > Define Logical System. In this step, you need to define the logical systems designated for SAP ERP HCM within the SAP technical landscape.
Step 2. Assign the client to each logical system.
Use transaction SALE or SPRO and follow menu path SAP Implementation Guide > SAP NetWeaver > Application Server > IDOC Interface/Application Link Enabling (ALE) > Basic Setting > Logical Systems > Assign Logical System to Client.
Step 3. Maintain sending and receiving Remote Function Call (RFC) connections.
Use transaction SALE and follow menu path IDOC Interface/Application Link Enabling (ALE) > Communication > Create RFC Connections. Figure 1 lists the RFC connection definitions for the source and target systems. Here you define the source system (SAP ERP Central Component [ECC]) and the target system (SAP GRC Global Trade Services).

Figure 1
RFC connections
Double-click ABAP connection ECDCLNT050 to see the details of the definition (Figure 2). Enter the connection type as 3 (ABAP Connection). You can also enter a description (such as ABAP Connection) to represent the system. Then, specify the host in the Target Host field under the Technical Settings tab, as well as the system number and IP address of the server. The source system to connect to the target system needs a logon user, so you must define the RFC log on source system and user ID in the Logon & Security tab.
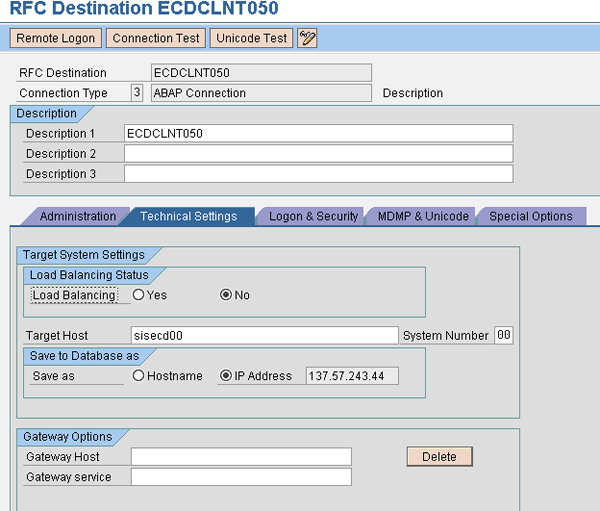
Figure 2
RFC destinations for the transfer of SAP ERP HCM data
Step 4. Determine the RFC destinations for method calls.
Assign RFC destinations to source logical systems by keeping the cursor on the logical system (for example, ECDCLNT050) and clicking the Standard BAPI destination icon. The system asks you to enter the destination system (GTDCLNT050).
You can display the RFC destinations assigned to each logical system by using transaction SALE and following menu path IDOC Interface/Application Link Enabling (ALE) > Communication > Determine RFC Destinations for Method Calls (Figure 3). This shows you the communication setup between the source and target systems for synchronous calls. Here you can define the standard delivered message types and the associated function modules. The message type identifies and defines the structure of the data that you need to transfer to the target system ¾ for example, if you are interested in the name and address within the master data, and not the date of birth, salary, or other data. The function module enables the transfer of data. Note that the logical system and the RFC destination must be the same, and the Basis team has to define the port for the connection to work.
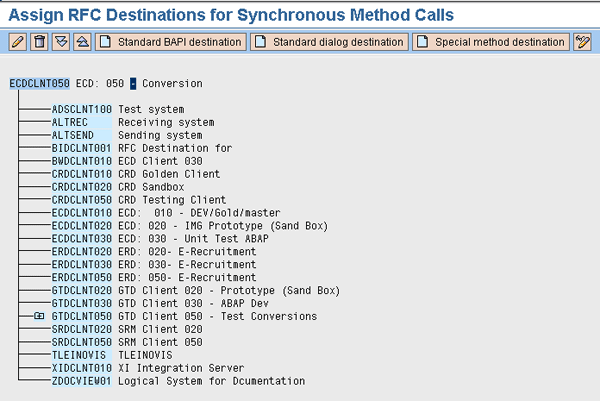
Figure 3
Method call for data transfer from SAP ERP HCM to SAP GRC Global Trade Services
Start Your ALE Setup
ALE setup involves identifying the sender and receiver system as partners, similar to the setup of an Electronic Data Interchange (EDI) between an SAP system and another system.
Step 1. Set up the port for partner profiles.
SAP ERP HCM and SAP GRC Global Trade Services are now the logical systems. In this step, you define the port for the Partner Type LS (Logical system) (Figure 4). Similar to an EDI, the ALE model needs to identify or recognize the target system as a logical partner. The partner profile helps you define the target system as a partner to whom you are sending the data.
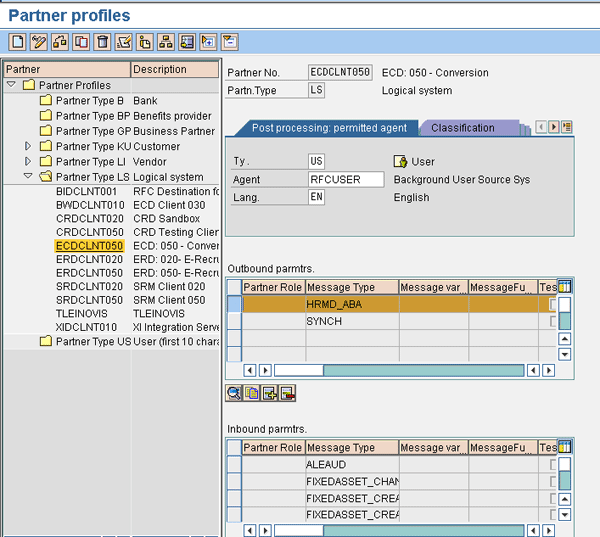
Figure 4
Partner profile for sender
For the Agent, use service user WF-BATCH. To define the sender, use transaction WE20 and follow menu path Partner Profiles > Partner Type LS Logical System (Figure 5). While defining the partner profile for the source system, you need to assign the port, which the system uses for data transfer. You also need to define the basic message type to capture the data for data transfer. The message type enables you to identify the data that needs to be transferred to the target system.
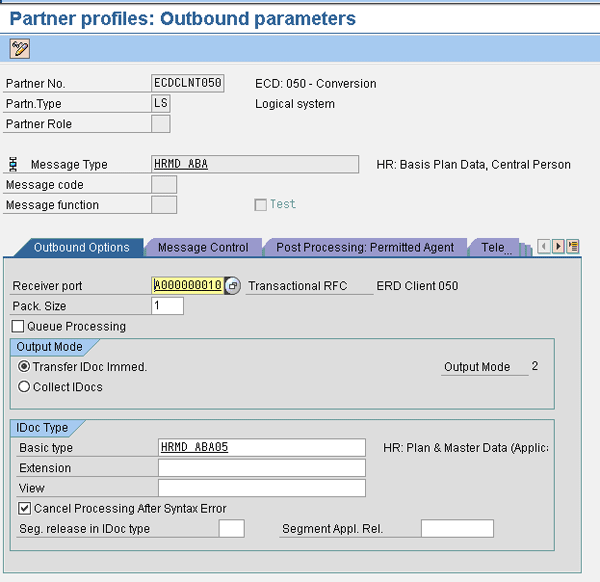
Figure 5
Define outbound receiving port and basic type for data transfer
You also need to define the receiving system, which in this case is the SAP GRC Global Trade Services receiver GTSCLNT050. Figure 6 displays the partner profile details behind the definition. Define the partner type as logical to represent these systems. Under the outbound and inbound parameters, define the message types for sending and receiving data. In Figure 6 you can see a definition for E-Recruitment SAP ERP HCM partner profile setup.
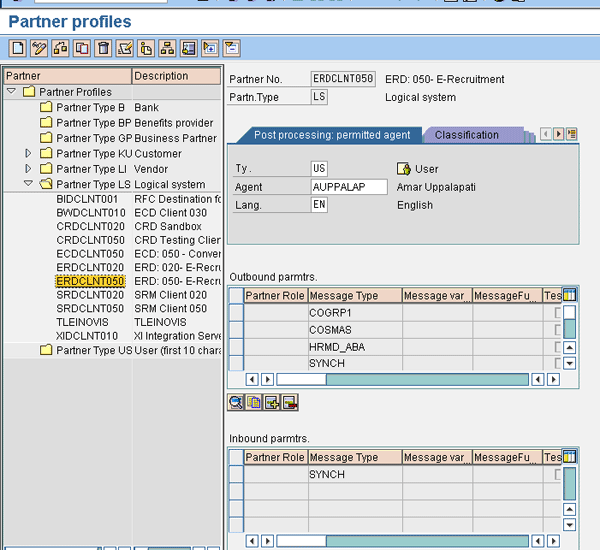
Figure 6
Partner profile definition details for source and target logical systems
Within the message type for outbound parameters, you need to define the receiver port (identification for receiver) and the packet size of the data transmitted. If you want to be able to delete or cancel the data after transmission, select the Cancel Processing After Syntax Error check box (Figure 7).
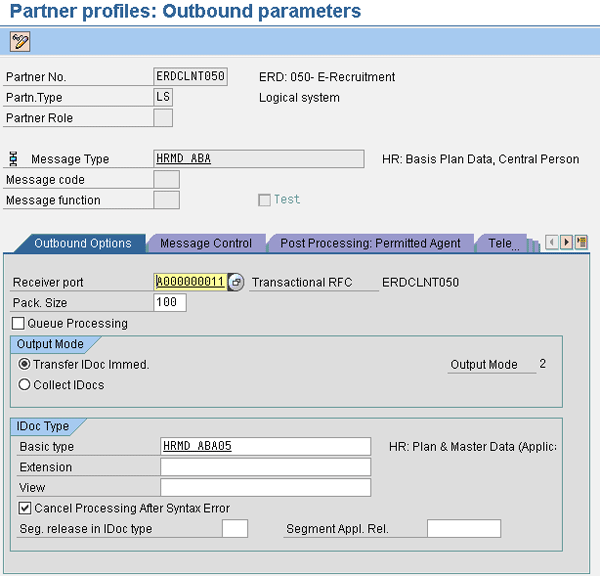
Figure 7
Message type definitions and settings for partner profile
Step 2. Create the distribution model.
Create a new distribution model to set up ALE for SAP ERP HCM. A distribution model describes the sending and receiving logical systems for data transfer with an application layer, distribution service, and communication. Use transaction SALE and follow menu path IDOC Interface/Application Link Enabling (ALE) > Modeling and Implementing Business Processes > Maintain Distribution Model and Distribution View > Model Views. Click the edit button and then click the Create model view button to see the screen in Figure 8.
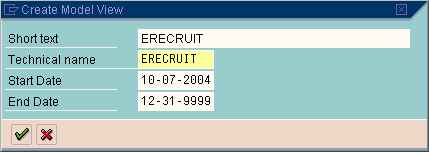
Figure 8
Model view definition with name, technical name, and validity dates
When you enter the details and click the enter icon, the system saves the values (Figure 9). This screen displays the distribution model created for the sending and receiving system — in this case, the SAP ECC system for SAP ERP HCM as the sender and SAP GRC Global Trade Services as the receiver for screening the employees.

Figure 9
Distribution models for ALE
Figure 10 displays the distribution model with the other definition steps: adding the message type, adding a BAPI, and filtering. The BAPI helps you choose the pre-delivered business application interface for setting up the communication service between the two systems. Filtering allows you to prevent sensitive data from being transferred to the target system without authorization — for example, an employee’s salary or date of birth.

Figure 10
Further definition of the ALE distribution model
Next, you need to click the Add message type button, which produces the pop-up screen shown in Figure 11. Enter the Model view, Sender, and Receiver that you defined earlier and enter the Message Type as HRMD_ABA, the message type responsible for HR master data. Click the enter icon and the message type is added.
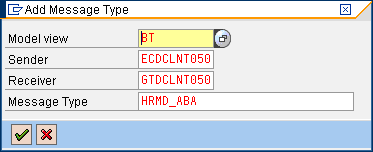
Figure 11
Assign the message type to the model
Step 3. Create a filter to select and properly distribute data into SAP ERP HCM.
Filters prevent any sensitive information in the data from being transferred to SAP GRC Global Trade Services without authorization. By default, the system does not propose a filter. Expand the model view and double-click the No data filter set. Then enter E-Recruit as the model view, ECDCLNT050 as the sender, GTSCLNT050 as the receiver, and HRMD_ABA (data filter active) as the message type.
Once you perform this step, you see the tree structure (Figure 12). These are the settings used for the connection template. You can see the source logical system and the destination logical system, as well as the message type and filter assigned to it.
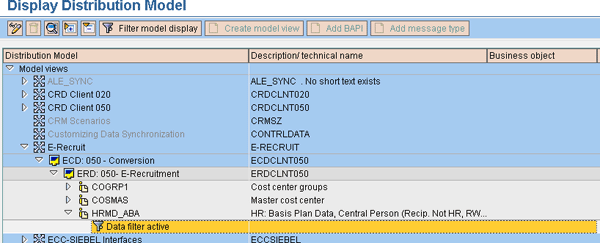
Figure 12
Data filter definition for the distribution model
Double-click Data filter active to produce the pop-up screen shown in Figure 13. Then double-click Data filtering to create the different filter groups (Figure 14).

Figure 13
Filter setup screen sequence

Figure 14
Default data filter group settings
The filter group allows you to group the data filter for transferring data into the receiving system. Figure 14 displays the default filter group settings that the system proposes.
I will use the example of the filter group Infotype. For this filter group, you must select the relevant infotypes for SAP GRC Global Trade Services screening: infotypes 0105 (Communication) and 0006 (Addresses). You can also select Employment Status so that you only transfer employees who are new hires or currently employed, excluding employees who have left the organization (Figure 15).
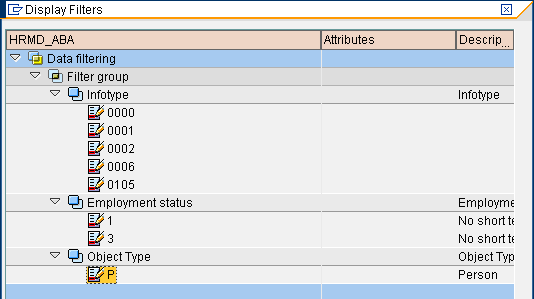
Figure 15
Further definition for filter groups
Note that there are two setups for the Employment status filter. The full ALE, which establishes a baseline of active employees in SAP ERP HCM, uses employment status 3 (active). You can then set the following ALE to Employment status 3 (active) and the next to 1 (inactive — person has applied for the job) to capture the changes in status.
Step 4. Generate the partner profiles.
Next, define the partner profiles of outbound and inbound messages identified for a given distribution model. Use transaction SALE and follow menu path IDOC Interface/Application Link Enabling (ALE) > Modeling and Implementing Business Processes > Maintain Distribution Model and Distribution View > Model Views. In the screen that appears, select Environment > Generate Partner Profiles to bring up the report shown in Figure 16.
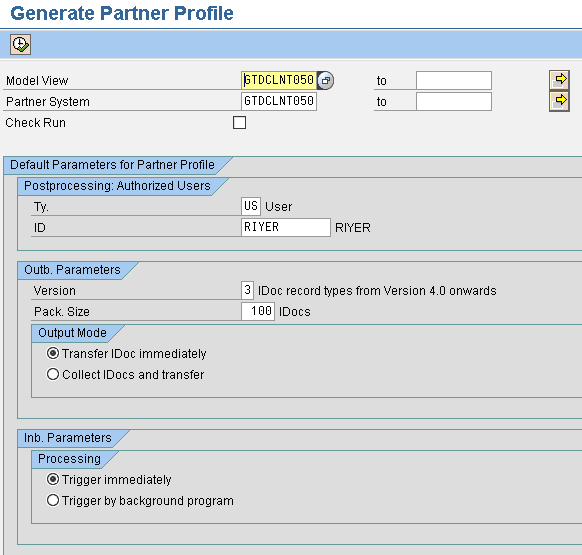
Figure 16
Generation of a partner profile
The generation log shows the generation status of partners, ports, and outbound parameters. Figure 17 shows the result of the report execution.

Figure 17
Partner profile generation report
Step 5. Distribute the model view.
Now you distribute the model that you created in the logical system into the receiving system so that you do not have to maintain the sender system in the receiving system. Use transaction SALE and again follow menu path IDOC Interface/Application Link Enabling (ALE) > Modeling and Implementing Business Processes > Maintain Distribution Model and DistributionView > Model Views. Select the model view that you created, and then select Edit > Model View > Distribute.
In the screen that appears, select the SAP GRC Global Trade Services target system. The system displays a confirmation screen for your selection.
The model view should now be visible in the target SAP GRC Global Trade Services system. To verify this, use transaction SALE and follow menu path Modeling and Implementing Business Processes > Maintain Distribution Model and Distribution View. Here you should see the model you created in the source system and the mirror or replica of it created in the receiving system, with the sender logical system as SAP ECC and receiver logical system as SAP GRC Global Trade Services.
Step 6. Set up the partner profile inbound parameter and the logical systems.
Similar to the setup you performed for the sending logical system, you need to set up the partner profile for receiving the data. Use transaction WE20, then select Partner Profile > Partner Type LS Logical System. Click Partner Type LS and select SAP GRC Global Trade Services in the list, as shown in Figure 18.
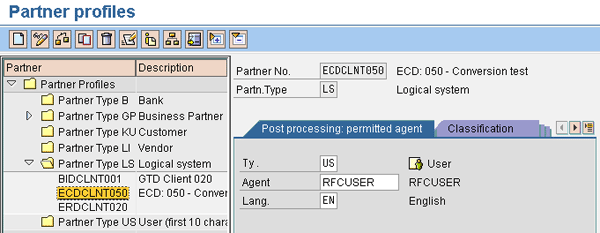
Figure 18
Define the inbound parameter for the partner profile
Next, define the source (outbound) logical system in the target system. In this example, you need to define SAP ECC as the outbound system, and then define the SAP GRC Global Trade Services system as inbound — both within SAP GRC Global Trade Services. SAP represents every system as a logical entity and for ALE communication. The data is received with inbound IDocs and sent through outbound IDocs.
While you are in transaction WE20, keep the cursor on Partner Type LS and click the create icon to create the partner number to represent the source logical system and enter the details (Figure 19).
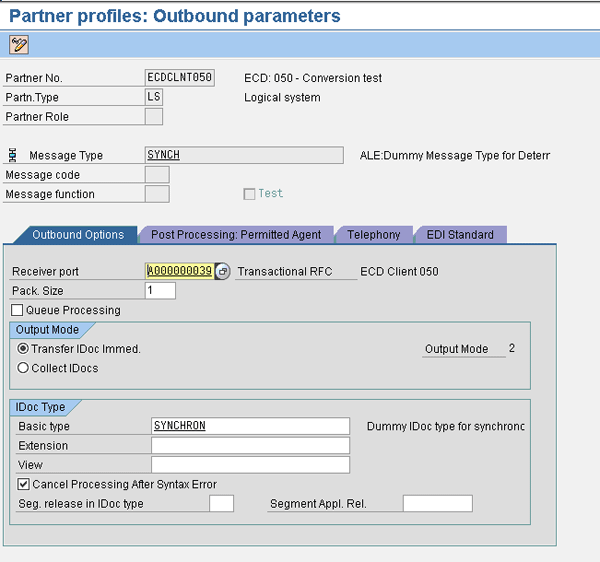
Figure 19
Define the outbound parameter for the source logical system
Now you need to define the receiving system as a logical system in a similar manner as you did for the sender system. This definition helps the receiving system recognize and identify when data has been received from the source system. While keeping the cursor on Partner Type LS, click the create icon to create the partner number to represent the inbound system (Figure 20).

Figure 20
Values for the inbound options with the source partner profile
Note
For testing purposes, the Processing by Function Module section shown in Figure 20 may be set to Trigger by background program. This holds all incoming IDocs in SAP ERP HCM for manual processing, which is useful for testing purposes. You can change this parameter back to Trigger immediately after you verify testing.
The message type defined within the partner profile for the sender system allows you to maintain the inbound parameters. The message type definition allows the system to recognize the data sent and identify the process code to handle the information.
Activate the BAdIs in SAP E-Recruiting
You must activate two Business Add-Ins (BAdIs), HRALE00SPLIT_INBOUND and HRALE00INBOUND_IDOC, to complete your setup. In SAP E- Recruiting, use transaction SE18 and then follow menu path SAP Menu > ABAP Workbench > Utilities > Business Add-Ins > Definition.
If there are multiple implementations of the BAdI definition HRALE00SPLIT_INBOUND, you need to define implementation RPM_CP_HRALE as the active implementation. Select Utilities > Adjustment > Multiple Active Implementations. Select the definition HRALE00SPLIT_INBOUND. Verify that RPM_CP_HRALE is the active implementation. If it is not, deactivate the currently active implementation and activate RPM_CP_HRALE. Click the activate implementation icon to produce a pop-up window. The system asks if you want to activate the BAdI, so you can click Yes to confirm this.
The BAdI HRALE00SPLIT_INBOUND is standard and allows exclusive handling of object P (person) within SAP E-Recruiting. Based on the message type selection, the system generates the IDocs in the receiving system. IDoc segments are collections of fields within the message type.
Transaction BD53 shows standard or default fields within the message type HRMD_ABA05 (Figure 21). The text highlighted in green represents the selection of fields, and the text highlighted in pink are the default fields.
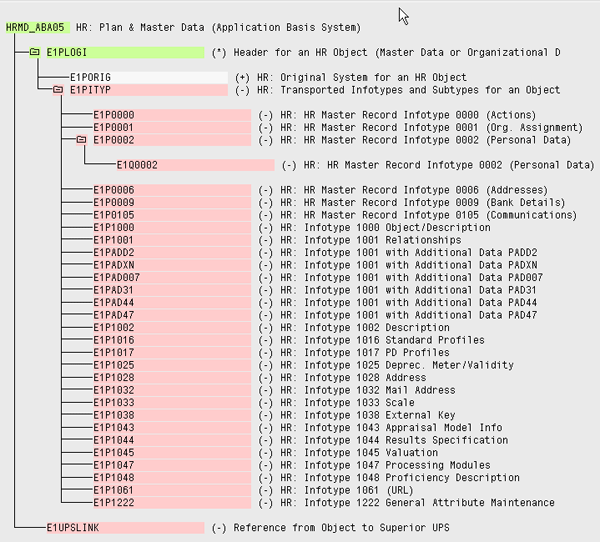
Figure 21
Message type display of IDoc segments
By keeping your cursor on an IDoc segment and following menu path Edit > Select, you can select the segment. Default segments within the message type are then passed to method HRRCF_CAND_FROM_EE_ALE, which extracts relevant data and creates the candidate, the user, and the organizational assignment if necessary. The IDoc represents the message type segment and field for data elements.
The BAdI HRALE00INBOUND_IDOC deletes all S-to-P (position-to-person) relationships from the inbound IDoc. The object P does not exist in SAP E-Recruiting, so the central person (CP) must be assigned to the position (S).
With the IDoc inbound review and verification, you complete the final steps in the setup. This step validates the data that is identified for transfer. These segments and fields are pre-delivered. You do not need to add or change any of these pre-delivered fields.
Now that you have completed building your interface, you can transfer any individual registered in SAP ERP HCM to SAP GRC Global Trade Services and perform an SPL screening on them, based on your configuration settings. In SAP GRC Global Trade Services, users can review any blocked individuals and take appropriate action. Be aware that these screening results only represent a possible match, and you must review your results to ensure that you do not have a false hit.
Rajen Iyer
Rajen Iyer is the cofounder and CTO at Krypt, Inc. Rajen has written several in-depth, best practice articles, white papers, patents, and best-selling books on SAP Logistics and SAP Global Trade Services, including Effective SAP SD and Implementing SAP BusinessObjects Global Trade Services. He is also an invited speaker at industry conferences.
You may contact the author at Rajen@kryptinc.com.
If you have comments about this article or publication, or would like to submit an article idea, please contact the editor.