Save time and avoid confusion about who reports to whom within a company by using your company’s existing organizational structure to set up a reportable hierarchical matrix.
Key Concept
SAP comes with standard object types for each module. Some examples within HR include position (S), organizational unit (O), and person (P). Custom objects are those objects that do not come standard in SAP and are created specifically within your organization. An example of a custom object might be shift (9S). Users have the ability to create and maintain new object types.
Relationships, special subtypes of infotype 1001, connect the objects. Each relationship has two relationship types, A and B, and for each relationship, SAP sets up the corresponding inverse relationship automatically. When you create new object types, you also must create and maintain the relationships between those objects.
Many companies want to find a way to report off their organizational structure across the company by functional areas. You can create a hierarchy to show who reports to whom within your company, eliminating confusion about accountability and saving you time when reporting off a specific business area.
Using basic reporting in Organizational Management (OM) is one way to create such a report, but it requires you to select units from your organizational structure. You have to know exactly which organizational units to select if you’re reporting off a specific functional area. However, you can use custom objects to select a functional area, such as a sales business group, and automatically pull in all organizational units assigned to that area — for example, national and domestic accounts — without knowing where they are in your organizational structure.
By using custom objects — object types that don’t come standard within SAP software — and by establishing relationships for these objects to build a company-wide hierarchical matrix that relates to your organizational structure, you can easily report off established divisions established within your organization. My team and I came up with eight steps to implement a reportable hierarchy matrix for a food manufacturer. In my next article, I’ll show you how to use this hierarchy to run reports.
How Does the Matrix Work?
The hierarchical matrix consists of multiple, user-defined custom objects for your organization that relate to each other through a top-down structure. My team and I used a methodology to build a reporting matrix that allows our users to report based on business group, unit, and division.
Figure 1 shows a sample general hierarchy matrix for sales. This sales group consists of national and domestic sales accounts, which then split into divisions.
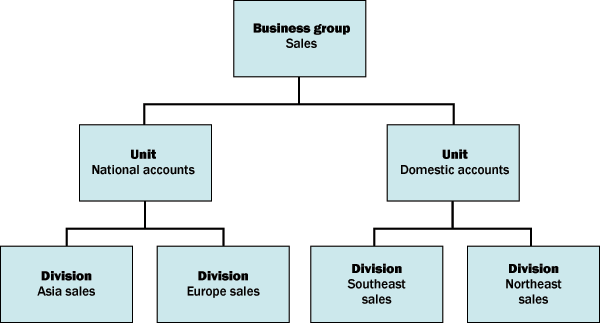
Figure 1
Example of a general sales hierarchy matrix
Once your matrix is set up and you create the relationships, you then can tie the matrix to your organizational structure by assigning only the division to an organizational unit. This allows you to report off all team members within a specific division, unit, or group.
Step 1. Create the custom object types for your hierarchy. Set up objects for division, unit, and group using the IMG menu path Personnel Management>Personnel Development>Basic Settings>Maintain Object Types. Select New Entry, then specify the object type and object type text, or label, you want to set up. You can label your objects to your preference as long as you don’t assign two objects the same label. Figure 2 shows the entries from the example hierarchy. I have set up 9F to stand for group, 9K for unit, and 9L for division.
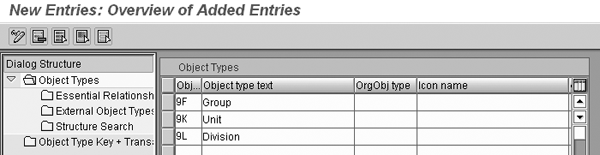
Figure 2
Entries for new object types
Step 2. Assign infotypes to the new objects. Before you can maintain the objects you created in the last step for your production environment, you first must assign an infotype to them. Otherwise no infotypes are available when you set up the objects’ relationships. For this project, use the 1001 (relationships) infotype, since relationships connect all of these objects. Additionally, the system requires you to add the 1000 (object) infotype to maintain the objects and their master data. To set up your infotype assignments, use the IMG menu path Personnel Management>Personnel Development>Basic Settings>Maintain Infotypes>Maintain Infotypes.
First, select the 1000 (object) infotype from your overview screen, then double-click on Infotypes per object type from the Dialog Structure window. This brings up a list of all objects that have the 1000 infotype set up. Click on the New Entries button and enter all the new object types you have set up for this project. Refer to Figure 3 for a list of entries for this step. Next, add the infotype 1001 (relationships) for each object type by selecting infotype 1001 from the overview screen and creating new entries the same way you did for the 1000 infotype. My team and I set up five object types for our reporting hierarchy: group, unit, division, complex, and decision maker.
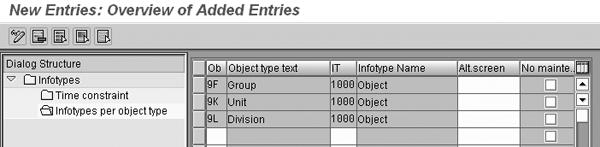
Figure 3
New object types assigned to infotype 1000
Tip!
I recommend that you set up your objects in the format of 9#. SAP reserves this format for customizing procedures within R/3. You define time constraints when you Maintain Infotypes during step 2 only if you are not creating subtypes for your objects. In this example, you are creating subtypes, so you can set up the time constraints during step 3.
Step 3. Create subtypes for your objects. In this step, you set up the allowable subtypes with time constraints for your objects. The time constraint determines how many records can exist at the same time and helps to ensure data integrity. For example, if a functional area belongs to more than one division at the same time, it would be important for that area to be allowed to exist at the same time. If, however, the functional area belongs to only one division at a time, you would not want multiple records to exist at the same time. Table 1 shows the different time constraints available with a brief explanation of what each one means.
| 0 = Present once |
Only one infotype record can exist for the same object at any time. |
| 1 = Without gaps |
Only one infotype record can exist for the same object at any time and there can be no gaps between record dates. |
| 2 = With gaps |
Only one infotype record can exist for the same object at any time and there can be gaps between record dates. |
| 3 = Unlimited |
Several infotype records can exist for the same object at any time and there can be gaps between record dates. |
|
| Table 1 |
Time constraint options and meanings |
To set up allowable subtypes, use the IMG menu path Personnel Management>Personnel Development>Basic Settings>Maintain Subtypes. When my team and I designed our reporting hierarchy, we decided to use the subtypes A003 and B003 for our objects. The A003 subtype for unit means that an object can belong to only one other object at a time and can have gaps between record dates. The inverse subtype of B003 for unit shows that an object can incorporate multiple objects at any given time and that there can be gaps between record dates. The system stores these subtypes under the 1001 infotype.
Select the A003 subtype for infotype 1001 from your overview screen and double-click on Time constraint from the Dialog Structure window. This brings up a list of all objects with time constraints that the system has assigned to the A003 subtype for that relationship. Next, click on the New Entries button to enter new objects that have the “belongs to” subtype. Refer to Figure 4 to see an example of how to add subtypes with constraints.
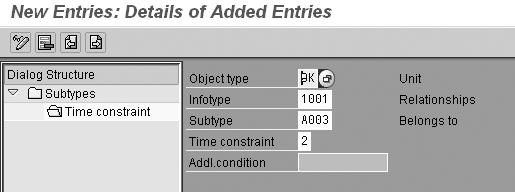
Figure 4
Add subtypes with constraints by filling in the fields as shown
Continue to enter your objects for the A003 subtype listed in Table 2. You may notice the 9F group object does not have the A003 subtype because group is the highest level in the matrix. Therefore, that subtype does not belong to a higher object. Also, be sure to add the A003 subtype to the organizational unit object. You must do this because you are assigning the division object to different organizational units and this subtype exists to show that the organizational unit belongs to another object. If this subtype is already set up but does not have a time constraint of 2, you need to choose another subtype for your organizational unit assignments. Otherwise, you could end up with multiple subtypes overlapping at the same time.
|
9K
|
1001
|
A003
|
2
|
|
9L
|
1001
|
A003
|
2
|
|
O
|
1001
|
A003
|
2
|
|
| Table 2 |
Time constraints for the A003 subtype (belongs to) |
Next, enter the B003 (incorporates) subtype for infotype 1001 by selecting the B003 subtype from your overview screen and clicking on Time constraint from the Dialog Structure window. This brings up a list of all objects with time constraints that you assigned to the B003 subtype. Add all of your new objects to the B003 subtype and set appropriate time constraints. If, for example, a division of your hierarchy reports to a unit, then the division belongs to that unit, and you need to assign the division an A003 subtype. At the same time, you need to assign the unit a B003 subtype since it incorporates that division. Refer to Table 3 for a complete list of B003 subtypes you should add for this project.
|
9F
|
1001
|
B003
|
3
|
|
9K
|
1001
|
B003
|
3
|
|
9L
|
1001
|
B003
|
3
|
| O |
1001 |
B003 |
3 |
|
| Table 3 |
Time constraints for the B003 subtype (incorporates) |
Step 4. Define relationships for your custom objects. Now, relate the object types to each other. You must set up two types of relationships, A and B, for each object type. Next, you should assign the 003 relationships using the IMG menu path Personnel Management>Personnel Development>Basic Settings>Maintain Relationships. Select the relationship of 003 from your overview screen and then double-click on Allowed Relationships from the Dialog Structure window. This brings up all relationships that you have established so far for 003. Next, click on the New Entries button to enter your new relationships to the group, unit, and division objects. Figure 5 shows the relationships that you define for this project.
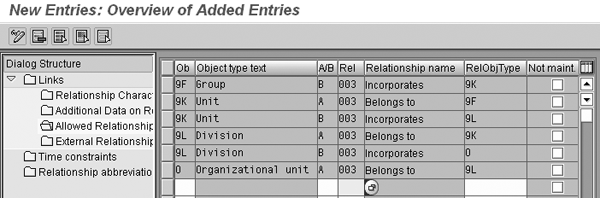
Figure 5
The relationships for your objects
When you establish relationships between your objects, use the 003 relationship to indicate to the system what type of relationship it is. For example, by using the A003 and B003 codes, you indicate that the unit belongs to a group and the unit incorporates a division. This is the foundation of how your reporting hierarchy fits together.
Step 5. Define the time constraints for each allowable relationship. In this step, you define the time constraints for each relationship established in step 3 using the IMG menu path Personnel Management>Personnel Development>Basic Settings>Maintain Relationships. Select the relationship of 003 from your overview screen, and then double-click on Time constraints from the Dialog Structure window. This brings up the established time constraints for relationships to 003.
Next, click on the New Entries button to enter time constraints for each relationship created in step 3. To relate the objects to each other use infotype 1001. Figure 6 shows you how to successfully set up the “belongs to” relationship for division with a time constraint of 2 (meaning the constraint is without gaps). This defines the fact that your division can belong to only one unit at a time and allows for gaps between relationship dates. If you do not want gaps between your dates, you should choose a time constraint of 1. You should do this, for example, when a defined division is always supposed to report to a unit. Gaps in dates for that division would make it so that there was no relationship to the unit during the gap. The system would not know what unit that division belonged to for that time period. This could cause you to lose data when you run your reports.
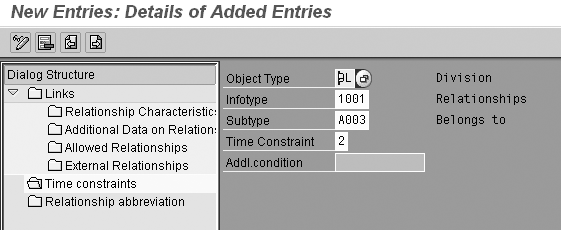
Figure 6
Time constraint for the “belongs to” relationship on division
Figure 7 shows that you set up an “incorporates” relationship for division with a time constraint of 3 (unlimited). This means a division can incorporate multiple organizational units at any time and that there can be gaps between dates. Since division is associated with multiple organizational units, it is important to set this constraint to 3.
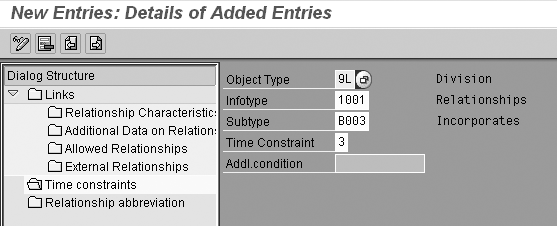
Figure 7
Time constraint for the “incorporates” relationships for division
Continue to set up your time constraints for each occurrence of the allowed relationships. Table 4 shows all time constraints that you should define for the example hierarchy of group, unit, and division. If you already have time constraints set up for the O (organizational unit) object type that do not match the constraints listed below, you need to create a custom relationship from the main screen of Maintain Relationships as I discussed in step 2 before continuing.
|
9F
|
1001
|
B003
|
3
|
|
9K
|
1001
|
A003
|
2
|
|
9K
|
1001
|
B003
|
3
|
| 9L |
1001 |
A003 |
2 |
| 9L |
1001 |
B003 |
3 |
| O |
1001 |
A003 |
2 |
| O |
1001 |
B003 |
3 |
|
| Table 4 |
All time constrains for group, unit, and division |
Step 6. Set up the master data for your custom objects in the production environment. Set up all the group, unit, and division objects you defined for your reporting matrix using infotype 1000 (objects). Refer to Figure 1 to see what objects you should set up for each object type defined within the example hierarchy:
| • 9F |
Group |
Sales |
| • 9K |
Unit |
National accounts |
| • 9K |
Unit |
Domestic accounts |
| • 9L |
Division |
Asia sales |
| • 9L |
Division |
Europe sales |
| • 9L |
Division |
Southeast sales |
| • 9L |
Division |
Northeast sales |
You can create these objects using the transaction PP01 (maintain objects), or transaction PP02 (maintain plan data: Expert Mode.) For ease of future maintenance, it is important to perform this step in your production environment, rather than creating the objects in your test environment and transferring them to the production environment.
Step 7. Create master data relationships for your new objects. Build your reporting matrix using the defined object types and relationships that you have set up. In this step, you are creating 1001 relationships for each of your new objects to link them to their relationships for your hierarchy. For example, the National Accounts unit, as defined in Figure 1, belongs to Sales and also incorporates the Asia sales division. Refer to Figure 8 to see the relationships you set up for the National Accounts unit by using transaction PP01. These relationships define the reporting structure in Figure 9.
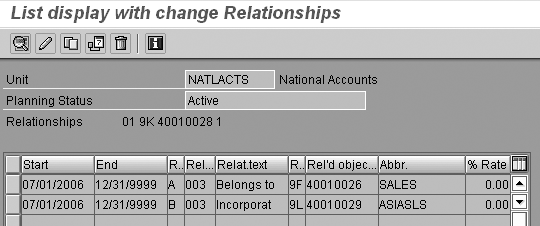
Figure 8
National Accounts unit (9K) relationships
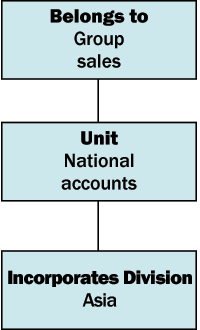
Figure 9
The reporting hierarchy you generate by defining the relationships to the unit object (9K)
Once you have set up all the A003 and B003 relationships for your objects, your matrix is partially ready for reporting. It’s important to note that you have only B003 relationships for the group objects because group is the highest level in your matrix and does not report to a higher object.
Step 8. Assign the division objects to your organizational units. This step links the organizational unit to a division object. With the defined reporting matrix, you can determine what unit and group to assign to that organizational unit based on the division it falls under on your company’s organizational chart. You can choose to assign these relationships to each individual organizational unit, or you can assign it to one organizational unit and use inheritance logic so that every one in that organizational unit and beneath it inherits that division relationship. I’ll describe inheritance logic in my next article.
The inheritance logic requires additional programming in your InfoSets and custom reports, but also saves time overall since you don’t need to set up this relationship for every organizational unit individually. You can define the relationships by using transaction PP01 and assigning the A003 relationship. Figure 10 shows an example of where the organizational unit China Sales Administration belongs in the division Asia Sales.
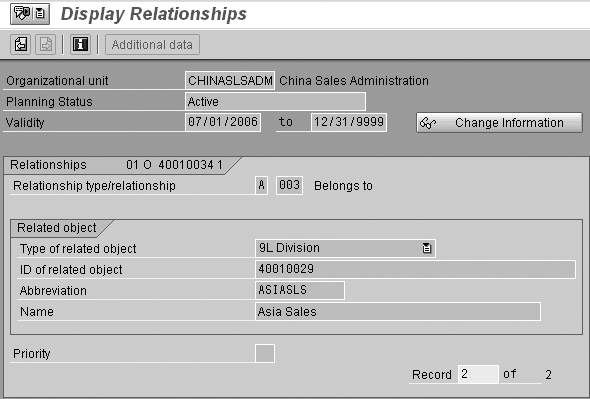
Figure 10
Example of organizational unit in a division assignment
As you assign these A003 relationships, you are linking your reporting matrix to your organizational structure. Figure 11 shows you how this fits together using the example reporting matrix and relationships that you have set up thus far. Now that you have set up your hierarchy matrix, you need to maintain it to keep up to date with your company’s organizational structure.
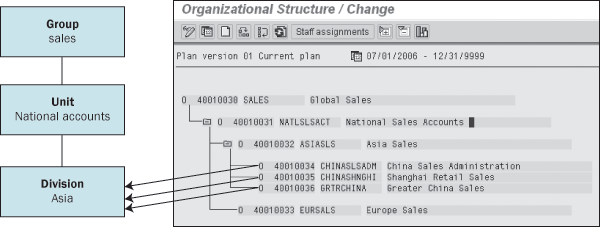
Figure 11
Reporting matrix as it relates to your company’s organizational structure
For end users to be able to see and report off the reporting hierarchy you have created, you can download all the objects and their relationships into a Microsoft Access database and use queries to build a searchable master table of your group, unit, and division. If you want to report from SAP Query (SQ01) or from Ad-hoc Query Designer, which are the most reliable ways to access the information, you need to set up an InfoSet to pull this information from your matrix, or get an ABAP programmer to build a program for you.
In a future article, I will explain how you can report off the hierarchy you designed by adding custom objects to your InfoSets.
Heather Clubb
Heather Clubb is a senior business analyst for HRIS. She has more than seven years of experience in designing, maintaining, and implementing HR modules. She has been involved with several data conversions and a reimplementation of HR modules. Heather’s expertise lies within Personnel Administration, Organizational Management, Recruitment, Training & Event Management, and SAP Query. She spoke at the HR 2006 and the Reporting & Analytics 2006 conferences. Heather also earned a BS degree in information systems.
If you have comments about this article or publication, or would like to submit an article idea, please contact the editor.