Managers often struggle with the timely availability of compliance-related data and the way the information is visualized for analysis and presentation purposes. You can eliminate these problems by following a four-step process to build a management dashboard for SAP's Management of Internal Controls (MIC) application. You can also use this procedure to build dashboards for other SAP applications and solutions.
Key Concept
The SAP application Management of Internal Controls (MIC) is part of mySAP ERP and the Compliance Management for Sarbanes-Oxley packaged solution. It helps management document business processes and controls covering all material areas. You can analyze the information gathered and stored in the application using:
- Built-in reporting capabilities with 30-plus report types
- PDF-based printing functionality
- SAP BW, which can display data relating to MIC in the same list-based format as in the predefined reports in MIC. It also offers slice-and-dice analysis capabilities.
SAP BEx Web Application Designer (Web AD), delivered with SAP BW, is used to create Web applications. It generates HTML pages that contain BW-specific content such as tables, charts, or maps. These objects retrieve BW data and place it in a Web application as HTML. In general, setting up a dashboard using Web AD consists of customizing and not programming.
The standard reporting options for SAP's Management of Internal Controls (MIC) application still lack graphical output capabilities, causing users to look for some advanced forms of data presentation. A graphical management dashboard would update executives on the status of internal controls and track issue remediation within their areas of responsibility. I'll show how to customize a Web-based management dashboard for MIC using existing technology by means of the Business Explorer (BEx) Web Application Designer (Web AD) functionality of SAP Business Information Warehouse (SAP BW). Table 1 provides information about system and staff requirements.
|
Prerequisites
|
- MIC installation (e.g., as part of mySAP ERP 2004, standalone, or on top of R/3 Enterprise or BW 3.0B+).
- BW installation (BW does not have to be on the same physical system as MIC.
|
|
Supporting SAP technology
|
- MIC’s BW extractors are available on the application’s side since MIC 1.0 Support Pack 12. In the case of a mySAP ERP installation, the FINBASIS 3.0 Support Pack 8 is needed.
- The necessary BI business content for MIC to be activated in BW is available since SAP BW 3.5.3 Support Pack 2.
|
|
Implementation time
|
The actual dashboard setup depends on the project scope and on MIC’s data readiness in BW. It may range from days to several weeks.
|
|
Project staffing needs
|
A BW consultant with BW extraction, BEx Analyzer, and Web AD skills is required, an application consultant (MIC) is recommended, and support via an SAP system administrator is necessary.
|
Table 1An FI expert with MIC knowledge and basic BW knowledge should drive the configuration of the dashboard with assistance from a BW expert. To configure a dashboard for MIC in BW, you need to complete these four tasks in order:
- Extract MIC data to BW (requires a functional and a BW expert)
- Configure BW queries (requires a functional expert with coaching from a BW expert)
- Set up a Web template using Web AD (requires a functional expert)
- Integrate the dashboard in MIC using a URL link (requires a functional expert)
Extract MIC Data to BW
Extracting data from MIC to the BW system is the key prerequisite for building a management dashboard. MIC's own extractors and BI business content include InfoSources, InfoObjects, ODS objects, InfoSets, and queries. They help you transfer the internal control-related information from MIC to an analytical environment, allowing flexible slice- and-dice reporting. The queries may serve as data providers for the management dashboard as well.
BW extraction does not copy all MIC information one to one into SAP BW, but it copies the information necessary for analytical purposes. The types of data that you can extract into BW using MIC's extractors and BI content include:
- Organizational hierarchy
- Process catalogs for the organizational units with the assigned control objectives, risks, and controls (the so-called P-CO-R-C structure)
- Management controls
- Control attributes
- Account groups and financial statement assertions
- Ratings
- Statuses
To extract MIC data into BW, perform the following steps:
Step 1. Collect and activate the delivered BI content (for the list of all available objects, refer to the detailed BI content documentation described below).
Step 2. Extract the data into SAP BW.
Step 3. When you want to update the extracted data, you first have to delete the old data, because the MIC data can only be extracted in a full upload.
Step 4. Extract all data again.
An exact description of the extraction procedure can be found under the following link as part of MIC's BI content documentation. You can also use this documentation as the basis for creating a process chain that would automate the individual extraction steps: https://help.sap.com/saphelp_nw04/helpdata/ en/06/ dad248dbfe4f06b524e092e1705543/
frameset.htm.
Note
Some of the MIC-specific principles outlined in this article (extraction, queries, restricted key figures) can be used for building an MIC dashboard using a different visualization technology, including the Visual Composer tool of SAP NetWeaver instead of the Web AD application.
Configure BW Queries
The information on internal controls, their attributes, and ratings as stored in MIC is fully time- dependent to secure auditability and does not contain explicit quantitative key figures. Thus, data extraction to BW is designed as time-dependent master data reporting, using a particular type of BW InfoProvider called an InfoSet. Unlike other InfoProvider types such as InfoCubes, an InfoSet contains an automatically generated counter key figure named Number of Records. When combined with a proper attribute value to form a restricted key figure, this automatic counter helps you easily generate the control-related key performance indicators you need, such as the number of controls with a green or yellow design rating by different dimensions including org units, accounts, assertions, or processes (Figure 1).
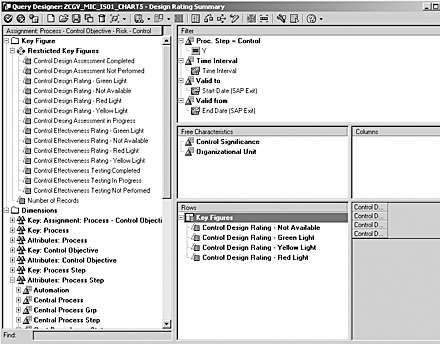
Figure 1
Configure a query for an MIC dashboard
The easiest way to create a data source for your graphical dashboard is to copy and slightly modify a delivered query, as they are designed to serve as list-based reports and not graphical charts. In BEx Analyzer (transaction RRMX), open the query 0CGV_MIC_IS01_Q0001 and save it under a different technical name and the title Design Rating Summary. You will use it as a data provider for a bar chart in your dashboard. In BEx Query Designer, convert the query from a list-based to a two-dimensional form by switching off Table Display. Click on the respective button in the icon bar.
Next, make sure by moving and restricting the respective InfoObjects that the query's filter box contains the following characteristics:
- Proc. Step = Control — restricted to "Y"
- Time interval — restricted to the variable Time Interval, technical name 0I_TMINT
- Valid to — larger than or equal to the variable Start Date (SAP Exit), technical name 0P_BEGDE
- Valid from — smaller than or equal to the variable End Date (SAP Exit), technical name 0P_ENDDE
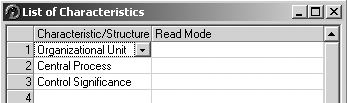
The free characteristics should include:
- Control Significance
- Organizational Unit
Tip!
When creating the restricted key figures for an MIC dashboard, combine the automatic number key figure Number of Records (technical name 1ROWCOUNT) with the respective attribute's value, e.g., the value Adequate of the characteristic Control Dsgn Rating (Figure 2). For restricted key figures of type Not Available, select the initial # attribute value.
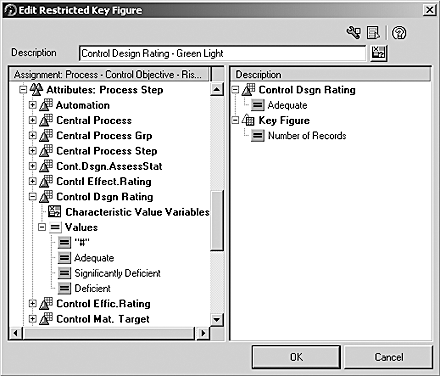
Figure 2
Restricted key figure for an MIC dashboard
For the rows of your query, create restricted key figures to generate the necessary data series of a bar chart. In BEx Query Designer, select the node Key Figure and in the context menu click on New Restricted Key Figure. Create the following restricted key figures to deliver the number of controls within the respective category:
- Control Design Rating — Not Available
- Control Design Rating — Green Light
- Control Design Rating — Yellow Light
- Control Design Rating — Red Light
Next, save and execute your query. In the variable prompt, enter the start and end date of the time frame you want to analyze. Finally, save the query results as a global view. Select Save icon>Save view global in BEx Analyzer. Enter a technical name and the view's title, Design Rating Summary.
Note
In a production use, you need to modify the time variables. You may configure SAP exit variables that always return the current time frame automatically or make the time interval selectable directly from the dashboard.
Next, create an Assessment Status query view using the same procedure. You need it for a pie chart later on. Maintain the same header selection of characteristics. Drag the Org. Unit characteristic to the column selection and Control Significance to the area of free characteristics. For rows, create the restricted key figures Control Design Assessment Not Performed, Control Design Assessment in Progress, and Control Design Assessment Completed, combining the counter with the respective values of the Control Design Assessment Status characteristic.
A third query view, Design Rating Details, serves as a list-based report in the dashboard. It contains the same header. Control Significance is used as a free characteristic. The row structure consists of the Org. Unit, Central Process, Control, and Control Design Rating characteristics. Do not use restricted key figures here, as the output of this query is a text table displaying design rating details without quantitative information.
Following the same process, you may create other query views including Effectiveness Rating Summary and Effectiveness Rating Details, or other queries to be used in your dashboard. For details, refer to the list of the available BI 3.5.3 content InfoSets for MIC below and the MIC BI content documentation.
- 0MIC_IS01 — reports on status and rating information, risk mitigation, and control details
- 0MIC_IS02 — reports on status and rating information, assertion coverage, and control details
- 0MIC_IS03 — reports on the company's sign-off procedure
- 0MIC_IS04 — provides data regarding the issues reported in MIC
- 0MIC_IS05 — provides data regarding remediation plans reported in MIC and issues with one or more remediation plans
- 0MIC_IS06 — reports on management controls, their ratings, and statuses
Set Up a Web Template Using Web AD
To launch Web AD, start BW BEx Analyzer (transaction RRMX). In its menu, go to Business Explorer>Web Application Designer. A new Web template is created automatically. Now you can start inserting the individual Web items of a dashboard, including graphical charts, table reports, and navigation blocks.
Step 1. Define dashboard structure using tab strips. From a business perspective, a typical MIC dashboard may contain different information areas relating to design assessment results, effectiveness test results, issues, or sign-off progress. It makes sense to distribute this content on different dashboard pages defined by tab strips. Otherwise the final dashboard may easily become overloaded with information and thus unreadable.
The process to implement a tab strip structure is the only part of a dashboard setup that involves contact with HTML coding. However, no expert HTML skills are required to accomplish this task. Open the detailed BW online documentation available in your system or in the SAP Help Portal. The following link refers to the BW 3.5 documentation: https://help.sap.com/saphelp_nw04/helpdata/en/e3/e60138fede083de10000009b38f8cf/frameset.htm.
In BW's online documentation, follow the navigation path SAP Business Information Warehouse>BI Suite: Business Explorer>BEx Web>Web Application Design: BEx Web Application Designer>More Complex Examples of Applications>Using Several Tab Pages. Copy the example coding on the bottom of the documentation page to a clipboard.
Switch to Web AD. In your newly created template, select HTML from the three different viewing options (Layout, HTML, Overview) on the bottom of the application's page. Delete the original template's coding by selecting all (Ctrl+A) and pressing the Delete key. Now paste in the example coding you have copied from the online documentation.
Next, delete two "<--!" and "-->" character strings. You find the first string in the coding in Figure 3 — “<script type=”text/javascript”>” – and the second one after “} while (document.getElementById('head_TAB'+i) != null) }”.
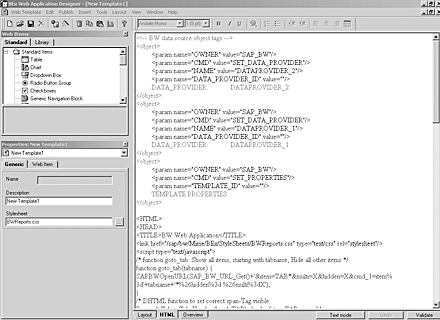
Now your tab structure is ready. Switch to the Layout view of your template to validate the inserted coding by Web AD automatically. Confirm the Keep the change? prompt.
Next, you may change texts to be displayed on each tab as a title. In my simple example, I’m creating two tabs, Design and Effectiveness. The delivered example coding from BW’s online documentation already contains two predefined tab strips. Creating more tabs is relatively easy when you apply the principles of the delivered HTML code, but it requires basic HTML knowledge.
In the Layout view of your template, simply rewrite the tab titles from Tab 1 and Tab 2 to Design and Effectiveness respectively. From now on, each tab represents a separate page in your dashboard. Switching between pages is secured automatically by the delivered coding. At this point, save your template.
Step 2. Define the page layout and content. Next, you need to fill your tab structure with content. Use the query views configured in step 2. On the Design tab, you may want to create the following Web items:
- Design Rating Summary: a graphical bar chart displaying the results of the assessment of control operating design (adequate, deficient, significantly deficient controls, controls without rating)
- Assessment Status: a graphical pie chart displaying the progress of design assessment (controls with assessment completed, in progress, not available)
- Design Rating Details: a list-based report showing details of the assessment exercise by org units
On the Effectiveness page, you can create the following content:
- Effectiveness Rating Summary: a graphical pie chart displaying the results of the testing of control operating effectiveness (adequate, deficient, significantly deficient controls, controls without rating)
- Effectiveness Rating Details: a list-based report showing details of the assessment exercise by org. units, etc.
For Web-based dashboards with page items arranged in multiple columns, I recommend that you build a page layout using HTML tables. In such a table, the area for each graphical chart or a list-based report is defined by the table’s borders. Thus, the Web items can be easily arranged on the page (Figure 4).
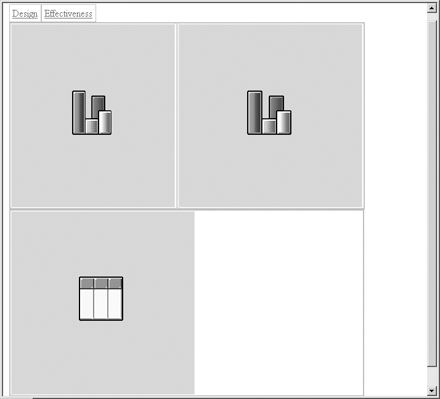
In the Layout view, select and delete the two original list-based queries with their surrounding table generated automatically when the HTML coding was copied over. Next, select Insert>Table>Insert table in Web AD’s menu. Create a table with one line and two columns. This table is used for the two graphical charts next to each other. Then create a new table underneath with just one field for the list-based report.
Note
If the newly created table is placed on the top of the page, select it in the Layout view and move it down to the tab area.
Step 3. Prepare graphical charts. To create a chart, go to the list of Web Items in the left upper part of Web AD. Select a Chart icon and drag it to the first cell of the newly created HTML table in the Layout view. In the Properties box on the left, select the respective DataProvider for this chart in the field Query/View. Use the choose view icon as you have already defined views for your queries in step 2. Select the Design Rating Summary query view. Now switch to the Web Item view in the Properties box. Select the detail icon in the row Edit Chart to maintain the chart’s properties via a chart wizard (or just double-click your chart in the layout view):
- Select the chart type (e.g., Bars 2.5D) and click on Next.
- Text and data selection: Enter the title of the horizontal axis (# of controls) and of the vertical one (Org. Unit) and select Next.
- Value properties: You can define a color scale for your chart. Configured in the query definition, your query view delivers the following data sequence using restricted key figures: number of controls with no assessment available, numbers of adequate (green), deficient (yellow) and significantly deficient (red) controls. Select each chart series (1-4) and choose the respective color (grey, green, yellow, red) instead of Automatic in the Color field. Click on Next.
- Element properties: Here you may perform advanced graphical settings for your chart (background color, etc.).
- Axis properties: confirm with Next.
- Complete your chart.
Save your template. To test it, execute your dashboard in a Web browser by selecting the respective icon in the icon bar of Web AD.
Tip
If the chart’s axes are displayed in a reverse order for the selected chart type due to the column and row set-up of the underlying query view (for example, showing org units on the horizontal and controls on the vertical axis), go to the Web item’s Properties again and select Swap Display Axes.
Now repeat the same procedure for the Assessment Status pie chart. Drag a chart-type Web item to the second HTML table field of your dashboard template. As the query view used for this chart is different from the first one, create a new DataProvider by selecting the New DataProvider icon in the Properties box. As the data provider, select the query view Assessment Status. In the properties, select the chart type (Pie 2.5D). As this chart displays the assessment’s progress rather that its results, you may define color scale for the individual categories that is different from the green-yellow-red traffic-light logic used in the first chart.
Finally, include the Design Rating Details list-based report by dragging a Table Web item to last empty HTML table field. Create a new data provider by selecting the query view Design Rating Details.
The analysis of MIC data via a dashboard requires navigation possibilities as well. You need a Web item called Generic Navigation Block to enable filtering in your graphical charts and list-based reports. Drag and drop the respective Web item to your layout. You want this single navigation block to affect all three Web items on this page. This is why you need to maintain the list of Affected Data Providers in the Properties box>Web Item. Select all three data providers for the Web items on this page by a check mark.
Tip
Generic navigation blocks in your dashboard support multiple selections, enabling you to analyze in one report controls for multiple, explicitly selected org units (e.g., US and Germany). This is a significant added value to MIC’s standard reporting supporting only a string-based search as selection criteria (e.g., org units containing US in their title).
In the Properties, you may also restrict the List of Characteristics used in this particular navigation block if you do not want to use some of the query’s free characteristics as filtering criteria (Figure 5).
Next, you can proceed with the Web item objects for the Effectiveness tab in a similar way. Create a new HTML table(s) in the same Layout view and drag and maintain the respective Web items. This page displays charts and list-based reports relating to control effectiveness testing activities such as the Effectiveness Rating Summary and Effectiveness Rating Details.
Tip
Use a simple rule to assign Web items to the individual tabs representing pages. The technical DataProvider names of these Web items maintained in the Properties box must begin with TABx with “x” representing the number of the respective tab. For example, TAB1_CHART1 is one of the charts placed on the first tab. Using TAB2_... places the Web item on the second tab.
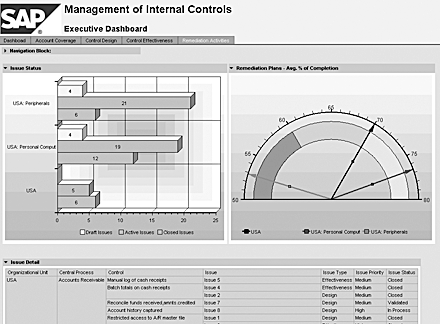
Finally, save and execute your dashboard to test it (Figure 6).

I’ve used some configuration shortcuts in the instructions. If you plan to use the dashboard in a production environment, other tabs could show high priority issues and relating remediation plans, the coverage of financial statement assertions or risks by controls, or the progress of the company’s sign-off procedure. You may apply the principles described in this article to configure the other pages as well. MIC’s BW InfoSets provide enough building blocks for those pages. For more detail, refer to the BI content documentation for MIC.
In a production use, you can also leverage the full functionality of Web AD, influencing the final output options of your dashboard – legend and value display in charts, other chart types, alert monitors, drop-down boxes and radio button groups as selectors, logos and texts and much more (Figure 7).
Integrate the Dashboard in MIC Using a URL Link
The final challenge is to include the configured dashboard in the end user’s working environment. You can easily integrate the dashboard in MIC, which is Web-enabled itself. In your MIC system, go to the respective section in MIC’s customizing (transaction SPRO>Management of Internal Controls>Determine URL for Start Page). Enter the title of the link (e.g., MIC Management Dashboard) and paste the link you get in your Web browser when you test launch the dashboard in Web AD.
From now on, when an end user enters his or her MIC start page, the link to the dashboard will be listed in the More Information area. If the user has proper BW authorizations, the management dashboard opens in a separate Web browser window. Another option is to include the MIC management dashboard in an SAP Enterprise Portal role for affected managers.
Dr. Karol Bliznak
Dr. Karol Bliznak is vice president of the Rapid Innovation Group (RIG) within the mobility division at SAP. He focuses on converging SAP’s strategic innovation categories, such as mobile solutions, SAP HANA, business analytics, and the cloud. He works at the SAP AG headquarters in Walldorf, Germany. He has more than 14 years of SAP experience in business intelligence, mobility and in-memory technologies, enterprise performance management, financial accounting, controlling, governance, risk, and compliance.
You may contact the author at karol.bliznak@sap.com.
If you have comments about this article or publication, or would like to submit an article idea, please contact the editor.