Technical Guide: Add Currencies using S/4HANA Finance 1809
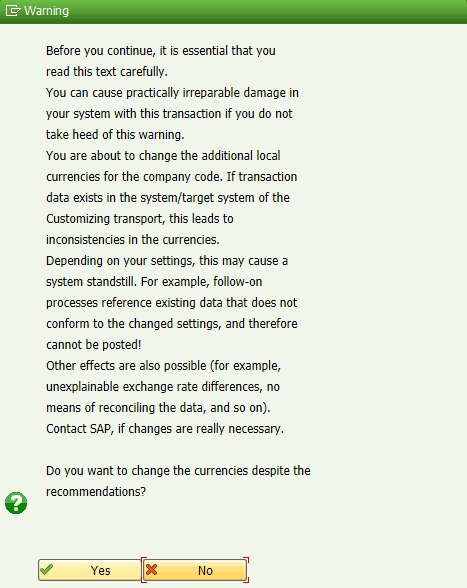
Traditionally, once you have gone live in a production system, the SAP system gives you a warning message (Figure 1) when you try to add a currency in the ledgers definition, and you then need SAP System Landscape Optimization (SLO) service for such a change in your currency setup.
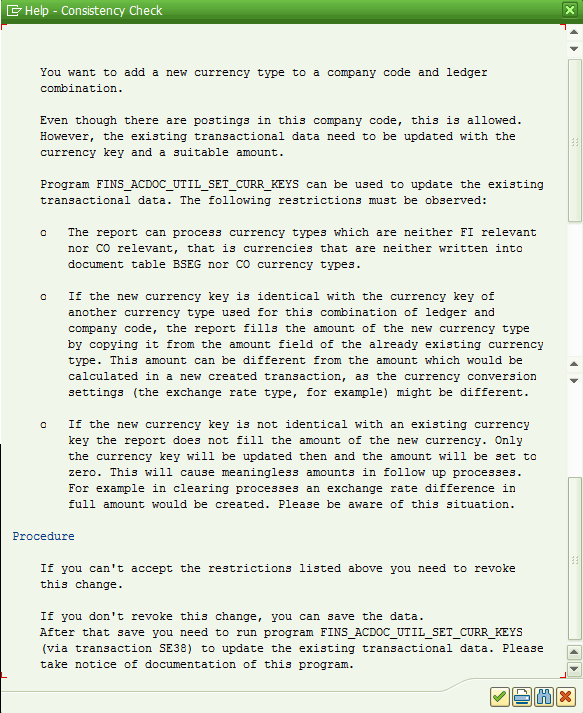
In an SAP S/4HANA environment, SAP provides a program named FINS_ACDOC_UTIL_SET_CURR_KEYS for updating the existing transaction data for new currencies. This program has restrictions as shown in Figure 2.
In a greenfield SAP S/4HANA implementation, it is quite common that not all 10 currencies would have been set up at the start of an SAP S/4HANA system. In a conversion scenario of an SAP S/4HANA implementation, currencies are migrated as they are, and no new currency introduction happens along with conversion. There can be many scenarios that require the new currency introduction, such as
- Introducing a group currency to unify the group reporting
- Introducing a sub-group currency to have regional reporting
- Introducing hard currency for countries with inflation
SAP S/4HANA Finance 1809 provides an integrated framework to add currencies into your company code in a ledger along with managing the journal entries already existing in your production system. Thus, the newly introduced currencies are available in the ACDOCA table only and can be used in both accounting-specific processes and reporting.
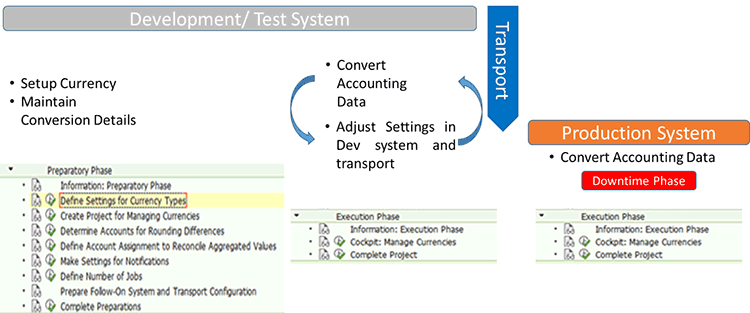
In this blog, I explain the activities for managing currencies at a high level as shown in Figure 3.
In my example scenario, I am adding a currency type Z0 with fixed EUR currency. From here on you will see the setup details and execution flow to add currency.
The Preparatory Phase
This section details the various elements to consider, as well as configuration and setup steps needed to add the new currency.
Define Settings for Currency Types
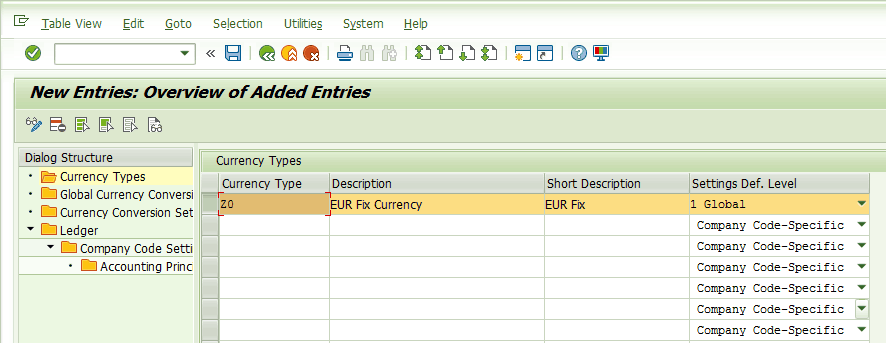
To complete this step, follow menu path SPRO > Financial Accounting > Financial Accounting Global Settings > Tools > Manage Currencies > Preparatory Phase > Define Settings for Currency Types. This path displays the screen in Figure 4.
If you are going to use a predefined currency type, then this setting is not required; otherwise, you can create a custom currency type. For my example you create a custom currency type of Z0. In Figure 4 select the Currency Types folder in the menu on the left and create a new entry. Enter Z0 in the field under Currency Type and populate the Description and Short Description fields as shown. In the Settings Def. Level (settings definition level) column, select 1 Global from the drop-down list of options.
You also define the EUR as fixed currency for this new currency type Z0. To complete this step, select the Global Currency Conversion Settings folder and create a new entry by populating the fields in the columns under Global Currency Conversion Settings as shown in Figure 5. Here I have defined the conversion to happen from company code currency to this new currency type.
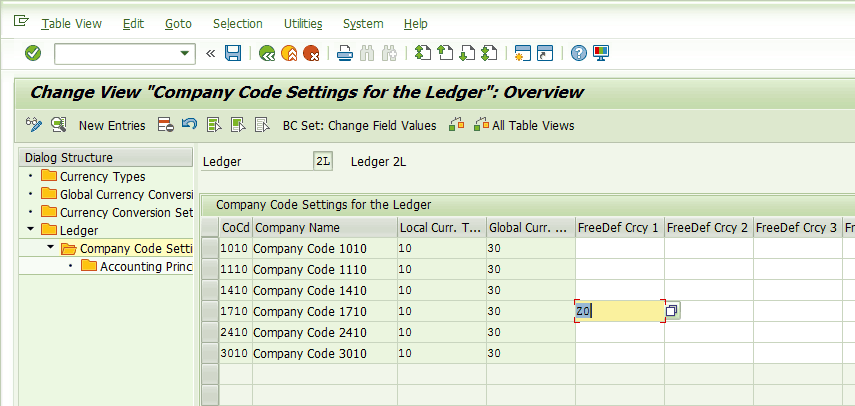
Then in the Company Code Settings subfolder under the Ledger folder, you can map the currency type in the freely definable currency field and save the changes (Figure 6).
Create a Project for Managing Currencies
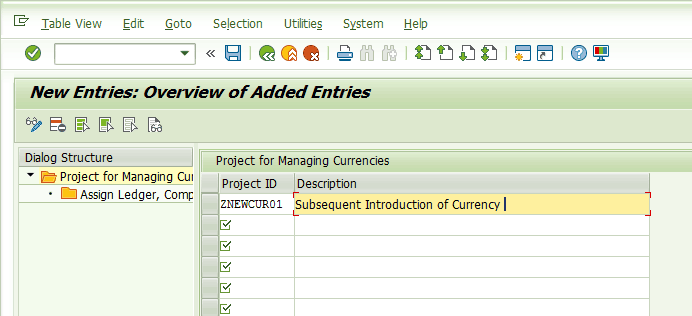
To complete this step, follow menu path SPRO > Financial Accounting > Financial Accounting Global Settings > Tools > Manage Currencies > Preparatory Phase > Create Project for Managing Currencies. After you click the New Entries button in the initial screen (not shown), the system displays the screen in Figure 7.
In this screen you create a currency introduction project by entering details for the new project. In the field under the Project ID column, enter an alphanumeric identification key for the implementation project that can be a maximum of 10 characters long. For my example, enter ZNEWCUR01. Enter a description in the field under the Description column (e.g., Subsequent Introduction of Currency) and press Enter.
Now double-click the Assign Ledger, Company Code to Project ID folder in the left side of Figure 7 to go to Figure 8. In Figure 8 enter data for the target ledger, company code, target currency type, source for the conversion, exchange rate, and transaction date type. Click the save icon to save your data.
Determine Accounts for Rounding Differences
To complete this step, follow menu path SPRO > Financial Accounting > Financial Accounting Global Settings > Tools > Manage Currencies > Preparatory Phase > Determine Accounts for Rounding Differences.
In this setting as shown in Figure 9, you can create new entries to map the general ledger (G/L) accounts for managing rounding differences while converting the source currency type amount to a target currency type amount. The G/L account can be differentiated to handle balances versus journal entry documents. This G/L account needs to be type N (i.e., Nonoperating Expense or Income).
Define Account Assignment to Reconcile Aggregated Values
To complete this step, follow menu path SPRO > Financial Accounting > Financial Accounting Global Settings > Tools > Manage Currencies > Preparatory Phase > Define Account Assignment to Reconcile Aggregated Values. This path takes you to the screen in Figure 10.
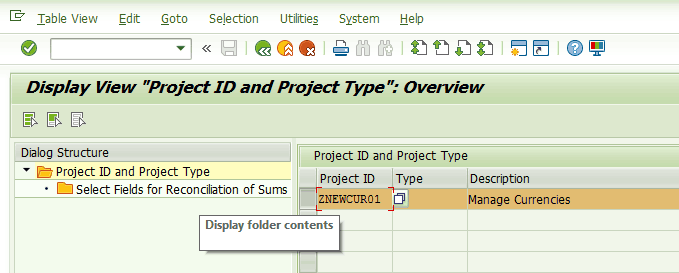
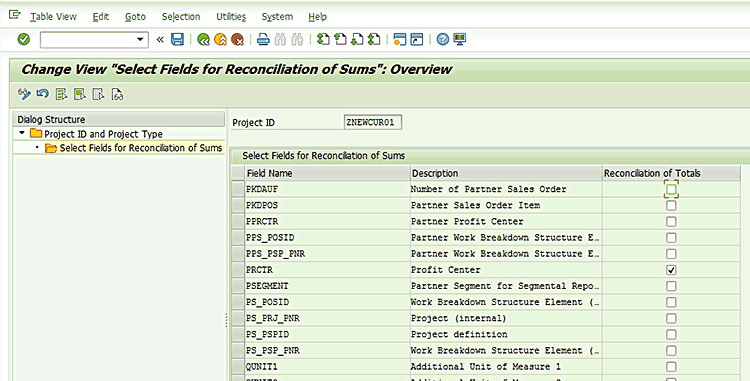
Here you need to select the Project ID and Project Type folder and then click the Select Fields for Reconciliation of Sums subfolder in the menu as shown in Figure 10.
In Figure 11, you select the fields on which the sums are calculated during reconciliation after the migration is over for values from the source currency moved over to the target currency.
Make Settings for Notifications
To complete this step, follow menu path SPRO > Financial Accounting > Financial Accounting Global Settings > Tools > Manage Currencies > Preparatory Phase > Make Settings for Notifications.
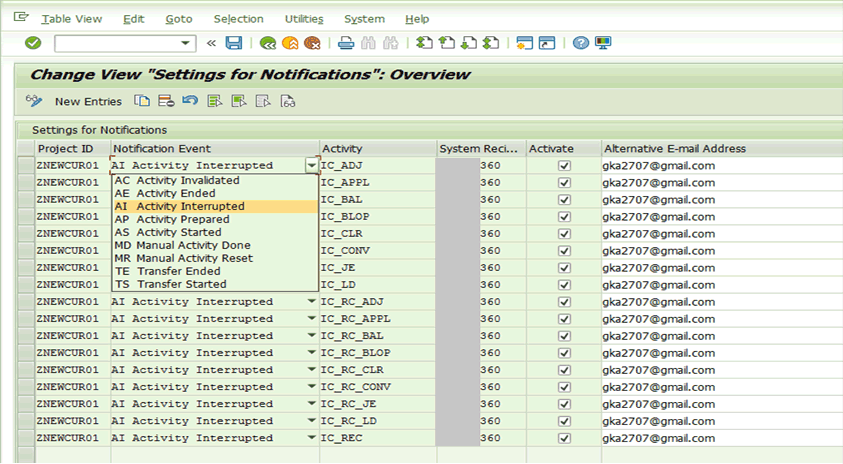
Notification settings can be customized for activity progress during the execution phase of the implementation of this project. This setting takes you to Figure 12 in which you need to specify various activities, notification settings, and the email address to be notified. Click the save icon.
Define the Number of Jobs
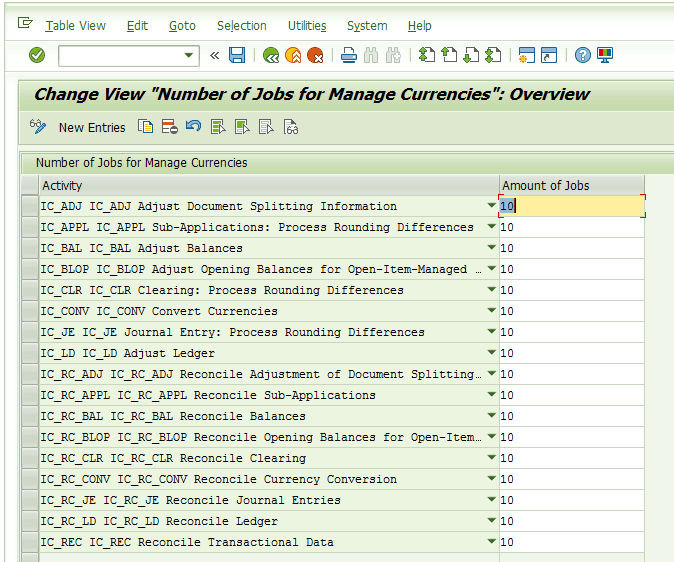
To complete this step, follow menu path SPRO > Financial Accounting > Financial Accounting Global Settings > Tools > Manage Currencies > Preparatory Phase > Define Number of Jobs. This path takes you to the screen in Figure 13.
Based on the system capacity and system load, you can specify the number of jobs that this project uses to transfer the data from the source currency type to the target currency type field. If no batch job is specified, the SAP system takes the maximum possible number in the system minus three jobs. In Figure 13 you can specify the number of jobs for various activities in the execution phase. Click the save icon to save your data.
Prepare the Follow-On System and Transport Customizing
All the previously mentioned settings are done in a development environment and then transported to a follow-on system (unit testing system, quality system, and finally to a production system) via transport.
Go to the notes for customizing activity in menu path SPRO > Financial Accounting > Financial Accounting Global Settings > Tools > Manage Currencies > Preparatory Phase > Prepare Follow-On System and Transport Configuration.
It contains a reference list for the various activities to be done in the follow-on system before the downtime starts for the actual execution phase for additional currency introduction (e.g., closing the previous fiscal year in various applications). Once all such prerequisite settings are done in the follow-on system and the customizations are transported, you then execute the steps listed for downtime in the note in the reference list of the same customization (e.g., locking all users for postings, opening posting periods for the current fiscal year, and so on).
Complete Preparations
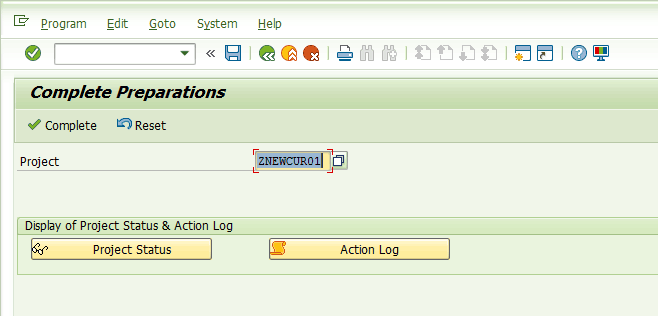
To complete this step, follow menu path SPRO > Financial Accounting > Financial Accounting Global Settings > Tools > Manage Currencies > Preparatory Phase > Complete Preparations. This path takes you to the screen in Figure 14.
Once all the settings described in the “The Preparatory Phase” section are done, you can mark the preparation phase as completed in the system in which you want to execute the project. Without marking this step, you can’t start the execution activities. In Figure 14 you need to enter the project ID and then click the Complete button.
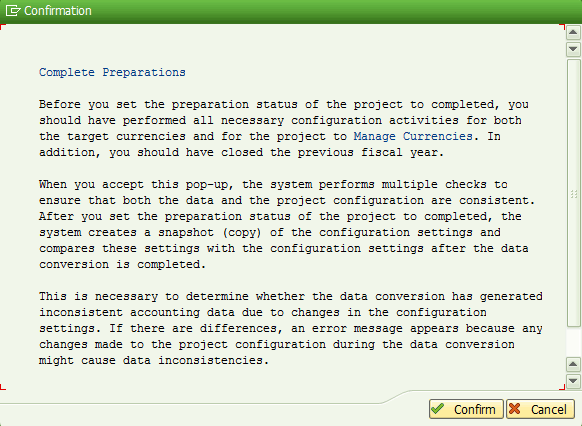
The SAP system once again shows a warning message (Figure 15) to confirm that you completed all the activities in the preparation phase. You need to click the Confirm button to complete the preparations.
After you click the Confirm button, the SAP system displays the information message shown in Figure 16 (provided there is no error in the setup).
This activity of confirming preparation phase completion starts your system downtime and thus no further posting can be done until the execution phase mentioned later in this blog is complete. This setting must be done in each system separately as it is not transported.
The Execution Phase
This phase is executed in a follow-on system (e.g., a unit testing system or a quality system and finally the production system). Once all the configuration setup is transported, follow-on activities are performed and downtime is started.
Cockpit: Manage Currencies
To complete this step, follow menu path SPRO > Financial Accounting > Financial Accounting Global Settings > Tools > Manage Currencies > Preparatory Phase > Cockpit: Manage Currencies.
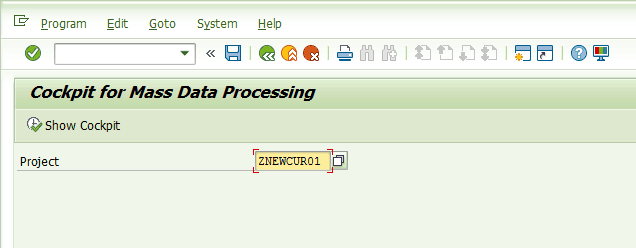
This path takes you to Figure 17. In the Project field, enter the project ID and then click the Show Cockpit button.
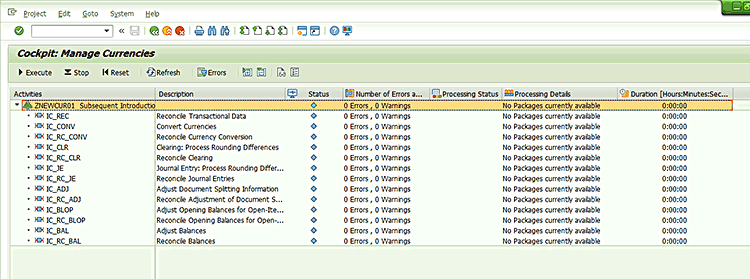
The next screen (Figure 18) displays various activities of the project execution. Click the Execute button.
The SAP system then displays a confirmation message shown in Figure 19. Click the Yes button to start the execution.
After confirming the execution, the SAP system displays a status message indicating that the background jobs have been triggered for various activities in the cockpit (Figure 20).
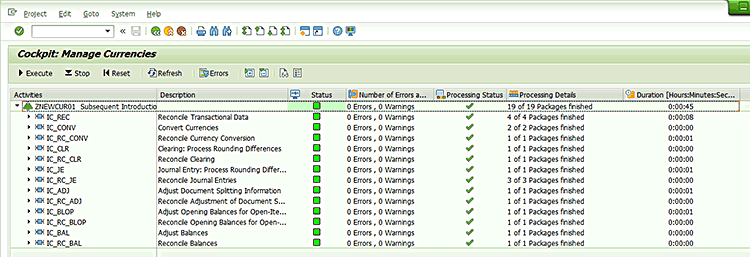
Once all the background jobs are finished successfully, the cockpit shows a green status for various activities shown in Figure 21.
The details of these activities are listed in Table 1.
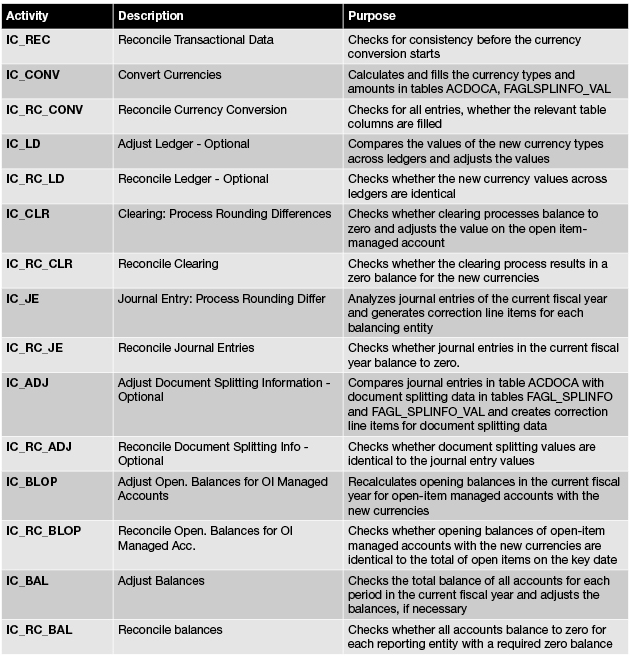
Here the SAP system ensures the following updates automatically:
• All historical transaction data is enriched by the new introduced currencies
• Reconciliation and adjustment only for transactional data of the current fiscal year — generation of rounding differences
• Introduction of the same currency across multiple ledgers for one company ensures identical values in new currency (if it was identical in source currency)
• Reconciliation and adjustments happen for all general ledger entities (company code, ledger, account and document splitting characteristics with balance zero flag)
(Note: You are very fortunate if you have such green lights after your first execution. There can be multiple errors or warnings during the execution, and the system displays these messages all at once for all the activities. You need to correct them and then re-execute by clicking the Reset button and then clicking the Execute button.)
Checking the Currency Introduction Results
Here I show you the impact of this new currency introduction at table entry level as displayed in Figures 22 and 23. The same currency settings can be verified in other reports such as FAGLL03 and the SAP Fiori application Manage Journal Entries.
Complete the Project
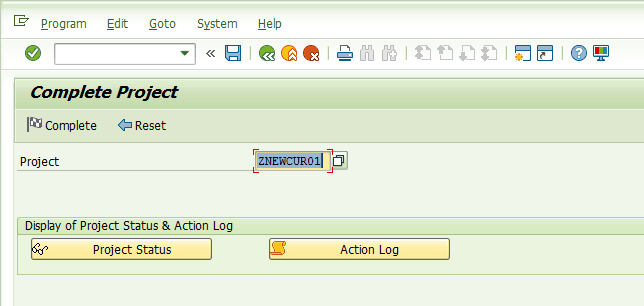
After you verify that currency amounts have been converted correctly, you can mark the data transfer as completed. To complete this step, follow menu path SPRO > Financial Accounting > Financial Accounting Global Settings > Tools > Manage Currencies > Preparatory Phase > Complete Project This path takes you to the screen shown in Figure 24 in which you need to enter the project ID in the Project field and then click the Complete button.
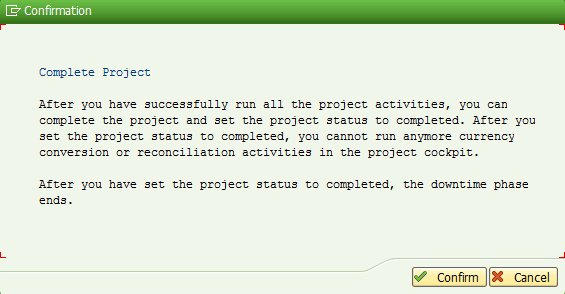
The system displays a pop-up screen (Figure 25) to confirm that the project is complete. Click the Confirm button.
The system then shows you a confirmation message that the status is changed (Figure 26).
Note that there are still certain restrictions in this manage currencies framework:
- Company code and controlling area currency cannot be introduced by this framework, as those are foundation-level elements in the company code definition and they should be tackled during company code setup.
- Conversion of the existing currency type — that is, changing the definition of an already included currency type as two settings for the same currency type bring inconsistencies
- Introduction of currency types for transfer prices, as this needs a special currency handling for various valuation views in transfer pricing
- New currencies are not reconciled with Asset Management, the material ledger, and Controlling, as these are mainly in Financial Accounting itself. This might change in the future when SAP streamlines the 10 currencies set up in all applications.
In a nutshell, this convenience of adding a new currency in a live environment will open up the options for leveraging the freely definable currencies innovation in SAP S/4HANA.

