Better Manage Enterprise Risk and Streamline Audit Lifecycle Management with SAP Audit Management (Part 2)
Using fictitious data, I portray a business example to show how you can use the SAP Audit Management system to capture and streamline audit functions in an organization. The example captures a typical audit lifecycle based on SAP Audit Management 1.2:
- Execution of the audit
- Preparation and submission of a draft audit report
- Review and approval of a draft audit report
- Preparation and submission of a final audit report
- Review and approval of the final audit report
- Issuance of the audit report
- Tracking of action and findings
- Closing the audit
In part 1, I discussed how the SAP Audit Management can be used for the following activities:
- Creation of an auditable item
- Creation of an audit
- Creation/maintenance and release of an audit plan
- Initiation of an audit
- Preparation and submission of a work program
- Review and approval of work program
The Business Example
I log on as a different actor during the workthrough of my business example. (By actor I mean a role such as auditor, audit lead, or chief audit executive.) The story line for the business example in this article is designed to address the following phases of the audit lifecycle:
- Audit execution
- Audit reporting
- Audit follow-up
Audit execution: The audit execution phase is where the proper audit takes place. This is aimed at gaining assurance that the controls in the business environment are operating effectively while gathering and documenting empirical evidence to substantiate audit findings. This can involve making recommendations and setting out an action plan for identified audit concerns.
In my business example, the auditor will
- Create a working paper
- Create findings
- Create an action
Audit reporting: In this phase, audit reports are created, reviewed, and communicated with the stakeholders, especially management.
In my business example, the audit lead will:
- Submit the draft audit report
- Submit the final audit report
In my business example, the audit manager will:
- Approve the draft audit report
- Approve the final audit report
- Close the audit
In my business example, the chief audit executive will:
- Issue an audit report
Audit follow-up: The follow-up phase allows auditors to establish management’s intent as it relates to identified findings and actions, while paying close attention to timelines defined for the deadline to address audit findings and implement an action plan.
In my business example, the audit lead will:
- Track open actions
- Track open findings
Execution of the Audit
The execution phase is when the auditor gets started with the proper auditing duties, which involve information gathering, interviewing auditees, documenting evidence and gathering findings, drawing conclusions, and offering recommendations. Log on to the SAP Audit Management system as the auditor and choose the My Ongoing Audits tile (Figure 1).

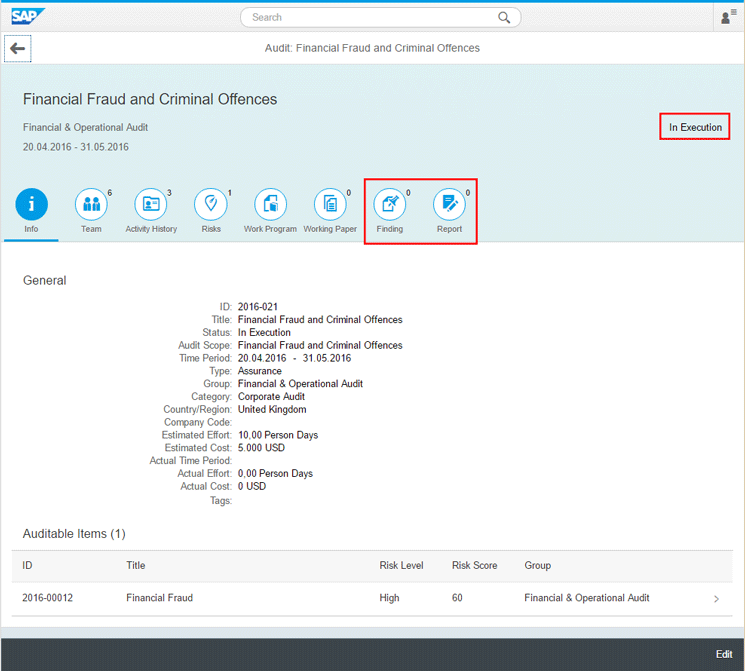
Choose an audit and Figure 2 displays with the status In Execution and additional tabs (such as Finding and Report) to capture findings and audit reports submission.
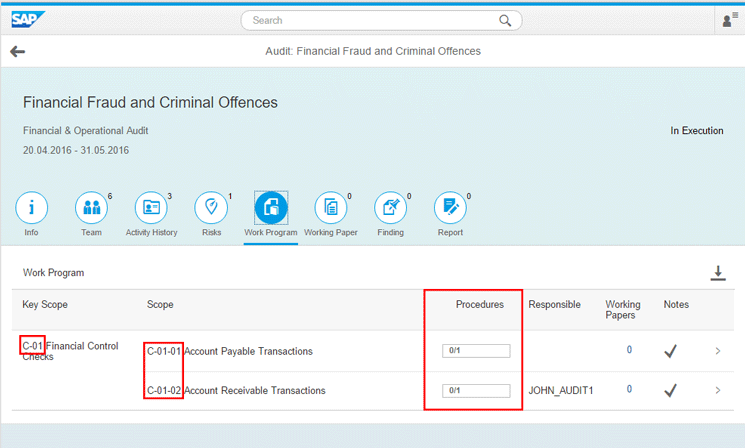
Choose the Work Program tab to carry out the activities detailed in the procedures under each scope (Figure 3). The procedure reads 0/1, which means no procedure has been completed out of the one possible procedure associated with the scope C-0-01 Account Payable Transactions and C-01-02 Account Receivable Transactions in my business example. When a work program is approved, the system generates a code for each structure node in this work program. This code, which is used for identification purposes, is appended to the corresponding node name. Reference codes for work program structure nodes are generated by appending a two-digit sequential number (C-01-01 and C-01-02 in my business example) to the code of the parent object (C-01 in my business example).
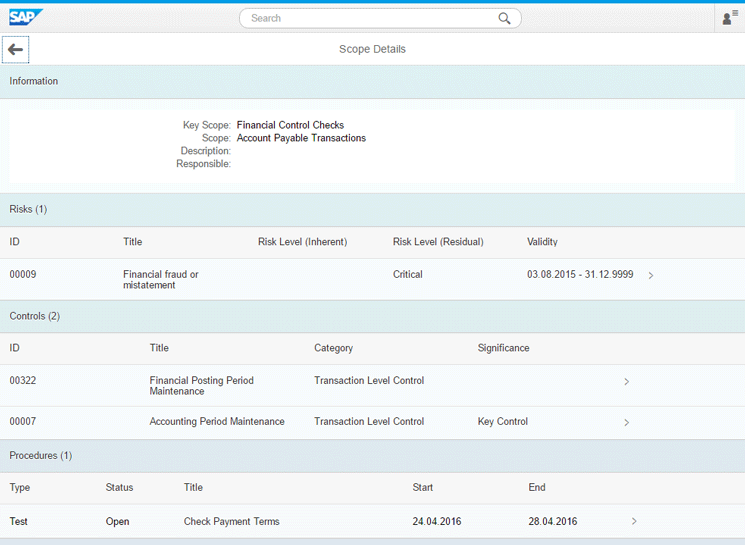
In the Work Program tab, carry out the activities detailed in the procedure by choosing a particular procedure entry (C-01-01 Account Payable Transactions in my business example) and Figure 4 displays.
For the test procedures added to this scope, you can set the control effectiveness after testing and enter comments as desired. To do this, choose the procedure you want to work on and Figure 5 displays with the associated controls and steps.
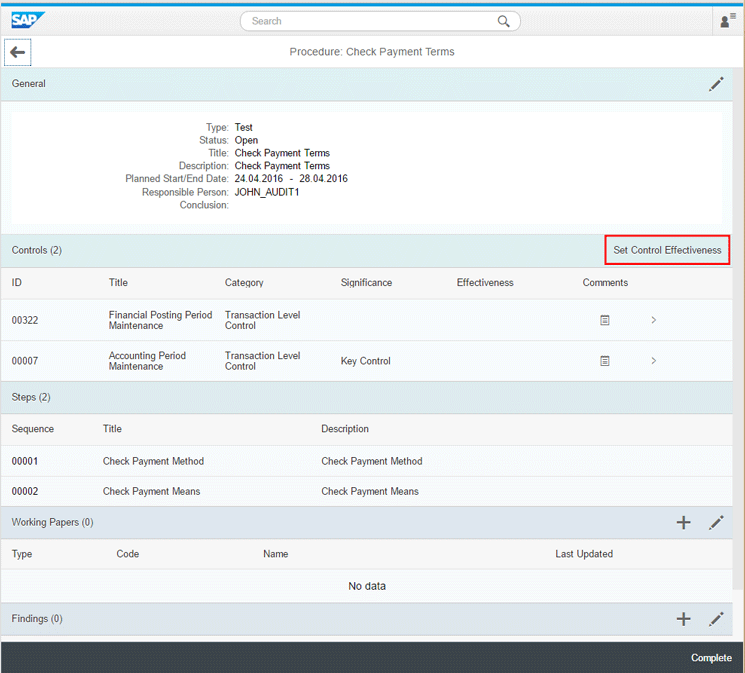
Choose the Set Control Effectiveness button and in the screen that displays, use the drop-down option to set a value for the Effectiveness field as shown in Figure 6. You can also add working papers and create findings directly here or assign a finding related to the procedure if it exists. For now, I will not add a working paper to the procedure. Choose the add (+) button to add a finding.
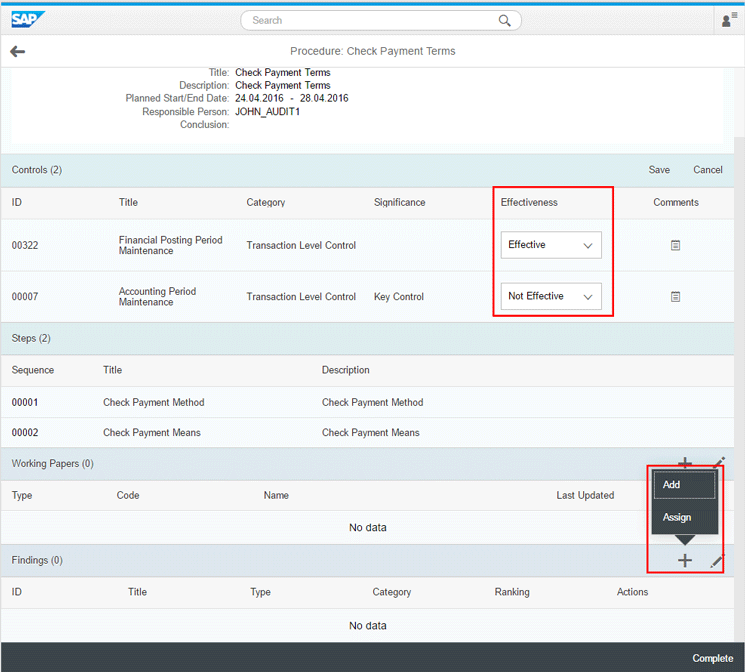
Findings represent the output from the auditing exercise that evaluates the audit evidence and compares it against the criteria used for the audit. Findings allow the auditor to capture any errors, irregularities, non-compliance, or adverse conditions identified during the audit process. As part of the finding definition, the auditor provides a recommendation for counteractive measures and an action plan to fix identified issues. To add findings to the procedure, click the Add button and in the screen that displays, enter values as shown in Figure 7.
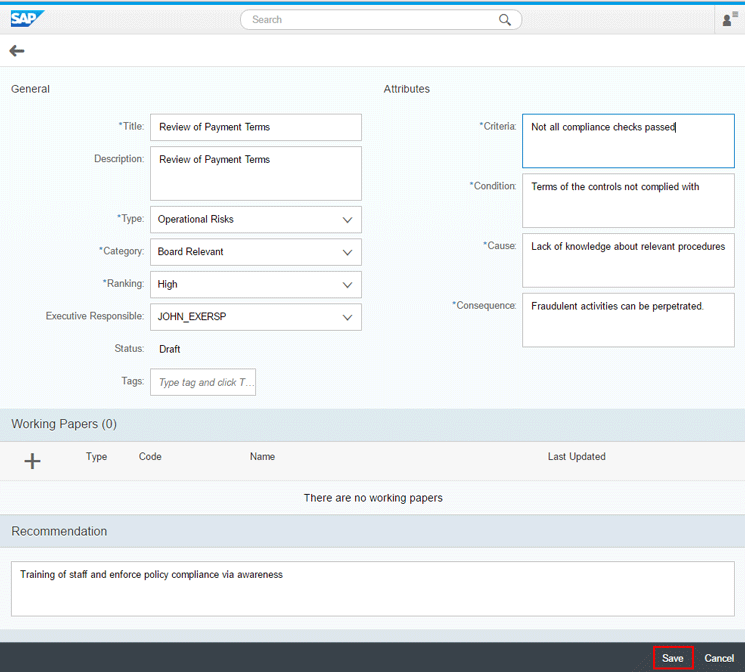
Click the Save button and you see a message confirming the creation of the finding. In the confirmation screen, click the Complete button, and in the dialog box screen that displays (not shown), click the OK button to confirm you want to complete the procedure. Figure 8 displays with the status changed to Completed.
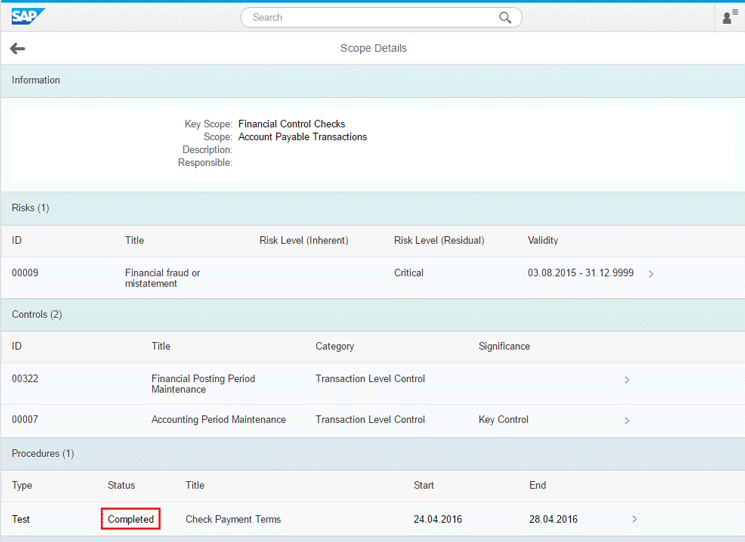
Follow the same instructions for the second procedure and click the back button afterwards. You should have a screen that looks like Figure 9 with the procedure completeness showing 1/1.

Working papers are grouped and stored in different folders on the Working Paper tab of an audit. Click the Working Paper tab and navigate to the desired folder by clicking the appropriate folder name in the folder directory of the Work Program tab. That takes you to Figure 10.
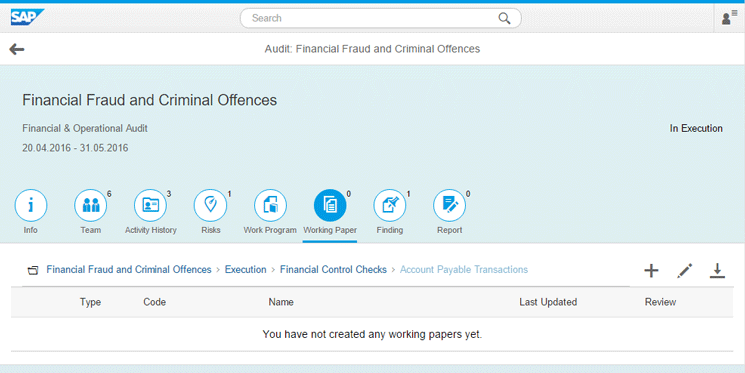
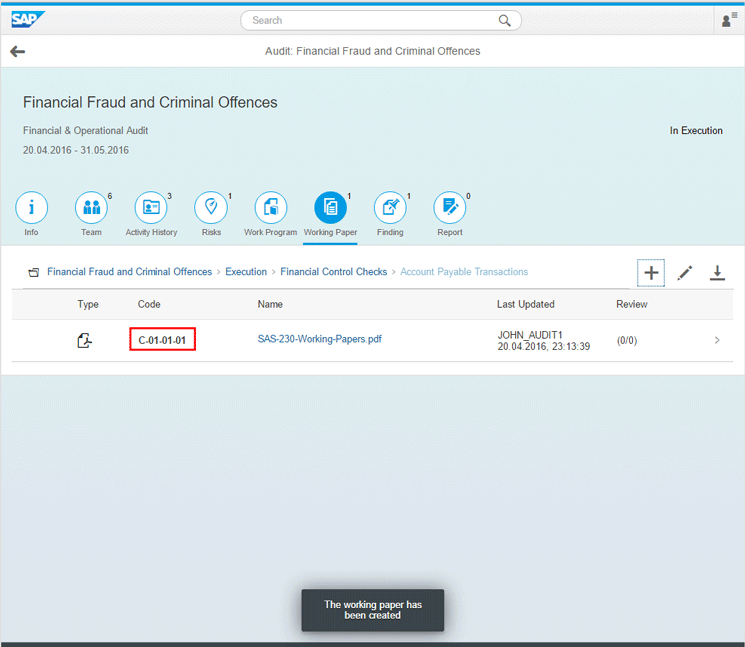
Choose the add (+) icon and a dialog box (not shown) displays that allows you to select the working paper you want to attach to the audit. Click the OK button and you should have a screen similar to Figure 11. When you create a working paper under a node, the system generates a reference code (C-01-01-01 in my business example) for the working paper by appending a two-digit number (01 in our business example) after the work program code (C-01-01; Account Payable Transaction in my business example).
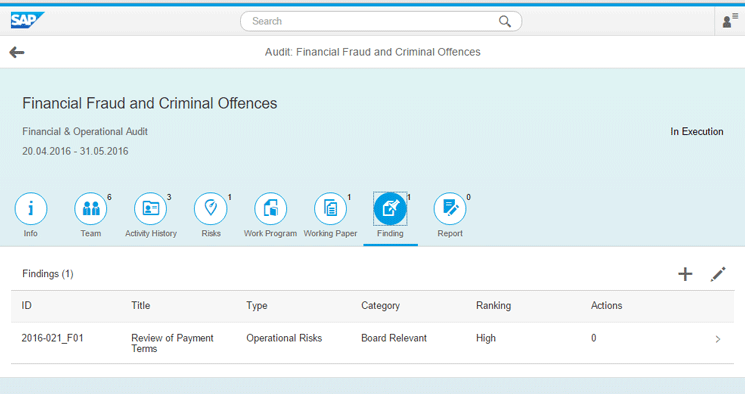
Click the Finding tab and Figure 12 displays with the finding created against the procedure previously. Board Relevant is the finding category and Revew of Payment Terms is the finding.
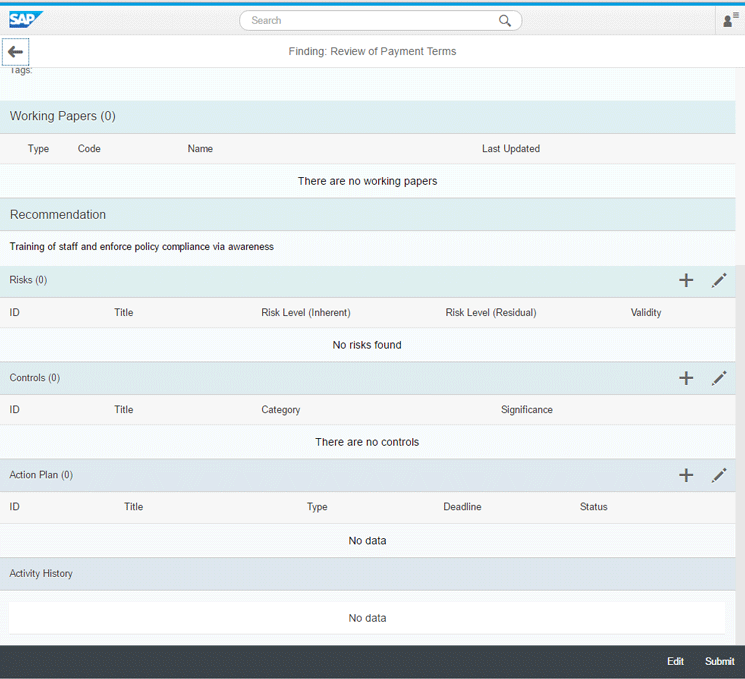
You can choose the add (+) button to create a new finding. To associate an action plan against the finding, choose the finding to display the details page as shown in Figure 13.
Choose the add (+) icon under the Action Plan section and in the screen that displays, enter values as shown in Figure 14.
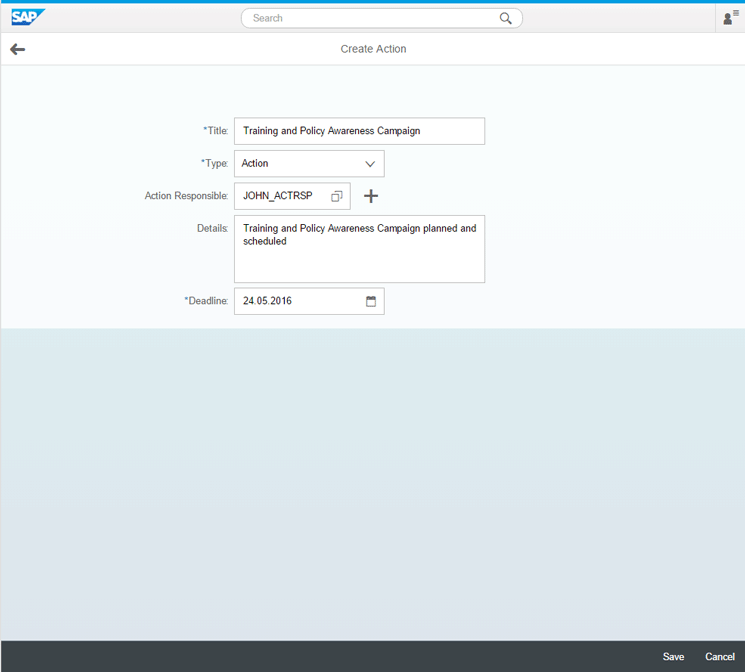
Click the Save button and you see a confirmation message that the action was created.
Preparation and Submission of Draft Audit Report
When the auditor completes the audit exercise, the audit lead can review the activities and proceed to generate a draft audit report to be sent to the audit manager. The audit manager reviews the report and makes an approval decision (approve or reject). To submit the draft audit report, log on as the audit lead and choose the My Ongoing Audits tile (Figure 15).

Choose the audit entry for which you want to submit the draft report and in the screen that displays (not shown), navigate to the Report tab shown in Figure 16.
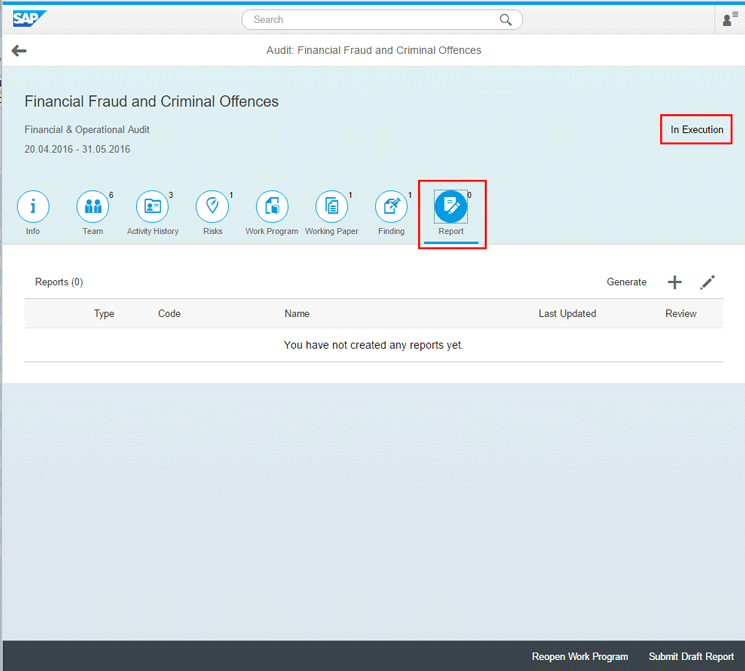
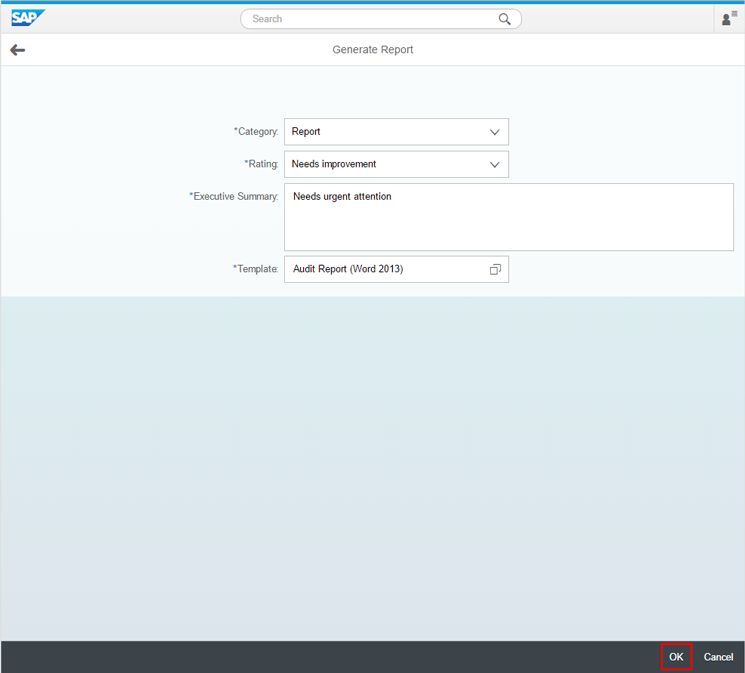
An audit report can be assigned by uploading a local file or by generating it online using report templates. You can create audit reports for audits in any of the following statuses: In Execution, Draft Report Approved, Rework Draft Report, or Rework Final Report. The system allows you to upload the audit report as a local file by dragging and dropping the file or by choosing the add (+) icon to browse the audit report. Alternatively, you can automatically generate the audit report based on a template by choosing the Generate button. In the screen that displays, select a report category and a report rating, enter the executive summary, and select a report template as shown in Figure 17.
(Note: The drag-and-drop functionality does not work in the Internet Explorer browser.)
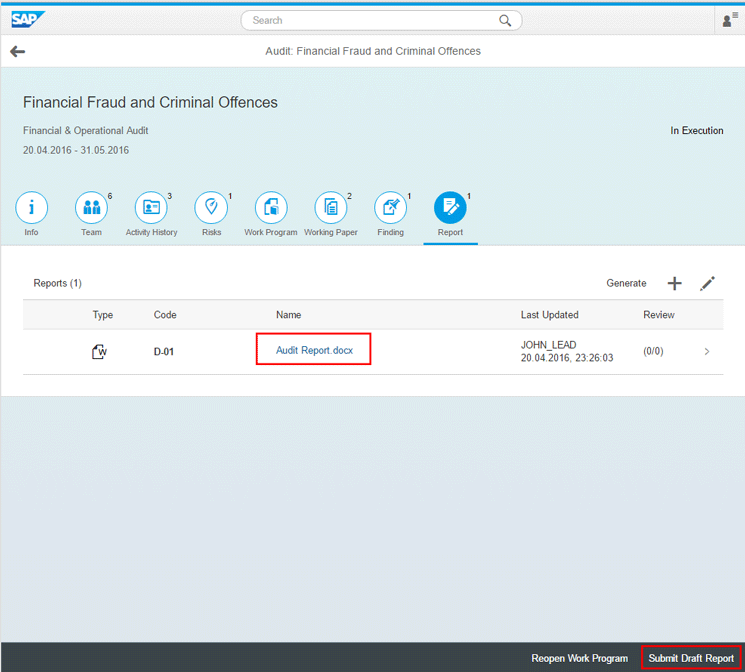
Click the OK button and Figure 18 displays with the generated report in the Report tab.
Click the Submit Draft Report button to go to Figure 19. Select the category, rating, and report and enter an optional comment.
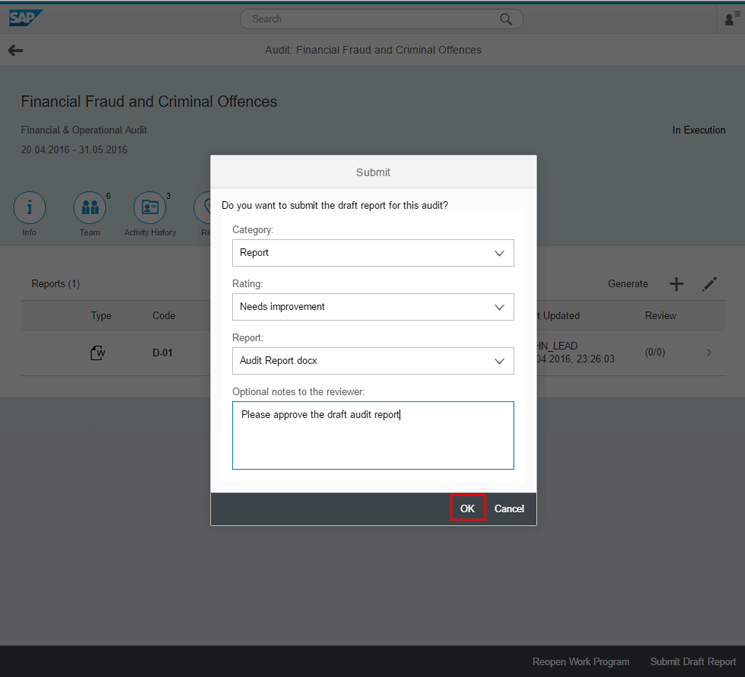
Click the OK button and you receive a confirmation message that the draft report has been submitted.
Review and Approval of the Draft Audit Report
Once the audit lead submits the draft report, the audit manager can progress to making an approval decision (approve or reject) about the draft audit plan. If the draft report is approved, the audit lead can go ahead to prepare the final audit report and submit it for review and approval. If the draft report is rejected, the system sends back the audit report to the audit lead for further review and resubmission. To approve an audit report, navigate to the SAP Audit Management user interface as the audit manager and choose the Approve Audit Report tile. Figure 20 displays with the applicable audit entries.

Choose the audit entry you want to work on and Figure 21 displays.
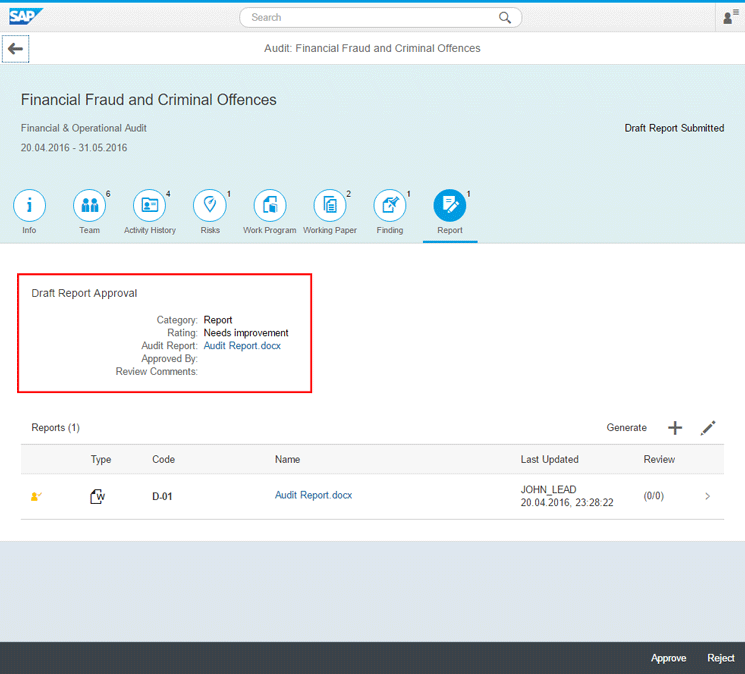
Review the audit exercise documentaion and you can download the audit report and choose Approve or Reject. I choose Approve in this business example. In the dialog-box screen (not shown) that displays, enter an optional note. Click the OK button and you see a status message confirming the submission of the draft audit report.
Preparation and Submission of Final Audit Report
The audit lead can only submit a final audit report after the draft audit report has been approved. As the audit lead, log on to the SAP Audit Management user interface and choose the My Ongoing Audits tile and Figure 22 displays.

Choose the audit entry you want to work on and in the screen that displays (not shown), navigate to the Report tab. Figure 23 displays.
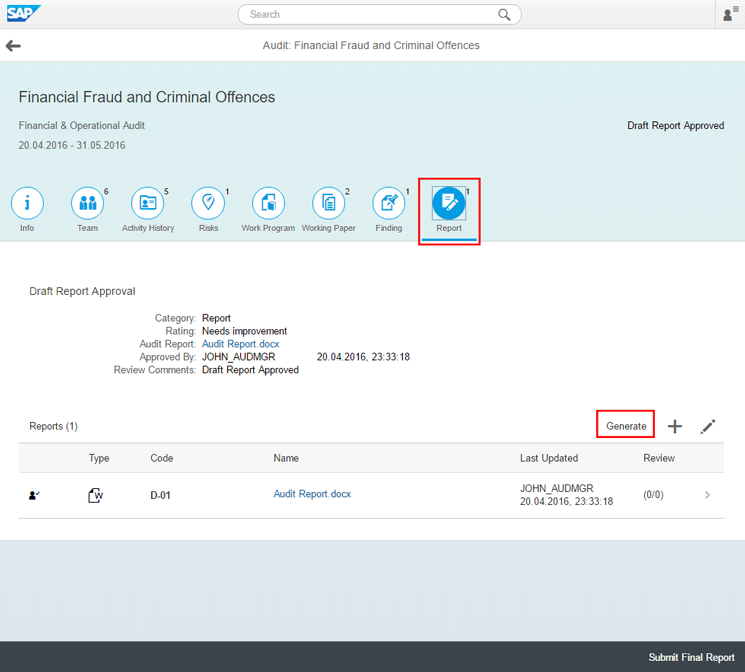
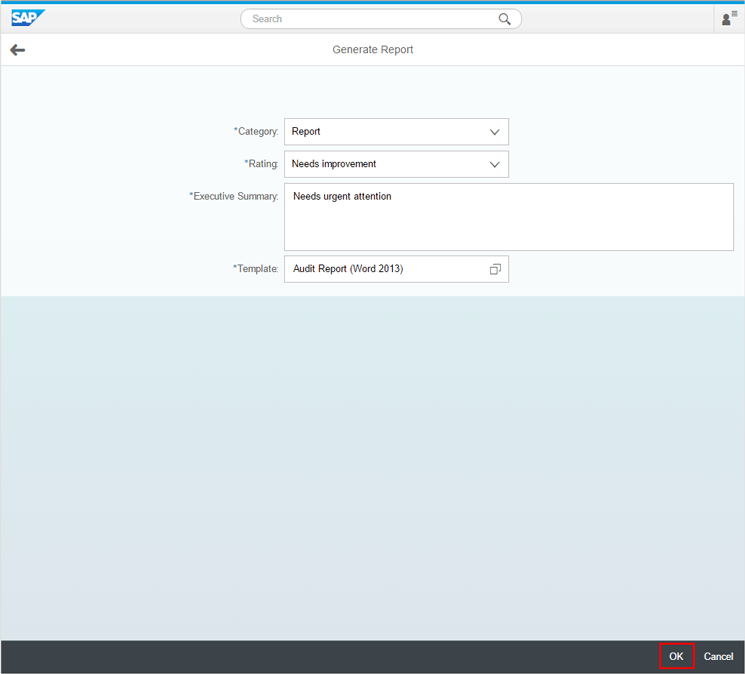
An audit report can be associated with an audit by uploading a local file or by generating it online using report templates. The system allows you to upload an audit report as a local file by dragging and dropping the file or choosing the add (+) icon to browse the audit report. Alternatively, you can automatically generate the audit report based on a template by clicking the Generate button. In the screen that displays, select a report category and a report rating, enter the executive summary, and select a report template as shown in Figure 24.
Click the OK button and Figure 25 displays with the generated audit report.
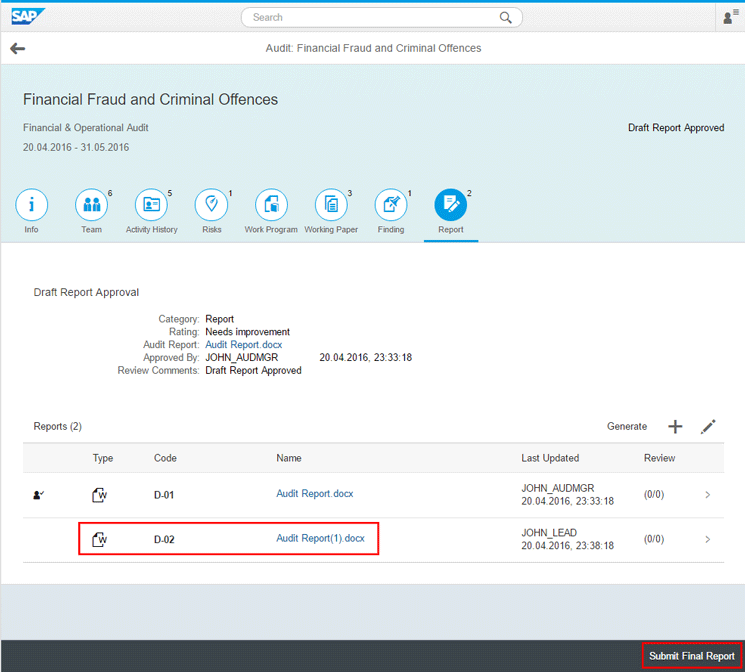
Click the Submit Final Report button and then select the category, rating, report, and optional comments as shown in Figure 26.
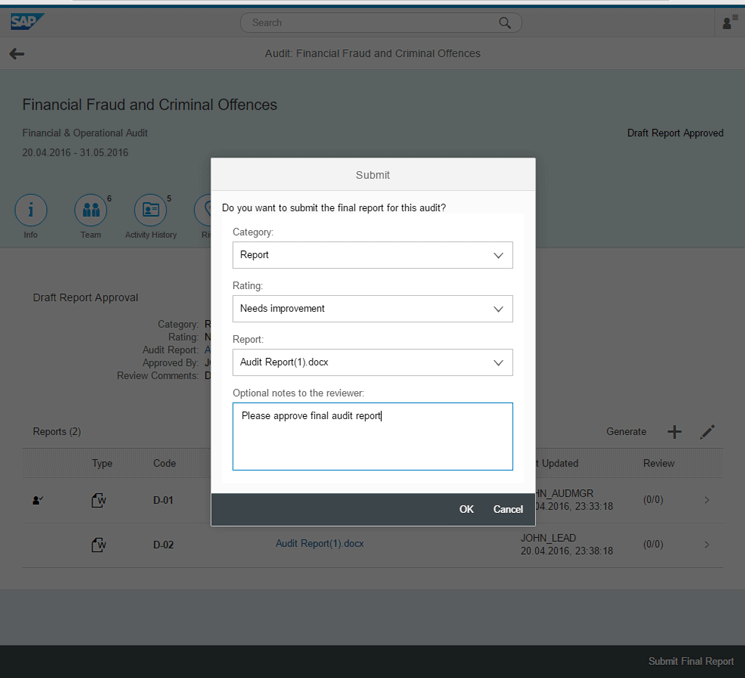
Click the OK button and you see a status message confirming the submission of the final audit report.
Review and Approval of Final Audit Report
Once the audit lead submits the final audit report, the audit manager can make an approval decision (approve or reject). If the final report is approved, the chief audit executive can go ahead to issue the final audit report. If the final report is rejected, the system sends back the audit report to the audit lead for further review and resubmission. As the audit manager, log on to the SAP Audit Management user interface and navigate to the Approve Audit Reports tile. Figure 27 displays.

Choose the audit entry you want to work on and Figure 28 displays.
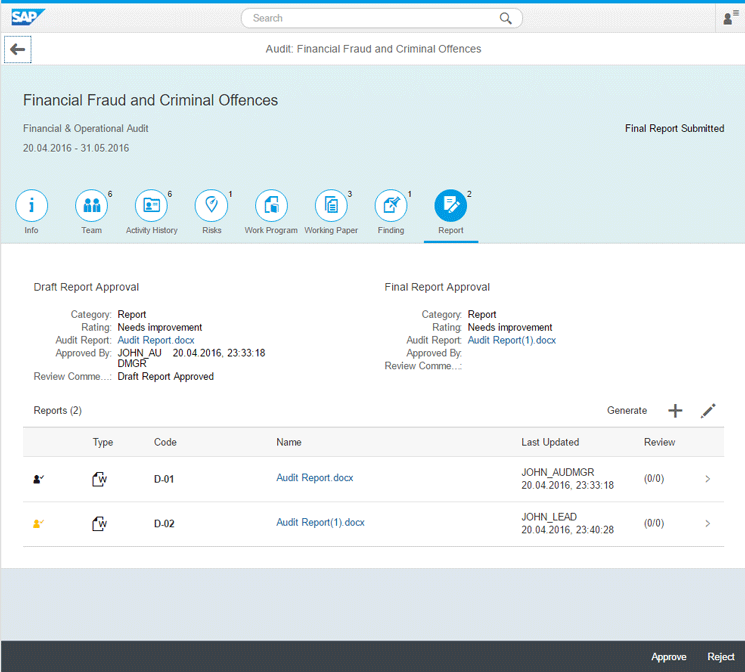
Click the Approve button and in the screen that displays (not shown), enter optional notes. Click the OK button and and you see a status message confirming the approval of the final report.
Issuance of the Audit Report
Following the approval of the final audit report, the chief audit executive issues the final report to the appropriate stakeholders to keep them abreast of the outcome of the audit exercise as it relates to the audit objectives and scope, including conclusions, recommendations, and action plans. To issue the audit report as the chief audit executive, log on to SAP Audit Management user interface (UI) and navigate to the Issue Audit Reports tile. Figure 29 displays.

Choose the audit entry you want to work on, navigate to the Reports tab, and Figure 30 displays.
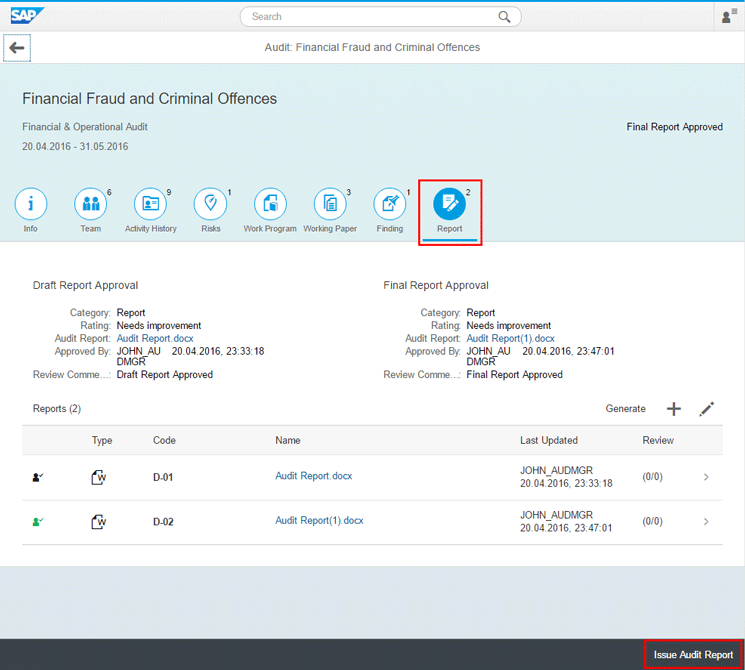
Click the Issue Audit Report button and in the screeen that displays (not shown), enter an optional note, and click the OK button. A status message confirms that the audit report is issued.
Issuing the audit report changes the status of the audit to Audit Report Issued and the audit can now be closed. For the purposes of this article, I do not close the audit at this point.
Tracking of Action and Findings
During and after the audit, the auditor needs to review the action plan at intervals. Actions and findings are closely integrated in the SAP Audit Management system and consequently have dependencies. For example, to close a finding, you must first complete all open actions under the finding. Furthermore, if you make a finding obsolete, actions under the finding with the status In Process are also set to obsolete. To perform follow-up activities on actions, access the SAP Audit Management UI and navigate to the tile Track Open Actions. Figure 31 displays. When the final audit report is approved, the status of all action plans automatically changes from Draft to Open, as you can see for the action plan associated with the action in my business example.

Choose the action you want to process. Figure 32 displays showing the details of the action including the log of the change in status by the audit manager who approved the final audit report.
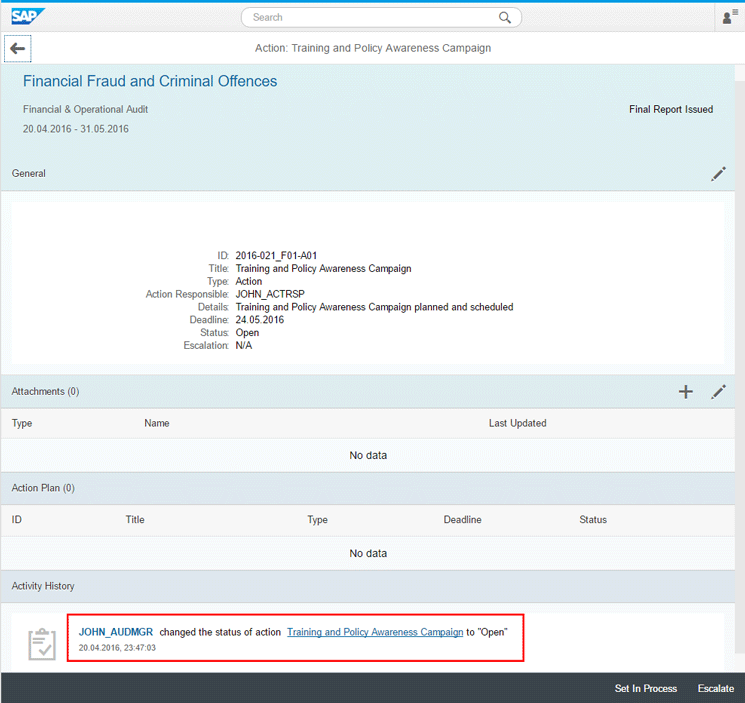
Actions that have the Open status can be set to In Process by auditors or by the responsible persons by choosing the Set In Process button. In the screen that displays (not shown), enter optional notes. Click the OK button and a status message confirms the change in status of the action to In Process.
For actions that are in process, the responsible person typically communicates with the auditor via email about updates to the action. Based on the feedback, the auditor can set the action to any of the following statuses: Reasonably Controlled, Follow-Up Required, or Complete. For the purpose of this article, I set the action to Complete by clicking the Complete button in Figure 33, which is accessible by selecting an audit entry in the Track Open Actions tile.
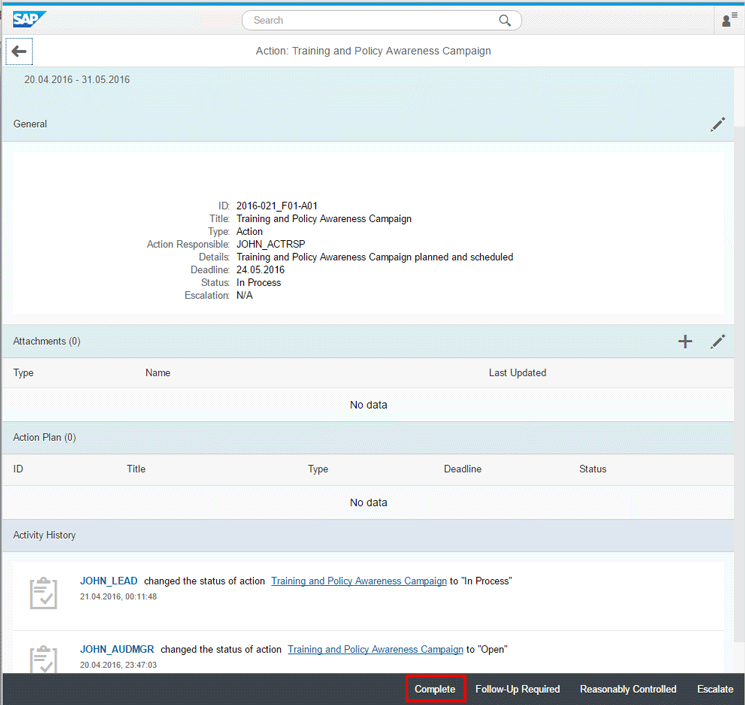
In the dialog-box screen that displays (not shown), enter optional notes. Click the OK button and you receive a confimration message that the status is set to Complete.
As part of the follow-up activities, you need to monitor open findings by evaluating management’s response to recommendations, countermeasures, and action plans relevant to the audit. You can open a finding by logging on to the SAP Audit Management user interface and choosing the Track Open Findings tile to go to Figure 34.

Click the finding you want to work on and Figure 35 displays.
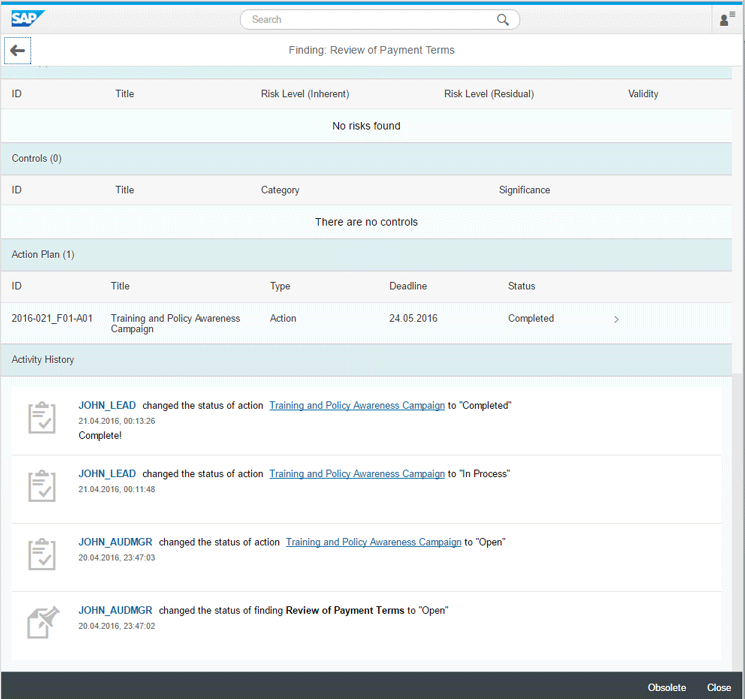
Open findings can be set to obsolete or closed depending on the feedback from the management response. You choose to close the finding when the actions in the finding have been taken, or when management decides to accept the risks of not performing the recommended actions. Furthermore, you can set the status of a finding to obsolete in the event that the finding and the actions are no longer relevant. For the purposes of this article, I close this finding by clicking the Close button. In the dialog-box screen that displays, enter an optional note and click the OK button. A status message confirms the closed status of the audit.
Closing the Audit
Following the issue of the final audit report, the chief audit executive or audit manager can close the audit. When you close the audit, findings and actions associated with the audit can still be tracked and managed. To close an audit, log on to the SAP Audit Management system as the audit manager and click the Track Ongoing Audits tile. Figure 36 displays.
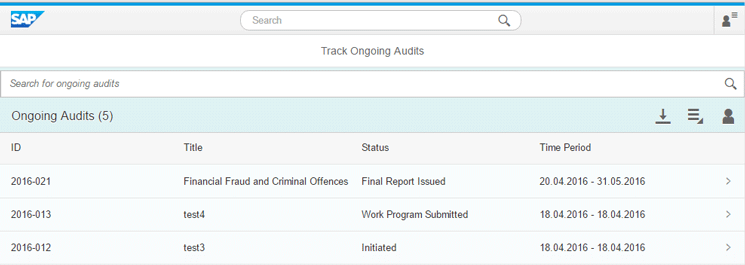
Choose an audit entry with the status Final Report Issued and Figure 37 displays.
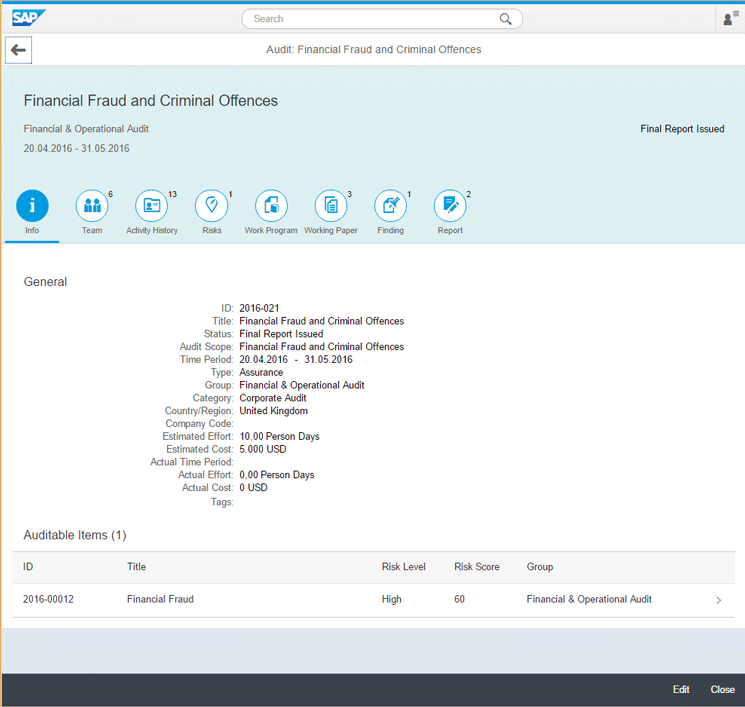
Click the Close button and in the dialog-box screen (not shown) that displays, enter an optional note. Click the OK button and a status message confirms the closure of the audit.
Be sure to read the first article in this two-part series:


