Become familiar with a method for substituting InfoCube characteristic values that avoids a full data reload: selective deletion.
Key Concept
The InfoCube is a model of a specific business scenario, so its content reflects the business environment. From time to time, BW teams are required to adjust an InfoCube’s content to a changed business environment. Substituting characteristic values to update the InfoCube is one such adjustment.
From time to time, BW teams are required to substitute the characteristic values of an InfoCube to adjust content based on a changed business situation. For example, you might have to substitute values caused by changes to the business environment such as a sales manager substitution, changes in product hierarchies, or data inconsistency.
In many cases, users choose to fully reload their data. However, this involves a long InfoCube downtime during which you delete incorrect data and load new data. Then the system recalculates aggregates. The InfoCube is unavailable during this process and the larger the InfoCube, the longer the downtime.
I propose two other approaches for substituting InfoCube characteristic values. The first is substitution with selective deletion. The second is substitution with reverse load, which I explain in my article, "Avoid Full Data Reload: Use Reverse Loading to Substitute InfoCube Characteristic Values." In many cases they are much more effective compared to the traditional method.
Most of the routine situations are associated with static data InfoCubes that have been left unchanged for a long time. For instance, a sales budget InfoCube contains target monthly sales key figures for customer managers. The BW team prepares this InfoCube at the beginning of each year and leaves it alone all year. This InfoCube is usually used for plan-fact comparison reports.
Business Scenario
During the planned period (a year), manager A could be substituted by manager X. The customer manager is represented by the characteristic CUSTOMER_MANAGER.
When the BW team adjusts the InfoCube to the new situation yearly, it substitutes the customer manager’s characteristic values (A to X) without changing the rest of the characteristics and key figures.
A few possible ways to handle this come to mind. The obvious option is a full or partial InfoCube reload from a source system. However, some situations demand another solution. For instance, the reload may be impossible because the source data does not exist or was archived and is not accessible. In addition, it may cause complex and expensive preparation and extraction, transformation, and loading (ETL) activities. Finally, the reload may cause a long downtime for large Info-Cubes. In my case, I populated the InfoCube as a final step of the Strategic Enterprise Management Business Planning and Simulation (SEM-BPS) process and did not want to repeat this process because of the changed manager’s characteristic value.
Figure 1 illustrates the principal schema that I use for both methods (selective deletion and reverse load). I chose the method in Figure 1 rather than a full data reload because the process leaves the source data unchanged and does not affect the business situation. This alternative solution is based on standard ETL activities.

Figure 1
Principal schema for characteristic value substitution
This technique involves a few processes. First, I localize the old characteristic value data in a separate temporary InfoCube. Then, I transform this data by substituting characteristic values while loading to a temporary InfoCube. Finally, I reload the transformed data back to the original InfoCube.
The detailed steps for both methods (selective deletion and reverse load) differ. I’m going to give the steps for selective deletion later in this article. The steps for reverse loading are in the article “Avoid Full Data Reload: Use Reverse Loading to Substitute InfoCube Characteristic Values.” I’ll also discuss the advantages and disadvantages for both selective deletion and reverse load when I explain the steps.
From the BW star-schema point of view, characteristic value substitution refers to the update procedure in the InfoCube’s DIM table. Figure 2 shows that BW stores InfoCube characteristics as SID values in a DIM table. This means that a characteristic value could be substituted in the BW environment independently of the source data.

Figure 2
Characteristic value presentation in the InfoCube star schema
I know that a characteristic value is stored in the InfoCube’s DIM table and I want to substitute value A with value X, so I could ask, “Why should I perform all these ETL routines and move a lot of data that requires many resources and causes downtime?”
Let’s access the DIM table and perform a simple update manipulation: replace all characteristic values SID-A with SID-X.
Performing a direct update in this table instead of executing the ETL process described in Figure 1 looks like a simple process that you could execute in seconds. However, this is a dangerous and illegal method! It is an illegal manipulation per the Sarbanes-Oxley Act, so you should never directly update star schema objects. Each mistake in this routine causes unrecoverable InfoCube inconsistency.
To illustrate the implementation of my approach, I created a sample InfoCube ICS and populated it with data (Figures 3 and 4). CURR_CHAR is one character long (Figure 5) and KF1 and KF2 are key figures (Figure 6). Additionally, I created a substitution rule table ZCHAR_SUBST using transaction SE11 and populated it with sample data (Figures 7 and 8).

Figure 3
Sample InfoCube ICS
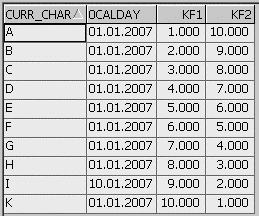
Figure 4
Sample InfoCube ICS content

Figure 5
Characteristic CURR_CHAR
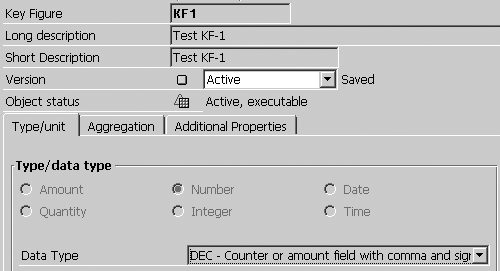
Figure 6
Key figure KF1

Figure 7
Substitution rule sample table ZCHAR_SUBST definition

Figure 8
Substitution rule sample table ZCHAR_SUBST content (transaction SE16)
Substitution with Selective Deletion
This approach includes the following steps (Figure 9):

Figure 9
Substitute characteristic value by deleting old value data
Step 1. Load the old characteristic value data to a temporary InfoCube with characteristic value substitution
Step 2. Selectively delete the old characteristic value data
Step 3. Reload the substituted new data without data transformation
In comparison to the data reloading, this method has obvious advantages:
- Independent of a source system and source data
- Applicable for all data including historical
- Relatively simple (requires one temporary InfoCube)
- Available for automating and repeatable use
On the other hand, the selective deletion takes a long time to execute because of aggregate recalculation. Large InfoCubes with a number of aggregates exacerbate this effect. The aggregates would be dropped before and recalculated after data deletion. So even for minor changes, this process may cause a long InfoCube downtime.
The selective deletion implemented by a program process item is not controlled by a process chain. I recommend that you execute step 3 separately after manually validating step 2.
Step-by-Step Instructions
Step 1. Load the old characteristic value data to a temporary InfoCube with characteristic value substitution. Create a temporary InfoCube called IC_TS as a copy of the original InfoCube (ICS). Select the InfoProvider in the modeling window of Administrator Workbench (transaction RSA1). Navigate to the application component you want to join to a new InfoCube. Select it, right-click, and choose Create InfoCube… to get to the screen in Figure 10. Next, populate the fields as shown in Figure 10. Select the Create button to get the next screen (Figure 11). Click on the activate icon to activate the InfoCube.

Figure 10
Create a temporary InfoCube as a copy of original InfoCube

Figure 11
Activate a temporary InfoCube IC_TC
Next, generate the export DataSource for the ICS InfoCube. Select the ICS InfoCube in the modeling window of Administrator Workbench, right-click, and choose Generate Export DataSource.
Create update rules for IC_TS InfoCube from the original InfoCube (ICS) with automatically proposed mapping. Select the IC_TS InfoCube in the Modeling window of Administrator Workbench. Right-click and choose Create Update Rules to get to the screen in Figure 12. Populate the fields as Figure 12 shows and click on the enter icon to approve the populated information. BW performs the mapping automatically (Figure 13).

Figure 12
Update rule creation start screen

Figure 13
Automatic mapping performed by the BW system in the Key Fig. Calculation, Time Ref., and Characteristics tabs
Create a start routine for characteristic value substitution. Click on the Create Start Routine button (Figure 13). Cut and paste the ABAP code in my sample start routine (Start routine for Selective Deletion.doc), which you can download by clicking this link. Figure 14 shows a sample of this code. This start routine performs two functions: sorts out only data that should be substituted and substitutes the characteristic values in the substitution rule table. Next, activate the update rules by clicking on the activate icon.
 loop at DATA_PACKAGE .
 sy_tabix = sy-tabix .
 select single *
 from ZCHAR_SUBST
 where OLD_CHAR = DATA_PACKAGE- /BIC/CURR_CHAR.
 if sy-subrc is initial . “Candidate for a treatment
 DATA_PACKAGE-/BIC/CURR_CHAR = ZCHAR_SUBST- NEW_CHAR.
 modify DATA_PACKAGE index sy_tabix.
 else .
 delete DATA_PACKAGE index sy_tabix.
 endif .
 endloop .
|
| Figure 14 |
Fragment of start routine for characteristic value substitution |
Note that you can classify characteristic value substitutions into two categories and I’ll explain how you should address both. Sometimes you need to perform a single repair activity (exception situation); in other cases, you must develop a reusable generic mechanism (routine situation). I have developed an effective reusable mechanism that applies to most practical implementations with minimal downtime.
As start routines filter the incoming data, the system only passes the relevant records through them. You can reduce the data traffic by filtering at the selection stage. The InfoPackage selection criteria for ZCHAR_SUBST characteristic is presented in the ABAP code InfoPackage Selection Condition document, which you can download by clicking this link.
Load the old characteristic value data to InfoCube IC_TS. To do so, create an InfoPackage. Select InfoSources in the Modeling window of Administrator Workbench. Find the 8ICS InfoSource, select it, right-click, and choose Create InfoPackage. This brings you to the screen in Figure 15. Describe the InfoPackage in the InfoPackage Description field and click on the Save button to get to the screen in Figure 16. Execute the InfoPackage by clicking on the Start button in the Schedule tab sub-screen. As a result, the IC_TS InfoCube is populated with data (Figure 17).

Figure 15
InfoPackage initial screen

Figure 16
InfoPackage for loading to IC_TS InfoCube

Figure 17
InfoCube IC_TS with substituted characteristics data
Step 2. Selectively delete the old characteristic value data. To delete the old data from InfoCube ICS once, perform a single manual run. Go to the Manage Data Target section for the ICS InfoCube. To get to this screen, select the ICS InfoCube in the Modeling window of Administrator Workbench. Right-click and choose Manage to get the screen in Figure 18. Select the Contents tab in the InfoCube’s Manage screen and click on the Selective Deletion button to get to the selective deletion screen (Figure 19).

Figure 18
InfoCube ICS manage screen

Figure 19
Selective deletion screen
Click on the DeleteSelections button in Figure 19 to get to the selection criteria screen (Figure 20). Populate the selection criteria values as shown and press the F8 button to approve it. You return to the screen in Figure 19. If you want to easily determine the selective deletion job, then fill the Job name. Otherwise, BW generates the job name automatically. Click on the Start button to run the deletion job.

Figure 20
Selection criteria screen for deletion
After this job finishes, you see the ICS InfoCube’s content (Figure 21). Records with CURR_CHAR values between A and C were deleted.

Figure 21
ICS InfoCube content after selective deletion
To delete the old data from InfoCube ICS automatically, generate a deletion program for ICS InfoCube (transaction DELETE_FACTS). Include ABAP code for substituted characteristic selection criteria and execute the generated program. Cut and paste the ABAP code for this substituted characteristic selection criteria (substituted characteristic selection criteria.doc), which you can download by clicking this link. You’ll find more detailed instructions for this step in the download.
Step 3. Reload the substituted new data without data transformation. Generate the Export DataSource for IC_TS InfoCube (I explained this process in step 1).
Create update rules from InfoCube IC_TS to InfoCube ICS with automatically proposed mapping. Perform it in the same manner as described in step 1. No ABAP routine should be created. Only approve the BW system proposals by activating the update rules.
Next, load all the data from IC_TS to ICS. Perform the same activities as instructed in step 1: Select the InfoSources in the Modeling window of Administrator Workbench. Find the 8IC_TS InfoSource, select it, right-click, and choose Create InfoPackage. Fill the InfoPackage Description field in the initial screen and press the save icon to get to the screen in Figure 22. Execute the InfoPackage by clicking on the Start button in the Schedule tab sub-screen. Figure 23 illustrates the result.

Figure 22
InfoPackage for loading to ICS InfoCube with substituted data

Figure 23
ICS InfoCube content after reloading substituted data
If you compare Figure 23 with Figure 4, you realize that records with A, B, or C characteristic values were substituted by records with X, Y, or Z, respectively. The reusable ETL process for this approach is implemented using a process chain (Figure 24).
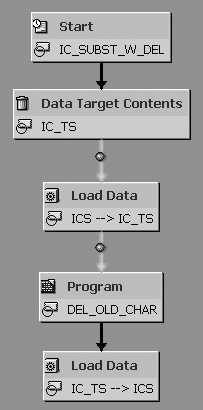
Figure 24
Process chain for characteristic value substitution by deleting the old value data
Michael Shtulaizen
Michael Shtulaizen is the SAP NetWeaver technical manager of Strauss Group Ltd., Israel. He has been working with SAP BW since 2002. He has rich development experience in SAP environments (more than 10 years) that allows him to propose original solutions in SAP NetWeaver BW systems.
You may contact the author at Michael.Shtulaizen@Strauss-Group.com.
If you have comments about this article or publication, or would like to submit an article idea, please contact the editor.