Companies have to deal with the import of goods into their country and the declarations that go along with importing. To improve on efficiency, reduce costs in your compliance process, and avoid delays in customs clearance, you can automate your import declarations using functionality in SAP BusinessObjects Global Trade Services.
Key Concept
Import filing to customs is performed in different stages, such as cargo manifest, entry summary, automated clearing house (ACH) authorization for duty payment, and finally the daily and monthly statement. For shipments that are sent through vessels, US Customs and Border Protection has mandated that companies send notification 24 hours prior to cargo being set aboard. These are called 10 plus 2 critical data elements. Upon the arrival or prior to the arrival of the goods, the products are declared to the CBP authorities in two formats: CF 3461 (entry or immediate delivery) and CF 7501 (entry summary). With CF 3461, you are notifying the CBP of the goods that are arriving and with CF 7501 you are declaring the goods with values for appropriate duty and other fee payments.
Every export is an import into another country. US Customs and Border Protection (CBP) has introduced a new rule titled Importer Security Filing and Additional Carrier Requirement, as of January 26, 2009. Under this rule, before any goods arrive by vessel into the US, the Importer Security Filing (ISF) needs to be submitted in advance by the importer or the agent (licensed customs broker) electronically to the CBP. This requirement only applies to cargo arriving in the US by ocean vessel, not to cargo arriving by other modes of transportation. The ISF importer or their agent must provide eight data elements no later than 24 hours before the cargo is set aboard a vessel destined to the US.
These data elements are: seller, buyer, importer of record number, consignee number, manufacturer (or supplier), ship-to party, country of origin, and the commodity’s Harmonized Tariff Schedule of the United States (HTSUS) number. Two additional data elements — container stuffing location and consolidator — must be submitted as early as possible, but no later than 24 hours prior to the ship’s arrival at a US port.
CBP may issue liquidation of $5,000 per violation for the submission of an inaccurate, incomplete, or untimely filing. If goods for which an ISF has not been filed arrive in the US, the CBP may withhold the release or transfer of the cargo, refuse the unloading of the merchandise, or seize it if it is illegally unloaded. Additional noncompliant cargo could be subject to “do not load” orders at origin or further inspection on arrival.
From an importing point of view, companies use different approaches to meet the requirement. We’ll discuss the import processes setup using SAP ERP Central Component (SAP ECC) and SAP BusinessObjects Global Trade Services, and the key configuration setup for building a robust solution, data, and process to support the requirement. We’ll also provide details on building an automated interface with your brokers for import declarations.
We’ll first give a quick overview of the logistics integration and the process overview of the import management. Import processes are triggered based on your incoming schedule, which could trigger based on the vendor purchase order. Let’s take the example of a purchase order logged in an SAP ECC system with the US as the country of destination. Follow menu path User Menu > Logistics > Materials Management > Purchasing > Create/Change/Display Purchase Orders to see a purchase order with product 11361 (Figure 1).

Figure 1
Purchase order with product 11361
From the Display/Change Purchase Order screen, click the Conditions tab to see the screen in Figure 2.

Figure 2
Purchase conditions
Click the Partners tab (not pictured) to see the screen in Figure 3. These screens provide the document data details that trigger the document in SAP BusinessObjects Global Trade Services for customs declarations, the purchase order, net value, and the statistical value.
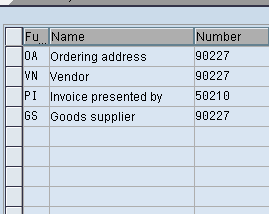
Figure 3
Partners in the purchase order
SAP BusinessObjects Global Trade Services Declarations
As the purchase order is saved in SAP ECC, this information is automatically transferred to SAP BusinessObjects Global Trade Services, and an equivalent customs declaration document is created in that system. Figure 4 displays the report in SAP BusinessObjects Global Trade Services, which shows the customs declaration work list. Click the icon next to Enter Customs Declaration Before GR and select Import > Entry for Consumption.
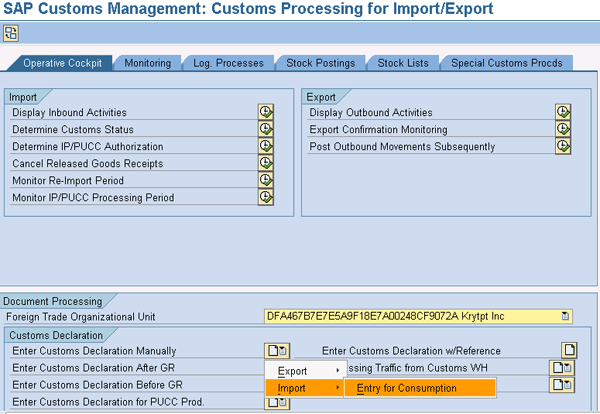
Figure 4
Customs entry for the consumption work list
This brings up the report shown in Figure 5. The report allows you to display the purchase orders that were logged into SAP ECC.
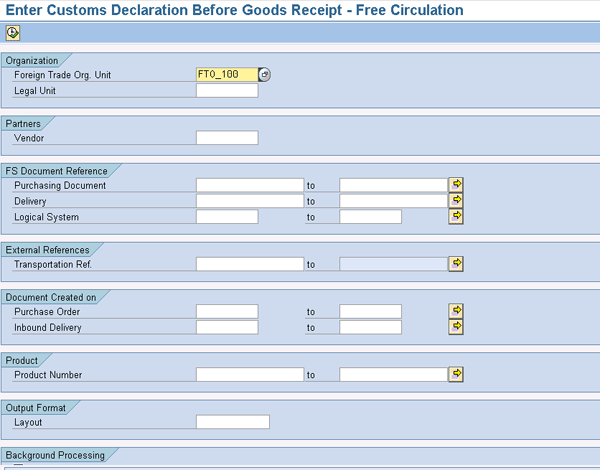
Figure 5
Review and prepare customs declarations prior to the goods receipt
This report displays all the purchase orders that have been logged in SAP ECC, for which equivalent SAP BusinessObjects Global Trade Services customs declaration documents are created (Figure 6).
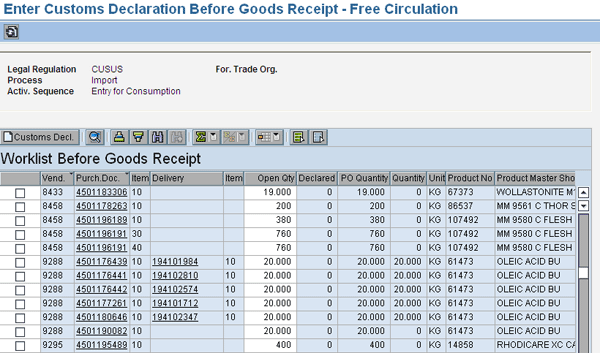
Figure 6
Customs declaration before goods receipt — free circulation
This worklist provides the details of the vendor, purchase order, item number, any inbound delivery, open quantity, unit of measure, product number, and the declared quantity. The inbound delivery triggers confirmation of the goods arrival (also called advanced-shipment notification) and these documents are identified for customs pre-clearance.
Customs Document Review
Prior to the customs declaration, it is important to review the document for key data elements prior to the preparation of declarations. In this section, I’ll go over the different data elements with the customs document that is transferred from SAP ECC.
Within the Item Overview tab of the default screen that comes up when the customs declaration is displayed, you can see the status of the item. If the item is complete you see a green square in the Incomple… (incomplete) column; it is red if it is not complete (Figure 7).

Figure 7
Item data
Partner data, also called partner functions within the document, is important information in reporting the data to customs. This includes the declaring party, consignee, seller, and other functions shown in Figure 8. Verify this information as being correct compared to Figure 3.
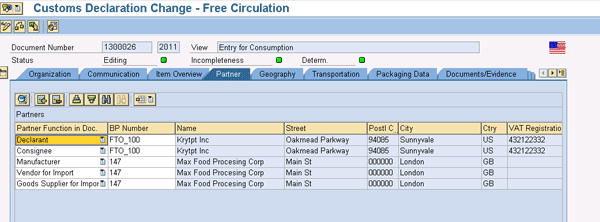
Figure 8
Partner details
The Transportation tab provides the key dates for declaration date, import date, mode of transport, and Inco terms (Figure 9).
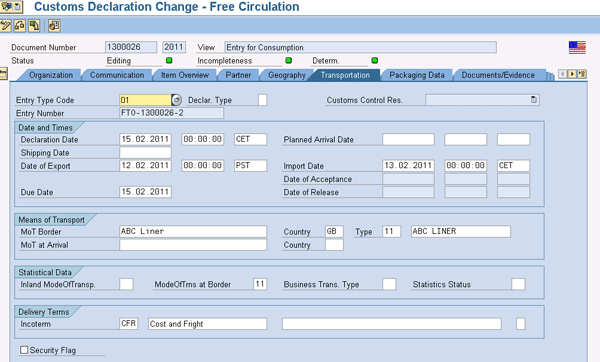
Figure 9
The Transportation tab
In the Documents/Evidence tab, you can store the reference number against which the import customs declaration is stored (Figure 10).
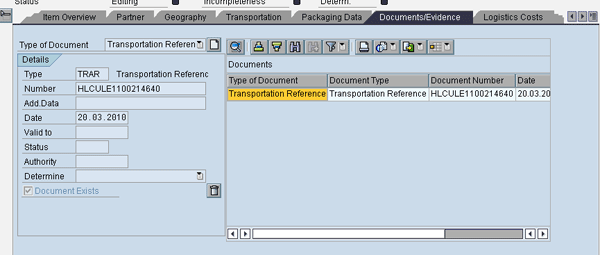
Figure 10
Store the reference number
Following the review of the header data, let’s review some critical item data. In the default view of the customs declaration item overview, click the Documents/Evidence tab. So far you have been reviewing the header data, but you can click the Item data to view item-related information. The General Data view provides the overview of the item with the product number, description, tariff number (Harmonized Tariff Number), other governmental agency (OGA) codes, item quantities, and weight (Figure 11). Users should review this information prior to submitting it to customs because if it is incorrect, they will get an error message.
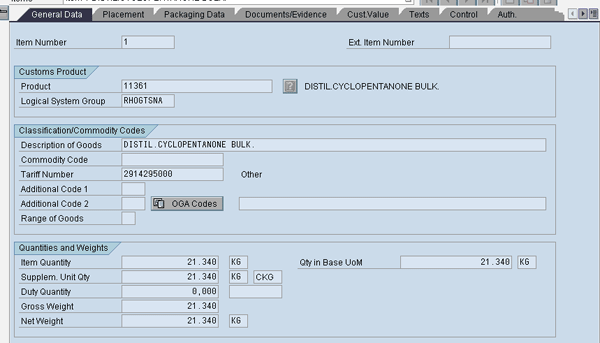
Figure 11
The General Data tab
While in the item data General Data tab, click the Packaging Data tab. In this view, the packaging data is stored by type, displaying the container number. This is a critical piece of information that is transferred to customs for declaration purposes (Figure 12).
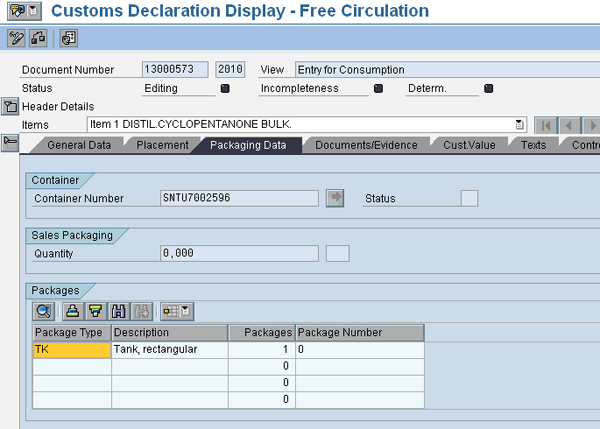
Figure 12
Customs declaration document with packaging data view
In the same view, click the Cust.Value tab to view the customs values with duties details (Figure 13).
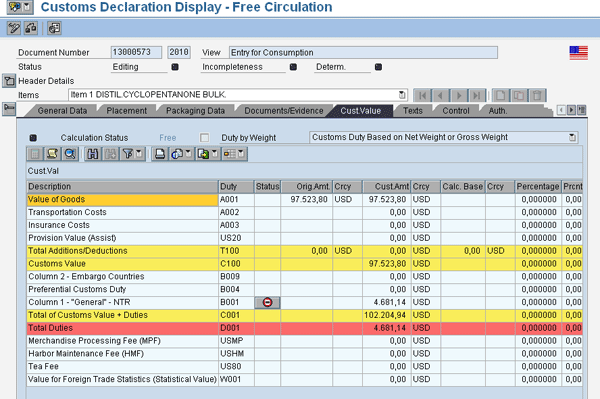
Figure 13
Customs declarations document: item customs value details
This view provides you with the details on the particular line item, including Value of Goods, Insurance Costs, Provision Value (Assist), Preferential Customs Duty, Merchandise Processing Fee (MPF), and Harbor Maintenance Fee (HMF). These are used for calculating the customs value and the duties that need to be paid to customs.
Click the Texts tab to review details captured within the texts (Figure 14). In our example, we have created a text item called Seal Numbers to capture the identification number of the seal used in the vessel shipments.
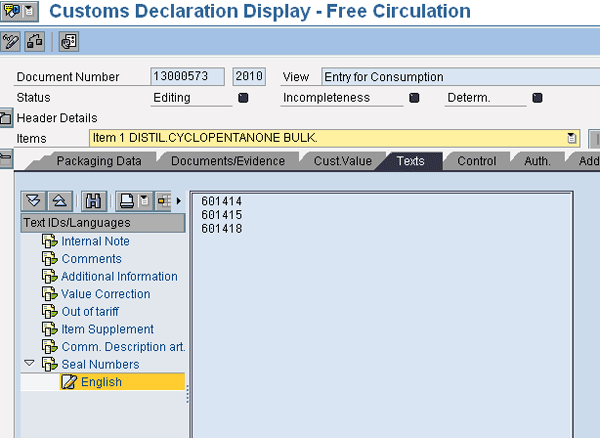
Figure 14
Customs document item text with customized item IDs
Similar to the use of item text to capture vessel seal numbers, you can use the Additional Data field to capture certain additional critical data, such as whether the customs document has a placeholder for, for example, the hazardous material indicator. With customs declaration, hazardous materials are identified, handled, and declared appropriate. While you are in the customs declaration item, click the Additional Data tab (Figure 15). Three fields are available for use. In this example, Addt’l Data 1 has already been configured as Hazardous Goods (H) and Addt’l Data 3 as Reference Numbers.

Figure 15
Customs declaration document item view: additional data
In the above steps, we have reviewed the critical data required for generating the declarations documents. This does not enable you to generate trade declaration documents. This case demonstrates where the customer is using the service of a broker for declarations. The two important documents that are generated are the cargo release and the entry summary. These two documents are passed on to the broker and the broker, in turn, uses this information to declare the shipment for imports. These documents are defined as messages, and the communication is sent to the broker to file the ISF and entry for consumption.
In the Communication tab (Figure 16), select the Message.

Figure 16
Customs document communication with messages display and print
Click the print preview icon to view the document details (Figure 17).
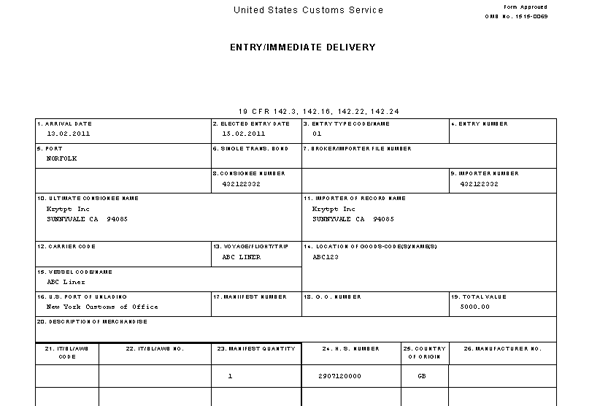
Figure 17
Cargo release document display
Message type P0380 displays the import master (Figure 18).
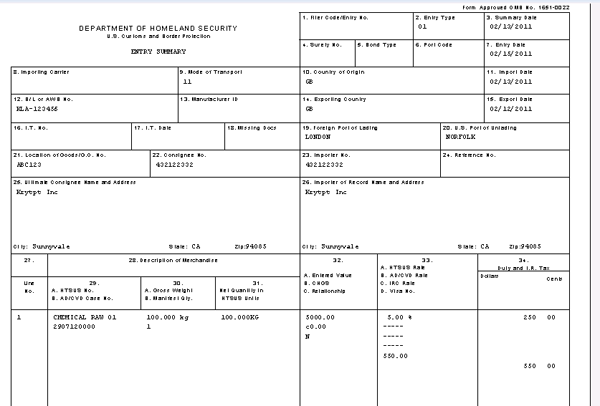
Figure 18
Entry summary document display
Customs Import Process: Configurations Steps
Having seen the customs declaration process steps, let’s now go over the configuration steps to set up this process.
Step 1. Perform feeder system settings for MM0A, MM0B, and MM0C (Figure 19). The first step in the configuration starts with setting up the feeder system documents that are identified for transfer to SAP BusinessObjects Global Trade Services and are used for customs declarations. In SAP ECC, follow IMG menu path Sales and Distribution > Foreign Trade/Customs > SAP Global Trade Services - Plug in > Control Data for Transfer to SAP Global Trade Services > Configure Control Settings for Document Transfer. Select the Application Level MM0A and click the Document Types folder, which brings up the list of document types shown in Figure 19.
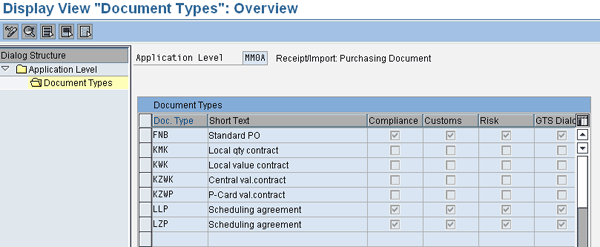
Figure 19
Document transfer configuration set up with SAP ECC
Step 2. Make purchase order type FNB and schedule agreement type LLP and LZP active for the compliance, customs, and risk components of SAP BusinessObjects Global Trade Services (Figure 20).
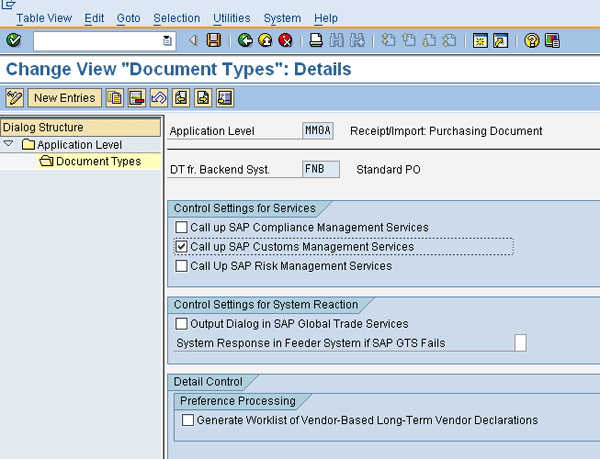
Figure 20
Document types details set up for control settings
Then select the appropriate services (Figure 20). For import customs declarations, select the relevant document type (in this example, purchase order type FNB), then select the Call up SAP Customs Management Services service check box for import declaration. Check the option Output Dialogue in SAP Global Trade Services if you want the system to prompt you with a pop-up window of the compliance screening results before the document is saved in SAP ECC. If you plan to activate Risk Management in SAP BusinessObjects Global Trade Services, you need to check the Generate Worklist of Vendor-Based Long-Term Vendor Declarations.
Step 3. Set the inbound delivery documents EL, ZELN, and ZELT to active for customs processing. In configuration step 1, select the Application Level MM0B (Figure 21).

Figure 21
Configuration setup for inbound delivery
Here you configure the inbound deliveries that are transferred to SAP BusinessObjects Global Trade Services import declarations (Figure 22). Click the New Entries button and maintain the entry for the inbound delivery document and in the details screen select the Call up SAP Customs Management Services check box. If you plan to identify the customs status as bonded, you need to check the Placement into Customs Status Before GR check box, but if you identify it as in transit, you should select the Hold Goods Receipt if Unloading Permission Is Missing option.
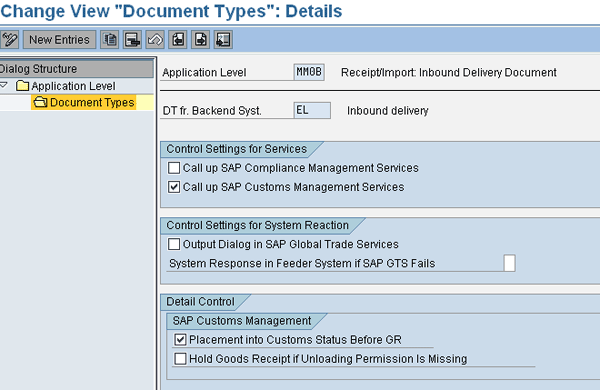
Figure 22
Document type configurations for inbound delivery
Step 4. Configure the goods receipt or materials document. Set the Call up SAP Customs Management Services indicator in Figure 22. The system generates goods movement documents as part of the post goods issue of the inbound delivery. From the configuration in step 1, select the Application Level MM0C (Figure 23). The documents are pre-defined.
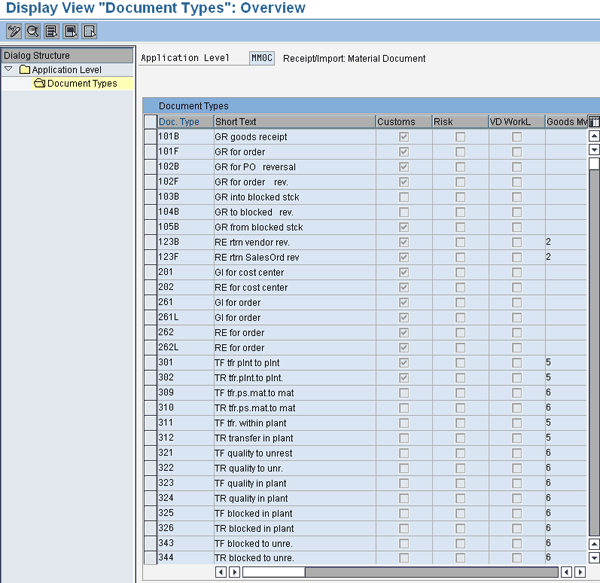
Figure 23
Document transfer setup for goods receipt material document
Click the New Entries button to maintain a new entry (for example, GR goods receipt 101B) (Figure 24). Then check the Call up SAP Customs Management Services check box. All the material movements are selected to monitor customs service. Don’t check the Generate Worklist of Vendor-Based Long-Term Vendor Declarations check box as it is only needed if you want to perform preference determination.
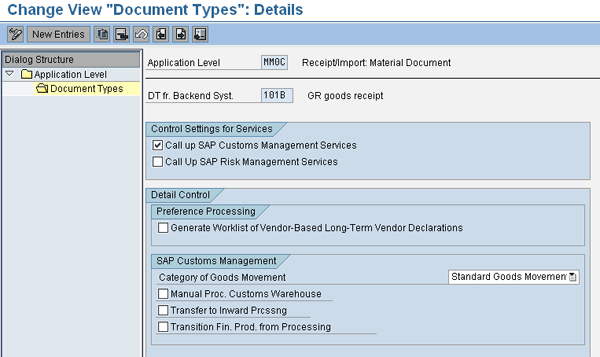
Figure 24
Maintain a new entry
SAP BusinessObjects Global Trade Services Configuration
In the previous steps, I went over the configuration steps within SAP ERP. Now I’ll detail what you need to do in SAP BusinessObjects Global Trade Services.
Step 1. Define partner functions that are in use within the customs declarations. Follow IMG menu path SAP Global Trade Services > General Settings > Partner Structure > Define Partner Functions (Figure 25). Review the partner functions that are pre-defined in the system and if needed you can define your own custom partner function by selecting one of the pre-delivered ones and clicking the copy with reference icon (next to the New Entries button).
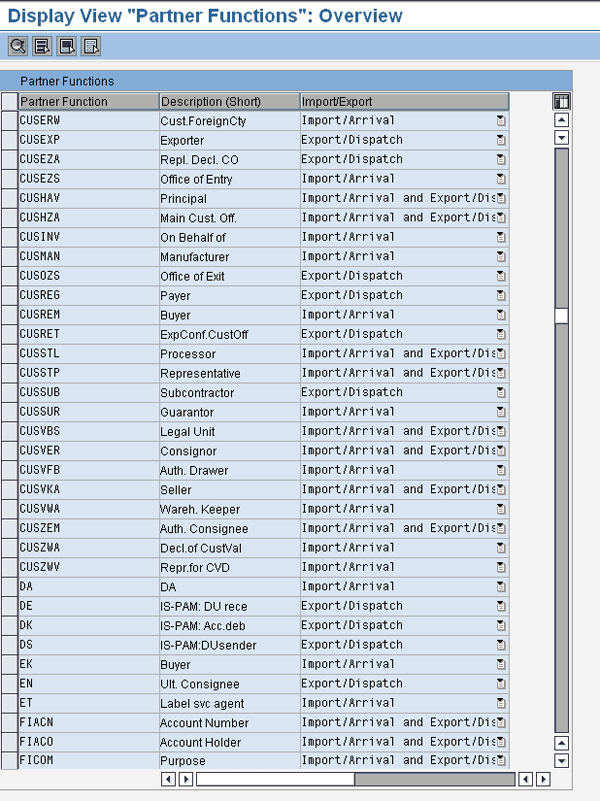
Figure 25
Define partner functions for customs declarations
Step 2. Set partner grouping. After defining the partner functions, you need to assign the partner types to the group (Figure 26). Follow IMG menu path SAP Global Trade Services > General Settings > Partner Structure > Define Groups of Partner Functions. There are pre-defined partner groupings delivered by SAP BusinessObjects Global Trade Services. The one for importing in customs management is PSCCUI. Select it and click the Assign Partner Function folder to see the partner functions that have been assigned. If you want to add a new one, click the New Entries button and add a new one as defined in step 1.
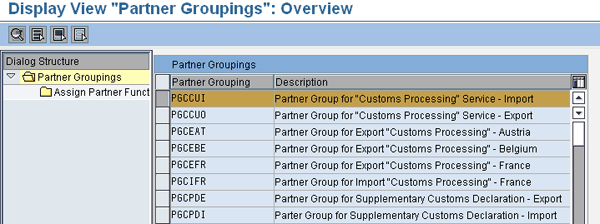
Figure 26
Partner grouping definitions
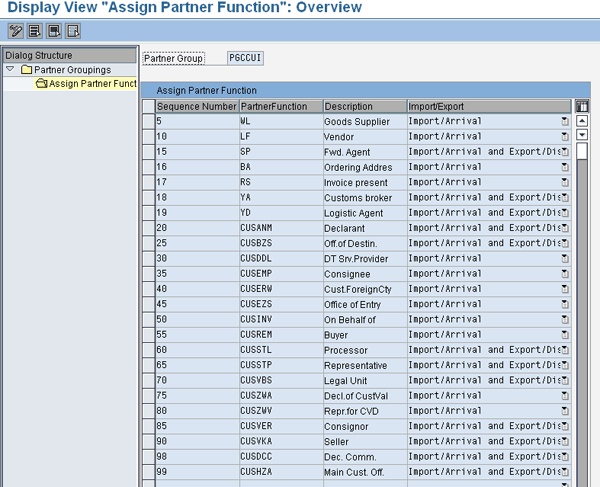
Figure 27
Assignment of partner function to the partner groupings
Step 3. Map the partner type to the logical system group (Figure 28). The partner types defined in step 1 are to be mapped to the feeder system logical system or logical system group. You can do this via IMG menu path SAP Global Trade Services > General Settings > Assign Partner Type to the Logical System group.
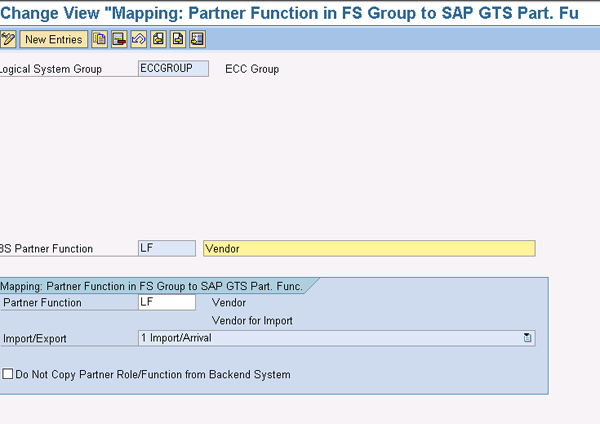
Figure 28
Mapping of partner type to the feeder system logical group
Step 4. Define the legal regulation. Define the customs regulations in SAP BusinessObjects Global Trade Services to represent the importing regulation (Figure 29). Here you can define the customs procedure against which the key determinations are defined. Follow IMG menu path SAP Global Trade Services > General Settings > Legal Regulations > Define Legal Regulations.

Figure 29
Define legal regulations
Review the pre-defined legal regulation (CUSUS for US) and ensure that the Type of Legal Code (Customs Processing), Import/Export (Import/Arrival), and Original City of LR (US) are correct.
Step 5. Assign the country or country group (Figure 30). In this case, let me take the example of country group. You can choose to use a country group for legal regulation. Follow IMG menu path SAP Global Trade Services > General Settings > Legal Regulations > Define Legal Regulation. Select the Legal Regulation folder and click the Assign Country Group folder.

Figure 30
Assign the country or country group to the legal regulation
Step 6. Set the determination procedure. SAP BusinessObjects Global Trade Services has a default determination procedure that you can use or make changes to as required. When the documents are transferred to SAP BusinessObjects Global Trade Services, the system refers to the procedure to determine if a country or country group is used for legal regulation determination. Follow IMG menu path SAP Global Trade Services > Custom Management > Define Procedure for Active Legal Regulations (Figure 31).

Figure 31
Define determination procedure for active legal regulations
Click the Assignment of Determination folder to see the screen in Figure 32. Review the default settings for determination procedure delivered. In some situations (e.g., you want to use a country group instead of the default country as the key for determining the legal regulation), define custom determination procedures.

Figure 32
Define the strategy within the determination procedure
Step 7. Activate the legal regulation. Follow IMG menu path SAP Global Trade Services > General Settings > Legal Regulation > Activate Legal Regulations (Figure 33).
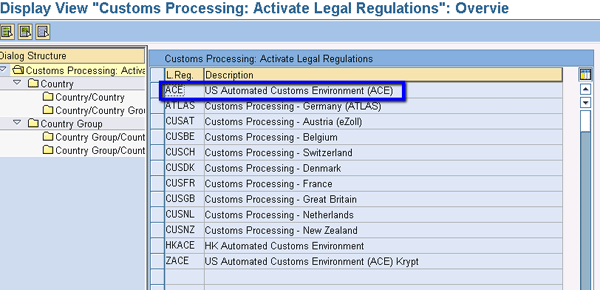
Figure 33
Activate legal regulations
You can choose between Country and Country Group folder. If you select Country, then you activate at country level (Figure 34). Then activate Customs Import/Active for a specific country by selecting from the drop-down 1 Check: Arrival/Import.

Figure 34
Country activation for legal regulation
Step 8. Define the harmonized tariff number structure (Figure 35). A harmonized tariff schedule is used for classifying your product and for import declaration of the products being imported. Follow IMG menu path SAP Global Trade Services > General Settings > Numbering Scheme > Define Numbering Scheme of Tariff Code Number. There are some pre-delivered numbering schemes from which you can select. Click the copy as icon to copy to a new numbering scheme. You can define a structure similar to what is shown in Figure 35.

Figure 35
Define the structure for tariff code numbers
Step 9. Assign the numbering scheme to the legal regulation (Figure 36). Once you have defined the numbering scheme, assign it to the legal regulation for use with product classifications. Follow IMG menu path SAP Global Trade Services > General Settings > Numbering Scheme > Assign Numbering Scheme of Tariff Code Number for Customs Processing. Assign the Import CTS to the Export CTS for the legal regulation CUSUS.
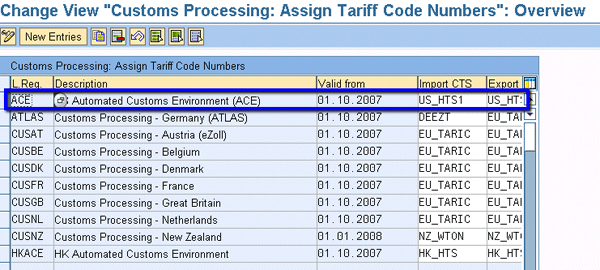
Figure 36
Assign a numbering scheme of tariff code number for customs processing
Step 10. Assign a foreign trade organization (FTO) and legal units (Figure 37). An FTO is the entity financially responsible for the shipment imported, and the legal unit represents the SAP ECC plant where the shipments are received. Follow IMG menu path SAP Global Trade Services > General Settings > Organization Structure. Define Foreign Trade Organization / Legal Unit.
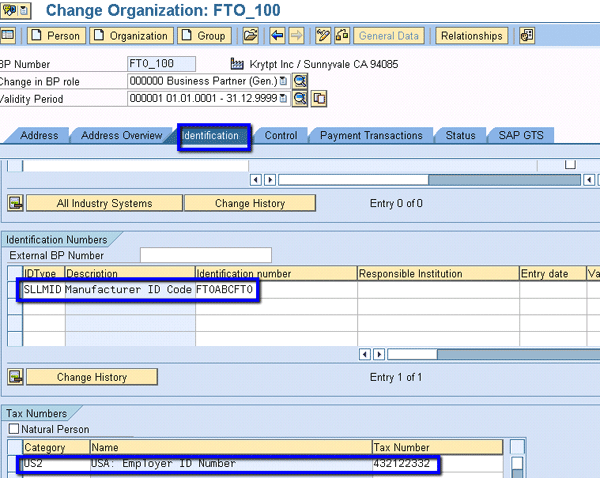
Figure 37
Define the FTO
Now let’s look at the configuration steps in Customs Management.
Configuration Settings for Customs Management
Step 11. Define document types. Document types in SAP BusinessObjects Global Trade Services define the processes that are carried out in the system for export or import declarations (Figure 38).

Figure 38
Define the customs document type for exporting or importing
Follow IMG menu path SAP Global Trade Services > SAP Customs Management > Document Structure > Define Document Type. Click the details (magnifying glass) icon to see the information shown in Figure 39. Ensure that there is a Number Range Number defined. Assign Document Type / Legal Regulation as the Access Control, and maintain the Partner Group from the pre-defined options in the drop-down menu.

Figure 39
Detailed configuration for import declaration document type
Step 12. Activate the document type. Document types are activated for different services: customs or transit. In this example, we just define customs. You need to activate the import declaration document types defined in the earlier step for import customs processing. Follow IMG menu path SAP Global Trade Services > General Settings > Document Structure > Activate Document Type (Figure 40).

Figure 40
Activate the document type for customs processing
Step 13. Map customs declaration with the legal regulation. Following the activation, the document types are mapped for determination (Figure 41). Follow IMG menu path SAP Global Trade Services > General Settings > Document Structure > Define Control Settings at Doc Type Level and Legal Reg. Level for CD/CS.
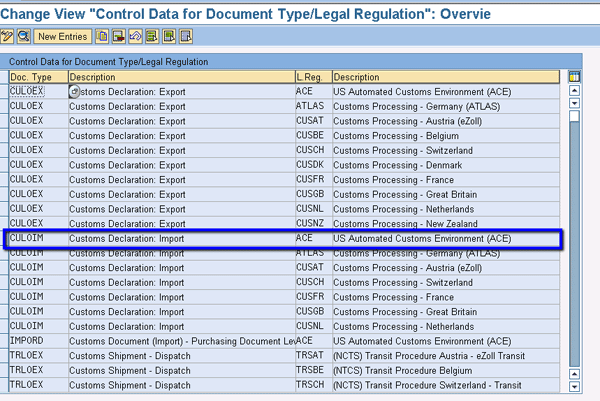
Figure 41
Control data for document type or legal regulations
Step 14. Perform control settings for the document type. Set up the control data based on the mapping with the document type and legal regulation. Follow IMG menu path SAP Global Trade Services > General Settings > Document Structure > Define Control Settings at Doc Type Level for Customs Doc and Legal Regulation (Figure 42). For the combination of document type and legal regulation, assign the Action Profile, Partner Group, Text Determ. Proced. (text determination procedure), and Calculation Profile.

Figure 42
Control data for document type or legal regulation
Step 15. Define item category (Figure 43). Follow IMG menu path SAP Global Trade Services > General Settings > Document Structure > Define Item Category. The settings are pre-delivered, but you need to ensure that the Transfer to SAP NetWeaver Business Intelligence Active check box is checked to make sure that the data is extracted to SAP NetWeaver BW for reporting purposes.
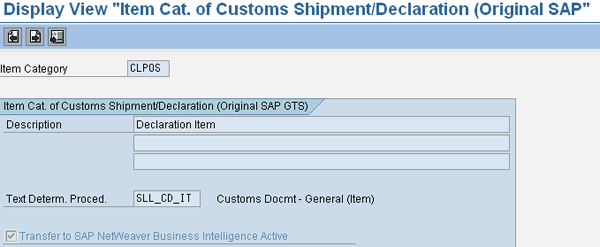
Figure 43
Define the item category
Step 16. Map the document type to the feeder system document type. The document type defined in step 14 is mapped to the feeder system. Follow IMG menu path SAP Global Trade Services > General Settings > Document Structure > Assignment of the Document Type from Feeder Systems.
Step 17. Similar to the document type, you need to map the item category defined in step 14 to the feeder logical system group. Follow IMG menu path SAP Global Trade Services > General Settings > Document Structure > Assignment of the Item Category Type from Feeder Systems (Figure 44).

Figure 44
Map the item category to the feeder system
Figure 45 allows you to map the application level (MM0B Receipt/Import: Inbound Delivery) to the Logical System Group from feeder system to the Item Category. Assign the feeder system or SAP ERP item category to the SAP BusinessObjects Global Trade Services item category that is defined (in this example, all the MM0B selections).

Figure 45
Details of the configuration mapping of the item category to the feeder system
Step 18. Define the incompletion procedure (Figure 46). You use the incompletion procedure to check the completeness of the data before preparing it for import declaration. Follow IMG menu path SAP Global Trade Services > General Settings > Document Structure > Control Incompleteness Checks in Customs Shipments and Customs Declarations. This shows the fields that are checked for completeness. If you want to add any fields, you can do so via the New Entries button.
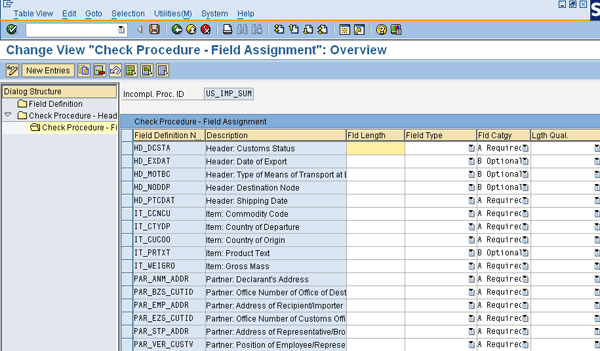
Figure 46
Field assignment to the incompletion procedure
Step 19. Define the action profile. Under the action profile, you also can set action definitions (Figure 47). Follow IMG menu path SAP Global Trade Services > General Settings > Communication Processes > Define Techn. Medium for Msgs (PPF Action) f. Customs Shipment and Cust. Decl. The action profile consists of action definitions; each action definition captures the details of the communication in terms of a print form or Intermediate Document (IDoc). It shows the Object Type associated with it and the Context Class.
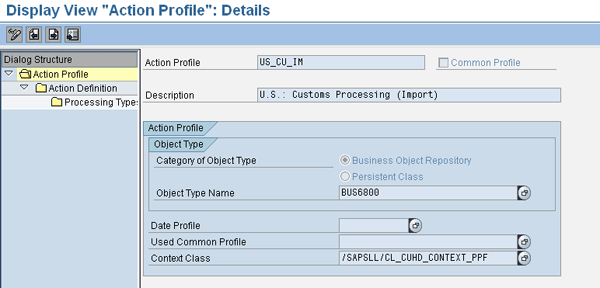
Figure 47
Define the action profile
Click the Action Definition folder to see a list of action definitions assigned to the action profile (Figure 48).

Figure 48
Action definition defined within the action profile
In this example, we have defined the action definitions CF 3461 for Immediate Entry and CF 7501 for Entry Summary. You can select one of the action definitions and click the Processing Type folder to see the details behind each action definition (Figure 49).

Figure 49
Processing type details behind the action definitions
Step 20. Define the process template. Here you can define the message type and output message (Figure 50). Follow IMG menu path SAP Global Trade Services > General Settings > Communication Processes > Define Control Settings for Communication Processes.

Figure 50
Process overview of a process template for customs declarations
The process CUSIM captures the details of activities and messages defined for importing. While in the above configuration, select the process CUSIM and click the Activities folder to bring up the screen in Figure 51.

Figure 51
Activities defined under process CUSIM
This shows the process activity within the process CUSIM (import). Select USETC and click Messages to bring up the screen in Figure 52.
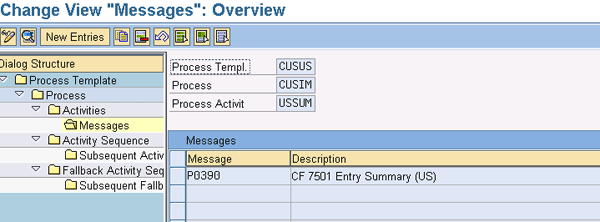
Figure 52
Message definition under process and process activity
Figure 52 shows the messages that are part of the process activity. These messages can be defined as part of the activity sequence. In other words, what are the messages that need to be printed or transmitted in sequence? While in CUSIM, click the Activity Sequence folder to bring up the screen shown in Figure 53.
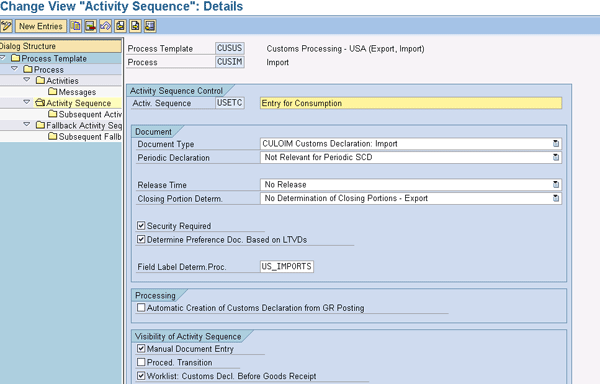
Figure 53
Activity sequence definition under process template and process
Step 21. Define the customs status for the import process (Figure 54). These statuses are used for reporting to the customs authorities. Follow IMG menu path SAP Global Trade Services > General Settings > Customs Code Lists > Assign Customs Status to a Process and Legal Regulation.

Figure 54
Assign the custom status to the import customs process
Step 22. Map the package type to the logical feeder system (Figure 55). Follow IMG menu path SAP Global Trade Services > Assignment of Packaging Materials Types from Feeder System. Assign the feeder system or your SAP ERP package material type to the SAP BusinessObjects Global Trade Services package type.

Figure 55
Assign packaging type material to the feeder system
Step 23. Define the duty type for the customs declaration (Figure 56). Follow IMG menu path SAP Global Trade Services > SAP Customs Management > “Customs Processing” Services > Define Type of Customs Duty. The ones shown are pre-delivered, but you can ensure that the ones that are needed are there and the ones that are not needed are not. For example, if you don’t need Preferential Customs Duty (B004), you can delete it from the duty structure.
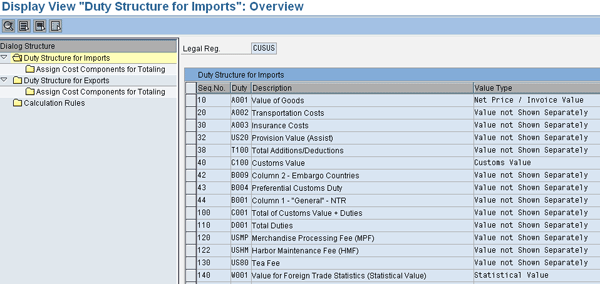
Figure 56
Define a duty structure for import
Step 24. Define the calculation profile for the import (Figure 57). Follow IMG menu path SAP Global Trade Services > SAP Customs Management > “Customs Processing” Services > Configure Control Setting for Customs Duty Calculations. Assign a calculation profile in the Calc. Prof column, such as the custom one that we assigned called IMP_02.

Figure 57
Define the customs duty framework
Click the Completeness Rules for Profile folder to see the standard calculation profile for importing (Figure 58). Review the check rules that are pre-delivered within SAP BusinessObjects Global Trade Services along with the type of duty associated profile. The rules are delivered by SAP, but if they don’t meet your requirements you can create custom rules for the calculation profile.

Figure 58
Calculation profile completeness check
Step 25. Assign the document type to the calculation profile (Figure 59). Click the Assignment of Profile to Document Type folder in Figure 58 to get to this screen. Assign the duty type to the legal regulation for duty determination in the customs declaration document.

Figure 59
Assignment of duty type to the customs regulation
Rajesh Malle
Rajesh Malle is a principal consultant at Krypt Inc. He focuses on providing consulting solutions in global trade and logistics areas. He holds a master's degree in engineering and project management and has executed several SAP projects involving SAP Materials Management and customer-facing modules with SAP ERP.
If you have comments about this article or publication, or would like to submit an article idea, please contact the editor.
Rajen Iyer
Rajen Iyer is the cofounder and CTO at Krypt, Inc. Rajen has written several in-depth, best practice articles, white papers, patents, and best-selling books on SAP Logistics and SAP Global Trade Services, including Effective SAP SD and Implementing SAP BusinessObjects Global Trade Services. He is also an invited speaker at industry conferences.
You may contact the author at Rajen@kryptinc.com.
If you have comments about this article or publication, or would like to submit an article idea, please contact the editor.


