Learn the configuration of a special benefit plan, wage types, and a rule in payroll that makes contributions to a supplemental savings plan possible even in the middle of a pay period.
Key Concept
The US Internal Revenue Service prohibits contributions to a qualified savings plan from earnings that exceed the section 415 compensation limit. Some companies allow employees who earn wages in excess of this limit to make a similar contribution to a non-qualified plan. The IRS defines several different types of qualified plans in publication 560. A non-qualified plan is one that does not satisfy the IRS rules for any of these qualified plans. Contributions to a non-qualified plan are normally pre-tax and the plans do have some tax advantages. You need to establish these plans through an Employee Retirement Income Security Act (ERISA) attorney.
When it comes to savings plans, most of us are familiar with qualified savings plans, particularly the 401(k). A rule of 401(k) plans is that no one person may contribute more than $16,500 plus $5,500 catch up on a pre-tax basis this year. Another rule is that each employee may only contribute to their qualified plan from the first $245,000 of earnings this year. These dollar amounts are periodically adjusted by the IRS. Many companies want to allow employees whose earnings exceed the limit to make contributions to a non-qualified plan. Non-qualified plans can be almost any type of salary deferral agreement the company wishes to have and are therefore not subject to the same restrictions. Most companies require their employees to wait until after they have reached the earnings limit on the qualified plan before they start participation in the non-qualified plan.
Standard SAP configuration supports the qualified limit. A benefit plan marked as “qualified” on the general benefit plan screen (V_5UBA_C) automatically stops calculating deductions once an employee has reached the limit he or she can contribute in one year. The limit is stored on table T511P as a value for constant 401KS. Here’s the problem. If your employee has reached the limit and wants to start a non-qualified plan in the middle of the year, there is no standard way to do this. Benefits administrators facing this problem often establish a manual review process that allows them to recognize the pay period in which an employee exceeds the limit. Enrollment in the supplemental plan is then manually started for the next pay period. Unfortunately, this solution requires constant attention from someone and it causes these employees to miss out on part of their contribution because employees rarely hit the limit exactly at the end of a pay period.
The solution proposed in this article enables supplemental plan contributions to automatically start in the middle of a pay period. They are deducted from each dollar of earnings that exceeds the limit. Note that this article assumes basic knowledge of benefits including the creation of contribution variants. All of the contributions here are pre-tax contributions. The salary is deferred until later and the taxes are due later. There are no limits on after-tax contributions because there is no tax advantage for after-tax contributions. After-tax deductions are no different than a union dues deduction.
Plan Configuration
The configuration steps are shown in Figure 1.
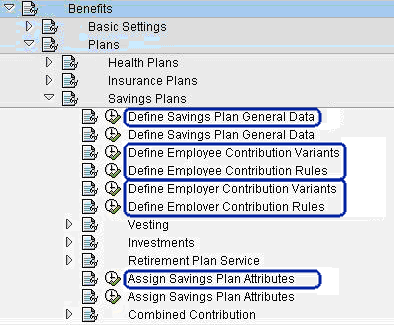
Figure 1
IMG for savings plan configuration
The first step is to configure a savings plan for the supplemental contributions. This savings plan is very similar to any other 401(k) type savings plan except that you do not list this plan as a “qualified” plan. Start in the IMG (transaction SPRO) at Personnel Management > Benefits > Plans > Savings Plans > General. Enter the plan begin date, end date, plan name, plan type, and status. Figure 2 shows this configuration step.
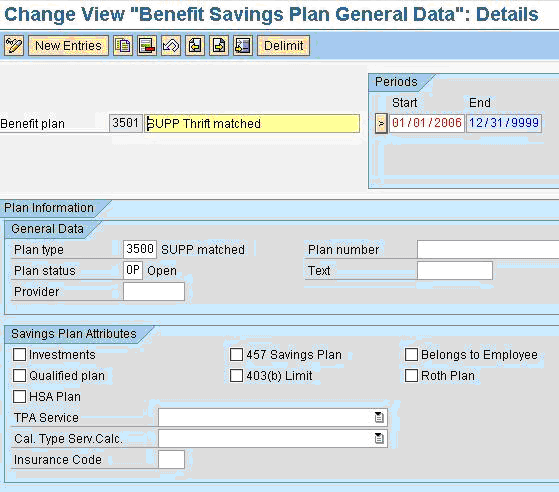
Figure 12
General plan data
Next, create an employee contribution variant and rule. These two steps work together to establish the rules for the employee’s election. Figure 3 shows the creation of an employee contribution variant. The sample employee contribution rule shown in Figure 4 allows from 0% to 6% of the salary to be deducted on a pre-tax basis, although the regulations themselves do not set a limit.
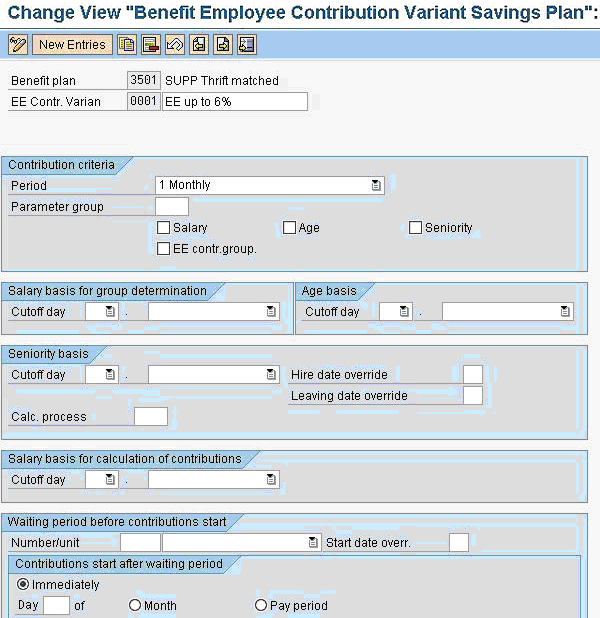
Figure 3
Employee contribution variant
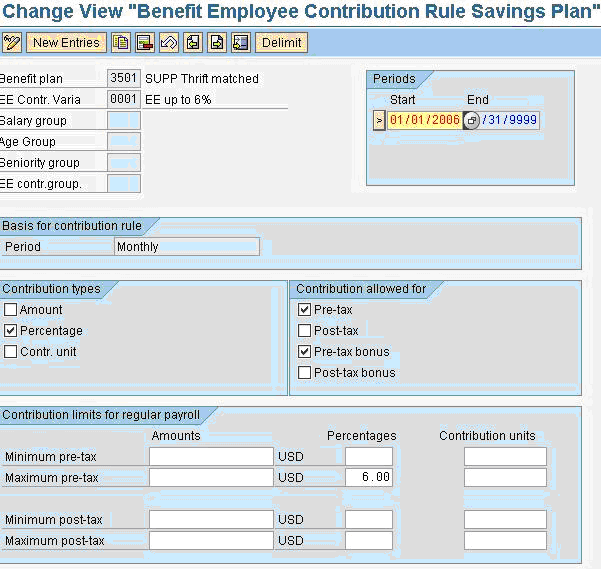
Figure 4
Employee contribution rule
The next step is to set up an employer contribution variant and rule. These steps allow you to specify the company match amount. It is important to note that employer contribution variants and rules are required even if the company contribution amount is zero. Figure 5 shows the creation of an employer contribution variant. My example rule shown in Figure 6 illustrates a rule in which the company matches 50% of the first 6% of salary that the employee contributes to the plan. The maximum match amount is effectively 3% of the employee’s salary.
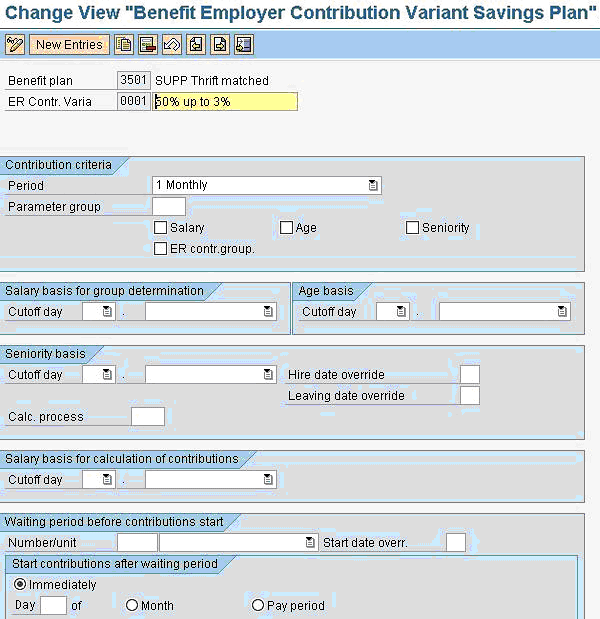
Figure 5
Employer contribution variant
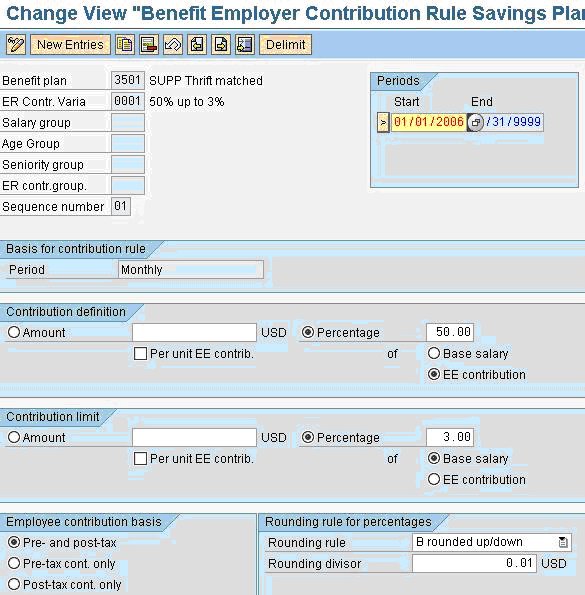
Figure 6
Employer contribution rule
Now finish off the savings plan configuration on the savings plan attributes screen. This screen ties the employee contribution rule to the company contribution rule in a certain time period. Figure 7 shows this screen.
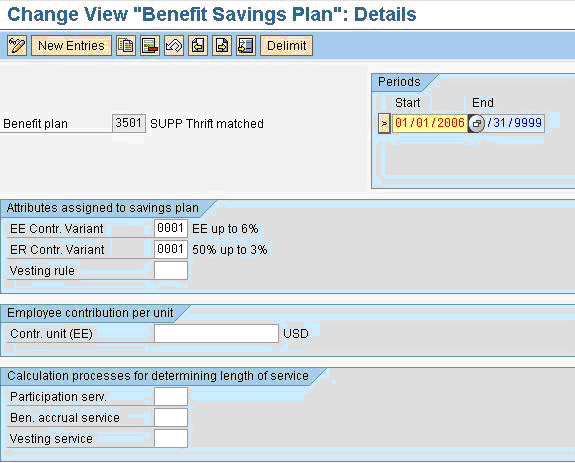
Figure 7
Savings plan attributes
Wage Type Configuration
So far the setup for the supplemental savings plan is just like any other savings plan with the exception of the Qualified plan check box on the general settings screen. The key to making this plan behave differently is in the wage type used for the technical salary basis. Most savings plans use the technical wage type /102, 401(k) wages. Wage type /102 is a standard SAP wage type and it is populated with the sum of the amounts of all individual earnings wage types that are considered savings plan eligible wages. The value in /102 is normally used as the salary basis in the employee and employer contribution rules during payroll processing. The goal with the supplemental savings plan is to have a basis of $0 as long as the year-to-date (YTD) /102 amount is less than or equal to the qualified plan limit. Once the YTD amount in wage type /102 exceeds the qualified plan limit, you want only the portion that exceeds the limit to be used as the basis for your new plan.
To accomplish this you need a new wage type. In transaction OH11 or PU03 you can copy wage type /102 to a new value in the customer name range. The allowed name range for customer cumulation wage types is /190 to /199. I choose wage type /194 as the custom wage type in my example. There is no difference between OH11 and PU03. Both transactions run the same program.
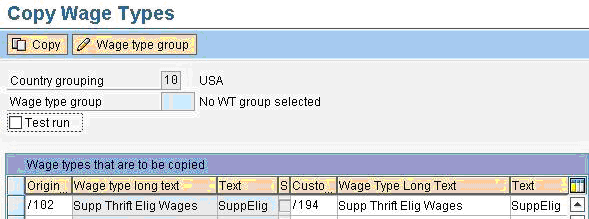
Figure 8
Copy wage type
Normally, as with wage type /102, you would go through your entire wage type catalog and mark all the individual earnings wage types that should add into this new basis wage type. In this case, I created a value in /194 by using a payroll rule as I didn’t want any payment wage types to be added directly into the salary basis for the supplemental plan. You can use transaction PC00_M99_DLGA20 to verify that none of your customer-defined wage types have this special cumulation class selected.
The final step of wage type configuration is to connect the new wage type to your benefit plan. Do this at the IMG step Payroll > USA > Benefits Integration > Enter wage types for plans. Enter your new wage type as the technical basis wage type for both regular and bonus payroll. Figure 9 shows this screen.

Figure 9
Assign wage types to plans
Create Custom Payroll Rules
Now you need to add a couple of rules to the payroll schema to calculate the value for your new wage type. These rules compare the current period and year-to-date (YTD) amounts of wage type /102 against the qualified plan salary limit stored on table T511P. The value of wage type /194 is calculated as the portion of the current /102 amount that causes the YTD total to exceed the qualified plan limit.
First you need to capture the YTD amount of wage type /102. This amount is taken from the previous CRT table. It represents the total amount of savings plan eligible wages as of the end of the most recent pay period. Use transaction PE02 to create rule ZSYT valid for wage type /102. The simple, single line rule is shown in Figure 10. This rule stores the YTD amount of /102 into variable &SUPY.

Figure 10
Rule ZSYT
Tip!
You may want to insert several print statements in your schema to help you during testing. The statement PRINT NP IT displays the wage types of the current IT table. Statement PRINT NP VAR displays the values of all variables that you have created. Inserting these statements before and after your new rules allows you to see exactly how the amounts are calculated.
Again using PE02, create rule ZSUP. This rule is also valid for wage type /102. In this rule you compare the prior period YTD amount with the current period amount and the section 415 limit on table T511P. A little bit of math allows you to determine exactly how much if any of the current period /102 wages puts the employee over the limit. The result is stored in wage type /194. Rule ZSUP is shown in Figure 11.
The first part of this rule stores the value of /102 in variable &SUPC. This allows the other calculations to be done without losing the current /102 amount. The amount field is then overwritten with the prior period YTD amount from variable &SUPY and is compared to the 401KS constant from table T511P. If the YTD amount prior to this period was already in excess of the limit it means that the entire /102 amount from this period should be sent to wage type /194. The last line of the rule does this.
If the prior period YTD amount is not greater than the 415 limit then the current period amount is added to the YTD amount on line 2. The total amount is compared to the 401KS constant. If this amount is greater than the constant it means that the employee will go over the limit for the first time in this current pay period. Line 4 of the rule subtracts the 401KS amount from the current plus YTD total amount. The difference is output in wage type /194 and the values of wage type /102 are restored. Line 3 of the rule simply restores wage type /102 because employees that hit this line have not yet reached the limit even after considering current period earnings.
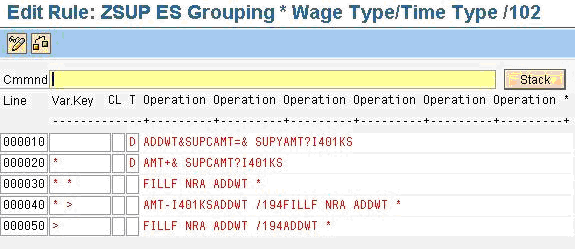
Figure 11
PE02: Rule ZSUP – Calculate value of wage type /194
Insert Custom Rules into the Payroll Schema
The two custom rules must be inserted into the payroll schema just ahead of the step that evaluates savings plan contributions. In the standard US payroll schema this is in the UBE2 sub-schema. In your installation this might be a custom version such as ZBE2. Search through your schema for function P0169 to find the correct place. If your site uses more than one schema be sure that you update each one. Figure 12 shows my ZBE2 schema with the rules in place.

Figure 12
PE01: Schema ZBE2 – Calculate benefits, second part
Run a Payroll Test
Now that you have the wage types and rules configured you can test this new plan. Create an employee and enroll that employee in the plan. You may choose to also enroll him in a standard savings plan. Give him enough pay to get close to but not to exceed the limit. Run payroll in update mode. Confirm that the wage type /194 is not in this pay result and that the supplemental plan deduction is $0. Give the employee enough earnings in the next period for him to go over the limit. Wage type /194 should be only the portion of qualified wages that are in excess of the 401KS limit and the supplemental savings plan amount should be based on this wage.
Clay Molinari
Clay Molinari has 20 years of experience in the IT industry and has been working as an SAP HR consultant since 1997. He is currently president of C&C Savant, Inc., an SAP consulting firm that specializes in combining standard SAP configuration and custom ABAP programming to help its clients solve unique or complicated requirements.
You may contact the author at claymolinari@comcast.ne.
If you have comments about this article or publication, or would like to submit an article idea, please contact the editor.