Tutorial: Build an SAPUI5 Application for SAP CRM or SAP ECC
by Lukas M. Dietzsch, CEO, Blackvard Management Consulting, LLC
This integrated example by Lukas Dietzsch of how to build an SAP Fiori application provides a step-by-step approach for how to transfer SAP materials management data onto a mobile device. This real-world business case, which is similar to any user’s Open Data Protocol (OData) service request, illustrates the entire process: covering the app creation, required services, publishing, and the app deployment.
Key Concept
The development process for building an SAP Fiori (SAPUI5) application consists of two parts. You create, implement, and publish the Open Data Protocol (OData) service in the back end. In the front end, you build the SAPUI5 application and deploy it in the SAP Gateway system. The application then retrieves real data from the SAP back end and displays it on the screen.
Explore related questions
This following example of how to build an SAP Fiori application (using an SAPUI5/HTML5 user interface) is based on a real-world user request: “The warehouse order picker must be able to verify the stock/availability of all warehouse materials in real time. This should be possible immediately, while the picker is in the process of collecting the articles for various deliveries. A mobile solution is required in order to obtain the information for each picker, without the use of a paper-based loading/inventory list.”
The above request is the starting point for this article, which provides all the information required to create a working application.
Obtaining access to time-critical materials management (MM) information, such as real-time inventory information, goods received, and goods issued, helps you to manage business processes. I show how to develop an SAP Fiori application that retrieves MM master data from the SAP Gateway back-end system. You then can display the data as a material list on the screen within the SAP Fiori application. The user can search for a specific material based on the material description. This mobile approach shows new opportunities for using your MM data.
In my example of this process, I focus on an easy-to-understand example containing MM information such as material data with a description.
SAP Gateway provides the ability to create an Open Data Protocol (OData) service that exposes information from one, or many, systems to the outside world. The underlying system can either be an SAP system (such as SAP ERP/SAP Customer Relationship Management [CRM], SAP ERP Central Component [ECC]), or a non-SAP system.
The SAP Fiori application is based on standard protocols: OData and SAPUI5. OData is an open-standard protocol for exchanging (querying and updating) data over the web, using standard protocols (HTTP, XML, or Simple Object Access Protocol [SOAP]). It provides a web-based application programming interface (API) that fully complies with the design principles of Representational State Transfer (REST). The application information can be retrieved via JavaScript Object Notation (JSON) or XML.
In the SAP Gateway system, complete the following steps:
- Create and generate the OData Model
- Implement the OData service
- Publish and test the service. Afterwards, the SAP Fiori application that uses this new SAP Gateway Service is created.
Figure 1 is a process overview of the SAP Fiori sample application.
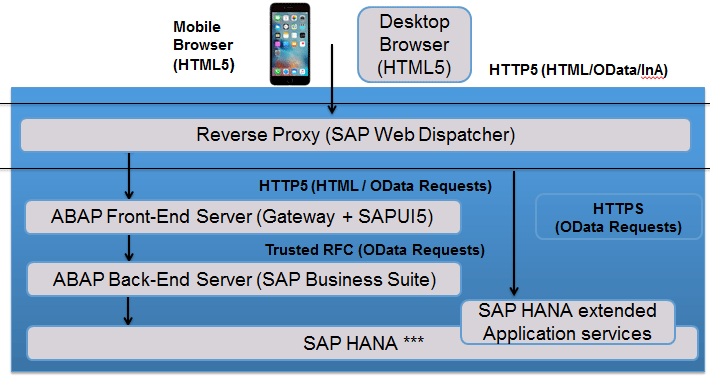
Note that in Figure 1, InA stands for the Info Access—InA—toolkit for HTML5. The InA toolkit is a set of HTML5 templates and user interface (UI) controls that can be used to configure a modern, highly interactive UI that runs in a browser. The technical prerequisites for this process are Eclipse Luna, SAP Gateway, the SAP ERP MM module, and SAP Fiori.
To develop the SAP Gateway Service, log on to the SAP back-end system. Start transaction code SEGW (the SAP Gateway Service Builder) and then click the create project icon ![]() to begin creating a new project. Once you click the create project icon, the Create Project pop-up in Figure 2 appears.
to begin creating a new project. Once you click the create project icon, the Create Project pop-up in Figure 2 appears.
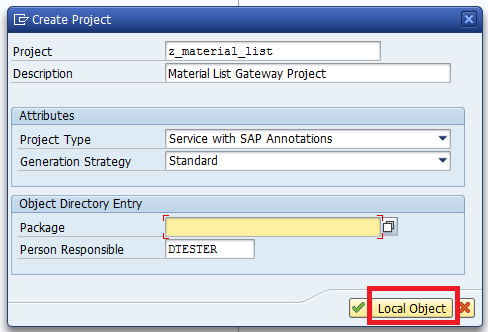
Assign your project a Project name and Description. In the example, the name is z_material_list. Neither the Project Type nor the Generation Strategy has to be changed here. Stick to the standard approach in this example.
You can select the Local Object button or assign your project to a transport package. In my example, I create a local object. Local objects are not transported into other systems. If your SAP landscape consists of multiple SAP systems and instances, you have to select a transport package to move your developments to the connected systems—but here I keep it simple, using it just locally.
In Figure 2 the user can enter the project details such as the Project name, Description, Attributes details, and Object Directory Entry details. Click the Local Object button to store it as a local object. In some systems, you could select a dedicated package to store it in a different location – but for this sample, simply store it locally.
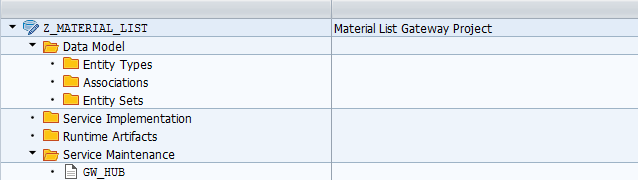
Once you click the Local Object button, the screen in Figure 3 opens. It displays the project structure that is created, called Z_MATERIAL_LIST.
Now create a new entity type. Entity types are physical or abstract objects that represent a specific type of data—for example, an item or a concept that can be distinguished from other informational objects. Entities are divided into entity types according to their properties. Each entity type must be assigned attributes, describing them. The properties of entities are described by values for the attributes.
Right-click the Entity Types folder and then select the Create option to go to Figure 4. Keeping it simple, my sample Gateway Model contains one single new entity type for the material.
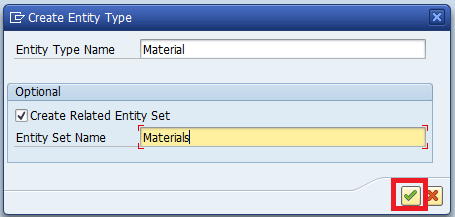
Assign an Entity Type Name (Material) and Entity Set Name (Materials) in the Create Entity Type pop-up window. Entity sets group together instances of an entity type with instances of any type, derived from a particular entity type. Entity types describe a data structure and entity sets contain the instances of that structure. In my example, the Entity Set Name Materials represents all the material data retrieved from the database. In more complex use cases, there can be multiple entities.
Ensure the Create Related Entity Set option is selected. Click the green checkmark icon ![]() to proceed to the Z_MATERIAL_LIST Properties folder in Figure 5.
to proceed to the Z_MATERIAL_LIST Properties folder in Figure 5.
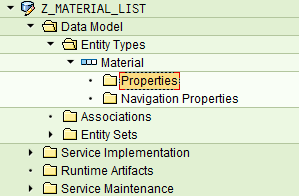
Expand the structure under the newly created Material entity. Then double-click the Properties folder of the Material entity. This opens the screen on the right, shown in Figure 6.

The appropriate properties/fields must be added to the Material entity. Begin adding the properties/fields data (featured in Table 1) to the Entity Type by clicking the create icon ![]() seen in the ribbon in Figure 6. After all the entries are completed according to Table 1, Figure 6 should look like Figure 7 (Figure 6 with values).
seen in the ribbon in Figure 6. After all the entries are completed according to Table 1, Figure 6 should look like Figure 7 (Figure 6 with values).
| Expose (SAPUI5) name | ABAP field name | Field type maximum length |
| MaterialNumber | MATNR | 18 |
| MaterialDescription | MAKTX | 40 |
| MaterialType | MTBEZ | 25 |
| MaterialGroup | WGBEZ | 20 |
| MaterialUnit | MSEHT | 10 |
Table 1
You must provide the mapping information from the SAPUI5 property with the internal SAP data types and fields (Table 1). MaterialNumber is the key for this entity. Ensure that these entries all have the type Edm.String, which is a required prefix, according to the Odata.org definition.
The Expose (SAPUI5) Name is the field name for the outside world (e.g., the SAPUI5 application). The ABAP field name is used when implementing the OData service. All fields are of the type string, so it’s important to give the fields a maximum length. The maximum length can be found in the underlying tables. The details of the underlying tables and their column specifications can be found using transaction code SE11 or SE16N.
In my example, I am using the table MARA (MaterialNumber/Type Code/Group Code/Unit Code) and the tables MAKT (MaterialDescription), T134T (Material Type Description), T023T (Material Group Description), and T006A (Unit Description).
After adding each of the properties lines from Table 1, the fields shown in Figure 7 are displayed. In this case, all values derived from the OData service were of the data string type originally. Therefore, provide the name according to Table 1, and insert Edm.String in the Edm Core Type field. Then provide the length of the data type (according to Table 1) and, finally, map the SAP data field for each line added.

Sample:
Step 1: In the Name column, MaterialNumber is the key field; this has to be marked with a checkmark in the Key column, as seen in Figure 7.
Step 2: In column Edm Core Type, enter the type Edm.String, and provide its length of 18 signs.
Step 3: Map the new OData field with its column in the SAP table. In the case of MaterialNumber, the matching SAP table column is MATNR— this has to be mapped in the same line found in the ABAP Field Name column.
Repeat these three steps for each field/column the service provides (MaterialNumber, MaterialDescription, MaterialType, MaterialGroup, and MaterialUnit).
Again, ensure that all the fields are of type Edm.String. It is important to fill the Max… column with the maximum allowed characters for each field. Figure 7 displays the properties’ fields, now containing the specified properties for MaterialNumber, MaterialDescription, MaterialType, MaterialGroup, and MaterialUnit.
Click the save icon ![]() (not shown). The SAP Gateway Model is complete. If you edit the entity (such as adding new fields, or renaming or updating the type) ensure that you regenerate the model again.
(not shown). The SAP Gateway Model is complete. If you edit the entity (such as adding new fields, or renaming or updating the type) ensure that you regenerate the model again.
In the screen that opens after you click the save icon (not shown), click the generate run-time objects icon ![]() . The pop-up window shown in Figure 8 appears. It depicts the Model and Service Definition pop-up window, containing the Model Provider Class, Data Provider Class, and Service Registration details.
. The pop-up window shown in Figure 8 appears. It depicts the Model and Service Definition pop-up window, containing the Model Provider Class, Data Provider Class, and Service Registration details.
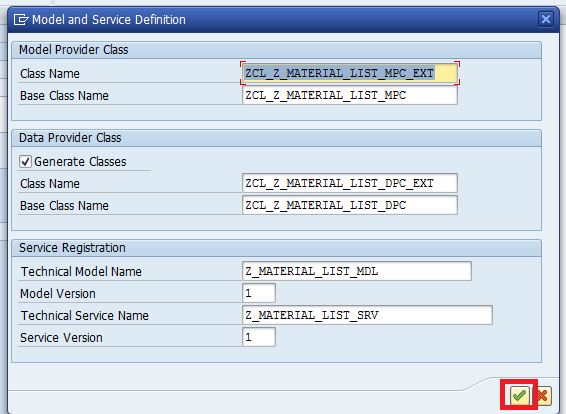
Leave the suggested names as they are, although you can edit them if required. Classes ZCL_Z_MATERIAL_LIST_MPC and ZCL_Z_MATERIAL_LIST_MPC_EXT are model provider classes. Classes ZCL_Z_MATERIAL_LIST_DPC and ZCL_Z_MATERIAL_LIST_DPC_EXT are data provider classes. Most work for the implementation is done by redefining the methods in class ZCL_Z_MATERIAL_LIST_DPC_EXT (the methods can be found in the generated data provider class ZCL_Z_MATERIAL_LIST_MPC_EXT).
Click the green checkmark icon and the Create Object Directory Entry pop-up appears (Figure 9). It contains the Object attributes, where the object can be saved as a local object or assigned to a package. Save the object by clicking the Local Object button.
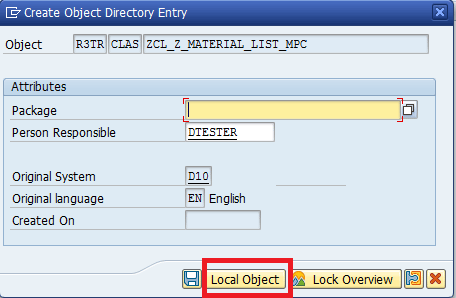
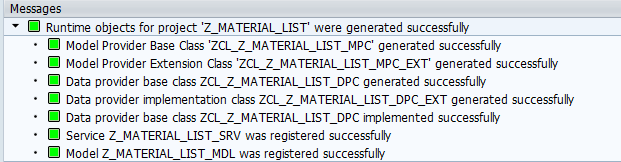
Figure 10 displays the generated system messages that appear.
For each defined Entity Type of the OData model, a number of standard entity methods are generated. For example, Figure 11 displays the standard entity methods for the Material Entity.

Now implement the necessary methods for the application. Go to Service Implementation > Materials > GetEntitySet (Query) and right-click GetEntitySet (Query). From the context-menu options that open select Go to ABAP Workbench, and the Information pop-up window shown in Figure 12 opens.
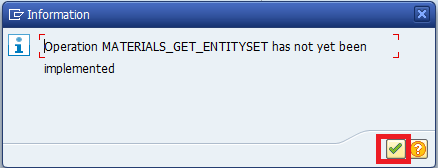
This pop-up window notifies the user that the MATERIALS_GET_ENTITYSET operation has not yet been implemented. For each entity type of the OData model, a number of methods are generated. The GetEntitySet method is the automatically generated query method for obtaining a material set. Click the green checkmark icon in Figure 12 and the Inherited Methods folder in Figure 13 appears.
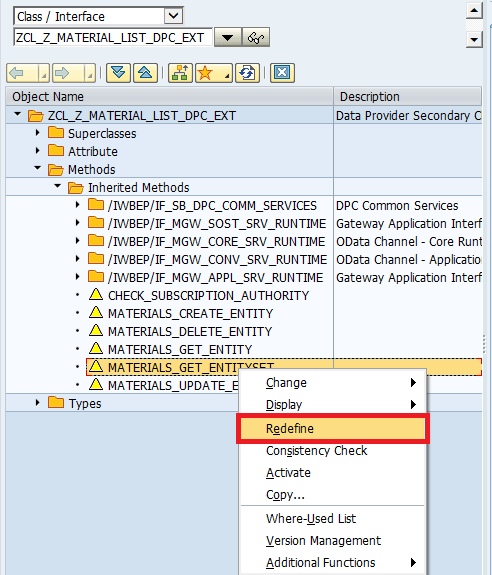
Now select and redefine the MATERIALS_GET_ENTITYSET inherited method. To do this, right-click the method name (MATERIALS_GET_ENTITYSET) and select the Redefine option. The method MATERIALS_GET_ENTITYSET is the query method for retrieving a set of materials (this is required to generate the list of materials). After the redefinition, the methods are saved automatically.
Registering the Gateway Service
The next step is to register the Gateway service. Go back to transaction SEGW. In the screen that opens (Figure 14), select the Service Maintenance folder and then click the Register button.
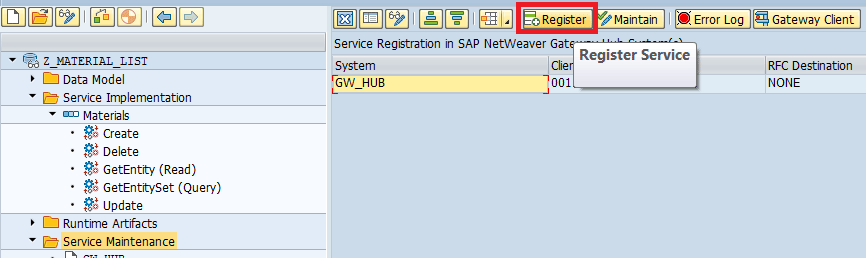
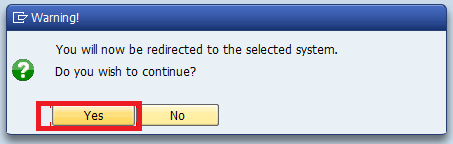
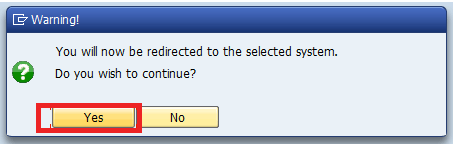
Figure 15 displays an SAP system warning pop-up. This Warning! notifies users that they are about to be redirected to the selected system. Click the Yes button in the pop-up to proceed to the Select System Alias (Hub to Backend) screen in Figure 16.

Choose the LOCAL system alias option as shown in Figure 16 and then click the green checkmark icon to proceed to the Add Service screen in Figure 17. The system alias can be local or another alias depending on the SAP Gateway installation.
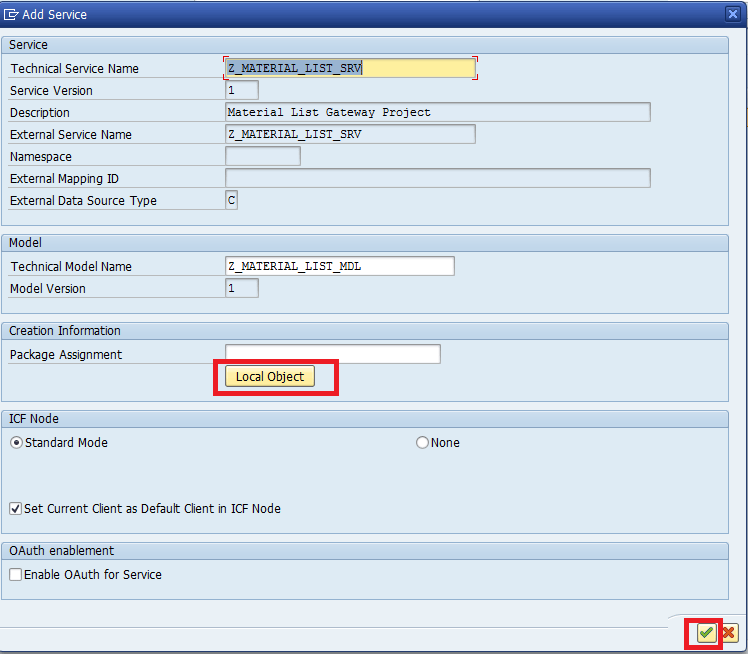
The user can select the Local Object option, Service details, Model details, Creation Information details, ICF Node details, and OAuth enablement details in the Add Service pop-up. Enter the service details pertinent to your project and then click the Local Object button. Click the green checkmark icon to proceed and finish the registration process.
Testing the Gateway Service
After successfully registering the service, a green traffic light appears in the Registration Status field (Figure 18). Now test the service using the Gateway Client. Therefore mark the service and click the Gateway Client button in the toolbar. A warning pop-up window appears (Figure 19).

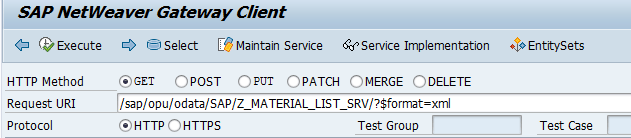
Click the Yes button in the Warning! pop-up window and the SAP NetWeaver Gateway Client screen appears (Figure 20) displaying the current Request URI details. Click the Execute button.
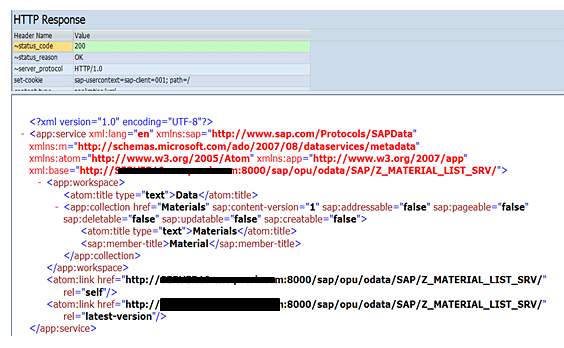
The HTTP Response screen is presented with a sample of the generated HTTP response (Figure 21). The response is in Atom/XML format.
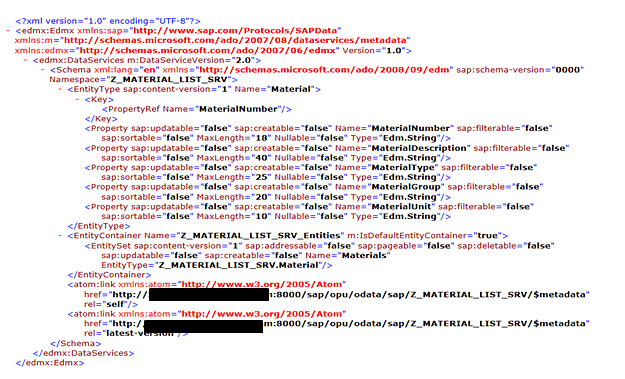
Modify the Request URI to create the structure of the OData service (e.g., change the code suffix from ?$format=xml to $metadata). OData metadata is only available in XML format, not JSON. Figure 22 shows the full Request URI, containing the required $metadata suffix.

Click the Execute button and the response is presented on the right side of the screen. Figure 23 shows an example of the newly generated HTTP response.
To retrieve the materials, change the suffix of the Request URI to Materials. Click the Execute button. Figure 24 depicts the new Materials suffix in the Request URI field.

Figure 25 shows part of the HTTP response that is presented on the right side of the screen. Each entity represents a material.

The last HTTP response displayed in Figure 25 is in XML format. Change the format of the response to JSON format, which is an open-standard format and is lightweight and easier to read. To do that, click the add header icon ![]() in the SAP NetWeaver Gateway Client screen (Figure 26).
in the SAP NetWeaver Gateway Client screen (Figure 26).
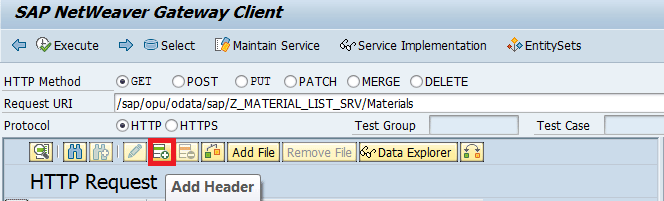
The Manage HTTP Request Header pop-up appears (Figure 27). Now allow JSON requests to be accepted in an HTTP request by filling in the following values:
Header Name: accept
Header Value: application/json

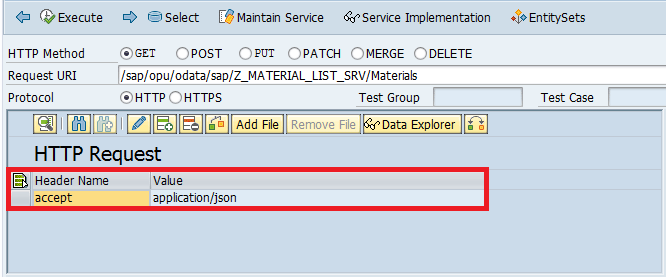
Click the green checkmark icon and the new HTTP Request is added. Figure 28 shows an example of the new HTTP Request Header Name and Value.
Click the Execute button. Figure 29 is a sample section of the response that is presented on the screen. This is the response of retrieving materials in JSON format.
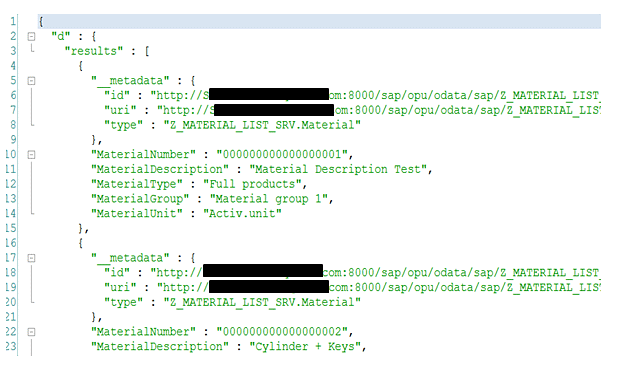
The OData Service is working properly.
Building the SAPUI5 Application
To build the SAPUI5 application, open the SAP HANA Development Eclipse system. Follow menu path File > New > Other… and the Eclipse wizard appears (Figure 30).
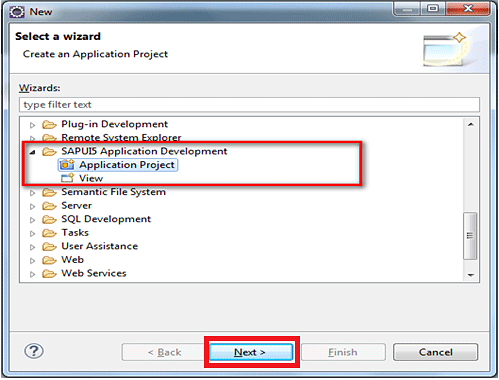
Scroll down the wizard’s screen to locate the Application Project under the SAPUI5 Application Development folder. Select the Application Project folder and click the Next button. The New Application Project screen appears (Figure 31).
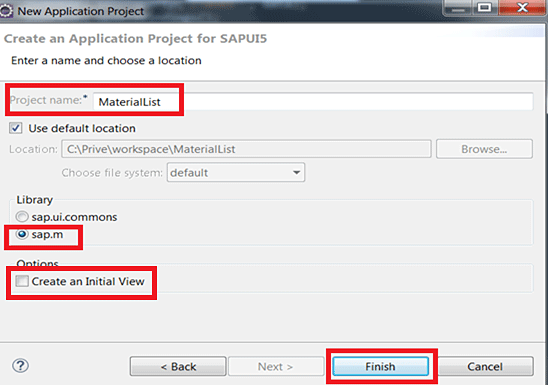
Figure 31 displays the Create an Application Project for SAPUI5 Library options. Give the project a name; in this case, MaterialList. The UI Library radio-button option sap.m, currently the leading library for SAPUI5 mobile application development, is selected by default. The Library sap.ui.commons option can be used for standard controls. In my mobile example here, I leave the sap.m option selected.
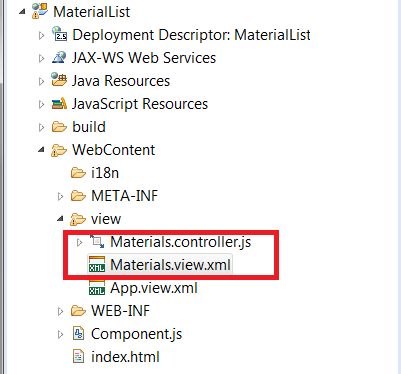
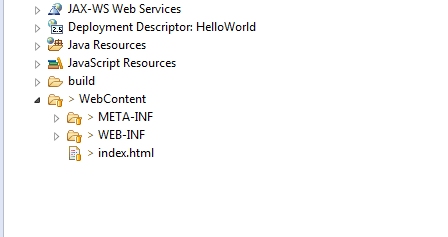
Uncheck the Create an Initial View check box and click the Finish button. The sap.m library becomes the main library of SAPUI5 (responsive library). The MaterialList project structure shown in Figure 32 is generated in the project structure of Eclipse.
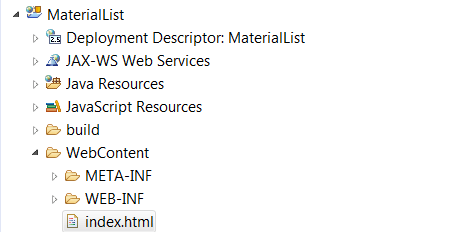
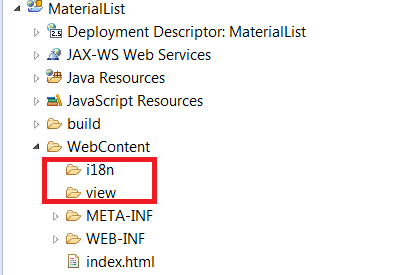
In this article, I am structuring all the required development in the folder WebContent. Depending on your project or team structure, multiple folders or a folder hierarchy could be useful. Figure 32 displays the simple MaterialList project structure, found under the WebContent folder.
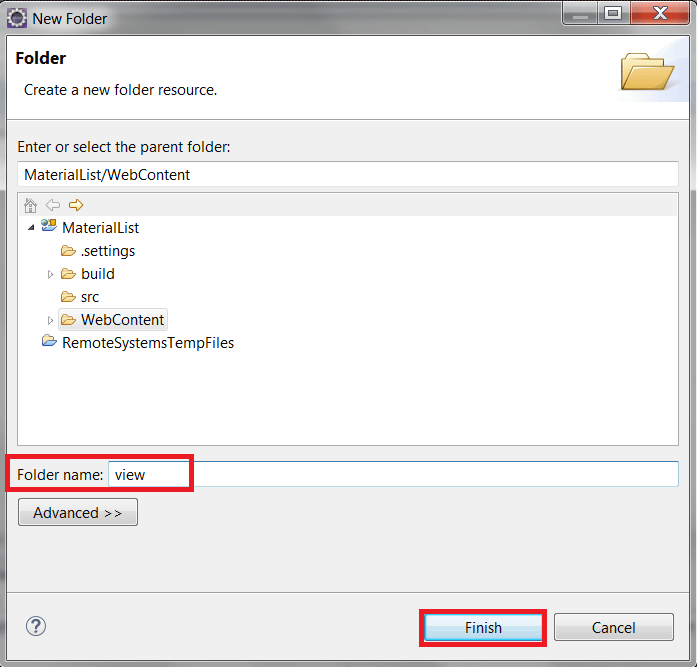
To provide the project with an efficient structure, create two new folders under the WebContent folder:
- The view folder, to contain all views and controllers.
- The i18n folder, to contain translatable texts to be used on the views.
First, create the first view folder. Right-click the WebContent folder and follow menu path New > Folder. This opens the New Folder pop-up window (Figure 33). Give the new folder the Folder name view. The view folder later contains all views and controllers. The application to be built is based on the Model View Controller (MVC) paradigm. Click the Finish button and the new view folder appears under the WebContent folder.
Under the MaterialList project structure, repeat the same process for the new folder i18n. The i18n (short for internationalization) folder contains (translatable) texts files.
After you create the two new folders, the project structure is displayed. Figure 34 shows the new WebContent MaterialList menu path, containing the new i18n and view folders.
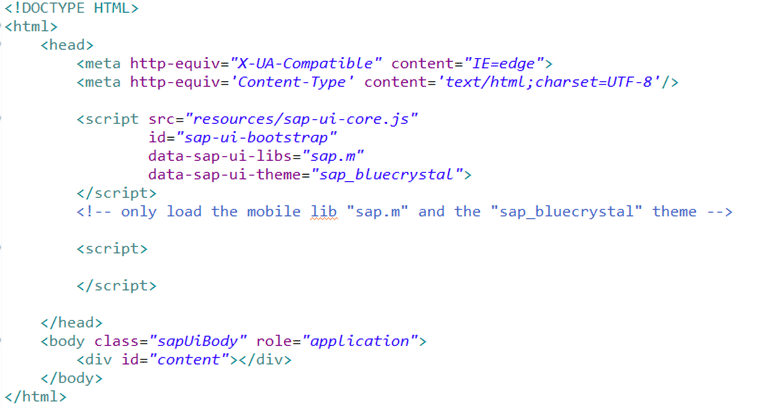
Now begin changing the project’s index.html, as required. The metatag “X-UA-Compatible” is required for the web browser to use the last rendering mode. Figure 35 shows a sample of the index.html content.
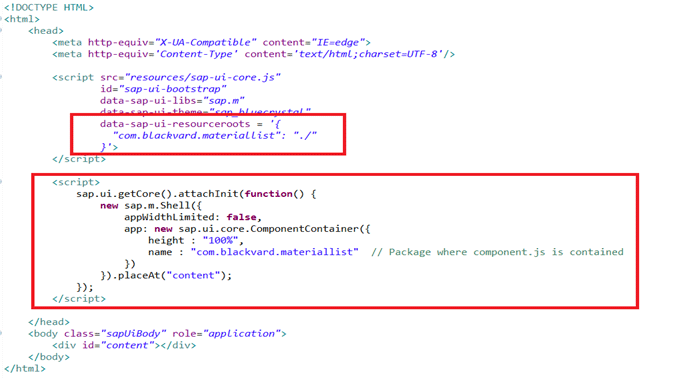
<script src="resources/sap-ui-core.js"
id="sap-ui-bootstrap"
data-sap-ui-libs="sap.m"
data-sap-ui-theme="sap_bluecrystal"
data-sap-ui-resourceroots = '{   "com.blackvard.materiallist":"./"}'>  </script>
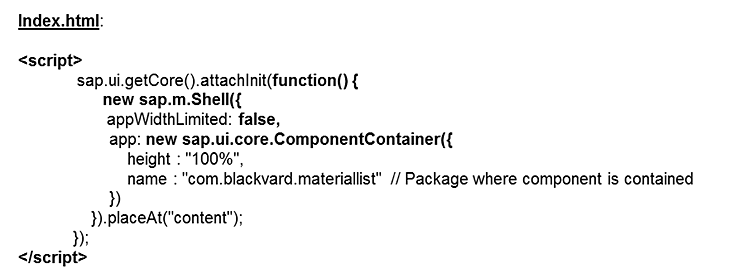
The <script> coding in Figure 36, also depicted in Figure 35, is required for bootstrapping the SAPUI5 framework.
Now change the content of the index.html to the required namespace. The sample namespace is shown in Figure 37.
data-sap-ui-resourceroots = '{ "com.blackvard.materiallist": "./"}‘
The artifacts with the namespace “com.blackvard.materiallist” are in the same folder as the index.html. SAPUI5 uses the component concept. Figure 38 displays a sample of the newly changed index.html.< /p>
When all the resources and libraries are loaded and SAPUI5 is ready, the library throws the global initialization event to signal that the library is ready to use. As mentioned before, I am using the sap.m library. It provides controls and elements for the mobile-device front end, meaning that the requested material data of my sample fits to the screen sizes of multiple mobile devices.
The resources and libraries used are:
- resources/sap-ui-core.js: This is the core JavaScript of SAPUI5.
- sap.m: The mobile library.
- Theme sap_bluecrystal is applied.
In the example shown in Figure 38, a reference to the SAPUI5 core was received by calling sap.ui.getCore() and an anonymous callback function was registered by calling attachInit(…) in the core.
A component container was also initialized, which is a wrapper for the application. The shell was used for the correct margins and paddings. Figure 39 shows a sample of the index.html.
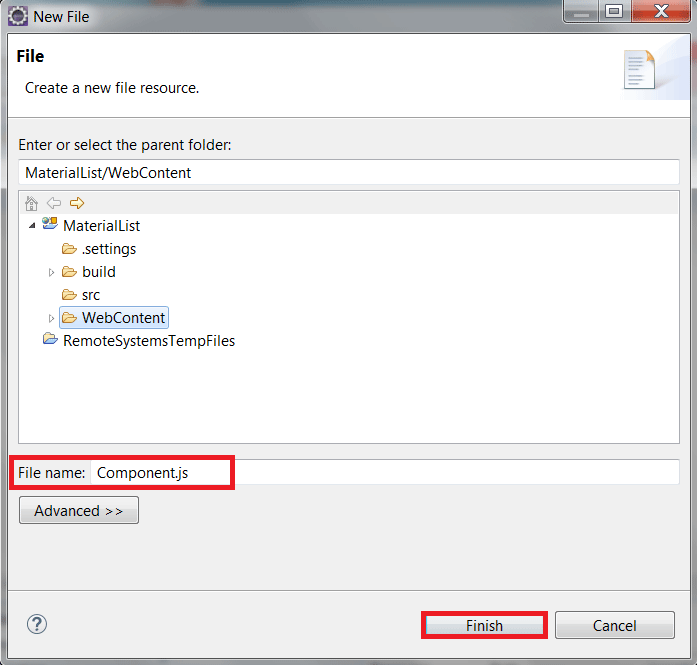
Now create the Component.js file in the same folder <WebContent> as the index.html. The file Component.js is the component controller, and contains run-time metadata and methods. Component.js initializes the models and the router.
Right-click the <WebContent> folder and choose New > File to go to Figure 40, which is the New File pop-up window. Give the file the File name Component.js and click the Finish button.
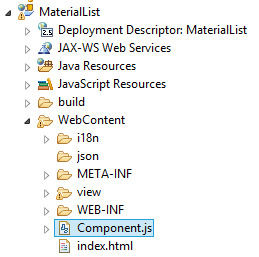
Component.js is added under the WebContent folder, as shown in Figure 41.
In the first part of the Component.js file, the component inherits from the base class sap.ui.core.UIComponent. The text rootView refers to the view that is automatically loaded. I show how to create this view later in this article.
Figure 42 shows a sample of the sap.ui.core.UIComponent base class coding.

The routing part of the Component.js file is shown in Figure 43.
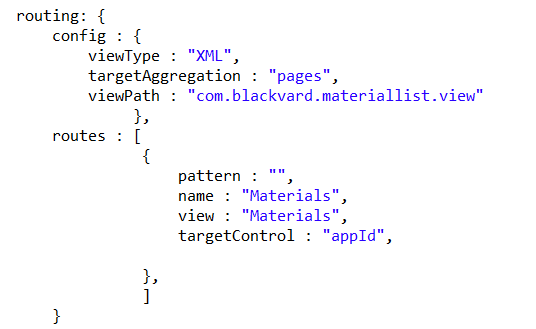
In the routing part of the Component.js file (Figure 43), viewType : “XML” means that all views are a default of the type XML. viewPath : “com.blackvard.materiallist.view” means that all views are created inside the view folder. The first view that is displayed is the Materials view. I show how to build this view later in this article.
Figure 44 displays a sample of the init method of Component.js.

The init method of the super class sap.ui.core.UIComponent is called when the component is initialized. Inside the init method two models are set:
- The resource bundle model will be called i18n. This model looks in the folder i18n for i18nproperties files.
- The main model, which refers to the Gateway OData service, has already been developed.
The router will be initialized. Now create the i18n file. During this step, store all used texts regarding the application in a central place. The text can be easily maintained and translated into other languages, if required.
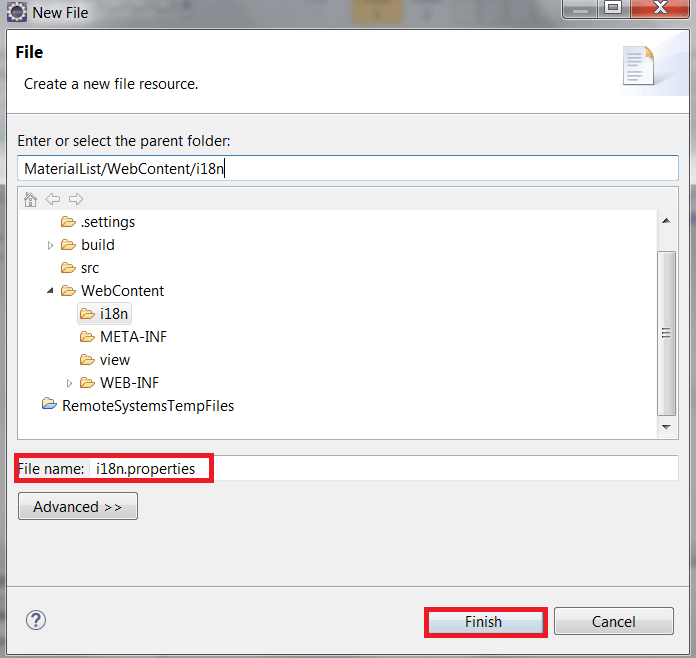
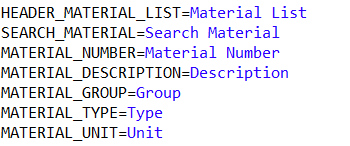
The process of i18n is achieved by using the concept of Resource Model and data binding, inside SAPUI5. In the project structure, create a new file under the i18n folder. Right-click the i18n folder and follow menu path New > File. This opens the New File pop-up window (Figure 45) where you can give the file a name. Give the file the name i18n.properties and click the Finish button.
The i18n.properties file contains text IDs and text values, following the syntax <Text id >=< Text Value>. The text IDs are used later on in the Materials view. Fill the content of the i18n.properties file with the text seen in Figure 46, which displays an image of the required i18n.properties text.
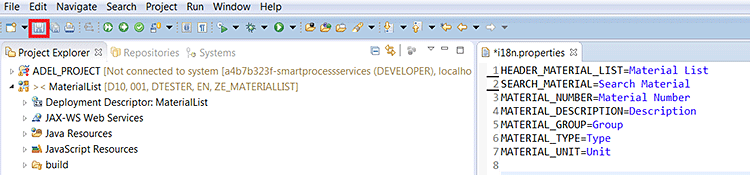
Save the file by clicking the save icon on top of the Eclipse tool bar. Now it should look like the image shown in Figure 47. On the left, you see your project details and folders, and on the right you see the content of the i18.properties file.
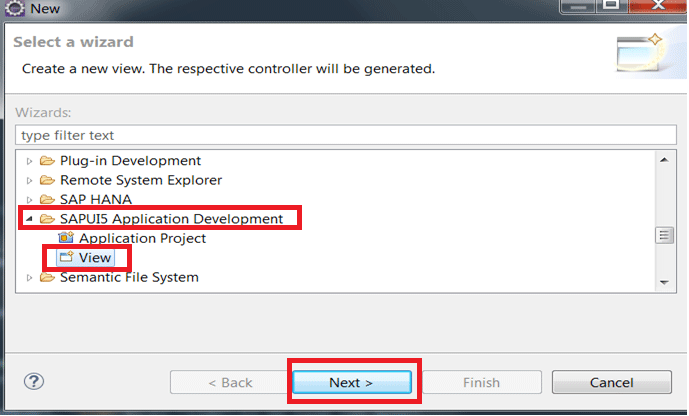
Now create the views and the controllers. As already mentioned, all views and controllers should be built under the view folder. Begin building the first view. From the project structure, right-click the view folder and follow menu path New > Other… . The wizard appears again, as seen in Figure 48. Locate the SAPUI5 Application Development folder and open it. Select View and click the Next button.
This opens the New View pop-up window shown in Figure 49 with the Project, Folder, Name, and paradigm type. Give the view the name App (this must be the same name defined in Component.js with the metadata name rootView). Choose XML as the Development Paradigm type and click the Finish button.

This creates two App files under the view folder (Figure 50):
- App.view.xml: The view itself.
- App.controller.js: The controller.

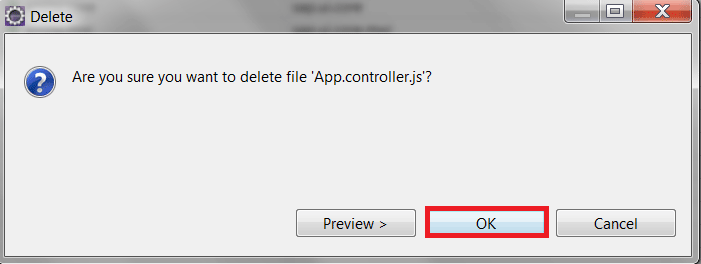
The App.controller.js file is not required. Delete this file by right-clicking the file name and selecting the Delete option from the context menu. This opens a pop-up window (Figure 51) where you confirm the deletion by clicking the OK button.
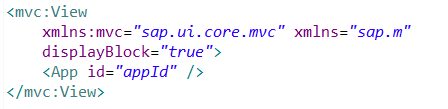
Back in the screen in Figure 50, double-click the App.view.xml file. In the screen that opens (not shown) change the content of the file to the coding shown in Figure 52.
displayBlock=”true” is required to avoid scrolling
Figure 53
Save the file by clicking the save icon on the Project Explorer screen toolbar (not shown).
Now create the next view under the view folder. Right-click the view folder and follow menu path New > Other…, which again takes you to the wizard screen (Figure 48). Under SAPUI5 Application Development, select View. Click the Next button. Give the view the Name: Materials. Choose XML view as the paradigm (Figure 49). Click the Finish button.
This creates two Materials files under the view folder (Figure 54).
- Materials.view.xml: The view itself.
- Materials.controller.js: The controller.
Now change the content of the Materials view. Double-click Materials.view.xml and the code editor displays the coding (Figure 55). It is a sampling of the initial content of the Materials.view.xml coding.
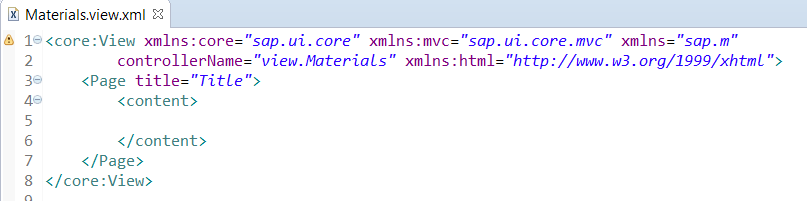
Now, correct the namespaces and the relation with the controller. Only the sap.ui.core and sap.m libraries are required, so delete the other namespaces. Change the controller name to “com.blackvard.materiallist.view.Materials”. Remember from the index.html, all artifacts under the WebContent folder must begin with the namespace “com.blackvard.materialist”.
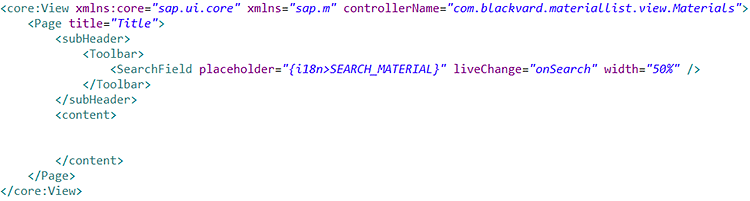
The new content of the Materials view is shown in Figure 56.

Further, upon analyzing the preview of materials, notice that two UI controls are required: one control represents the Search field for search criteria and the other control is dedicated to a table with five columns containing the resulting data (MaterialNumber, MaterialDescription, MaterialType, MaterialGroup, and MaterialUnit).
For the Search field, use the sap.m.SearchField control. For the table, use the sap.m.Table control. For texts, use the resource bundle. Refer to a text ID using “{i18n>TEXT_ID}”. For example, “{i18n>MATERIAL_NUMBER}” refers to the text Material Number.
Finally, search for a specific material based on the material description. For this purpose, assign a method that reacts on an event every time the user types something in the Search field. Call the method onSearch. The method has to be implemented in the controller (MVC pattern).
Add the Search Control with placeholder text, and name the method. The method onSearch will be triggered on liveChange events. Figure 57 shows a sample of the Search field and table coding.
Manually change the page title and add the table with five columns within the XML code,? as follows (see Figure 58). Note: To change the content of any file, double-click the file name, change the content, and click the save icon.
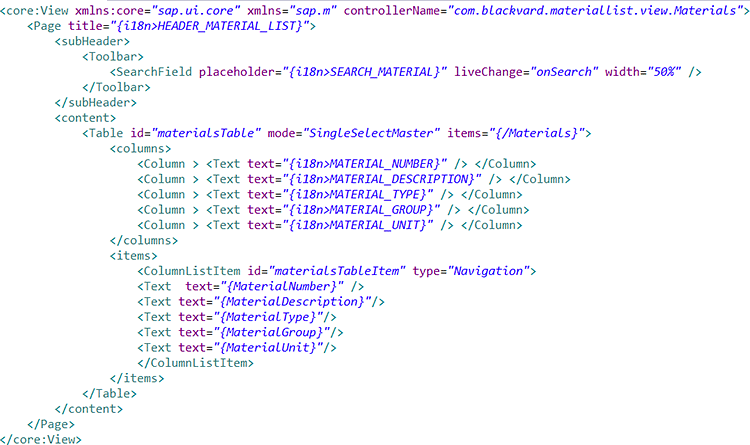
Editing the page title: <Page title=”{i18n>HEADER_MATERIAL_LIST}”> should be the page title. For this example, set the title of the page to the text element HEADER_MATERIAL_LIST, which was already defined in the i18n.properties file (under the i18n folder).
Editing the table: Give the materials table an ID. The ID in this case is “materialsTable”. You use that ID later on in the Materials controller. This allows the user to select a maximum of one item. Set the mode of the table to “SingleSelectMaster”.
Editing the column headers: The column headers correspond to the <columns> tag. Inside the <columns> tag, define the columns. Refer to text elements defined in the i18n.properties file (under the i18n folder).
Editing rows with data: The rows correspond with the <items> tag. The values of the rows come from the mail model (Own Gateway model). For each column, define the correct property. For example, the first column is the MaterialNumber property value.
The item property of the table is set to /Materials. This value triggers the SAPUI5 framework to send a request to the SAP Gateway system to retrieve the materials and bind them to the table.
Figure 58 shows the final code of the Materials view.
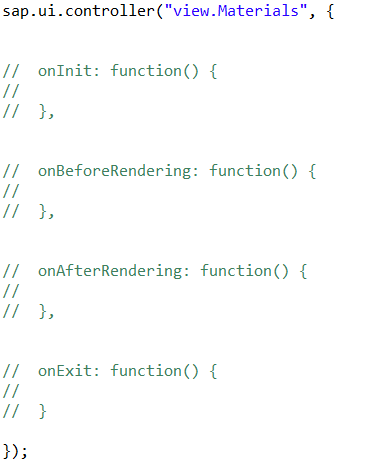
The Materials view is finished. Move on to the Materials controller. The Materials controller corresponds to the Materials.controller.js file. Figure 59 shows a sample of the initial code of the controller.
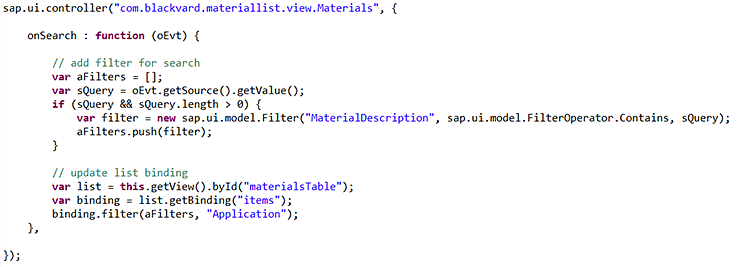
Change the name of the controller to “com.blackvard.materiallist.view.Materials”. Figure 60 shows the coding change to “com.blackvard.materiallist.view.Materials”.

Now implement the method onSearch. The onSearch method is triggered every time the user fills a value. The entered value is stored in variable : var sQuery = oEvt.getSource().getValue();. Only if that value is empty is an object of type sap.ui.model.Filter created in the field MaterialDescription, and added to the array aFilters.
Finally, update the table binding with the newly created filter (aFilters). This triggers an HTTP Request to the SAP system in order to retrieve the materials with that filter. Figure 61 shows a sample of the final coding of Materials.controller.js.
To save the controller, click the save icon on the Project Explorer SAP toolbar.
Deploying the Application
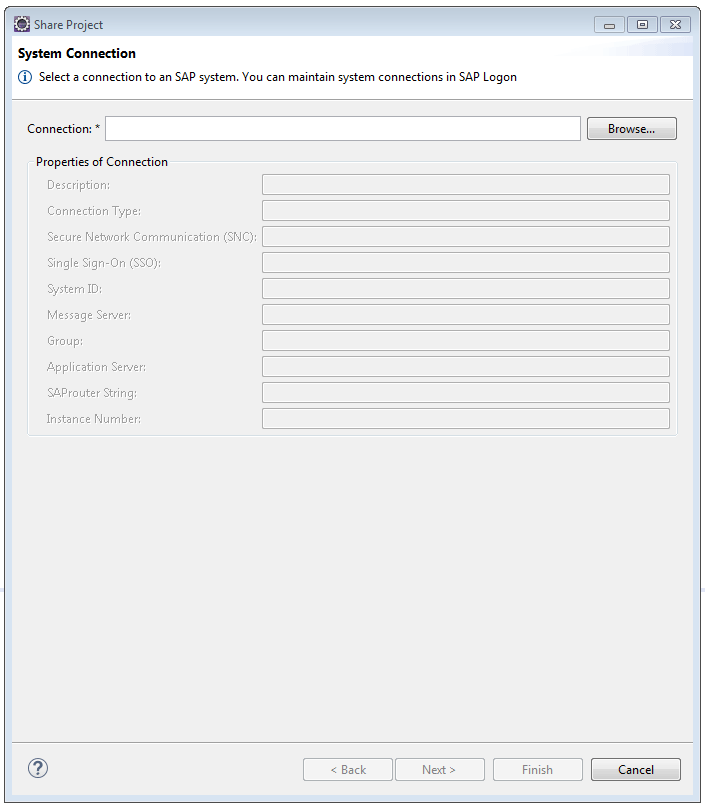
To deploy the application, right-click the project name MaterialList and choose Team > Share Project. Share Project sets a connection between the Eclipse project and the SAP Gateway Business Server Pages Application. Follow menu path MaterialList > Team > Share Project… to go to Figure 62.

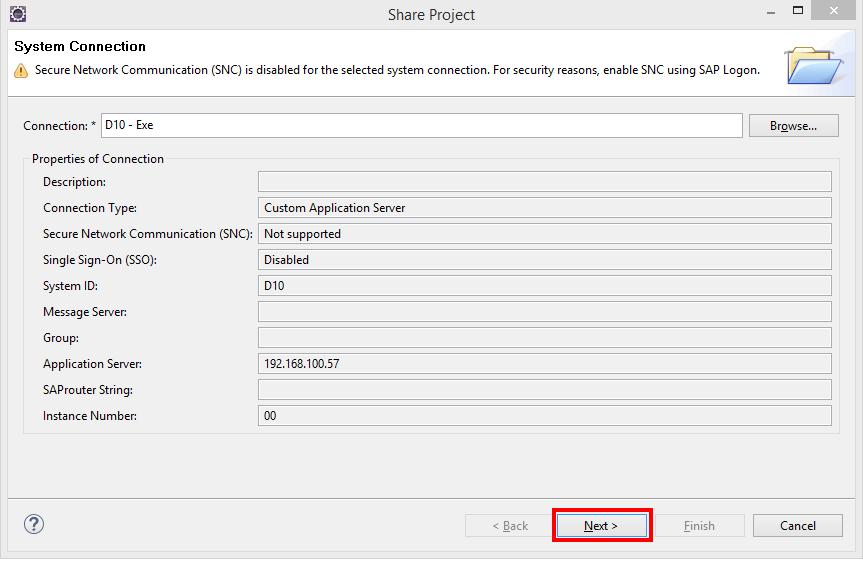
Select SAPUI5 ABAP Repository and click the Next button. SAPUI5 ABAP Repository is the plug-in you should download and install, along with the SAPUI5 installation tools. You can download the plug-in from https://tools.hana.ondemand.com/. The SAPUI5 ABAP Repository helps deploy applications from Eclipse to SAP. In the System Connection window that opens (Figure 63), click the Browse… option, which locates the SAP system from the logon pad.
After selecting the correct SAP system, the system displays the screen in Figure 64. After verifying that the information is correct, click the Next button.
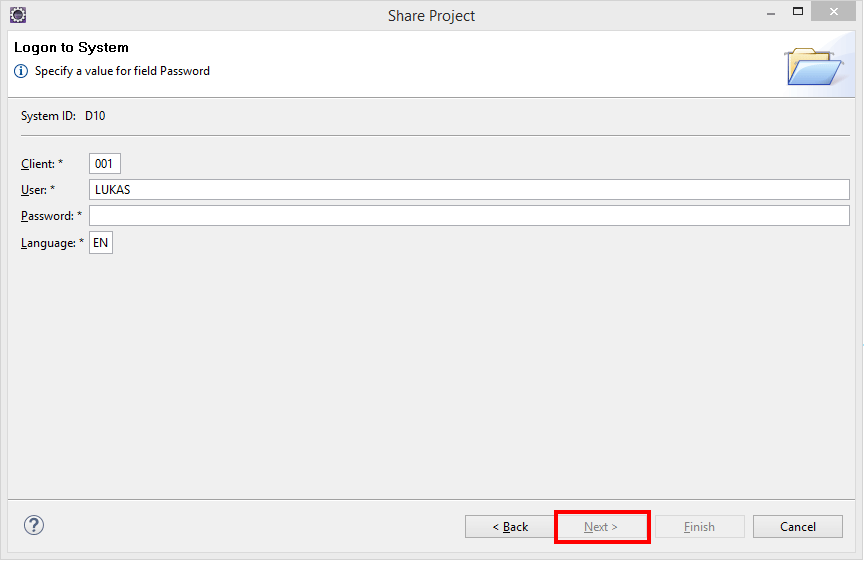
This opens the Logon to System window (Figure 65) where you enter your log-in details (Client, User, and Password) and click the Next button.
In the screen that opens (Figure 66), you can create a new BSP application or add it to an existing BSP application. Adding the application to an existing one allows you to share your front-end development and connect to another landscape. In my example, you could connect your simple MM application only to your demo system, or you could attach/connect/share it with another landscape where you are authorized to do so.
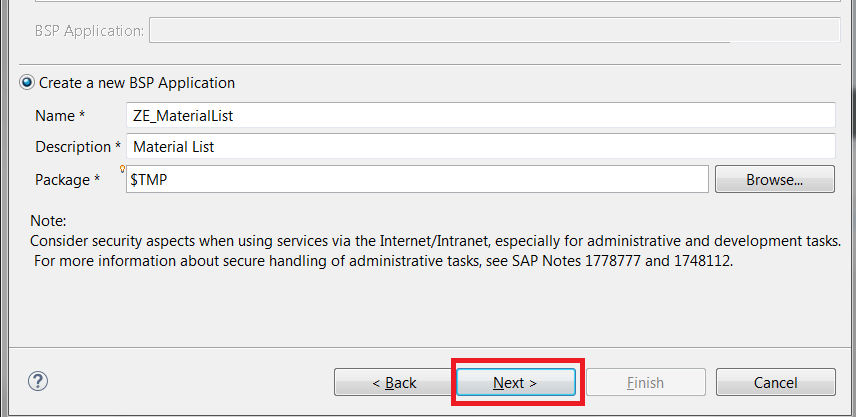
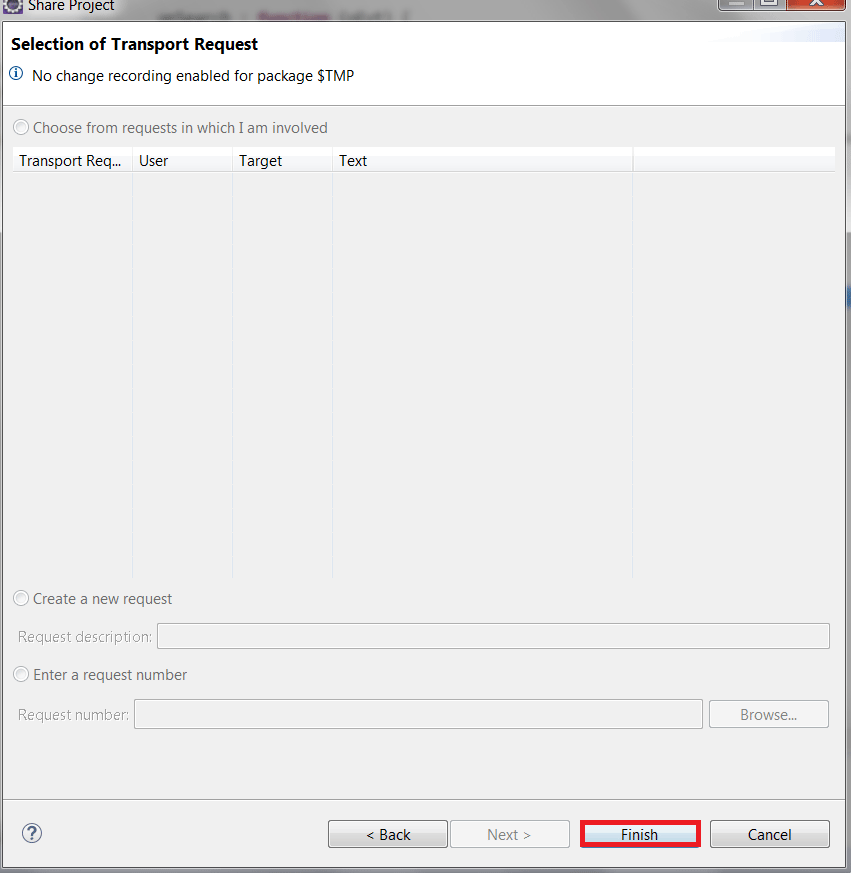
Enter the BSP application details (Name, Description, and Package) and click the Next button. In the screen that opens (Figure 67), select a transport request (if required), and click the Finish button.
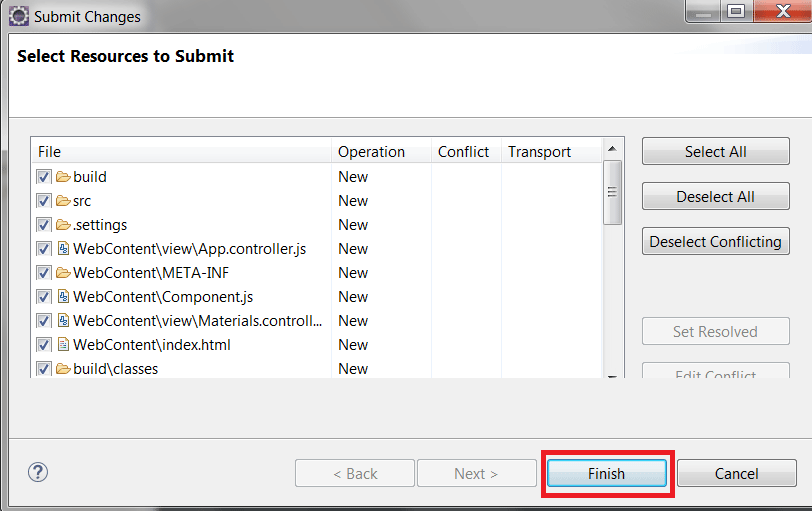
Sharing a project is similar to setting a connection between Eclipse and the SAP system. After sharing the project, the changes have to be submitted to the SAP system. The arrow (>) before the WebContent folder (Figure 68) indicates that changes are available in Eclipse and are waiting to be submitted to the SAP system.
After successful connection to the SAP system, the changes must be moved into the SAP system. Right-click the index.html context component (Project Name) under the WebContent folder. In the screen that opens (not shown), follow menu path MaterialList > Team > Submit.
After you click the Submit button, Eclipse displays the list of changes (Figure 69). Check for conflicting changes in the system and resolve any issues. If the changes are correct, click the Finish button to move the changes into the SAP system.
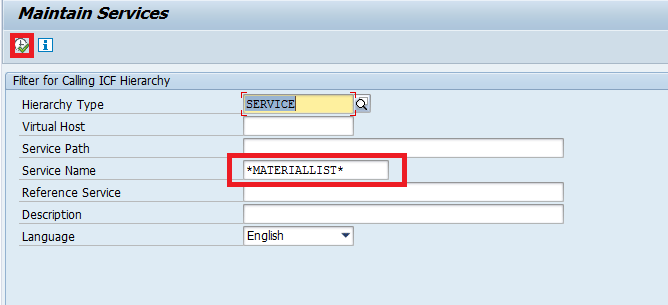
Testing the SAPUI5 Application
To test the application, start transaction code SICF (HTTP Service Hierarchy Maintenance). In the screen that opens (Figure 70), fill in *MATERIALLIST* as the Service Name and click the execute icon.
The system returns a list of services that are already available (e.g., pre-defined standard services), as shown in Figure 71.
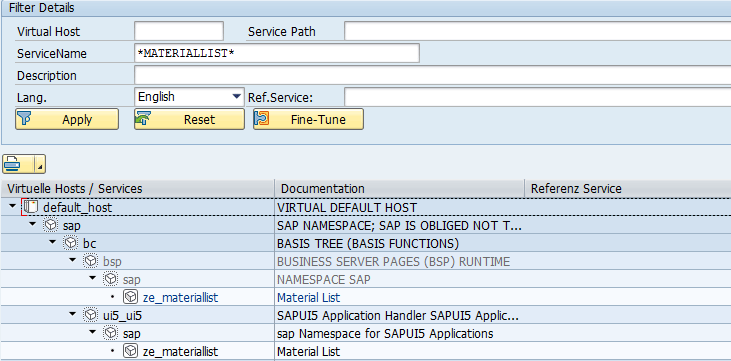
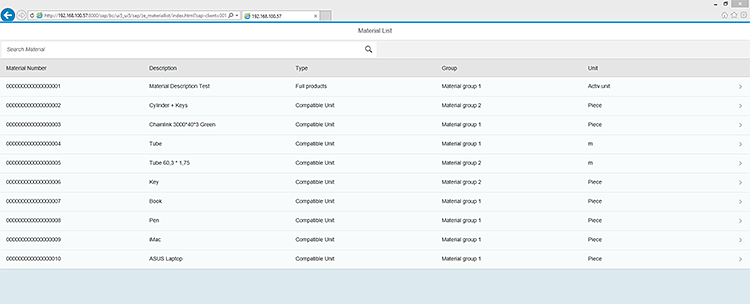
To test the application directly from the SAP system, right-click the ze_materiallist application and select the Test Service option from the context menu, which takes you to Figure 72. It shows a sample of the final application output.
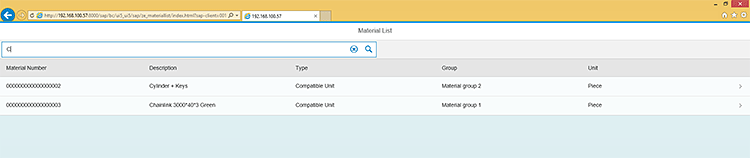
Now, the user can search for specific products. When the user types something in the Search Material field, only the products with that string are displayed. Figure 73 shows the product string search results.

Lukas M. Dietzsch
Lukas M. Dietzsch is CEO at Blackvard Management Consulting, LLC. He holds an international master’s degree in information technology and is an experienced IT solution architect and project lead. He started software development with Java in 2001 and focused on SAP software development and architecture in 2007. He is SAP certified in various technologies and was involved in numerous global SAP rollouts with various SAP modules such as Logistics, ERP, SRM, MM, and FS-CM. Lukas has a proven expertise in adapting to requirements and processes in different industries and on various software platforms. Due to his knowledge and experience, Lukas frequently works as an SAP coach and trainer. You can follow him on Twitter #dietzslu.
You may contact the author at Lukas@blackvard.com.
If you have comments about this article or publication, or would like to submit an article idea, please contact the editor.
More Resources
See All Related Content-

-

-

 Premium
What’s So Cool About Fiori?
-