Starting with Compliance Calibrator 5.1, and continuing with versions 5.2 and 5.3, you can connect Compliance Calibrator to non-SAP systems to perform Segregation of Duties analysis. See how to set up Compliance Calibrator to do this in six steps.
Key Concept
Compliance Calibrator is one of SAP’s solutions for GRC. It provides real-time controls compliance and features capabilities such as Segregation of Duties analysis at the object level, while providing both management and analytical reports. It also contains internal control monitoring capabilities, including simulation and automated testing and reporting.
Even as an SAP employee, I recognize that companies often end up with a system environment that includes, in addition to SAP systems, numerous purchased software packages and home-grown applications. This invariably makes the analysis of Segregation of Duties (SoD) very difficult. Not only do you have to deal with conflicts within a single system, you might have conflicts across multiple systems as well.
Up to version 4.0, Compliance Calibrator was only available for SAP systems. With the introduction of version 5.1 on SAP NetWeaver, this limitation no longer exists. In fact, Compliance Calibrator 5.2 and 5.3 now come with adapters not just for SAP but for Oracle, PeopleSoft, and JD Edwards. SAP Note 1076755 includes specifics on what versions this solution supports and how the adapters work. This allows companies that have large heterogeneous environments to directly connect Compliance Calibrator to these different purchased software platforms. Compliance Calibrator also contains a base-level rule package for these non-SAP applications.
However, many companies might have other systems, such as BAAN, Hyperion, or homegrown legacy applications, that they want to evaluate for SoD. Until now, many companies had to rely on a manual process for doing an evaluation of these other systems.
I’ll go through the steps necessary to set up Compliance Calibrator in a manner that allows you to evaluate SoD for any computer application that you want. For the purpose of this article, I will use the term “legacy application” to denote an application to which Compliance Calibrator cannot directly connect. Remember that you can follow these steps for a homegrown application or a purchased software application.
Keep in mind that while you can set up Compliance Calibrator to do SoD analysis for legacy systems, the analysis is not real time. The system analyzes for SoD based on the data uploads you perform periodically. How often you refresh your data determines how real time your analysis is.
You can use six steps to enable Compliance Calibrator to analyze legacy systems:
- Step 1. Create the system connector
- Step 2. Extract data from the legacy system
- Step 3. Analyze and create system-specific rules
- Step 4. Load data into Compliance Calibrator
- Step 5. Run the Comparison Utility to load changes
- Step 6. Schedule batch risk analysis to populate management reports
Note
The Compliance Calibrator 5.2 user guide has several sections that provide an excellent overview of this process as well. You can find the user guide in the SAP Service Marketplace at
https://websmp209.sap-ag.de/support. Then follow menu path Release & Upgrade Info > Installation & Upgrade Guides > SAP Solution Extensions > SAP Solutions for GRC > SAP GRC Access Control > SAP GRC Access Control 5.2 > Virsa Compliance Calibrator 5.2 > Configuration/User Guide.
Step 1. Create the System Connector
You need to create system connectors for legacy systems just as there are for systems that are actually connected in real time to Compliance Calibrator. These legacy connectors are different because they’re connecting to a file folder that stores the data you’re extracting from the legacy system instead of connecting to the legacy system itself. To create the connector, log onto Compliance Calibrator and go to Configuration > Connectors > Create. Name the connector to clarify which system it is for and then choose Legacy in the System Type field and File – Local in the Connection Type field. The User ID and Password should be the user ID and network password of the person creating the connector (Figure 1).
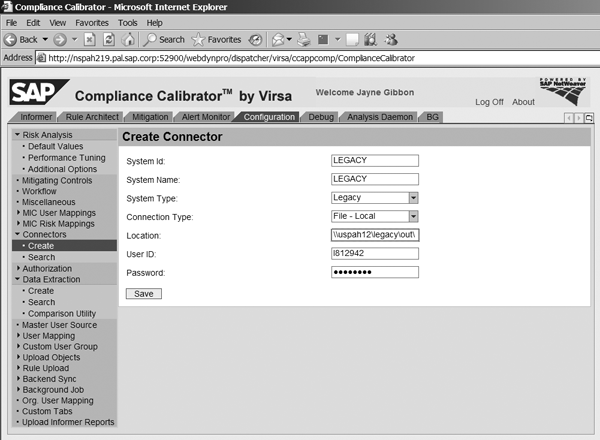
Figure 1
Create a connector for a legacy system
The Location is very important: If you don’t define the location correctly, the application cannot read the files. You need to store the files on an application server to which Compliance Calibrator is mounted and has full read/write permissions. You might need assistance from your Basis team and a network person if this is not an area with which you’re familiar. For each legacy system, create three folders on the file server. Name them in, out, and exp. The Comparison Utility background job requires these folders:
\servernamelegacysystemfoldernamein
\servernamelegacysystemfoldernameout
\servernamelegacysystemfoldernameexp
In the Location field of the connector, enter the full path of where you store the files and reference the out folder. Make sure you have the at the end of the location name. Also keep in mind that if the application server is a UNIX box, the path should reflect the UNIX path characteristics. Then save the connector.
Step 2. Extract Data from the Legacy System
Every software application, whether purchased or homegrown, has its own unique way to handle security. In the SAP system, roles contain transactions and authorization objects that define the actions that you can perform. The security team then assigns roles to users. A custom application might administer security by allowing you to attach screens directly to a user’s ID.
First you need to obtain a detailed understanding of the security methodology that the application employs. If you are familiar with SAP security, the best way to do this is to map your legacy system’s methodology to your SAP system. This helps define the pieces of security data that you need in Compliance Calibrator. See Table 1 for an example of this type of mapping.
| User |
User ID |
User ID |
| Action |
Transaction |
Screen |
| Permission |
Authorization object |
Variable |
| Field |
Authorization object field |
Not used |
| Role |
Role |
Grouping |
| Profile |
Profile |
Not used |
|
| Table 1 |
Map the legacy system’s methodology to your SAP system |
After completing the mapping, you need to extract from the legacy application the files that contain the data defining who can do what in the system. This can sometimes be the most difficult part of the process because you need to find someone in your organization who understands the security structure of the legacy system and knows which reports or tables hold the information you require. Many times, you have to create a custom program in your legacy system to extract the data required in the necessary format. You need to format the data you extract from the legacy system as described in the Compliance Calibrator 5.2 user guide, Appendix B.
It’s very important that the process you put in place is repeatable because you need to extract the data periodically to update Compliance Calibrator so it reflects the actual data from the legacy system. Most companies do this at least monthly, if not weekly. You should extract six to nine key files from the legacy system that you want to analyze. The actual number of files depends on the security structure of the legacy application. When extracting the files, you need to store them in the out folder you made when you created the connector.
I’ll go through each of these nine files next. The first two are mandatory and the next seven are optional.
File 1: User File
This includes user master information, such as ID, name, email, department, and user group.
File 2: User Action File
The data in this file is comparable to what you’d call a user transaction file in SAP terms. This file needs to list the users and all the actions that they have access to in the legacy system. It’s important that you match the actions you’re extracting exactly to the actions that you defined in your rules. If the format and naming of the actions are different between this file and the rules, Compliance Calibrator reports incorrect results.
File 3: User Permission File
This data is similar in SAP terms to authorization objects. This file is optional because it depends on the legacy system’s security structure. Many applications are only secure at the action level. If a user has the action, there’s no way to further restrict what he or she can do in that action. If there is no permission concept in the legacy application, there’s no reason to load this data. However, this file is required if there are permissions and especially if you built your rules to include permission checks.
File 4: Role File
This holds the role ID and name. Role is a term that SAP uses to denote a grouping of actions. In some applications, it might be that actions are directly assigned to users and there’s no concept of roles. If that’s the case, there’s no reason to create these files or upload them into Compliance Calibrator. However, if the legacy application groups actions into some sort of repository, it’s important that you load those roles here.
File 5: Role Action File
As with the user action file, this contains the definition of what actions each role contains. It’s imperative that the role ID match the role ID that’s also included in the user action file. Also, these actions have to match the action IDs that you used to create the rules.
File 6: Role Permission File
This is the same as the user permission file. If the legacy application does not employ a concept of permissions, then you don’t need this file.
File 7: Profile File
This holds the profile ID and name. Profile is a term that SAP uses to denote a grouping of actions. In some applications, it may be that actions are directly assigned to users and there’s no concept of profiles. If that’s the case, there’s no reason to create these files or upload them into Compliance Calibrator.
File 8: Profile Action File
As with the role action file, this contains the definition of which actions each profile contains.
File 9: Profile Permission File
This is the same as the role permission file. If the legacy application does not employ a concept of permissions, this file is not required.
Keep in mind that the file formats that I’ve described sometimes use SAP terms, such as roles. However, you need to translate this SAP terminology into your legacy system’s security model. For example, most applications don’t have a concept for profile. So in the files, this data can be blank. However, you still need to keep the column in your data files as the user guide describes so the column uploads correctly.
In addition to these nine main files, you need to extract two other files. However, these are not files that you necessarily need to update periodically.
File 10: Action to Permission File
This is comparable to the transaction SU24 (USOBT_C) table in SAP terminology. This table holds the linkage between actions and permissions. Compliance Calibrator uses this data when a user loads new actions into the rules or when an administrator does simulation analysis. Because this data doesn’t normally change very frequently, it’s often acceptable to load the data once and then reload it quarterly or so. The frequency of loading depends on how often this master data changes.
File 11: Action and Permission Descriptions
In SAP terms, this is the TSTCT table and the table that holds the action and permission descriptions. As with the action to the permission file above, this is not something that normally changes very often so it’s acceptable to load once and just update quarterly.
You load these two files using the Upload Objects feature under Configuration (Figure 2). You need to do this prior to building your rules. You load file 11 (c:file_11_text_objects.txt in my example) under Text Objects. Enter the connector you created above as the System ID. You load file 10 (c:file_10_text_objects.txt in my example) under Auth Objects (Figure 3). Again, the System ID is the connector for the legacy system that you created above.
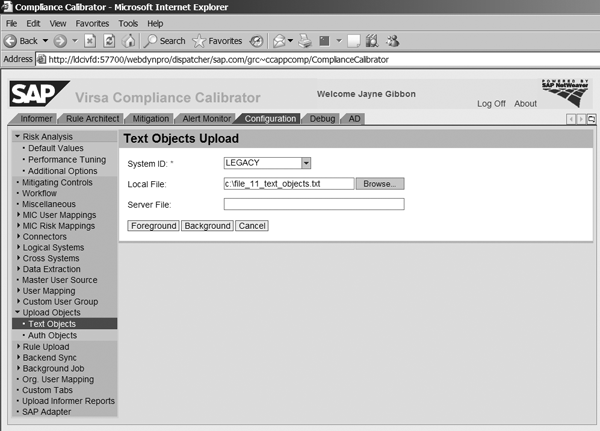
Figure 2
Load file 11

Figure 3
Load file 10
Step 3. Analyze and Create System-Specific Rules
It’s important that the person building the rules have a good technical understanding of the security methodology because you need the technical aspects to build the rules. After you understand the security setup of your system, you can proceed to build the rules. You may encounter two scenarios; the way you build your rules differs based on the scenarios.
Compliance Calibrator Is Already in Use
It may be that you are already using Compliance Calibrator for SoD analysis for SAP systems. In this case, you have normally already defined the functions and risks that are relevant for your company. Including the legacy system in the SoD analysis doesn’t require you to build new functions or risks: you’ve already defined these as part of your original implementation of Compliance Calibrator. You just have to add the legacy security data to the existing functions.
To ensure a complete evaluation, it’s best to pull a report from the legacy system of all actions used in production by your end users. Someone who is familiar with each action should determine if the action allows the user to perform one of the functions that is already defined in Compliance Calibrator. If the system identifies an action such as allowing a user to perform a function, you need to add the action to the function in the Rule Architect with reference to the legacy system.
For example, upon review of the legacy application, your purchasing lead indicates that screen (Action) PO_CREATE allows a user to maintain purchase orders and therefore you should add it to the PR02 (maintain purchase order) function (Figure 4). You add the action just as you would an SAP action by going to Compliance Calibrator, selecting Rule Architect > Functions > Search, and then specifying the function to change. When filling in the System field, you enter LEGACY instead of the SAP system. If you loaded files 10 and 11 per the steps above, the system automatically shows the action description as well as any permission linked to that action. You set the values in the functions in the same way that you would for SAP actions and permissions.

Figure 4
Add the action to the function
The other area that you need to review in the function is the setting of Scope of Analysis. If you set a function to have a scope of analysis of Single System, any rules that you create only generate rules within a system. If you set the scope of analysis in a function to be Cross System, the system creates rules within a single system and also across the systems. You can have 10 systems under a function, but the function can still be a single system function. This setting only affects how rules are built for risks that contain that function.
For example, the system includes the function PR02 in the risk in Figure 5 and conflicts with function AP02 (process vendor invoices). If you set function PR02 to Single System, the system creates the rules for this risk so that LEGACY transactions from the PR02 function conflict only with LEGACY transactions from the AP02 function.
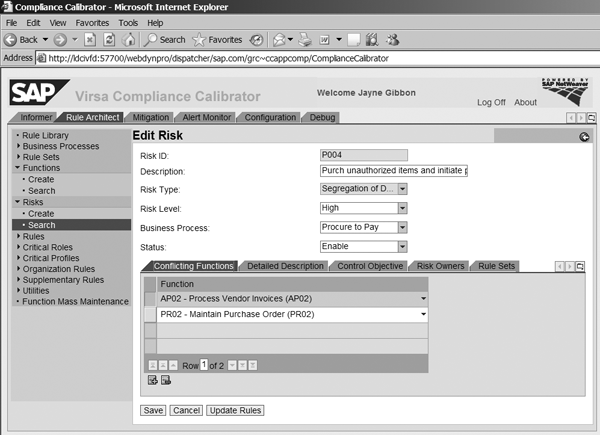
Figure 5
PR02 is included in the risk
If you set the function to Cross System, the system creates the rules so that LEGACY transactions from the PR02 function conflict with both LEGACY transactions and the SAP ECC 6.0 transactions from function AP02.
Note that you can only set Single System or Cross System at the function level, not at the risk level. Therefore, if you set a function to Cross System, the system generates rules across systems for all risks of which the function is a part.
It is important that you only set a function to be a cross-system function if there are conflicts across systems. The main reason is that the system limits the risks to only contain 46,656 total rules. If you have functions with a lot of actions and you make this cross-system, you double the number of rules created for that risk.
Compliance Calibrator Is Not in Use
The definition of legacy rules requires more work for companies that don’t have Compliance Calibrator in use. This is because they need to define the functions and risks from scratch.
Several documents are available to help you understand how to go through this initial process. The Compliance Calibrator 5.2 user guide provides a high-level description of how this works. Another key piece of documentation is the GRC Access Control – Access Risk Management Guide. This is available on the Business Process Expert Community at www.sdn.sap.com/irj/sdn/bpx-grc?rid=/webcontent/uuid/00dd6b2e-57a3-2910-8a8c-e083aed 57143. It provides an overview of how to set up and implement risk identification and remediation.
After you have identified and created your functions and risks, you can add your legacy actions to the functions in the same manner as I described above.
Step 4. Load Data into Compliance Calibrator
The first thing you need to do is create the data extractor. Log onto Compliance Calibrator, go to the Configuration tab, and then click on Data Extraction > Create (Figure 6). In the System field, choose the system you created in the first step (LEGACY in this example). You have three choices for the Object field: User, Role, and Profile. In this example, I’m going to run through how to create the extractors for the User; the process is the same for roles and profiles. In the Data Extraction Mode field, select Flat File. The screen shows other options, but flat file is the only mode that SAP currently supports.
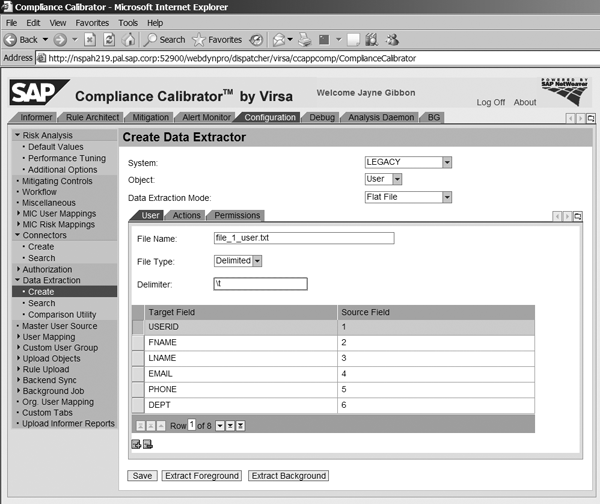
Figure 6
Create the data extractor
Below these fields are three tabs. These correspond to the files created from the legacy system. For Object User, the User tab is file 1, the Actions tab is file 2, and the Permissions tab is file 3. You need to fill in each tab and reference the exact file that you saved out to the folder structure for each type (file_1_user.txt in this example). The normal File Type is Delimited with the Delimiter being a tab (t).
You then fill in the same for the Actions and Permissions tabs, referencing each File Name as appropriate (Figures 7 and 8). Keep in mind that if you didn’t create a file for permissions because your application doesn’t use permissions, you don’t need to create a data extractor for permissions either.

Figure 7
Create data extractor for user actions

Figure 8
Create data extractor for user permissions
After you’re finished, save the data extractor by clicking on the Save button. Now that you’ve saved the details, you’ll be able to pull in your data on a periodic basis. This is just setting up the master data. To load the data into Compliance Calibrator, click on the Extract Background button while in the data extractor and the screen in Figure 9 appears. You should load each file separately instead of trying to load all three at once. To do this, select the User check box and click on the Upload button.

Figure 9
Upload user actions via the data extractor
The normal background job comes up (Figure 10). Enter the job name in the Job Name field and click on the Schedule button. This schedules the background job, which uploads the data into Compliance Calibrator. After the first job completes, schedule the next job and so on until you have loaded all extracted data into Compliance Calibrator.

Figure 10
The background job screen appears
Step 5. Run the Comparison Utility to Load Changes
You’ve now loaded the initial data into Compliance Calibrator and can immediately run ad hoc reports. However, the security environment is never a stable one: You always have to add, change, or delete users. Therefore, it’s imperative that on a periodic basis you re-extract the data from the legacy system and reload it into Compliance Calibrator. How often you do this is based on your company’s situation, the number of changes that flow through the system, and how often management wants to have updated SoD analysis. You should update at least monthly, and weekly is preferable.
Compliance Calibrator comes with a Comparison Utility to aid in this. The first step is to extract the same six files you originally extracted from the legacy system. The names of the files should be the same as the names of the original files so that they match the file names in the data extractor. Save these new files to the in folder that you created earlier.
The Comparison Utility takes data files from the in folder, compares them to data in the Compliance Calibrator database, places the incremental data files (adds, deletes, or changes) in the out folder (overwriting old files) for data extraction loading. After you complete this process, the Comparison Utility deletes data files from the in folder. You place files in the out folder only once (during the initial load) and for all times after that, you place the extracted files in the in folder.
In the Configuration tab in Figure 11, select Data Extraction > Comparison Utility. Select LEGACY as the System Id. You can run the comparison for all objects (i.e., users, roles, and profiles) or run each individually. In this case, I selected All to update all three objects. Select either the Foreground or Background button depending on how you want to process the utility.

Figure 11
Comparison Utility for data extractors
If the comparison is successful, the system produces the message shown in Figure 12.

Figure 12
The system produces a message if the comparison is successful
Keep in mind that all the Comparison Utility is doing is comparing the in files to the out files. This is not actually updating the data in Compliance Calibrator. After you run the Comparison Utility, you have to run the actual data extraction again, just as you did for the initial load, as I showed you in step 5.
Step 6. Schedule Batch Risk Analysis to Populate Management Reports
Now that you have loaded the data from your legacy systems into Compliance Calibrator, you can run analysis just as you would for a connected system. However, it’s imperative that you have performed all the steps above prior to trying to run management reports.
Updating management reports for legacy systems is basically the same as for connected systems, but there are three key differences for legacy systems.
First, the management reports for legacy systems are based on the data uploaded and are not dependent on a connection to the legacy system.
Second, there’s no need to run the sync job that connected systems require. For connected systems, this is the job you run by going to Compliance Calibrator > Configuration > Background Job > Schedule Analysis and scheduling the User/Role/Profile Synchronization (Figure 13). Again, this is not required for legacy applications. The data extraction is in effect performing the sync of data.

Figure 13
Schedule User/Role/Profile Synchronization
Third, because the data extraction overwrites the data in the database, there are no dates that show changes. It’s a complete overwrite. For that reason, only full batch risk analysis is appropriate. You should never run incremental batch risk analysis for a system that has data loaded through data extraction.
To run the batch risk analysis, follow Background Job > Schedule Analysis in the Configuration tab. Choose Full Sync in the Batch Mode field and to select the system, choose LEGACY in the Systems field under the User Analysis check box. Then select the Management Reports check box. As highlighted in SAP Note 1034117, it’s a best practice to schedule individual jobs for User Analysis, Role Analysis, and Profile Analysis versus trying to do them all simultaneously. Schedule User Analysis first and after you’ve completed that job, move on to Role Analysis and Profile Analysis. Remember to select the Management Reports check box for each job. This provides the management dashboard reports for the legacy system in exactly the same format as for the connected systems.
Jayne Gibbon
Jayne Gibbon, CPA, has been implementing SAP applications since 1996 and is currently a director in the Chief Customer Office at SAP. Jayne’s focus is making customers successful with their SAP HANA deployments. She has helped more than 100 customers drive business value with SAP HANA. Prior to joining SAP in 2007, Jayne worked for two multinational manufacturing companies based in Wisconsin. While an SAP customer, Jayne led the very first implementation of Virsa’s Compliance Calibrator, which is now part of SAP Access Control. Jayne’s experience includes internal audit; computer security; governance, risk, and compliance; SAP HANA; and SAP analytics.
You may contact the author at jayne.gibbon@sap.com.
If you have comments about this article or publication, or would like to submit an article idea, please contact the editor.