You can create new services for users in Employee Self-Service (ESS) without special skills in Flow Logic, HTML, JavaScript, or Java.
Key Concept
Employee Self-Service (ESS) is designed for non-professional users who do not access the HR system via a SAP GUI installed on their PC, but via a Web browser. SAP delivers a variety of ready-to-use ESS services. These standard services cover a broad range in the areas of master data, payroll, benefits, time management, travel management, recruitment, skill management, and appraisals. They allow the user to access his inbox for workflow and mail in the SAP office.
Many people believe that you need special expertise beyond ABAP and simple customizing to create custom services in SAP Employee Self-Service (ESS). I’m going to show you an easy way to do this based only on ABAP skills. Any ABAP developer with HR and customizing experience will be able to do the tasks described in this article. Any functional user who can customize will also be able to build a new ESS service using this article.
A functional user must stick to standard R/3 transactions for use in the new services or must ask a developer to create a new transaction in R/3 first. The sidebar, “How to Create the Transaction ZP_LOAN,” below, describes how to create the transaction used in this example. I’m using a simple example here so that I can show the entire coding.
The key for this solution is the Web GUI functionality of the Internet Transaction Server (ITS). It can translate a normal transaction into a Web-enabled user interface. You do not even have to define an Internet service. You only need a transaction with the new functionality that you want to include in your ESS. Then you follow some simple steps in Customizing.
I’ll use two examples to describe the procedure:
- The standard master data maintenance (transaction PA30) to show you that you even can include well-known existing transactions in your ESS menu.
- A straightforward custom transaction (ZP_LOAN) to show you how to create custom services from scratch. This transaction keeps a list of items that the employee has been issued. It is based on the master data infotype 0040 (objects on loan).
ESS has been available since R/3 Release 3.1. The concept described in this article is based on an R/3 system with Release 4.6C or higher. The screenprints are from an R/3 Enterprise 1.10 system with no SAP Enterprise Portal or Workplace. An ITS with Release 6.20 is recommended. It works with earlier ITS versions, too, but SAP support for those versions is already terminated or will be terminated soon.
I am using the standard transaction PA30 to show you how simple it is to integrate a standard transaction into your ESS menu. However, in some cases you will want to create a custom transaction instead, because PA30 has some drawbacks. Although the transaction will work in a Web interface, Web GUI functionality should be limited to simpler transactions. The reason is that Web interfaces require a special design to guarantee good performance and usability. The Web GUI doesn’t provide this design but simply translates a transaction designed for R/3.
Transaction PA30 is rather complex because of its many tab strips and fields and thus doesn’t provide good performance via a Web GUI. Simple transactions do not have many fields or any tab strips or pop- ups. You can compare it to the custom transaction ZP_LOAN to see the difference between simple and more complex transactions. There is no clear line to tell you which transactions to use in ESS. My two examples should show you how to decide, and you’ll be able to try other transactions in the same way.
Follow these steps to integrate the two transactions in your ESS menu. Note that the custom transaction ZP_LOAN must have been created by a developer, whereas PA30 already exists in standard R/3.
Step 1. Create the new services. I named the new service 90000001 (Master data) and 90000002 (Objects on loan), in the customizing view T77WWW_SRV (ESS service). To do this, call transaction SM31, enter the name of the view into the field Table/View, and choose the Maintain button. Then maintain the two entries shown in Figure 1 via the New Entries button. Save your changes.
You could use any other number starting with 9 in the Service field, which is the key for the new service. The ESS name of service field contains the name shown in the ESS menu and S.type (service type) must always be an S for the type of services described in this article. The last column shown in Figure 1 is the most important for this concept. It contains the name of the Internet service, which normally had to be created via transaction SE80 or via the SAP@WEB Studio. If the ITS doesn’t find a service with that name, it knows that this must be the name of a normal transaction in R/3. It then processes this transaction via the Web GUI. The concept of this article is built on this ITS ability.
Step 2. If you want the new services to be included in a new category on the ESS menu, you have to create this category now. If you want to use a category that already exists, you can skip steps 2 and 3 and go right to Step 4. Maintain the key (starting with a Z) and the name of your new category in the customizing view T77WWW_CT (ESS Service Catalog) as shown in Figure 2, in the same way as described in Step 1.
Step 3. Include your new category in the ESS menu. The normal ESS menu is PZM3 but you should check with your administrator. Your company may use another key for the menu (e.g., some companies use ZPZM3). To include your new category, maintain the view T77WWW_MNP (ESS menu item) as shown in Figure 3. The field No. specifies in what order the categories are shown in the menu.
Step 4. Include the services created in Step 1 in a category. You do this in the view T77WWW_CTP (ESS service item), as shown in Figure 4.

Figure 1
Add ESS service type to third column
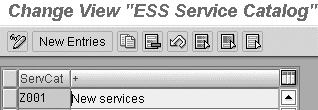
Figure 2
Add name of service catalog

Figure 3
Select the order in which categories are shown

Figure 4
Include new services added
Now you can use the new services in your ESS application. Figure 5 shows the new category, which I named New services, at the end of the menu. It contains the two new services with the names maintained in the view T77WWW_SRV in the order specified in the view T77WWW_CTP.
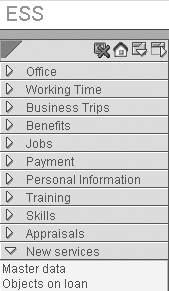
Figure 5
New services category added
If you select the service Objects on loan, you’ll get the result shown in Figure 6. Make sure that there are some entries in infotype 0040 for your test.
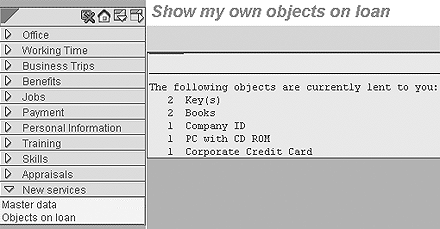
Figure 6
Example of entries in new services
The service Master data (Figure 7) also works within ESS. However, you’ll see that usability is poor — especially if your network has a low bandwidth. The transaction is slow and pop-up-windows do not always work properly. Moreover, this transaction is usually considered far too complicated for a typical ESS user, who maybe only needs it once or twice a year. The user has to know which infotype and subtype he has to select and then there are often fields in the infotypes that only professional users understand. Nevertheless, some companies do use PA30 or similar transactions within ESS, because it is a quick and cheap way to provide a broad functionality. In this case, the authorization concept must guarantee that the users can only maintain some of the infotypes.
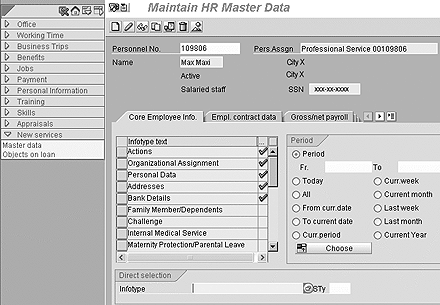
Figure 7
New service of master data added
To focus on the requirements of ESS users, SAP provides special services for master data maintenance in ESS. These services allow you to maintain a single infotype (e.g., address data and bank details) or even a single subtype, but they are not available for all infotypes. They are the better option if services are available for the infotypes you require.
Sidebar: How to Create the Transaction ZP_LOAN
This transaction provides a list of entries from infotype
0040. You first need a report that creates such a list. In the case of ESS, the report must provide this list with data that matches the data of the current user. The link between the current user and his or her HR master data is infotype
0105 (communication). Subtype
0001 of this infotype contains the user ID for each person who is using ESS. Each report providing data for an ESS user follows this simple procedure: Current User (
SY-UNAME) >PA0105-USRID (infotype
0105, subtype
0001)>
PA0105-PERNR> PAnnnn-PERNR (any infotype from the current user’s HR master data).
Figure 1 shows the ABAP coding that follows this procedure to provide a list from infotype 0040. The coding does not use the concepts of ABAP Objects, so that readers not familiar with ABAP Objects will be able to understand it. Create a report with this coding and the name ZP_LOANS via transaction SE38 or ask an ABAP developer to do so.
REPORT zp_loans. TABLES: pa0105, pa0040, t591s.
DATA: flag(1). * no selection screen, because it is always for today and
* always for the personnel number assigned to the current user START-OF-SELECTION. * get personnel number of current user (infotype 105)
SELECT SINGLE * FROM pa0105 WHERE usrid = sy-uname
AND sprps = ' '
AND subty = '0001'
AND begda LE sy-datum
AND endda GE sy-datum. * get objects on loan for this personnel number
SELECT * FROM pa0040 WHERE pernr = pa0105-pernr
AND sprps = ' '
AND begda LE sy-datum
AND endda GE sy-datum.
IF flag IS INITIAL. "write this only only once
WRITE: / 'The following objects are currently lent to you:'.
flag = 'x'.
ENDIF. * get description for the subtype
SELECT SINGLE * FROM t591s WHERE sprsl = sy-langu
AND infty = '0040'
AND subty = pa0040-subty.
WRITE: / pa0040-anzkl, t591s-stext.
ENDSELECT. * give feedback, if no data found
IF flag IS INITIAL.
WRITE: / 'Currently, there are no objects lent to you.'.
ENDIF. END-OF-SELECTION.
|
| Figure 1 |
ABAP coding needed to obtain a list from infotype 0040 |
After that, you have to build a transaction based on this report. To do this, use transaction SE93, enter ZP_LOAN in the field Transaction code and choose the create icon. Enter any Short text and select the Program and selection screen button (Figure 2). Maintain the next screen as shown in Figure 3 and save your changes.

Figure 2
Select program and selection screen
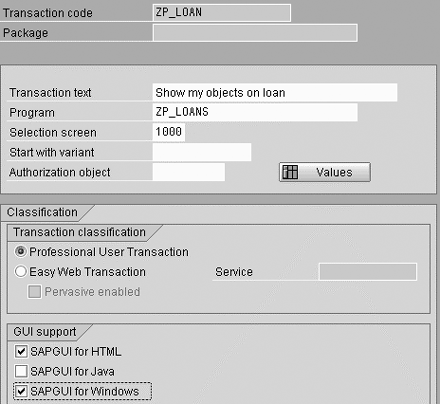
Figure 3
Select buttons and check boxes shown and save
Tip!
To keep the coding simple, I designed it for English-speaking users only. If you need a multilingual solution, use text symbols instead of the texts within the coding. Text symbols can be translated, and then they are shown in the current user’s language. Your ABAP developer will be familiar with text symbols.
Sven Ringling
Sven Ringling is executive director at iProCon (www.iprocon.de) and iProCon Human Capital Management (www.iproconhcm.co.uk). He started working as an SAP HCM consultant in 1996 and also works in strategic HR and change management. He is one of the authors of the books Mastering HR Management with SAP and HR Personnel Planning and Development Using SAP.
You may contact the author at s.ringling@iproconhcm.co.uk.
If you have comments about this article or publication, or would like to submit an article idea, please contact the editor.