/Mobile
Learn how to use radio frequency-enabled mobile scanning devices in your day-to-day warehouse operations to improve efficiency and throughput, increase data accuracy, and boost storage capacity and warehouse organization.
Key Concept
The SAP Logistics Execution System provides support for data entry using radio frequency (RF)-enabled mobile scanning devices. Typical RF devices are handheld terminals, barcode scanners, and truck-mounted terminals. RF uses barcodes for receiving goods, putaway, posting, bin-to-bin movements, and inventory counting. RF uses an extended wired local area network and has three primary components – a mobile RF scanner, a base station, and a network controller connected to a server holding some kind of a database application. The location and number of access points can vary depending on various factors, such as the warehouse size and layout. Data is usually entered either by scanning barcode labels or using a keyboard or touch screen.
The modern warehouse is cable-free with paperless receiving, putaway (i.e., transferring material from the goods receipt interim storage area to the appropriate storage types), picking (i.e., taking goods from a storage location in the right quantity for shipping), and inventory counting. SAP integrates various warehousing functions in the SAP system through radio frequency (RF).
The following is a scenario of our successful implementation of RF at a major telecom company. Though this implementation was done for a telecom industry, the same solution can be used for inbound receiving of material in any RF-enabled warehouse.
In its original process, the company raised a purchase order against an external vendor to procure material. The vendor sent an Advanced Shipping Notification (ASN) through the EDI interface that contained the details of pallet ID, serial number of material, quantity, and vendor. An Intermediate Document (IDoc) was triggered in the SAP system, which created an inbound delivery containing all the pallets for which the ASN was sent. Each pallet ID was assigned a corresponding handling unit in the system when the delivery was created. When the material arrived at the warehouse, a goods receipt needed to be created for the material against the inbound delivery. A transfer order was created and confirmed. The goods receipt was posted in the central receiving area (CRA) and the receipted material was put away at the desired storage type and bin. Performing each of these transactions manually by keying in the pallet ID or quantity took a considerable amount of time and the data was subject to human error.
Solution
We implemented RF to perform all the receiving transactions in a much faster, more accurate, and more efficient manner. All the transactions for receiving and putaway were placed under a single RF menu, which made it much easier and faster for the user to access the transactions without having to remember the transaction codes. Some of the transactions – transfer order create, transfer order confirm, and posting of goods receipt – were merged together to be performed in a single transaction with the help of custom development. You can also add other standard SAP transactions such as LM19 for handling unit pack and LM22 for handling unit unpack directly to the RF menu.
You can build this RF menu through the define menu management functionality in the SAP system. The RF solution provided quicker and error-free data communication through the use of mobile RF scanners. The RF scanners receive data directly from the SAP system and transmit the results back to the system in real time.
This RF functionality benefitted the organization in the following aspects:
- All the warehouse-related transaction codes were added to the RF menu tree, making RF a single, faster source for all warehouse-related transactions. The users didn’t have to remember the transaction codes to perform the required transactions. The RF menu description was written in a simple language easily understood by the users, who then executed the individual functions using push buttons.
- During the peak season, numerous temporary staff members were employed by the company. Because RF scanners are front-end devices (i.e., automated data entry devices linked to the SAP system) only minimal training was required for any user to become operational. This saved a lot of effort, money, and time.
- Often, the warehouse faced situations in which a pallet had been assigned to warehouse WH1 as per the ASN, but the vendor shipped the pallet to warehouse WH2. The user responsible for receiving the pallet had access only to the barcode containing the pallet ID, pallet size, and serial number of the unit, but no warehouse information. Without the warehouse information, it was impossible for the user to know that the pallet was sent to the wrong warehouse. The RF queue management functionality assigns an RF menu to the user for a particular warehouse (by transaction SPRO in RF Management or transaction LRFMD in SAP Easy Access) so the user receives an error message if a pallet does not belong to the warehouse. The user can then take appropriate action.
- The warehouse also often encountered another scenario in which the physical inventory and the data did not match. For example, the serial number in the system and the physical material were different. With the RF menu, these problems were immediately handled (in this case, set aside for return to the vendor) because the receipt/posting happened immediately and the user did not have to wait for the operator to find time to enter the data. This saved a lot of time and labor that would have been required to store the items in a bin and then retrieve them later on.
Let’s look more closely at the receiving function in a general warehouse where RF is implemented.
Receiving
Most businesses receive materials or shipments ranging from raw materials and components to office supplies and products ready for retailers’ shelves. Regardless of the type of business, the receiving process is more or less similar for all. The receiving company needs to receive the goods into the company’s warehouse, inform the vendor that the orders have arrived, track the goods, update their databases and financial records, and then initiate the vendor payment process.
Integrating a single source of RF menu into this sequence provides significant advantages over the conventional paper-based environment of manually keying in all the information, such as purchase order number, serial number, pallet ID, quantity, location, and vendor. This is time-consuming and liable to error. An RF-enabled employee receiving a pallet can quickly scan the barcode, which automatically sends all the information (i.e., serial number, PO numbers, and quantity) to the database, where the item is noted as received. If any disparity exists between the quantity received and the quantity ordered, the system immediately warns the user, who can then take appropriate action.
You must have the following configurations set up to enable RF menu management in a warehouse.
Define Menu Management
To configure and customize RF Menu Management, follow IMG menu path Logistics Execution > Mobile Data Entry > Define Menu Management. I have configured WH1 as an RF-enabled warehouse for my prototype. To access the RF menu logon screen (Figure 1) use transaction LM00 in SAP ERP. (This process applies to SAP ERP versions 4.6 and higher.) In the warehouse, the RF menu is accessed by scanners using SAPConsole.
SAPConsole enables companies to use the standard SAP RF transactions that became available with SAP R/3 4.6. SAPConsole translates graphic user interface (GUI) screens to character-based screens, which are used with handheld RF devices. Until SAP GUI 6.40, SAPConsole was delivered together with SAP GUI. Starting with SAP GUI 7.10, SAPConsole is a standalone component and no longer delivered with the SAP GUI. SAPConsole operates on a Windows NT platform and interacts with the RF terminals connected to it.
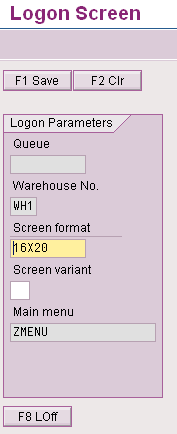
Figure 1
Logon screen for RF menu
Figure 1 is exactly how the RF menu logon screen looks in the scanner. (The main menu is referred to as ZMENU.) The screen format 16X20 tells you the screen size. The system gives you the option of using two standard screen formats: 16X20 (narrow format) and 8X40 (large format). Technically speaking, the 8X40 screen has eight rows and 40 columns and the 16X20 screen has 16 rows and 20 columns. All portable handheld devices such as the scanner use the 16X20 format.
I configured two selections into ZMENU using transaction SPRO in RF menu management (Figure 2):
- Inbound Recevg (inbound receiving): This is selected for inbound receiving of materials shipped by the vendor.
- Warehouse Mgt (warehouse management): Once the material is receipted through inbound receiving, the material needs to be put away to the storage area and may have to be packed/unpacked. All these transactions can be processed under Warehouse Mgt.
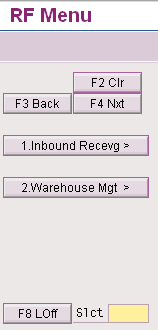
Figure 2
ZMENU (main menu)
Under inbound receiving, you have two selections (Figure 3):
- Receive by PO (receive by purchase order): When the material came in without the ASN and we did not have the pallet information/delivery already created in the system (against which the material could be receipted), we receipted the material by scanning the PO.
- Receive by Plt (receive by pallet): When the material came in with the ASN and the pallet ID was already created in the system and assigned to the inbound delivery, all we needed to do to receive the material was to scan the pallet ID and the goods receipt was completed.
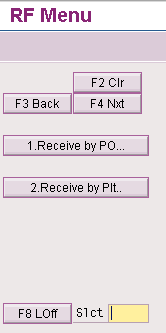
Figure 3
Selections for Inbound Recevg
Under Warehouse Mgt., you have two selections: 1. Putaway and 2. Pack Unpack (Figure 4):

Figure 4
Selections for Warehouse Mgt
The Pack Unpack button (Figure 4) drills down to the individual SAP standard transactions for pack (transaction LM19) and unpack (transaction LM22), as shown in Figures 5 and 6.
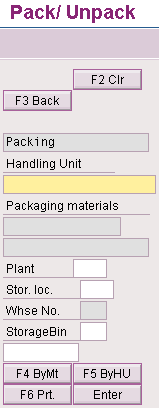
Figure 5
Transaction for packing
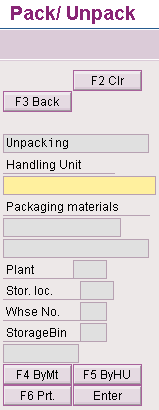
Figure 6
Transaction for unpacking
Next I will show you how to configure these RF scanner menus through transaction SPRO. Follow menu path Logistics Execution > Mobile Data Entry > Define Menu Management. Make new entries for warehouse WH1 (as shown in Figure 7). The dynamic menu (Dyn. menu) can have many submenus, with each submenu assigned to a separate transaction or menu. When using a transaction, you can access it directly through the SAP Easy Access without going through transaction LM00.
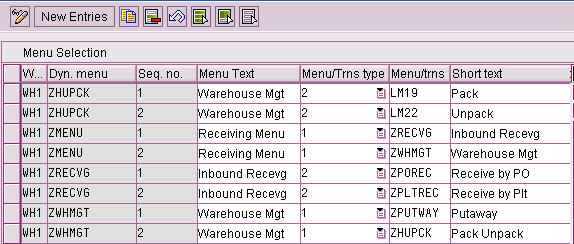
Figure 7
IMG menu selection
In the IMG, 1 stands for menu and 2 stands for transaction. These can include standard SAP transactions such as LM19 or LM22, or customized transactions.
As shown in Figure 7, the warehouse WH1 ZMENU has two submenus: ZRECVG (inbound receiving) and ZWHMGT (warehouse management). ZRECVG is further assigned to ZPOREC (receive by PO) and ZPLTREC (receive by pallet), and ZWHMGT is assigned to ZPUTWAY (putaway) and ZHUPCK (pack unpack). ZHUPCK is then assigned to transactions LM19 and LM22.
ZRECVG is set as a transaction, which means this transaction can also be accessed directly through SAP Easy Access. The transactions or menu can be nested further based on your requirements.
RF Queue Management
You can also configure a different RF menu (with a similar setup to the one in Figure 7), build a separate menu tree listing different transactions, and assign it to the warehouse. You can also add variants to an existing menu through Queue Management. For example, you can have ZMENU with variant 00 (which uses the standard screen) and ZMENU with variant 01, which uses a user exit with a different display information or screen size.
You can control the user assignment to the different RF menu through Queue Management. To assign a range of activities to users, you need to define RF Queue Management and specify the screen size for the user by following IMG path SRPO > Logistics Execution > Mobile Data Entry > RF Queue Management > Assign Processor to Queues.
You can also use a non-configuration based method for adding or removing RF users under the SAP Easy Access menu path via transaction LRFMD. With RF Queue Management, you can assign a main menu to each user. With this assignment, the warehouse manager is in the position to control which user has to access to which transactions. The user will not be able to access the RF menu unless he or she is assigned to the particular menu for a warehouse. A user can be active only for a single warehouse at any time.
With all the RF devices, navigation is primarily driven by function keys. I explain in more detail in the following section.
Function Keys
An SAP ERP system uses function keys to allow users quick access to commonly used functions. The function keys are special keys on the keyboard (F keys) that enable you to trigger functions without having to use the menu.
Due to the character mode of the RF devices, pushbuttons on the screen are used for all available functions. You set up the RF device so that it corresponds to the standard function keys. The standard layout of the RF screens is designed in such a way that the pushbuttons for the key functions are located in the upper half of the screen, while additional pushbuttons are set in the lower half of the screen.
Figure 8 shows an example of a 16X20 screen showing the function keys F1(save), F2 (clear), F3 (back), and F4 (next).

Figure 8
The barcode for pallet and the quantity to be scanned in the screen
Develop a Program Behind the Custom RF Menu or Transaction
For customer transactions and menus that are not standard SAP transactions, you need to develop an ABAP program that performs the required functions. You configure the RF menu, develop the program, and assign the program to the transaction or menu configured in RF menu through transaction SE93. An RF program behind the custom RF menu or transaction basically involves calling to various screens and processing them. The development should proceed in the following steps:
- Create the executable program
- Make use of the appropriate standard function modules for all the functional processes such as creation of a transfer order (TO), confirmation of TO, and creation of a goods receipt
- Create the screens
- Create the function modules to access the screens
- Program the screens
- Create subroutines to call the screen and validate the data coming from the screen
- Assign a transaction code to the program through SE93. The transaction code should be of the type Program and Selection Screen.
- Assign the transaction code to the RF menu via customizing in Define Menu Management as shown in Figure 7.
Challenges Faced
The inbound process was designed in such a way that when the ASN file was received by EDI, it was transmitted to the SAP system by the SAP NetWeaver Process Integration (SAP NetWeaver PI) interface in the form of IDocs. (SAP NetWeaver PI enables you to connect systems from different vendors [non-SAP and SAP] in different versions with different programming languages [such as Java and ABAP].) An inbound delivery is created for every ASN received. The inbound delivery has multiple pallets assigned to it – usually a truckload consisting of 50 to 80 pallets and sometimes even more.
The problem was that when the shipment arrived at the warehouse, only one user could scan the full shipment. Because the transfer orders were created for every scanned pallet and the inbound delivery was updated at the same time, the inbound delivery would become locked up by that user. If any other user at the warehouse also wanted to receive pallets from the same shipment, he was unable to do so because the delivery was being processed by another user. To improve efficiency and enable faster processing, we had to find ways to support simultaneous processing of the pallets.
We overcame this limitation by introducing the logic of a temporary table (Figure 9) in the program for inbound receiving under the menu path LM00 > ZMENU > Inbound Recevg (ZRECVG) > Receive by pallet (ZPLTREC). The table stored the pallet ID, handling unit, warehouse number, and inbound delivery for the pallets. When the user started scanning the pallets belonging to the same shipment, the pallet information was stored in the temporary table without updating the inbound delivery in real time. When the user pressed the post button on the scanner, the program picked up all the pallets scanned for the shipment, including their corresponding TOs. The post button also confirmed the TOs and posted the inbound delivery.

Figure 9
Temporary table storing the handling unit, pallet ID, inbound delivery (object key), and the status of the pallet
We could also track the status of the pallet or handling unit by introducing the status indicator flag in the temporary table, showing different statuses such as S (scanned), T (TO created), and R (TO confirmed). This helped in tracking the progress of the scan and also in error handling. If the scan failed (e.g., timed out, connectivity was down, or the user logged out by mistake without completing the scan), the status indicator flag told us which pallets were scanned and their status. We then proceeded to scan the rest of the pallets.
This temporary table helped prevent locking issues when multiple users were scanning the pallets belonging to a single shipment. This also led to faster processing as multiple users could scan the pallets simultaneously for a single shipment. We had a considerable volume of receiving in the warehouse at any time, so to reduce the load on the temporary table, we cleared the data for any inbound delivery whenever it was posted.
Another limitation with the RF was that very often the ASN received and the actual physical shipment received had different units for a given pallet. For example, Pallet A in the ASN had two units – unit 1 and unit 2 – but Pallet A in the actual physical shipment had unit 3 and unit 4. Because we were scanning only the pallet ID during receiving, the units we received by scanning the pallet ID and the units that came in the ASN for the pallet were sometimes different. This led to discrepancies in the system data.
To solve the issue, we introduced an additional screen in transaction ZPLTREC. The screen prompts for a sample scan of units belonging to a pallet immediately after the pallet is scanned and validates it against the ASN data. If the data matched, we went ahead with scanning other pallets and posting the delivery. If it did not match, the pallet was set aside and returned to the vendor, who would then send a replacement.
Tip!
Do a cost/benefit analysis of modifying the processes to use the proper fields. Sometimes it is better to continue with the non-standard use of the field and work around it, as we did when we introduced the temporary table. Note that sometimes custom programs that are appropriate for current releases might become obsolete in later versions. For example, similar functionality might become available with the newer releases or the custom object might not perform correctly when it is migrated to the upgraded system. Additional work would be required to adapt them to the new upgraded environment.
Malti Rawat
Malti Rawat is a senior consultant for Infosys Technologies, Ltd., with six years of consulting experience. She has worked in SAP MM, WM, and ESM. She is currently working as a consultant for a market leader in the telecom sector. She has a bachelor’s of engineering degree from MNNIT, Allahabad, and an MBA from SCMHRD, Pune.
You may contact the author at rawatmalti@gmail.com.
If you have comments about this article or publication, or would like to submit an article idea, please contact the editor.


