Some companies have a requirement for employees to provide absence quota entitlements on specific dates or on anniversaries. This can be the employee hiring date or any other date specification stored in infotype 0041.This type of entitlement is generated with the help of custom personnel calculation rules within time evaluation, if the design is for a positive time pattern. (A positive time pattern means time evaluation with clock times, which is based on the clocked-in or clocked-out time). I use a copy of SAP standard sample schema TM00, which is used to evaluate clocked-in and clocked-out times.
Key Concept
Table V_T559L is the selection rule configuration table for absence quota. In this configuration table, assignment of time type is assigned in the accrual entitlement tab.
Companies may have a requirement to generate fixed absence quotas on a yearly basis based on the employee hire date or another date specification. Here I explain the steps for generating absence quotas on a yearly basis in advance. I also show how to design the personnel calculation rule (PCR) for triggering the quota generation at the start of the year and how to assign the PCR to the schema. To illustrate these concepts, I show this process in SAP standard sample schema TM00.
Before going further into more detail, readers should understand the two different types of absence quotas entitlement. They are:
- Earned absence quota – This quota entitlement is credited to the employee in a recurring way, based on the time worked as the year progresses (e.g., a statutory quota).
- Fixed absence quota – This quota entitlement (fixed number) is credited to the employee at the start of period in advance (e.g., a sick leave quota or compassionate leave quota).
Note
Readers should know how to create custom PCRs and understand how to configure absence quotas to understand this article.
The Steps for Generating and Triggering Absence Quotas
There are seven steps for generating—and triggering and assigning—absence quotas, as follows:
- Configure the date type
- Create and configure the absence quota type
- Create the time type
- Configure the ease entitlement
- Generate the absence quota rule
- Design a PCR to trigger quota generation
- Assign the PCR to the schema
I discuss each of these steps for generating absence quotas in detail and, in the final sections, I cover how to design the PCR to trigger quota generation and assign the PCR to the schema.
Step 1. Configure the Date Type
The date specification is the combination of date type and date. The date type is a specific code configured for storing specific dates of the employee in infotype 0041. The first step is to configure the date type XX. XX can be any two-character or alphanumeric date type code. In my example the date type is 03.
First, follow IMG menu path Personnel Management > Evaluation Basis > Date Specifications > Define date type > Table V_T548Y. This opens the screen show in Figure 1.

Figure 1
Specify the date type in table V_T548Y
Enter 03 in the first Date type column and give a meaningful description in the second Date type column. Leave the Date indicator column blank. Click the save icon to save your changes and then the back icon to exit.
Note
After you click the save icon in each of these steps, you may get a dialog box asking you to save your changes in the transport request. Click the Yes button to accept and save.
The next step is to create the time type.
Step 2. Create the Time Type
You need to create the time type (in this example, 01 ZLFT) that is used in the PCRs to trigger the base entitlement at the start of a new quota cycle. The time type is a semantic grouping of a time span. The balances are formed in time evaluation after the evaluation of shift hours and the employee’s actual working time, and then they are transferred to the time type.
To create the time type, follow IMG menu path > Time Management > Time Evaluation > Time Evaluation Settings > Define Time Types, which results in the screen in Figure 2.
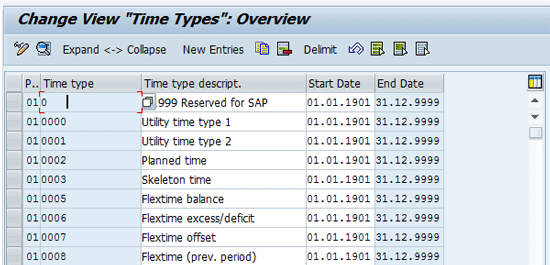
Figure 2
Create the time type in table V_T555A
Click the New Entries button and a screen like the one shown in Figure 3 opens, with no entries.

Figure 3
Create a time type with a day balance value of 1
Enter the PS Grouping (as per your design—in this example, 01), Time type (ZLFT), give a meaningful description in the field to the right (Trigger Quota), and enter the Start and End periods.
For this requirement, you need to hold the time type value only for the current evaluation day. In the screen shown in Figure 3, enter 1 in the Save as day balance field and leave all the other fields blank. Click the save icon to save your changes and then click the exit icon to leave this configuration screen.
The next step is to create and configure your new absence quota type.
Step 3. Create and Configure the Absence Quota Type
This absence quota type is used for quota generation, and can be created in table V_T556A. Follow IMG menu path Time Management > Time Data Recording and Administration > Managing Time Accounts Using Attendance/Absence Quotas > Time Quota Types > Define Absence Quota Types, which opens the screen in Figure 4.

Figure 4
Create the new absence quota type
Click the New Entries button and provide the applicable employee subgroup grouping (ESG) and personnel subarea grouping (PSG). Also enter the absence quota type number, description, and start and end dates per your requirement. Click the save icon to save your changes and then click the exit icon to leave this configuration screen.
The next step is to configure the base entitlement for your new absence quota type.
Step 4. Configure the Base Entitlement
The base entitlement determines the quota type created in step 3. It tells the time evaluation program when and how the absence quota should be generated. In this scenario, I am setting the entitlement to be constant for three days over a 12-month time period in configuration table V_T559E.
Follow IMG menu path SPRO > Time Management > Time data Recording Using Attendance/Absence Quotas > Calculating Absence Entitlements > Rules for Generating absence quotas > Set Base Entitlements (Figure 5).
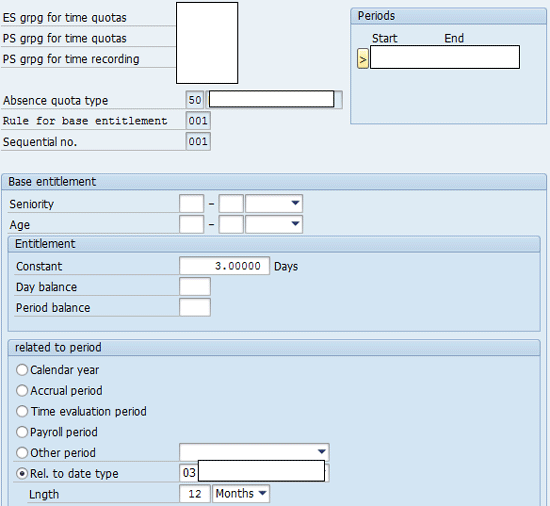
Figure 5
Configure the new base entitlement
In the screen in Figure 5, enter the employee subgroup grouping, the personnel subarea grouping for time quotas and time recordings, the absence quota type, the rule for base entitlement, and the sequence number. In my example, the Constant value is 3.0000 Days. Select the Rel. to date type radio button and assign a value of 03 which was configured in step 1 (Figure 1). In the Lngth fields enter 12 and choose Months from the drop-down options, as the entitlement is created for 12 months.
The fifth step (and final step for generating the absence quota) is to configure the generation rule of the new absence quota.
Step 5. Generate the Absence Quota Rule
In this step, I show how to configure table V_T559L. The absence quota entitlement is generated based on the configuration done in this table with the applicability, accrual, period, base entitlement, and accrual entitlement. This table is configured for the employee subarea grouping, the personnel subarea grouping, time quotas, and the time recording level.
Follow IMG menu path IMG Path > Time Management > Time data Recording Using Attendance/Absence Quotas > Calculating Absence Entitlements > Rules for Generating absence quotas > Define Generation rule for Quota Type Selection. This opens the screen shown in Figure 6.
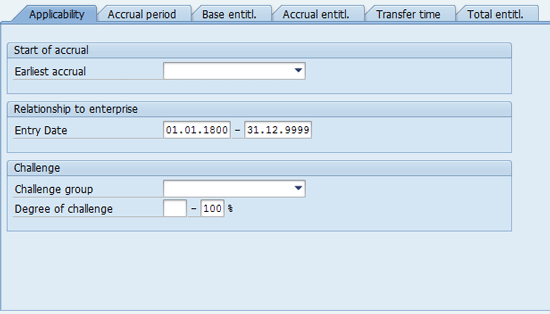
Figure 6
Configure the applicability in the generation rule
There are multiple tabs in table V_T559L: Applicability, Accrual period, Base entitl., Accrual entitl., Transfer time, and Total entitl, as shown in Figure 6. I discuss each in detail below.
Applicability – This tab is for applicability of the rule. In my example, the values are the standard default values.
Accrual period – This is where you configure the accrual period (Figure 7); in my example, Daily. This triggers quota generation on a daily basis. Based on the base entitlement and accrual entitlement configuration shown in the following steps, the absence quota will be created.

Figure 7
Configure the accrual period in the generation rule
Base entitl. – In Figure 8 is where you choose the rule for base entitlement that was created in Figure 5. In my example it is 001.

Figure 8
Assign the base entitlement in the generation rule
Accrual entitl. – Here (Figure 9) you configure the quota generation based on a pro rata or no pro rata calculation. Pro rata calculation is used for reducing the total number of quota generation in cases where an employee joins within a fixed quota validity period. In this example the No pro rata calculation radio button is selected because the validity period depends on the employee engagement date and it remains valid for the full period. Then select the Day balance radio button and assign ZLFT as the time type in Multiplication with time balance block, which was created in step 2 (Figure 3).
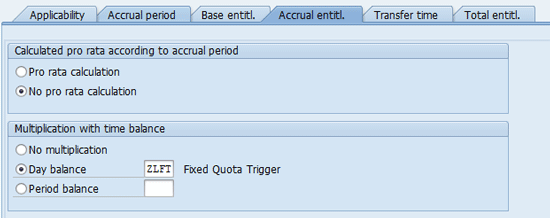
Figure 9
Configure the accrual entitlement in the generation rule
Transfer time – In Figure 10 you specify when to transfer the generated quota to infotype 2006. In my example, select the Upon accrual radio button because you want the Quota to be transferred to infotype 2006 as soon as it is generated.
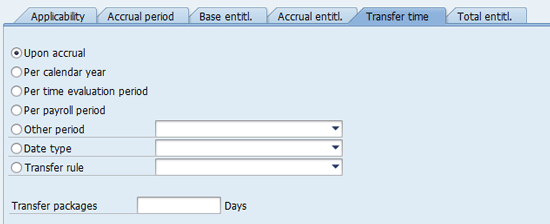
Figure 10
Configure the transfer time in the generation rule
Total entitl. – Here (Figure 11) you can restrict the total entitlement within the quota validity period. The Max entitl field puts a block on quota generation for the quota validity period and sets an upper ceiling for quota generation. Enter the value of 3.0000 Days as the upper ceiling. This is an optional step in this example.

Figure 11
Configure the total entitlement in the generation rule
After you have completed the configuration in the respective tabs, click the save icon to save the changes in table V_T559L.
The final two steps are to design a PCR to trigger quota generation and assign it to the schema.
Step 6. Designing the PCR to Trigger Quota Generation
Up to now, I have shown how to configure the system for absence quota type 50. The next step is to trigger the quota generation configuration, which generates the absence quota and updates the employee database.
In my example, the PCR triggers quota generation once a year. To create this PCR, execute transaction code PE02 using the syntax shown in Figure 12.

Figure 12
Use this PCR
In the first block (outlined in blue) the highlighted code generates quotas for the employee in advance of the hiring date. This code executes whenever an employee is hired. In the second block (outlined in yellow) the highlighted code executes on every anniversary date of the hiring of the employee.
Here is what the different codes in Figure 12 mean:
HRS = YDAD03 – This is operation HRS with the following variables:
Variable 1 = Y
Variable 2 = D (date specifications in infotype 0041)
Variable 3 = A (date of the evaluated day)
Variable 4 = D (days)/Y (full years)
Variable 5 = YY (date type from date specification infotype 0041)
Here, the value generated from YDAD03 is assigned to operation HRS. The value generation is based on the number of days.
HRS = 1 – Operation HRS with the value 1 (HRS = 1) is passed to time type ZLFT using operation ADDDBZLFTZ.
The new time type ZLFT was assigned to the generation rule in the Accrual entitl. tab (Figure 9) in step 5. The two blocks of code shown in Figure 12 execute only on the hiring date or the hiring anniversary, so the time type always has a value of 1 in this instance.
Step 7. Assign the PCR to the Schema
The final step is to assign the PCR to the schema. First, execute transaction code PE01 to edit the schema. The assignment of the PCR should be done before function QUOTA. This ensures that the generated value in time type ZLFT can be used when executing the QUOTA function. The function QUOTA uses time type ZLFT to generate the absence quota based on the configuration done in steps 1 to 5. In my example, the rule is added as shown in Figure 13.
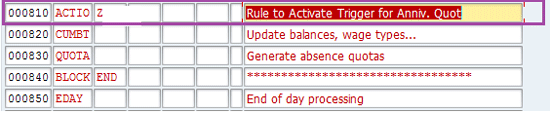
Figure 13
Schema with custom PCR (in this example it is in line 000810)
Dheeraj Nadamwar
Dheeraj Nadamwar is an SAP HCM consultant at Accenture, India, with over seven years of experience. He has worked with multiple manufacturing and natural resource industries across different continents, including Asia, Europe, North America, and South America, with multi-language configurations. Dheeraj’s areas of expertise are Organizational Management, Personnel Administration, and Time Management.
You may contact the author at dheeraj.nadamwar@accenture.com.
If you have comments about this article or publication, or would like to submit an article idea, please contact the editor.