The author presents an alternative method for collecting and transporting requests using SAP's BW Transport Connection. The complex models often used for BW implementations require a collection/transport strategy, like the one in this article, for BW requests.
SAP created the Correction and Transport Organizer (CTO) to move configuration settings, programs, and data across different systems. BW, however, uses a modified version of the CTO called the BW Transport Connection. With standard CTO, collecting and transporting requests is a relatively simple process. This is not necessarily the case with the BW Transport Connection, particularly for complex data models. You need a transport strategy with BW, so I'm presenting a process using the BW Transport Connection that has worked well at many of my clients. This process applies to all versions of BW.
A typical SAP environment consists of development, quality assurance, and production R/3 systems, and corresponding BW systems. Transports run from the development to the quality control and production systems, as Figure 1 shows.
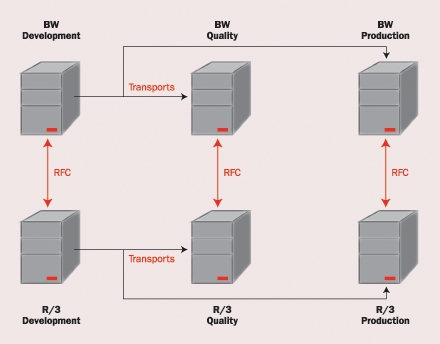
Figure 1
Connections and data flow between corresponding BW and R/3 systems
After the connections have been established and the appropriate security access has been delegated, you need to perform a series of checks. For example, make sure that the relevant release-dependent extractors have been installed. You also want to confirm that the remote ID and Transport Management System (TMS)/CTO authorizations to relevant users have been set. The remaining checks are specific to the BW Transport Connection, so I've outlined the remaining steps you must perform to use this tool.
Step 1. Check the Connection Between BW and the Source Systems
The first check is to ensure that BW is properly connected to the source systems. This is required for replication of the DataSources before transporting. Go to the Administrator Workbench (transaction code RSA1) and click on the Modeling tab (Figure 2), and then click on the Source Systems menu item.
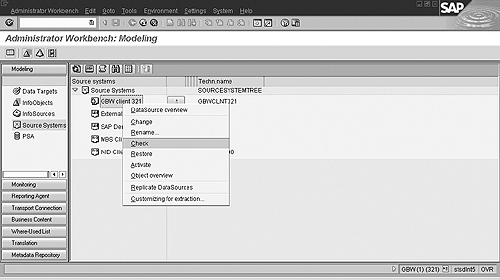
Figure 2
Check connectivity to source systems
To the right you will see a list of source systems. Right-click on the one you want and then select Check in the pop-up window that appears. Repeat the process for each of your source systems.
Step 2. Map Source System Names
The next step is to map your source systems to BW. Since some objects in BW are source-system specific (such as transfer rules and transfer structures), these objects must establish the connection to the target source system after successful transport. In the Administrator Workbench of the target system, click on Tools>Mapping of Source system names, as shown in Figure 3.
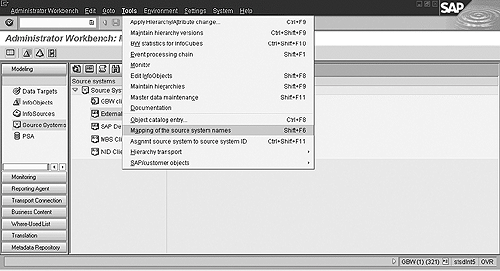
Figure 3
Select the Mapping of the source system names option
This will bring you to the screen shown in Figure 4. Here, you enter the appropriate object names in the source system (R/3) column (OrSrceSyst) and the corresponding object name in the target system (BW) column (TargSrceSyst).
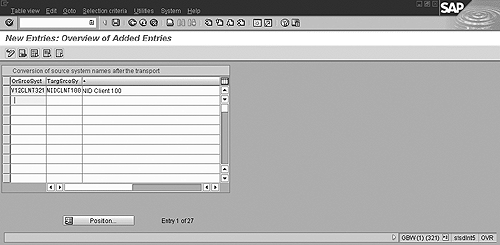
Figure 4
Enter the corresponding R/3 and BW object names in the appropriate columns
Step 3. Configure the TMS
This check ensures that the TMS has been configured properly and is active. This is a Basis function. Figure 5 shows the configuration screen for the TMS check (transaction code STMS).
Figure 5
The TMS configuration screen
Step 4. Create Development Classes
This important step ensures that the objects are collected and stored correctly. In general, you need to create the following development classes:
- One for all the administrator objects—InfoObjects, InfoCubes, ODS, InfoSources, InfoPackages, etc.
- For all queries and query elements—one development class for each InfoCube/ODS on which you write a query, and one development class for all variables (recommended for complex implementations with large query-development teams).
- For all the technical business content—BW Statistics, for instance
Also, use the BEx Development Classes button under Transport Connection of the Administrator Workbench to assign BEx development classes.
Step 5. Collect Objects
By default, all new BW objects are stored in the local development class ($TMP). These objects must be collected and assigned to a transportable development class and a transport request to carry out transports.
You can separate the objects into two main collections: initial collection and changes. The steps for setting up each of the three classes of initial collections follow. For individual objects, select the object from the object list, set the grouping to Only necessary objects, and set collection to Manual collect. (See Figure 6.)
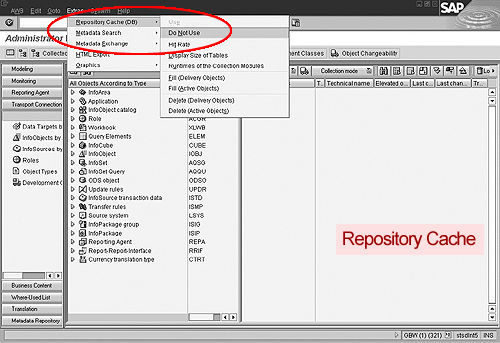
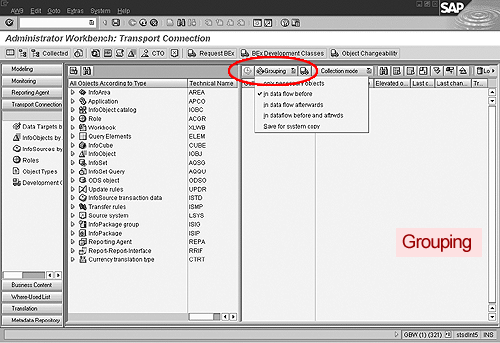
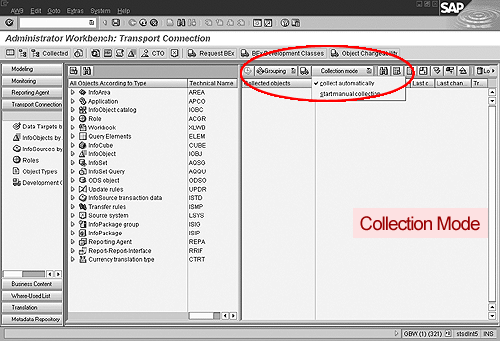
Figure 6
Settings for collecting objects by Repository Cache, Grouping, and Cellection mode, respectively
For Administrator Workbench objects (InfoObjects, InfoCubes, ODS, InfoSources, InfoPackages, etc.). In the Transport Connection section of the Administrator Workbench, make the following settings before carrying out the transports:
| Setting |
Value |
| Repository Cache |
Do not use |
| Grouping |
In data flow before |
| Collection mode |
Collect automatically |
Identify the data target at the top of the data model. To illustrate, I've created the sample PCA MultiCube shown in Figure 7. Drag and drop the data model into the collection area. The system will automatically collect all the objects for that data target. Click on the transport icon to create a new request to store the collected objects.
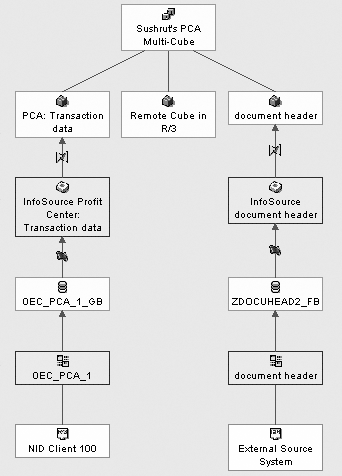
Figure 7
An example PCA MultiCube
For Business Explorer objects. Set the following values for each item below:
| Setting |
Value |
| Repository Cache |
Do not use |
| Grouping |
Only necessary objects |
| Collection mode |
Collect automatically |
Select all the queries that need to be transported for a data target (InfoCube or ODS). Drag and drop the queries into the collection area. The system collects the required objects. For each query collected:
- Right-click and deselect all objects under InfoCube/ODS
- Expand and select the workbooks to transport
- Right-click and deselect roles selected
When you are finished with all the queries, click on the transport icon and select the development class for that InfoCube/ODS. Save it in a new transport request.
For variables. Set the following values for each item below:
| Setting |
Value |
| Repository Cache |
Do not use |
| Grouping |
Only necessary objects |
| Collection |
Collect automatically |
Select object types from the Transport connection menu and select Query Elements. Select Variables from the Variable submenu and drop them into the collection area.
For transporting changes. If objects have never been transported before, changes can be made directly since the objects still reside in the local development class. You can then wait for the prompt for a transport request if they have been transported to a target system.
- Administrator Workbench objects prompt for a transport request during the change.
- Variables prompt for a transport request during the change.
- Business Explorer objects are saved automatically under the BEx request assigned to the BEx development class.
Step 6. Release the Transports
For simple data models, you just release each request after it is collected. For complex data models, do not release any requests until all data targets have been collected. Then release requests in the same sequence in which they were collected, and likewise transport them in the same sequence in which they were collected.
The five-step transport sequence is as follows:
- Transport the extraction structures, extraction programs, and DataSources from R/3 development to R/3 quality to R/3 production systems.
- Replicate the DataSources in BW.
- Transport administrator objects from BW development to BW quality to BW production systems. Transports that export DataSources from one R/3 system to the next require a replication from R/3 to BW and a re-transport of the corresponding infosources in BW.
- The variables transport.
- Related BEx objects transport in the sequence in which they were collected.
I have not run into any issues when transporting Administrator Workbench objects (InfoCubes, InfoSources, InfoPackages, ODS, etc.) if the transport requests are collected, released, and transported in the appropriate sequence. However, transports with exported DataSources might require a replication and a re-transport for BW releases up to 2.1. Using the automatic collection function for BEx objects requires a custom development strategy depending on each client outside the technology. This might reduce the flexibility of the system.
My company has successfully used the above process for different implementation scenarios across different industries with different functionalities.
Sushrut Shrotri
Sushrut Shrotri is a consulting manager for the northeast region with SAP America. He has over six years of experience in BW and SEM and over 10 years of industry and ERP experience. He has successfully managed six BW implementations and two upgrades. Multiple customers and implementation partners have requested Sushrut as a specialist, advisor, and quality analyst.
You may contact the author at sushrut.shrotri@sap.com.
If you have comments about this article or publication, or would like to submit an article idea, please contact the editor.