Gain insight into the events that trigger an employee master data pre-booking lock. Learn two different methods for removing the lock and drill down on the pre-booking lock configuration steps.
Key Concept
The employee master data pre-booking lock was built into SAP ERP HCM to facilitate the transfer of employees across company codes in scenarios in which the employee remains in the exact same position. To allow such cross-company code transfers, SAP ERP HCM places a temporary master data lock (known as a pre-booking) on the employee master data until an organizational reassignment action is executed, bringing the data between the personnel development and the organizational assignment modules back in synch.
Sometimes in the process of maintaining employee master data, SAP ERP HCM users may encounter an error that reads “Pre-booking exists for personnel number 12345.” This error message means that the personnel number in question has a special kind of lock called a pre-booking. The user cannot make most master data changes for that employee until such pre-booking has been removed.
This error is caused by what SAP calls extended integration, which facilitates employee transfers between company codes. When you transfer a position with a holder to a new company code, the company code in the personnel development (PD) module and the company code in the personnel administration (PA) module (stored in infotype 0001) are out of synch until a new infotype 0001 (organizational assignment) is created. You need to create the new infotype 0001 manually to get the company code assignment back in synch with the PD and PA modules.
As long as the organizational reassignment action is not carried out, the corresponding personnel number is locked for all other transactions. This makes it impossible to create, change, or delete infotypes until the organizational reassignment action has been completed.
This pre-booking error is only triggered when a person is transferred between company codes while remaining in the same position. You should follow this sequential order for such cross-company code transfer:
- Move the position to the new company code via the organizational management module (e.g., transaction codes PPOME or PP01). This automatically triggers the pre-booking (master data lock) for the employee assigned to such position.
- Execute the organizational reassignment personnel action via transaction code PA40 so that the employee’s organizational assignment is updated in infotype 0001. This step removes the pre-booking for this employee.
You can avoid pre-booking errors by performing these two steps back-to-back.
Note
The pre-booking error is not triggered if you transfer the person to a new company code by assigning the person to a new position.
Prior to SAP R/3 4.6C, the only way to transfer a position or holder between company codes was to remove them from their position and reassign them after the position was transferred to the new company code. Obviously, this process was cumbersome so SAP ERP HCM now allows you to move the position to the new company code. However, to ensure that the company code data is brought back in synch, it disallows any master data changes other than an organizational reassignment personnel event, which brings the company codes back in synch.
Correcting Pre-Booking Errors
There are two methods you can use to correct pre-booking errors. One method is to manually execute an organizational reassignment. As described previously, you must access transaction PA40 and execute the organizational reassignment action. The required data for the action (date of the personnel action, type of action, and position) is automatically transferred to infotype 0000 (action). The system then displays the message “Flag for pers.no. [NNNNNNNN] was deleted” once infotype 0001 is saved (Figure 1).
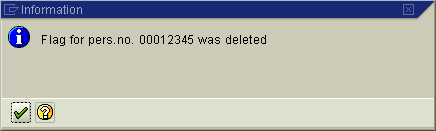
Figure 1
The personnel number pre-booking lock is removed
The second method you can use to remove the pre-booking lock is to execute program RPLEVENT (overview of pre-bookings for personnel action). This program first generates a list of the employees who have been pre-booked and then you can execute the necessary personnel actions directly from the report.
Unfortunately, this program does not seem to be accessible via a menu path or have a transaction code assigned to it. Therefore, you have to assign the program to a custom transaction code. Until the program has its own transaction code, you can follow these steps to execute program RPLEVENT. Access transaction code SA38 and enter selection criteria values in the program selection criteria or run it with an empty selection criteria to see a complete list of personnel numbers (employees) with a pre-booking lock (Figure 2).
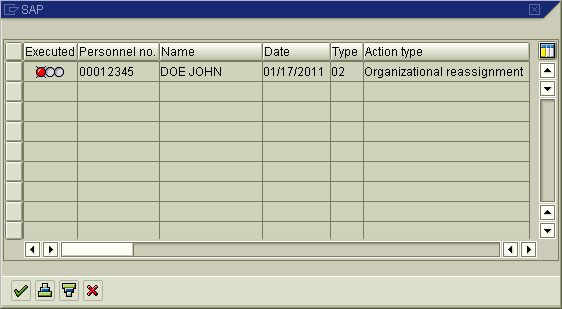
Figure 2
Program RPLEVENT allows you to view and process pre-booking locks
Select the employees you wish to process and click the green checkmark icon. The program then displays a screen with the data to be used for the organizational reassignment. Click the Create Action button. The system then walks the user through the creation of the organizational reassignment action.
The system displays the message “Flag for pers.no. [NNNNNNNN] was deleted” after infotype 0001 is saved (Figure 1).
Note
It is important that you follow one of the two processes I just described for clearing the pre-booking lock. You should not create a custom ABAP program to delete these pre-bookings because this could have unforeseen consequences, such as the organizational assignment data being out of synch between the organizational assignment and PA modules.
Extended Integration Configuration Steps
You can customize the system behavior for the company code transfer by following IMG menu path Personnel Management > Organizational Management > Integration > Integration with Personnel Administration > Set Up Integration with Personnel Administration > Basic Settings.
The extended integration functionality requires the configuration of the following three switches (Figure 3):
- PLOGI-ORGA (PA-PD integration switch): The master data integration between PA and PD must be activated for the extended integration functionality to work. Therefore, the PLOGI-ORGA switch must be set to a value of X before you can activate the enhanced integration functionality.
- PLOGI-EVENB (enhanced integration switch): The enhanced integration functionality is activated by setting this switch to a value of X. This allows you to transfer an employee between company codes without having to assign the person to a new position. The personnel number is locked until the organizational reassignment action is executed.
- PLOGI-EVCCC (personnel action for company code change): To complete an employee company code transfer, you must execute an organizational reassignment for the employee in question in PA. The PLOGI-EVCCC switch stores the two-digit numeric key of the organizational reassignment action used to complete the employee company code transfer. In the standard system, the value of such an action is 10 but you can modify this value to reflect the organizational reassignment action you wish to use in your system.

Figure 3
Configure three settings in table T77S0 to activate the company transfer functionality
Manuel Gallardo
Manuel Gallardo is the director of HCM consulting at /N SPRO. He is a former SAP platinum consultant and his area of expertise is SAP HCM enterprise architecture, SuccessFactors, and enterprise mobility. Since working on his first SAP implementation in 1994, he has also worked on a wide variety of SAP HR modules, as well as SAP NetWeaver Portal and ABAP development. Manuel is the author of Configuring and Using CATS, and is a frequent conference speaker.
You may contact the author at manuel.gallardo@n-spro.com.
If you have comments about this article or publication, or would like to submit an article idea, please contact the editor.