A Primer for the ALV Display with Integrated Data Access for SAP HANA
With ABAP 740, SAP provides a new, improved, and faster form of the ABAP List Viewer (ALV). This is known as the Integrated Data Access (IDA) version of ALV. Due to its numerous advantages, including fast performance, memory consumption optimization, and compactness of code and effort on the part of the developer, it is a must-learn topic for ABAP developers today.
I start with an overview of IDA as it pertains to the ALV display and the advantages it provides. I cover the details of the class CL_SALV_GUI_TABLE_IDA in detail and the useful methods it offers. Next, I cover the main steps involved in creating the IDA ALV display, along with the concept of IDA ALV field catalogs. You will see how to enable various functions for the IDA ALV, as well as how to create an ALV via Core Data Services (CDS) views.
Throughout the article, there are fully working coding examples. The examples and screenprints are from an SAP NetWeaver 7.50 system. The coding shown in this article works regardless of whether the underlying database is SAP HANA. For ALV in IDA, both full-screen and container display are possible. However, the emphasis of this article is on full-screen display.
Explore related questions
IDA ALV: An Overview
IDA ALV is designed to perform optimally in a memory computing environment. The class for IDA ALV uses mostly code pushdown (i.e., a lot of processing is done within the SAP HANA database). The IDA ALV is used for displaying a very large number of records and for manipulating such records without causing any memory or performance issues.
Before getting into the details of ALV with IDA, let’s first revisit the traditional ALV, prior to IDA. In classic ALV, the SELECT statement allows the user to fetch data from the database to the application server. The final data to be displayed is stored in an internal table that is linked to the ALV object. The various functions such as sorting, totaling, and subtotaling are carried out on the application server. With traditional ALV, memory consumption issues may occur, and using page up and page down can take considerable time, particularly when a large number of rows and columns is involved.
On the other hand, in the case of ALV with IDA, the various operations such as totaling, subtotaling, sorting, and grouping are done at the SAP HANA database level. The main class used for the display is the CL_SALV_GUI_TABLE_IDA class.
As already mentioned, when you are using the IDA form of ALV, there is no internal table involved. On a single database trip, only so many records as can fit on a single screen (without page down) are fetched from the database. The moment the user presses page down or scroll down, additional rows are fetched from the database. So, if the underlying table has a million records, only 25 or so (corresponding to the screen size) are read into the memory. This results in better consumption of memory than with the traditional ALV, which reads the entire million records into the application server. In the IDA version of ALV, no record is transferred to the application server until it needs to be displayed; the IDA ALV only fetches the data to be shown on the screen at any given instant. This performance is optimized for the SAP HANA database, with which it can work extremely quickly. The ALV IDA exhibits high speed when paging up and down and uses little memory.
Another advantage of the new IDA ALV is that the user does not feel any difference in the functionalities or interface. IDA ALV displays the same buttons and functions as the traditional ALV class CL_SALV_TABLE, as well as the look and feel of the zebra design. The user can add new function buttons, make fields into hotspots, and change the text of column headers. All the buttons are the same and the functions and keyboard shortcuts are the same, so no extra training is required for the user.
It is now time to look at the structure of class CL_SALV_GUI_TABLE_IDA. Figure 1 shows the structure of the class and the main methods it provides.
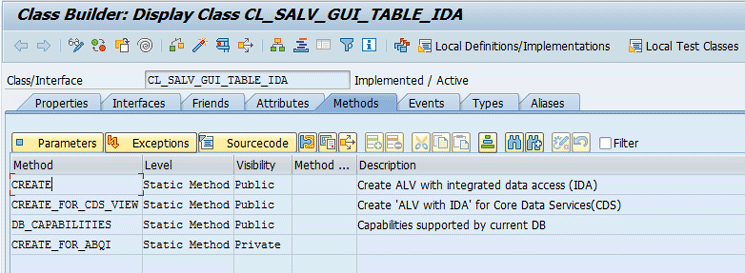
The two main methods for creation of ALV output are CREATE and CREATE_FOR_CDS_VIEW. The latter allows you to generate ALV directly from a Core Data Services (CDS) view. The parameters of the CREATE method are shown in Figure 2.
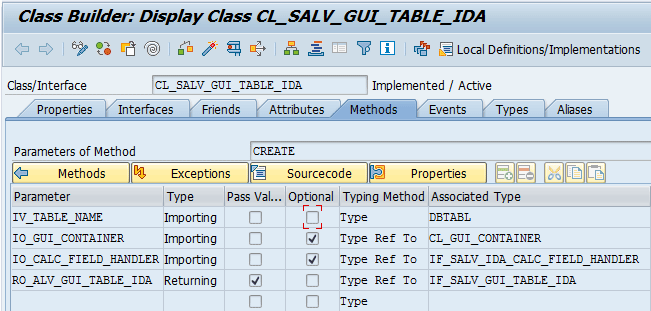
The commonly used parameters of the various methods are IV_TABLE_NAME—the underlying database table name—and IO_GUI_CONTAINER, the container in which the ALV is to be displayed if it is not full-screen display. The returning parameter of the method is based on the interface type IF_SALV_GUI_TABLE_IDA.
The interface IF_SALV_GUI_TABLE_IDA provides a number of useful methods for displaying and modifying the look and feel of the ALV. Table 1 shows a list of common methods.
|
Method |
Purpose |
|
FIELD_CATALOG |
Provides access to the attributes of displayed fields |
|
SET_SELECT_OPTIONS |
Specifies selection criteria for database access |
|
FULLSCREEN |
Activates full-screen mode for ALV display |
|
DISPLAY_OPTIONS |
Modifies the look (e.g., alternate shading of rows) |
|
CONDITION_FACTORY |
Specifies the parameter conditions for database selection |
|
STANDARD_FUNCTIONS |
Switches standard functions on or off |
|
DEFAULT_LAYOUT |
Changes layout, such as sort and grouping order |
Table 1
Methods for working with ALV
Create a Simple ALV IDA Output
Now let’s see a working example of a typical requirement by generating a very simple ALV output. Suppose you have a table SCARR, and you need to show the data of this table in the form of an ALV.
As mentioned earlier, since the advent of class CL_SALV_GUI_TABLE_IDA you no longer need an internal table or any SELECT statement for fetching data from the database. The data retrieval is done by the new ALV class. You simply specify via parameter IV_TABLE_NAME the name of the table from which the data is to be retrieved. If you do not have any selection criteria or filter criteria and you have to display all the rows of the database table SCARR, the statement in Figure 3 is enough.
cl_salv_gui_table_ida=>create(
iv_table_name = ‘SCARR’)->fullscreen( )->display( ).
Figure 3
Output the entire table content
The next section shows the steps to take if you have selection options and parameter values involved. It is worth noting that the above line of code displays the ALV in full screen. The output is shown in Figure 4.
For displaying the ALV in a container, use the container parameter of the CREATE method to specify the container in which the ALV is to be displayed. The steps for this are beyond the scope of this article.
Making ALV with Selection Criteria
The last example was a very simple requirement that did not involve any selections or use any selection criteria, nor did it hide any columns or change the text of column headers. Now let’s see the main steps required to specify selection criteria. You can specify ranges and single values using selection options and parameters, respectively. As an example, I use the CARRID field of the SCARR table for specifying the selection criteria (based on SELECT-OPTIONS entered on screen) and the CURRCODE as a hard-coded parameter value pertaining to only a value of EUR.
First, specify the name of the table with the CREATE method, then call a number of methods in order to specify the selection criteria and parameters. Together, these form the WHERE condition based on which the table records are to be read.
The first step is to call the static method of class CL_SALV_GUI_TABLE_IDA. Pass the name of the table whose data is to be displayed. (Be sure that no full-screen or display method is called until this point.) The code for this is shown in Figure 5.
data(my_alv_object) = cl_salv_gui_table_ida=>create(
iv_table_name = ‘SCARR’).
Figure 5
Use the create method
Specifying Selection Options
Next, you specify the range for field CARRID. As the range is to be taken as input, specify a select option first (Figure 6).
tables scarr.
select-options : s_carr for scarr-carrid .
Figure 6
Select the options for CARRID
Specifying a value range has three small steps. First create an object for the class CL_SALV_RANGE_TAB_COLLECTOR and assign it to a variable MY_RANGE_TABLE (Figure 7).
data(my_range_table) = new cl_salv_range_tab_collector( ).
Figure 7
Create a range table object
The collector, as the name suggests, allows you to collect a number of ranges or select options from internal tables (using ADD_RANGES_FOR_NAME) and combine them into a single internal table (using method GET_COLLECTED_RANGES), which can then be used. For the method ADD_RANGES_FOR_NAME, supply the internal table corresponding to the SELECT options for this method (Figure 8).
my_range_table->add_ranges_for_name(
iv_name =’CARRID’ it_ranges = s_carr[] ).
..
my_range_table->get_collected_ranges(
importing et_named_ranges = data(selection_values) ).
Figure 8
Collect ranges
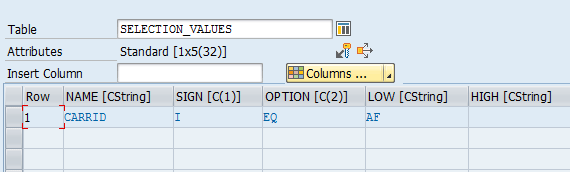
If there is more than one range to be specified, the ADD_RANGES_FOR_NAME method can be called multiple times. Finally, you can call the GET_COLLECTED_RANGES method once. After you call this method, the contents (selection criteria) are returned as an importing parameter in internal table SELECTION_VALUES, as shown in Figure 9.
I use these in a later step to specify the criteria (WHERE condition) based on which the data is to be filtered.
Specify Parameter/Single Field Values
Next, you specify the condition value for the currency code CURRCODE. As mentioned earlier, you must display rows that correspond to the CURRCODE equal to EUR. This can be written in two steps.
First, call the condition_factory method using the MY_ALV_OBJECT. This returns a reference to the condition object. Then call the method equals. This method takes as input the name of the table field as well as the value that you want to set for fetching data. The code for this is shown in Figure 10.
data(parameters) =
my_alv_object->condition_factory( ).
data(parameter_value) = parameters->equals( name = ‘CURRCODE’
value = ‘EUR’ ).
Figure 10
Set a condition for parameters
This returns the PARAMETER_VALUE based on class L_SALV_IDA_CONDITION_FACTORY.
Specify Selection Options and Display ALV
For the ALV object, now call the SET_SELECTION_OPTIONS method to link the applied selection option and parameter values to the ALV object (Figure 11).
my_alv_object->set_select_options(
it_ranges = selection_values
io_condition = parameter_value ).
Figure 11
Link the select options and parameters to an ALV object
Once this is done, you are ready to display the ALV using the full-screen and display methods. Finally, you see the full-screen method and the display method using ALV_OBJECT (Figure 12).
my_alv_object->fullscreen( )->display( ).
Figure 12
Display ALV
The complete coding for this is shown in Figure 13.
tables scarr.
select-options : s_carr for scarr-carrid .
try.
data(my_alv_object) = cl_salv_gui_table_ida=>create(
iv_table_name = ‘SCARR’).
data(my_range_table) = new cl_salv_range_tab_collector( ).
my_range_table->add_ranges_for_name(
iv_name =’CARRID’ it_ranges = s_carr[] ).
my_range_table->get_collected_ranges(
importing et_named_ranges = data(selection_values) ).
data(parameters) =
my_alv_object->condition_factory( ).
data(parameter_value) = parameters->equals( name = ‘CURRCODE’
value = ‘EUR’ ).
my_alv_object->set_select_options(
it_ranges = selection_values
io_condition = parameter_value ).
my_alv_object->fullscreen( )->display( ).
catch cx_salv_db_table_not_supported.
catch cx_salv_ida_contract_violation.
endtry.
Figure 13
Complete coding for the requirement
The output of the program is shown in Figure 14.
Change the ALV Look and Feel
Now that you are done with the basics of displaying ALV using IDA, let’s complicate things a little and change the display of the ALV.
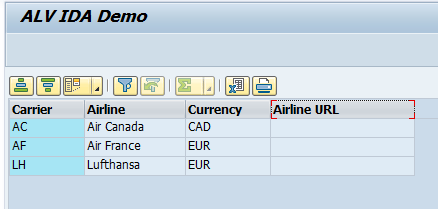
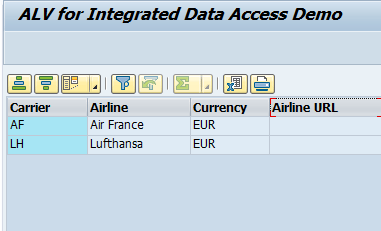
Consider a scenario in which it may not be necessary to display all the fields of the table in question (in my example, table SCARR). As you will note in Figure 14, the URL field is empty, so it is better to remove this from the display. For this, you need to add a few more steps to the code you wrote in the previous section. Before the display method, you need to insert lines that fetch the list of available fields from the field catalog of the ALV. You then delete the URL field from it.
Access the field catalog using the FIELD_CATALOG method, which gives access to two important methods, namely SET_AVAILABLE_FIELDS and GET_AVAILABLE_FIELDS, for reading the existing displayed fields in the ALV and specifying the new set of displayed fields. Use the code in Figure 15.
my_alv_object->field_catalog( )->get_available_fields(
IMPORTING ets_field_names = data(displayed_fields) ) .
Figure 15
Get the displayed field names
This method returns the name of the displayed columns as an internal table (corresponding to parameter ETS_FIELD_NAMES). You have specified the name of the internal table as DISPLAYED_FIELDS. Once this method is called and successful, the four columns displayed are included in the internal table, as shown in Figure 16.

Use a DELETE statement to delete the URL row from the internal table (Figure 17).
delete displayed_fields where table_line eq ‘URL’.
Figure 17
Delete statement
Next, use the SET_AVAILABLE_FIELDS method to specify the new set of displayed fields (Figure 18).
my_alv_object->field_catalog( )->set_available_fields(
exporting its_field_names = displayed_fields ) .
Figure 18
Specify a new set of displayed fields
Once this is done, you have successfully removed the last column of URL. The changed output is shown in Figure 19.
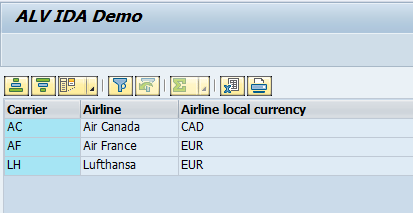
Now let’s see how to change the column headers of the various fields. Suppose you need to change the header text of the Currency column. Instead of Airline local currency (as shown in Figure 19), you need this to say Payment Currency, and the tooltip should only be Currency.
For this, you call another method using the field catalog object. This method is SET_FIELD_HEADER_TEXTS, as shown in Figure 20.
my_alv_object->field_catalog( )->set_field_header_texts(
iv_field_name = ‘CURRCODE’
iv_header_text = ‘Payment Currency’
iv_tooltip_text = ‘Currency’ ).
Figure 20
Change the header text
For the method, you have the parameter iv_field_name. Here, specify the field name for which the change is to be made. The parameters iv_header_text and iv_tooltip_text are used to specify the new header text and tooltip text, respectively.
Using this method, you can specify only one field text item at a time. If more than one field header needs to be changed, you include this method call multiple times, using a separate call to method SET_FIELD_HEADER_TEXTS each time. The changed header text is shown in Figure 21.
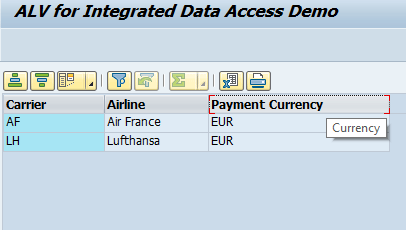
As you see, you have changed both the currency header text and the tooltip. Now set the zebra ALV style by making rows alternately light and dark gray. Use the display_options method along with the enable_alternating_row_pattern method. The coding for this is shown in Figure 22.
my_alv_object->display_options()->enable_alternating_row_pattern( ).
Figure 22
Enable alternate row coloring
Once this is done, you get the output shown in Figure 23.
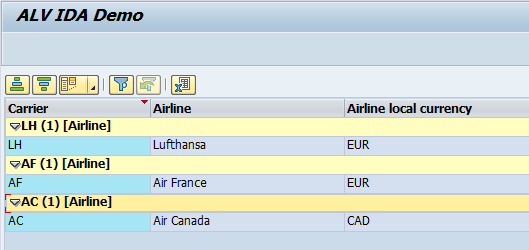
As in traditional ALV, you can also set the sort order of the field columns using the IDA ALV. For this, access the layout by using the DEFAULT_LAYOUT method. Then apply the SET_SORT_ORDER method to specify the field name(s) and the sorting criteria (descending or ascending). You can also specify whether a particular field can be used as a grouping criterion.
The SET_SORT_ORDER method takes an internal table that has three fields as input, namely FIELD_NAME, IS_GROUPED, and DESCENDING. Since in my example you need to create a grouping according to the field CARRID and want it to sort the same way in descending order, pass a single row to the internal table parameter, as shown in Figure 24.
my_alv_object->default_layout( )->set_sort_order(
value #( ( field_name = ‘CARRID’
IS_GROUPED = abap_true
DESCENDING = abap_true ) ) ) .
“” set grouping/sorting order
Figure 24
Set the sort order
You can also enable or disable certain functions if you like. The ALV standard functions object is accessed using the STANDARD_FUNCTIONS method. The interface provides a number of useful methods for enabling or disabling the functions available on the ALV toolbar. The various methods used for enabling or disabling functions on the ALV toolbar are shown in Table 2.
|
Method |
Function to be Enabled or Disabled |
|
SET_EXPORT_ACTIVE |
Export |
|
SET_PRINT_ACTIVE |
|
|
SET_FILTER_ACTIVE |
Filter |
|
SET_SORT_ACTIVE |
Sort (ascending or descending) |
|
SET_DETAIL_ACTIVE |
Detail |
|
SET_AGGREGATION_ACTIVE |
All aggregations |
|
SET_TEXT_SEARCH_ACTIVE |
Text search |
Table 2
Methods for enabling (or disabling) toolbar functions
The same set of functions can be used for enabling or disabling a particular function. If you want to enable something, pass a TRUE value. To disable, pass a FALSE value.
After calling the STANDARD_FUNCTIONS method earlier, you can use the relevant method shown in Table 2 to enable or disable the toolbar button in question. Sample code for this is shown in Figure 25.
alv_object->standard_functions( )->set_print_active( iv_active = abap_false ) .
alv_object->standard_functions( )->set_aggregation_active( iv_active = abap_false ).
Figure 25
Remove the aggregation and print functions
With this code, you make the print and the aggregation functions inactive. Finally, after applying all the methods, you get the ALV output shown in Figure 26.
Last but not least, as mentioned in the overview, one advantage of the IDA approach is that it can also generate ALV output directly from a CDS view. The method used for this is CREATE_FOR_CDS_VIEW. For example, if the CDS view name is ZVW_MY_VIEW, the corresponding code is like the one shown in Figure 27.
CL_SALV_GUI_TABLE_IDA=>CREATE_FOR_CDS_VIEW(‘ ZVW_MY_VIEW’ )->fullscreen( )->display( ).
Figure 27
Use a CDS view in ALV Display
(Note: As in the case of traditional ALV, it is also possible to add your own button on the ALV toolbar. A method TOOLBAR is provided to change the look and feel of the standard toolbar.)