Manager
Learn how to set up and use SAP Solution Manager Root Cause Analysis and Wily Introscope Enterprise Manager.
Key Concept
End-to-End Root Cause Analysis offers systematic analysis and resolution of incidents for a distributed environment. End-to-End (E2E) Root Cause Analysis is part of SAP Solution Manager and uses SAP NetWeaver Business Warehouse (SAP NetWeaver BW) and CA Wily Introscope Right to View (RTV) to achieve E2E Root Cause Analysis. CA Wily Introscope is a performance management solution that enables you to monitor complex Web applications in production environments. You can download it from the SAP Service Marketplace. CA Wily Introscope and SAP signed an agreement in July 2006 that allows you to use CA Wily Introscope with SAP-developed dashboards and instrumentation as part of SAP Solution Manager.
To ensure the continuous operation of your applications, you must provide comprehensive support that manages the complexity of systems, risks, costs, and resources. Given the nature of today’s IT environment, which typically involves running diverse software in a highly distributed landscape, managing individual applications has become increasingly difficult. In a distributed, multi-technology solution with multi-channel access through various devices and client applications, analyzing the root cause of an incident requires a systematic top-down approach. By implementing SAP End-to-End (E2E) solution operations, organizations can achieve greater efficiency, transparency, and security in their application management.
Here’s an example of how E2E Root Cause Analysis works. If an end user experiences a browser performance problem, the performance hit could be in the client network or server environment, which comprises various instances of many different technologies. Server-side processing may take place in SAP NetWeaver Portal, reach out to an SAP ERP Central Component (SAP ECC) back end, and finally, call the database and the storage subsystem for data retrieval. A performance problem or functional defect may occur in any of the stages of this “round trip.” E2E Root Cause Analysis can identify the specific component that is causing the performance bottleneck.
The Root Cause Analysis tools do not allow changes by SAP support unless they are explicitly requested by the client and enforced by their change management process. I’ll explain how to use E2E Root Cause Analysis and give step-by-step directions on how to set up Root Cause Analysis in SAP Solution Manager and Wily Introscope Enterprise Manager.
E2E Root Cause Analysis Overview
E2E Root Cause Analysis is comprised of the following applications:
- E2E Workload Analysis
- E2E Exception Analysis
- E2E Trace Analysis (for Internet Explorer-based scenarios)
- E2E Change Analysis
The goal of E2E Workload Analysis is to provide access to statistical performance data of different systems. You can perform a cross-system correlation analysis based on the temporal behavior of performance metrics. Key performance indicators (KPIs) are calculated and displayed, allowing you to quickly gauge which system or product instance is the root cause of a potential performance problem. For an actual problem, you can use Introscope, which extracts data hourly.
To achieve Root Cause Analysis in SAP Solution Manager, statistical performance data has to be collected from various sources of different system types. Performance matrixes are collected based on an SAP instance product such as SAP Customer Relationship Management (SAP CRM) ABAP or Java for SAP NetWeaver Portal. The technical infrastructure to collect the data is the Extractor Framework (EFWK) as shown in Figure 1. Based on the product instance, EFWK collects key KPIs and stores them in SAP NetWeaver BW for reporting.
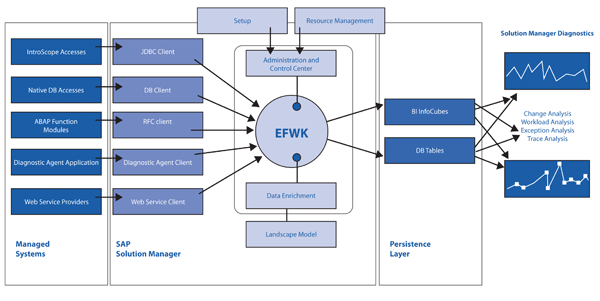
Figure 1
E2E extractor framework and SAP NetWeaver BW overview
E2E Workload Analysis provides a full range of analytical tools available in SAP NetWeaver BW as the statistical performance metrics are stored in dedicated SAP-delivered InfoCubes. Thus, the EFWK collects the performance data on an hourly basis from specific extractors or agents and stores it in SAP NetWeaver BW. Extractor framework collects data both from Wily and Solution Manager Diagnostics (SMD) agents. For example, for ABAP-based instances, the EFWK collects data via Remote Function Call (RFC) connections (Figure 1). E2E Workload Analysis displays the data using Web-rendering technologies supplied by SAP NetWeaver BW. The same technological approach is used for both E2E Exception Analysis and E2E Change Analysis.
The goal of the E2E Exception Analysis is to easily and efficiently identify the most frequent errors and the applications causing them. It provides an overview of dumps and exceptions from both ABAP- and J2EE-based instances and adds application-specific views if the monitored system is running SAP CRM or SAP NetWeaver BW components (e.g., status information for Business Documents [BDocs] and queued RFCs [qRFCs]). Dedicated KPIs are calculated and displayed, allowing you to quickly isolate locations that cause a large number of errors or an unusual number of critical system errors.
Thus, E2E Exception Analysis serves as a central hub for the analysis of errors, exceptions, and dumps across all monitored systems. All data is extracted in regular intervals and can either be displayed in a condensed manner or in greater detail according to the requirements. In-depth analysis of specific error states can be initiated by accessing individual logs, traces, or transactions through various jump-in features. You can jump in the back-end system for more information about that issue, using RFC connections to jump to the system that is having issues.
When an E2E trace is performed, a passport is sent with each request through all monitored systems. This passport contains trace flags and correlates trace information. Depending on the trace flags, each system writes the relevant traces locally. (If the trace flags are not written locally, they do not work.) The passport has the capability to analyze across a complete solution landscape so a component causing a problem can be isolated and the root cause can be identified. Therefore, the response times of each component involved in the request execution and the request path through the involved components are provided for a detailed analysis.
E2E Change Analysis provides a top-down view of the configuration parameter and software (configuration items) changes of the managed systems. It is based on the data of the Configuration and Change Database (CCDB), which is part of SMD. The total number of changes made is stored in SAP NetWeaver BW. The configuration data itself is stored in the CCDB.
Note
The configuration of the text and screenprints in this article is based on SAP Solution Manager 7.0 Support Package 17, running on Microsoft Server 2003 SP2 with MSSQL 2005 SP2 database. The SOLMAN_SETUP functionality, which covers some of the steps in this article, was introduced with enhancement package 1 or Support Package 18 and therefore is not used in this article.
CA Wily Introscope and SAP
Figure 2 shows the Wily Introscope Enterprise Manager infrastructure. It collects performance matrix data from Wily agents running on different SAP instances and writes that data to local SmartStors (which contain all the information collected by the Wily agents). Users can access real-time, historical, and performance data in different dashboards via Introscope WebView and Workstation. SAP Solution Manager extracts performance matrix data and stores it in SAP NetWeaver BW for E2E Root Cause Analysis.
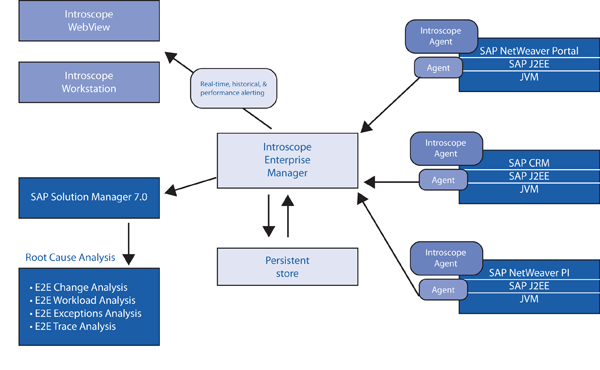
Figure 2
CA Wily Introscope architecture
Before You Begin
E2E Root Cause Analysis requires SAP Solution Manager 7.0 with a double-stack system (i.e., SAP NetWeaver Application Server ABAP and Java in one SAP system). You should run SAP Solution Manager on Unicode. SAP recommends that companies migrate SAP NetWeaver Application Server ABAP to Unicode if they have upgraded from previous releases of SAP Solution Manager 7.0 and are not yet on Unicode. You need to have the following software components in SAP Solution Manager installed to be able to convert to use Root Cause Analysis.
To check the ABAP Stack, follow menu path Menu > System Status. Figure 3 shows the installed ABAP component information in SAP Solution Manager. You are required to have the following installed:
- BI Content 703 SP08
- ST 400 SP16
- ST-SER 700_2008_1 SP04
- ST-A/PI 01J_CRM500
- SAP NetWeaver BW SP16
- IGS 7.00 patch 10
- SAP NetWeaver PI Basis 2005_1_700 SP16
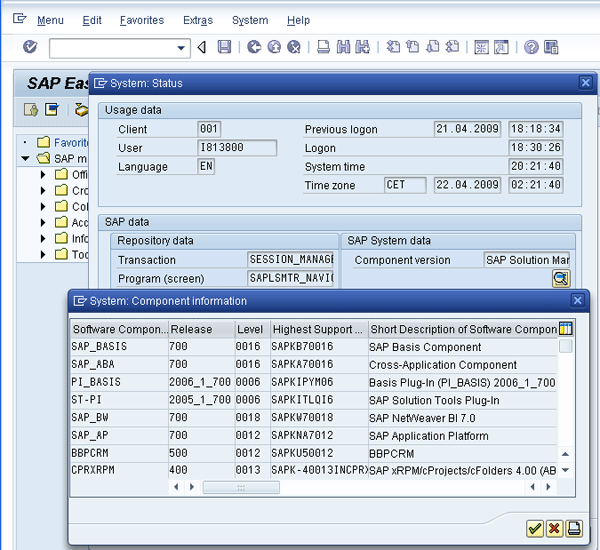
Figure 3
ABAP component information for SAP Solution Manager 7.0
For the Java stack, you should have the following installed:
- LMService SP17
- ISAgent.sca 7.2 P11
- SMDAGENT.SAR SP16
To check Java components, go to https://< ServerName :<port>/sap/monitoring/ComponentInfo and log in as j2ee_admin or as a user that has an SAP_J2EE_ADMIN role. You should see a screen similar to the one shown in Figure 4.
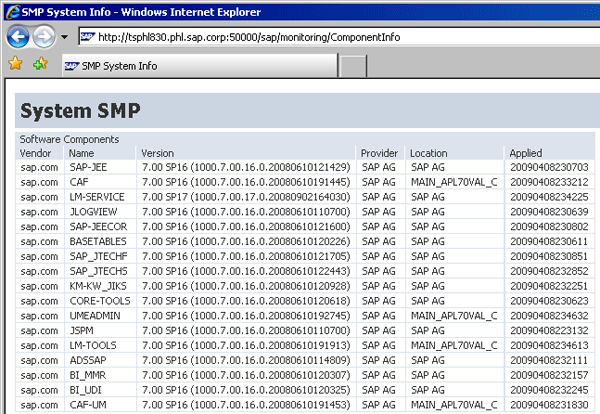
Figure 4
Java component information for SAP Solution Manager 7.0
Note that you should be mindful of the Support Package release levels. Do not mix different versions. The ABAP and Java stack must be on the same release or Root Cause Analysis does not work properly.
Figure 5 shows the users that are mandatory for the installation of Root Cause Analysis in SAP Solution Manager. The passwords for all of these users are required during the installation.
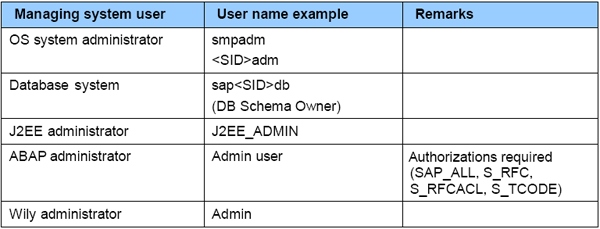
Figure 5
Required users for installation and configuration
To use the full functionality of E2E Root Cause Analysis, the following software component must be installed on the user’s computer:
Before configuring E2E Root Cause Analysis, certain IMG activities for SAP Solution Manager need to be completed in transaction SPRO. Find these activities by navigating to SAP Solution Manager > Configuration > Basic Settings > Wizard-based Initial Configuration of Basic Settings > Solution Manager > General Configuration. These steps should already have been performed by the Basis team.
To install and configure SMD, perform the following steps in SAP Solution Manager:
- Deploy ISAgent and LS-Service software
- Change the work process for SAP NetWeaver BW reporting
- Activate the SAP NetWeaver BW source system
- Change the SAP NetWeaver BW authorization concept
- Install Wily Introscope Enterprise Manager and SAP Management Modules
- Execute the managing system wizard
- Configure the remote connection for SAP Support
- Generate Profile Roles SAP_BI_E2E and SAP_SATELLITE_E2E_DISP
- Set up SAP Solution Manager
In the following sections, I’ll describe each of these activities.
Deploy ISAgent and LS-Service Software
First, download and deploy the latest Wily Introscope IS Agent software from the SAP Service Marketplace. Navigate to https://service.sap.com/swdc > Download > Support Packages and Patches > Support Packages and Patches - Entry by Application Group > SAP Technology Components > SAP SOLUTION MANAGER > SAP SOLUTION MANAGER 7.0 > Entry by Component > Agents for Satellite Systems > WILY INTROSCOPE AGENT 7.2 > # OS independent > ISAGENTSMD72_03-10005468.SCA.
After you download the ISAgent software, you can use the Software Deployment Manager (SDM) in the SAP Solution Manager Java stack to deploy it. Move the downloaded SCA file above to D:usrsaptransEPSin (this is the drive I’m using in my example). Log in to the operating system level in SAP Solution Manager with an ADM username and launch SDM by navigating to D:usrsap/SDMprogramRemoteGUI.bat (Figure 6).
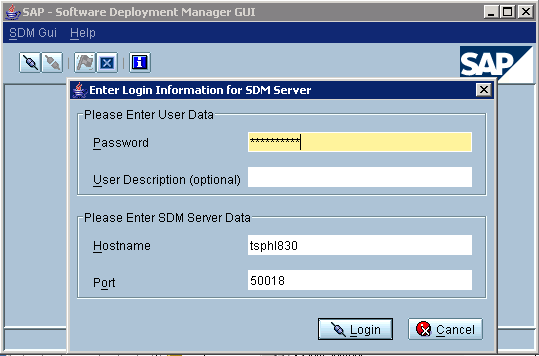
Figure 6
Log in to SDM
Once you are logged in, go to the Deployment tab and select the Wily Introscope Agent 7.2 SCA file downloaded earlier and click the Next button (Figure 7). Continue to click Next until you see the ready to deploy screen shown in Figure 8.
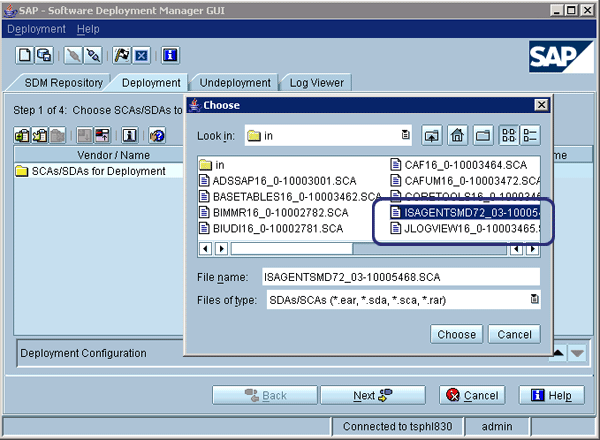
Figure 7
Select Wily Introscope Agent ISAgent
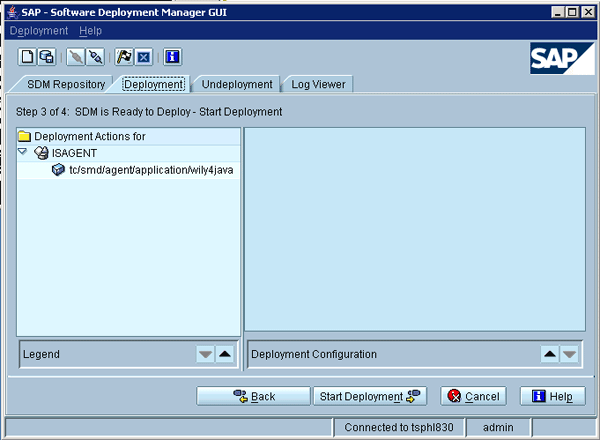
Figure 8
Start the deployment of ISAGENT
Depending on your hardware resources, this deployment might take several minutes. Once the deployment of ISAGENT is completed successfully, confirm it by clicking the Confirm button (Figure 9).
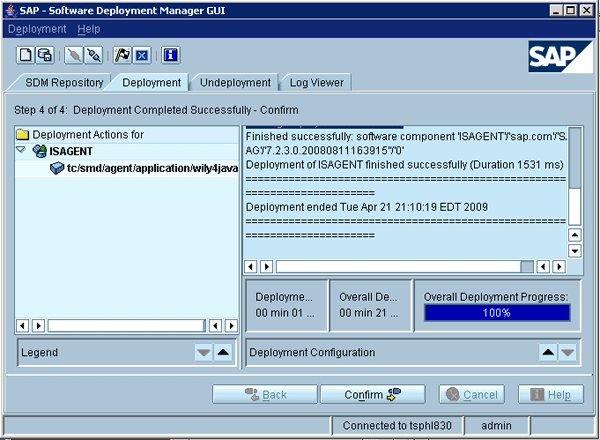
Figure 9
Confirm the deployment of ISAgent
Next, download and deploy the latest LS-Service software from the SAP Service Marketplace. Navigate to https://service.sap.com/swdc > Download > Support Packages and Patches > Support Packages and Patches - Entry by Application Group > SAP Technology Components > SAP SOLUTION MANAGER > SAP SOLUTION MANAGER 7.0 > Entry by Component > Solution Manager JAVA Stack > SOLMANDIAG 7.00 > # OS independent > LMSERVICE17P_5-20001429.SCA. You can then deploy LS-Service software the same way as ISAgent.
Change the Work Process for SAP NetWeaver BW Reporting
To ensure that SAP Solution Manager has enough work processes to process all the SAP NetWeaver BW reporting and avoid running into performance issues, you need to increase the background processes to a minimum of three. The Diagnostics extractor framework manages the data extraction for three parts of Root Cause Analysis: E2E Workload Analysis, E2E Change Analysis, and E2E Exception Analysis. Depending on the number of managed systems, this can potentially consume all available batch work processes of SAP Solution Manager. The more work processes you have, the better the SAP instance performs. If you do not have enough work processes, requests have to wait until a work process is free.
To change work processes, enter transaction RZ10 in SAP Solution Manager. In the Profile field, enter the profile as __ with your particular parameters and click the Change button (Figure 10).
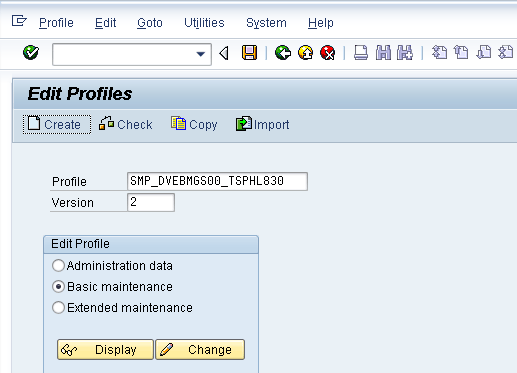
Figure 10
Change work processes
In the next screen, increase background work processes to at least three (Figure 11). Depending on the system resources you have available for SAP Solution Manager, you can increase background work processes to a much higher number. In this case, I’m increasing to six background work processes. Click Copy and save the profile.
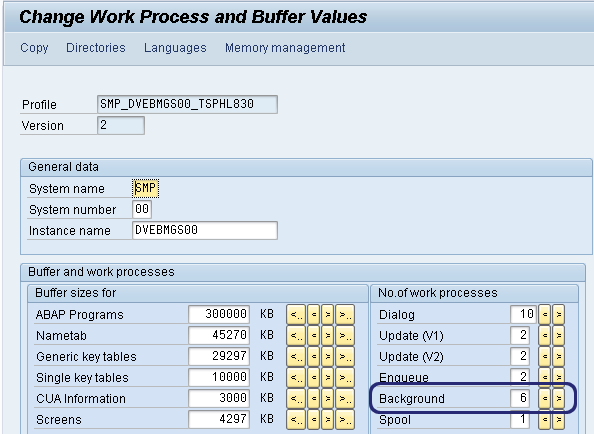
Figure 11
Change background work processes
Note that a restart of the SAP Solution Manager instance is required for this to take effect. Log in to the OS level in SAP Solution Manager with an ADM username and launch sapmmc. Stop the SAP Solution Manager instance by right-clicking the SAP Solution Manager SMD and selecting Stop (Figure 12). SMD is the SID of SAP Solution Manager. It is based on the SID chosen during the installation of SAP Solution Manager. You can then restart the instance by following the same process and clicking Start.
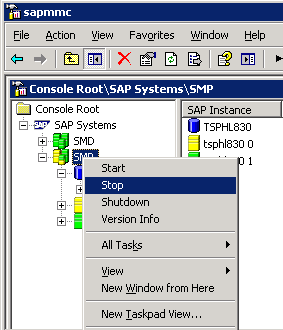
Figure 12
Stop the SAP Solution Manager instance
Activate the SAP NetWeaver BW Source System
SMD requires SAP NetWeaver BW to be activated. SAP Solution Manager has SAP NetWeaver BW installed but you can use a separate SAP NetWeaver BW installation if needed. You can use different systems for reporting, but my recommendation is to use SAP Solution Manager because it easy to set up and manage in the future.
You will see the following set of pop-ups the first time you run transaction code RSA1 in SAP Solution Manager. In the Replicate Metadata? pop-up, click the Replicate As Well button (Figure 13).
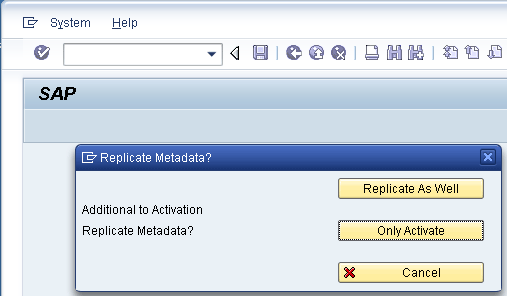
Figure 13
Replicate metadata
Next, select the this and following 8 as 3.x DataSource (ISFS) option when asked how you would like to create the object in SAP NetWeaver BW. Confirm by clicking the green checkmark icon (Figure 14).
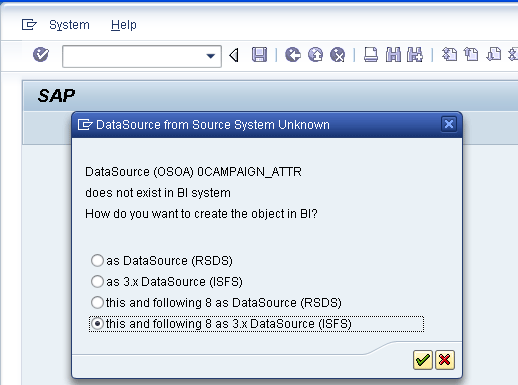
Figure 14
Select DataSource type
The technical SAP NetWeaver BW content must be installed or activated. The technical content is installed automatically in the background (background job BI_TCO_ACTIVATION) when you execute transaction code RSA1 for the first time. A pop-up confirms this for you (Figure 15).
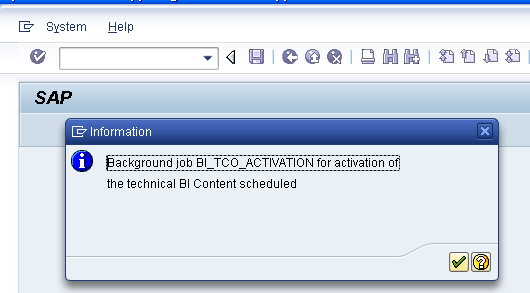
Figure 15
Confirm background job
Before performing any other SAP NetWeaver BW configuration, verify that background job BI_TCO_ACTIVATION has completed successfully. Enter transaction code SM37 in SAP Solution Manager and enter the job name BI_TCO_ACTIVATION. You should see the screen shown in Figure 16 if it has been completed.
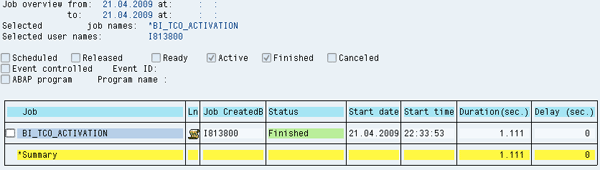
Figure 16
Background job BI_TCO_ACTIVATION is completed successfully
Change the SAP NetWeaver BW Authorization Concept
SAP NetWeaver BW has two types of authorization objects. The first, an authorization object, restricts SAP NetWeaver BW users from completing certain functions such as creating queries or assigning them to roles. SAP NetWeaver BW provides all the required authorization objects for this classification type, so you don’t need to create custom objects in this category. The other type of authorization object, reporting (RSR), restricts users from seeing certain data. SAP NetWeaver BW does not provide standard RSR authorization objects so you have to create them yourself using transaction RSSM. RSR authorization objects are needed for SMD.
To change the SAP NetWeaver BW authorization concept, go to transaction RSCUSTV23 and enter Obsolete Concept with RSR Authorization Objects in the Authorization mode field. Save your work (Figure 17).
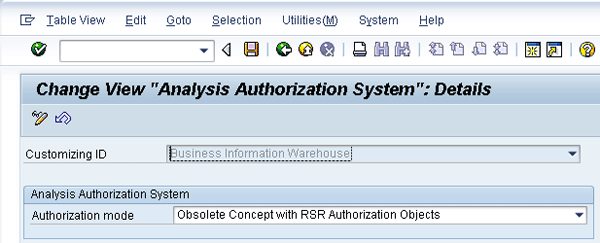
Figure 17
Authorization concept
You are prompted to create a change request shell, in which you can put all the configuration in a transport request. Create a new change request and save it (Figure 18).
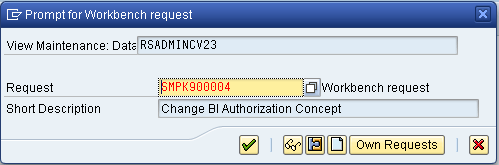
Figure 18
Create a new change request.
Install Wily Introscope Enterprise Manager and SAP Management Modules
First download Wily Introscope Enterprise Manager to install it. Navigate to https://service.sap.com/swdc > Download > Support Packages and Patches > Support Packages and Patches - Entry by Application Group > SAP Technology Components > SAP SOLUTION MANAGER > SAP SOLUTION MANAGER 7.0 > Entry by Component > Solution Manager JAVA Stack > WILY INTROSCOPE ENTPR MGR 7.2 > Win32 > SAPISEM72_02-10005646.SAR.
Next, download SAP Management Modules for Wily Introscope. Navigate to service.sap.com/swdc > Download > Support Packages and Patches > Support Packages and Patches - Entry by Application Group > SAP Technology Components > SAP SOLUTION MANAGER > SAP SOLUTION MANAGER 7.0 > Entry by Component > Solution Manager JAVA Stack > WILY INTROSCOPE ENTPR MGR 7.2 > # OS independent > SAPISMM72_02-10005644.SAR. Now you can set up these products in SAP Solution Manager by following these steps.
Step 1. Unzip or extract the Enterprise Manager file sapcar –xvf SAPISEM71_09xxx.SAR. As a result, you find two extracted files: the file installer.properties and introscope7.2.2.0windowsSAPExpertCenter.exe (Figure 19).

Figure 19
Wily Introscope executable file
Step 2. Edit the installer.properties file. Open the file installer.properties in a text editor. Locate the USER_INSTALL_DIR property and change the install directory location to USER_INSTALL_DIR=D:\usr\sap\ccms\wilyintroscope\ (Figure 20).
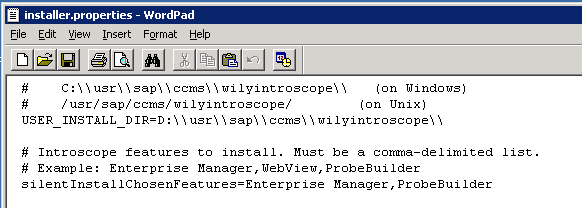
Figure 20
Edit the installer.properties file
Step 3. Execute introscope7.2.2.0windowsSAPExpertCenter.exe. The installation runs in the background mode and no GUI is displayed during the installation.
Step 4. Verify the installation of Wily Introscope Enterprise Manager. The installer does not give you a confirmation of a successful installation on the console. To confirm installation was successful, you must:
- Verify that the Introscope directory exists at /usr/sap/ccms/wilyintroscope or C:\usr\sap\ccms\wilyintroscope\
- Open the file /usr/sap/ccms/wilyintroscope/install/Introscope_InstallLog.log
- Verify that the following lines appear at the top of the file:
- Summary
- Installation: Successful:
- 170 SUCCESSES
- 0 WARNINGS
- 0 NONFATAL ERRORS
- 0 FATAL ERRORS
Step 5. Ensure that Wily Enterprise Manager is registered as a Windows service. You can do this by finding the local services on the server where you installed Wily Introscope Enterprise Manager (Figure 21).

Figure 21
Check your local services to verify the installation
Then, to install the SAP Management Modules for Wily Introscope Enterprise Manager, extract the file SAPISMM71_xx.SAR in the home directory of the Enterprise Manager installation (e.g., D:\usr\sap\ccms\wilyintroscope\). Note that these newly installed management modules only become active after the Wily Introscope Enterprise Manager is restarted.
Execute the Managing System Wizard
To set up SMD, you need to use the setup wizard in SAP Solution Manager. Go to https://:500 > Diagnostics Setup > Diagnostics System > Setup Wizard. A message appears telling you that you need to run the upgrade first (Figure 22).
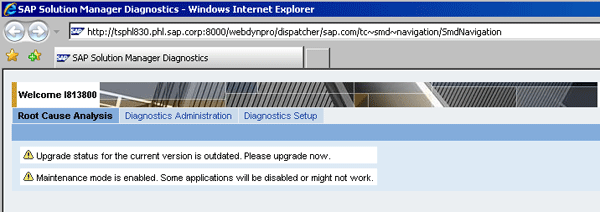
Figure 22
Alert that you need to upgrade
Run the upgrade by going to Diagnostics Setup > Diagnostics System > Setup Wizard > Upgrader. Start the upgrade by clicking the Upgrade Now button (Figure 23).
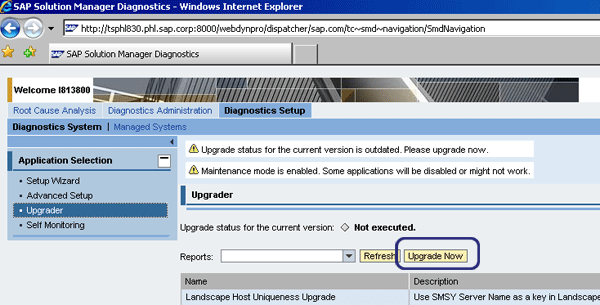
Figure 23
Upgrade SMD
Execute the Managing System Wizard by following menu path Diagnostics Setup > Diagnostics System > Setup Wizard. Fill out all the required fields (i.e., the ones with entries in Figure 24).
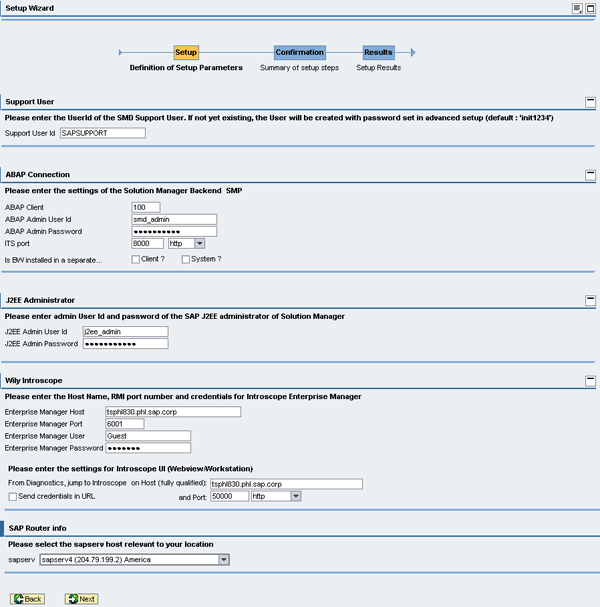
Figure 24
SMD setup wizard page
Figure 25 appears when you click the Next button. This shows all the steps that will be executed in SAP Solution Manager to configure Root Cause Analysis.
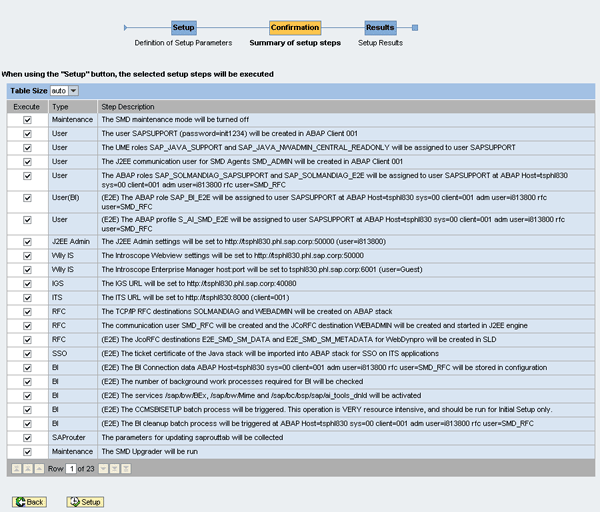
Figure 25
Setup steps executed in SAP Solution Manager
Make sure you check the box for CCMSBISETUP shown in Figure 25 (fourth from the bottom). The Setup Wizard indicates a background job. This job is resource intensive. Before running this setup, verify that the SAP NetWeaver BW source system was activated. CCMSBISETUP activates all the InfoCubes and SAP NetWeaver BW reports for Root Cause Analysis. You can verify that CCMSBISETUP is successfully completed via transaction SM37 (Figure 26).
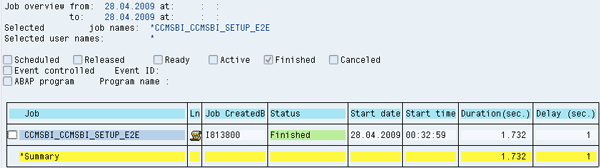
Figure 26
Verify that the status is Finished
Configure the Remote Connection for SAP Support
Adjust the SAProuter configuration file saprouttab using the information given by the Diagnostics Setup Wizard results (Figure 27).
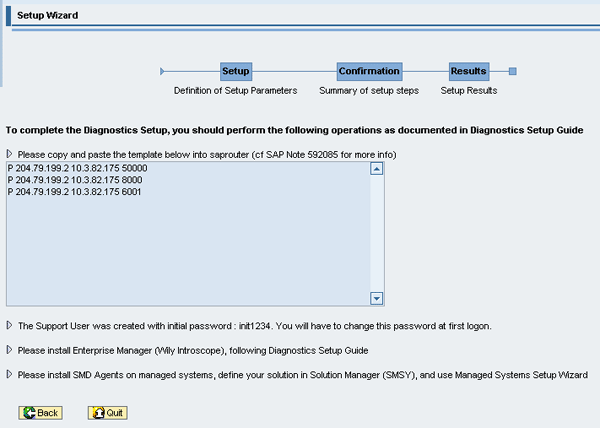
Figure 27
Diagnostics Setup Wizard results to add in SAProuter
Generate Profile Roles SAP_BI_E2E and SAP_SATELLITE_E2E_DISP
To use SMD, you need to generate SAP role SAP_BI_E2E and SAP_SATELLITE_E2E_DISP to enable users to have proper authorizations. Use transaction PFCG and select the role SAP_BI_E2E (Figure 28). Repeat this process to generate the SAP role SAP_SATELLITE_E2E_DISP.
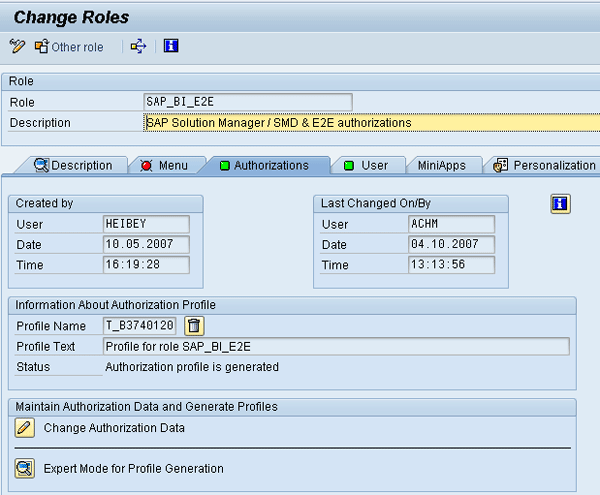
Figure 28
Select roles
Set Up SAP Solution Manager SLD
The data in the bullets below is retrieved from SLD by SAP Solution Manager. You must import SLD into the SAP Solution Manager local landscape directory (SMSY), which acts as a central point for all the SAP systems documented. SMSY is used by SMD during the setup of satellite systems.
For ABAP systems:
- System name and number
- Message server
- Clients (information from client table T000)
- Installed software components
- Releases and patch levels
- Instances of the system
- Servers assigned to the instances
- Server data
- Databases of a system
- Server of a database
- License keys from system
For Java systems:
- Instances of the system
- Servers assigned to the instances
- Server roles (types)
- Installed software components, releases, and patch levels
You should use SLD locally in your SAP Solution Manager system. To set up SLD locally, access the SAP NetWeaver Administrator by going to Deploy and Change Tab (Figure 29).

Figure 29
Configuration templates for SLD in SAP NetWeaver administrator page
Run the following Configuration Wizard templates for SLD:
- NWA_01_This wizard will execute configuration for local SLD
- NWA_02_SLD system: Connect SLD to CEN (if CEN present)
- NWA_03_Creating a connection to the SLD and Setting required authorizations for SLD (CIM client settings)
Import all the systems from SLD to your SAP Solution Manager System and SLD. This automatically populates SMSY in SAP Solution Manager. Root Cause Analysis uses this information during the setup of satellite systems.
Log on to the ABAP stack of SAP Solution Manager to switch SAP Solution Manager from the Transport Management System (TMS)/RFC to SAP Solution Manager local SLD. Enter transaction SMSY_SETUP and change the settings from TMS/RFC to System and Landscape Directory (SLD) as shown in Figure 30.
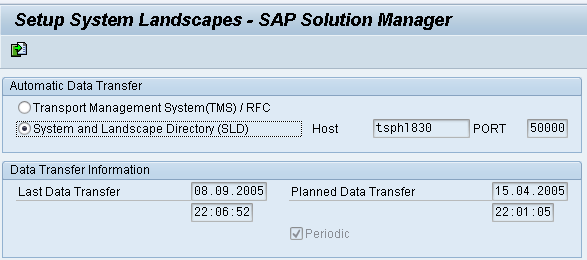
Figure 30
Data transfer for system landscapes in SAP Solution Manager
You can verify that background job LANDSCAPE FETCH finished successfully by using transaction SM37.
Labinot Bytyqi
Labinot Bytyqi graduated with a degree in computer science and business management and a minor in economics from George Fox University in 2005. Currently, he is pursuing a master’s degree in information technology management. Labinot joined SAP in 2007 as a technical consultant with more than eight years of information technology experience and SAP consulting, particularly in the application lifecycle management area, where he was a lead for an SAP Solution Manager and extensions practice in the West region. Labinot currently is responsible for field services software sales portfolio business development and strategy, as well as for SAP Extended Diagnostics by CA Wily.
You may contact the author at labinot.bytyqi@sap.com.
If you have comments about this article or publication, or would like to submit an article idea, please contact the editor.