Gain an overview of the technical prerequisites for installing the SAP Lumira, server for Business Intelligence (BI) platform, add-on. Learn about workflows and the functionality that is now available to your users with SAP Lumira, server for BI platform, and the steps for using these new capabilities.
Key Concept
SAP Lumira has mainly been seen as a pure desktop environment and sharing of documents was often done by sharing actual SAP Lumira documents via email. With the addition of SAP Lumira, server for Business Intelligence (BI) platform, companies can now integrate their SAP Lumira desktop installations as well as all their SAP Lumira documents with their existing SAP BusinessObjects BI landscape and in that way share SAP Lumira documents without having to install SAP Lumira desktop.
With the addition of SAP Lumira, server for BI platform, your users now have very easy options to save, share, edit, view, and schedule SAP Lumira documents via the SAP Lumira server add-on for the SAP BusinessObjects Business Intelligence (BI) platform. I explain the steps needed to install and configure the SAP Lumira, server for BI platform, add-on as part of your overall BI landscape. Using this new SAP BusinessObjects BI platform add-on, companies can now integrate their SAP Lumira documents the same way any other BI client documents are integrated.
Prerequisites
To install SAP Lumira, server for BI platform, as part of your
overall SAP BusinessObjects BI landscape, you need to make sure the
following prerequisites have been fulfilled:
- Your SAP BusinessObjects BI landscape needs to be on release 4.1, Service Pack 04 or higher.
- You need to have Windows 2008 or Windows 2012 server as your operating system (OS).
- You need to have at least 16 GB of RAM, but 32 GB of RAM are recommended.
Note that in the current release (SAP Lumira release 1.28), English is the only supported language for SAP Lumira, server for BI platform.
First, I show you how to set up the authorizations on the SAP BusinessObjects BI platform to structure the necessary user rights for leveraging SAP Lumira documents as part of the SAP BusinessObjects BI platform. I then explain how to create a new SAP Lumira document and how to save and share the document via the BI platform. Finally, I show you how to schedule an SAP Lumira document so that you can keep a set of historic instances.
Set Up Authorizations
After the SAP Lumira, server for BI platform, add-on has been installed on your SAP BusinessObjects BI platform, you can set up the user rights for SAP Lumira-related tasks, such as creating, viewing, editing, or sharing a document. You also must perform some initial configuration tasks for the new SAP Lumira services as part of your overall platform.
To set up the necessary rights for your users, you should consider creating specific user groups for your SAP Lumira-related tasks so that you can quickly assign your users to these user groups, depending on their rights. For example, create one group named LUMIRA_VIEWING and another group named LUMIRA_EDITING.
Set Up User Groups
To create these user groups, follow these steps.
1. Log on with an administrative account to the Central Management Console of your SAP BusinessObjects BI server and navigate to Users and Groups under the category Organize (Figure 1).

Figure 1
Log on to the Central Management Console homepage and select Users and Groups
2. In the next screen (Figure 2) expand the Group Hierarchy node, and in the ribbon at the top of the screen, select Manage > New > New Group from the drop-down list of options.

Figure 2
Users and groups
3. In the Create New User Group screen that opens (Figure 3), enter LUMIRA_VIEWING in the Group Name field and click the OK button (not shown). (For my example, leave the Description field, which is optional, blank.)
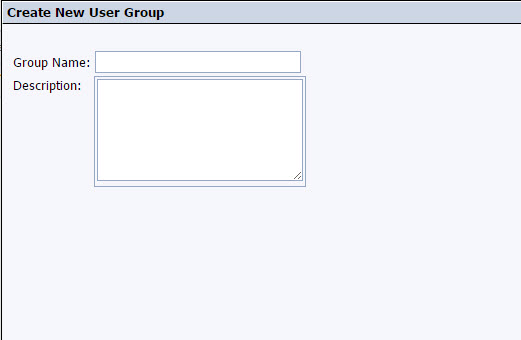
Figure 3
Create a new user group
4. Repeat these steps and create a second group called LUMIRA_EDITING.
5. After both groups have been created, you can now select these groups from the list on the right of the screen (Figure 4). Right-click one of the groups and, from the context menu that appears, choose an item from the list of options. In my example, select the LUMIRA_VIEWING group, right-click, and select Add Members to Group to add your users to the group based on their authorizations.
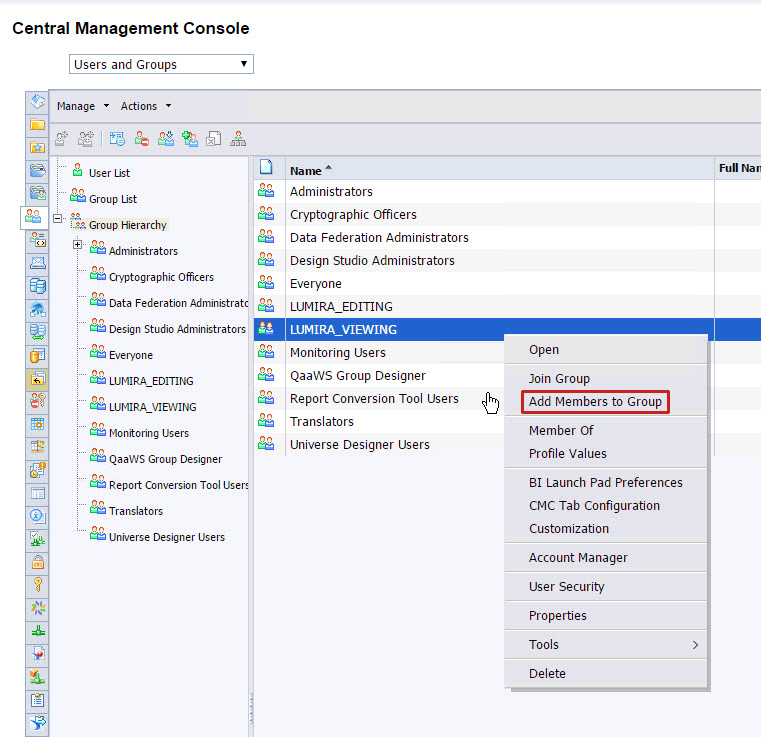
Figure 4
Add authorized members to user groups
Assign Security to User Groups
For the following steps I assume that you already have a folder named LUMIRA_DOCUMENTS in the SAP BusinessObjects BI system for storing the SAP Lumira document. For this folder you assign the security for the two new user groups to view and edit documents.
1. Log on with an administrative account to the Central Management Console (CMC) of your SAP BusinessObjects BI server.
2. In the CMC under Organize, navigate to the LUMIRA_DOCUMENTS folder and right-click your mouse to display the list of options in the context menu (Figure 5).
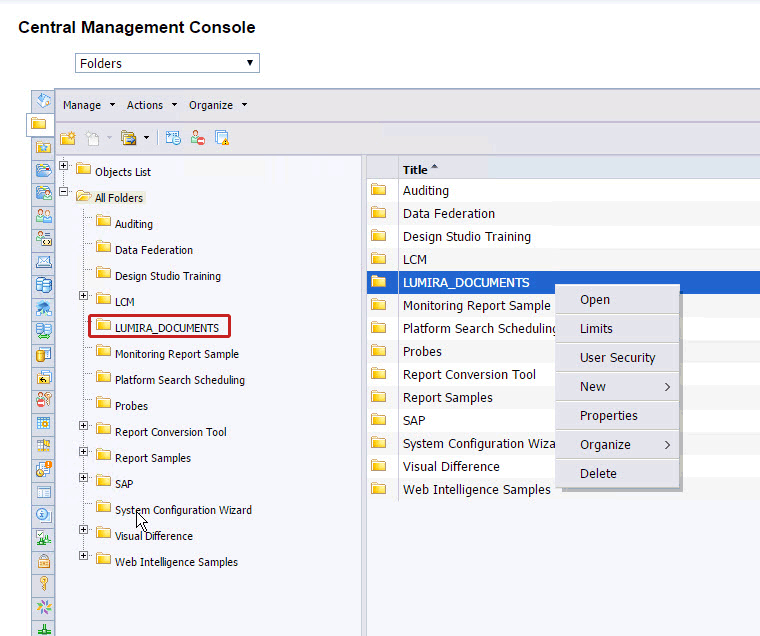
Figure 5
Open the LUMIRA_DOCUMENTS folder
3. From the list of options, select User Security. This action opens the screen in Figure 6.

Figure 6
User Security
4. Click the Add Principals button, which opens the screen in Figure 7.
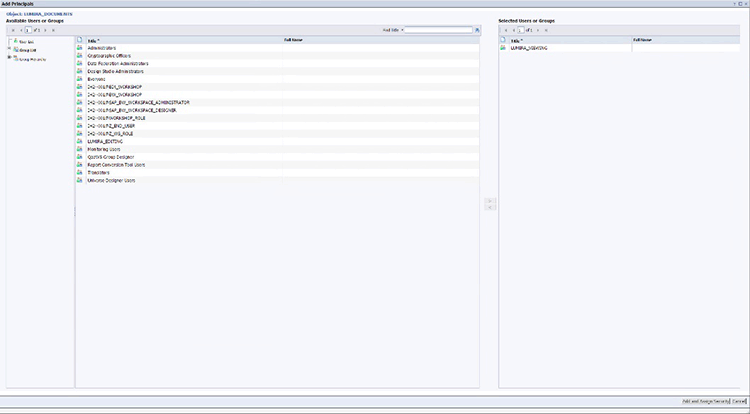
Figure 7
Select your user groups
5. Select the LUMIRA_VIEWING group on the left side and, using the arrow in the middle of the screen, add the user group to the Selected Users and Groups section (Figure 7). Click the Add and Assign Security button to display the screen shown in Figure 8.
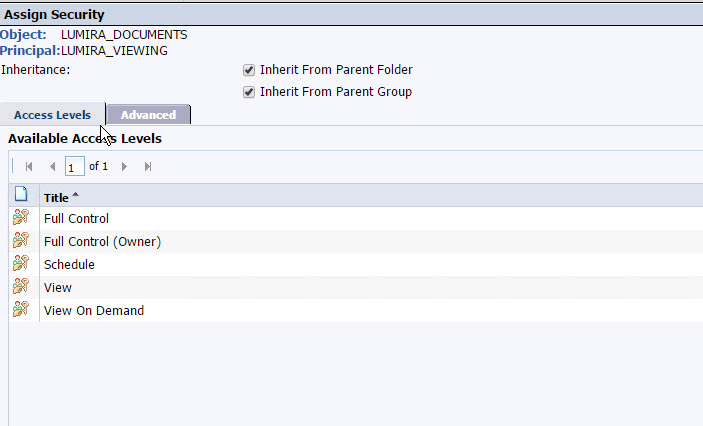
Figure 8
Add and assign security to the new users group
In this screen, you can choose from a list of predefined access levels, such as Full Control, Full Control (Owner), Schedule, View, or View on Demand, or you can navigate to the Advanced area and assign individual rights.
6. In this case, you’re assigning individual rights, so click the Advanced tab (Figure 9).
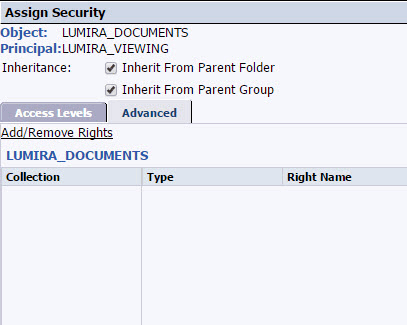
Figure 9
Assign individual user’s security
7. Click the Add/Remove Rights link (not shown) to display the Add/Remove Rights screen (Figure 10) in which you can add rights for the LUMIRA_VIEWING group.
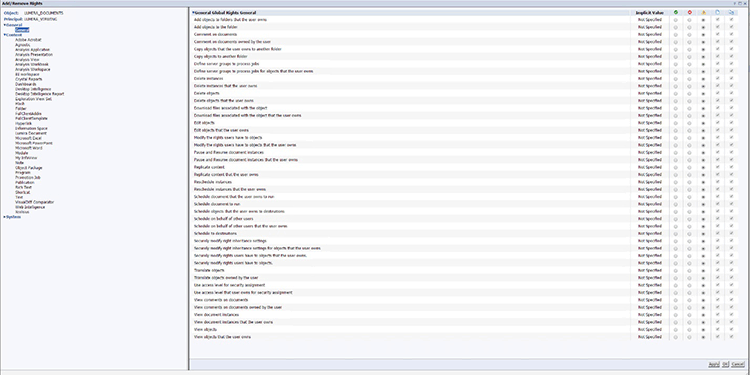
Figure 10
Add or remove users’ rights for the new LUMIRA_VIEWING group
You are presented with a detailed list of user authorizations. On the left side you can choose to use the General area, which means you are assigning the rights independent of the content type, or you can choose to assign the rights for a specific content type, such as Crystal Reports or SAP Lumira.
8. In this case, select the Lumira Document entry under the Content category.
9. For the LUMIRA_VIEWING group, assign the following rights (by selecting the circles in the green checkmark icon column on the right of each option):
- Comment on documents
- Comment on documents owned by the user
- View comments on documents
- View comments on documents owned by the user
- View objects
- View objects that the user owns.
10. After you make your selections, click the OK button twice.
11. In this example, the user group LUMIRA_VIEWING has been added to the LUMIRA_DOCUMENTS folder with the configured user rights (Figure 11).

Figure 11
User group LUMIRA_VIEWING is added to the folder LUMIRA_DOCUMENTS
12. Click the Add Principals button. In the screen that opens (not shown), this time select the LUMIRA_EDITING group and, again using the arrow in the middle of the screen, move the group to the Selected Users and Groups section.
13. Click the Add/Remove Rights link and the Add/Remove Rights screen opens (not shown) in which you can add rights for the LUMIRA_VIEWING group.
14. For the LUMIRA_EDITING group, assign the following rights:
- Add objects to folders that the user owns
- Add objects to the folder
- Edit objects
- Edit objects that the user owns
- Copy objects that the user owns to another folder
Note
In this example, I did not include the rights to delete objects. When
you need to include such an authorization, you can add the Delete
objects and Delete objects rights that the user owns to the security
settings.
15. Click the OK button twice.
16. In this example, the new user group LUMIRA_EDITING has been added to the folder LUMIRA_DOCUMENTS with the configured user rights. You can now close the User security settings for the folder.
In the previous steps I showed you how to configure the security for two user groups and a specific folder. In your SAP BusinessObjects BI landscape you should also look at the options to leverage the inheritance of security so that you do not have to specify the security for each folder individually.
Post-Installation Server Configuration
In addition to defining the user security related to SAP Lumira documents, you also need to complete five configuration steps after the SAP Lumira, server for BI platform, add-on has been added to the SAP BusinessObjects BI landscape.
1. Log on to the CMC with an administrative account.
2. In the Central Management Console homepage, select Manage and then Applications from the drop-down list of options, which opens a list of available applications (Figure 12).
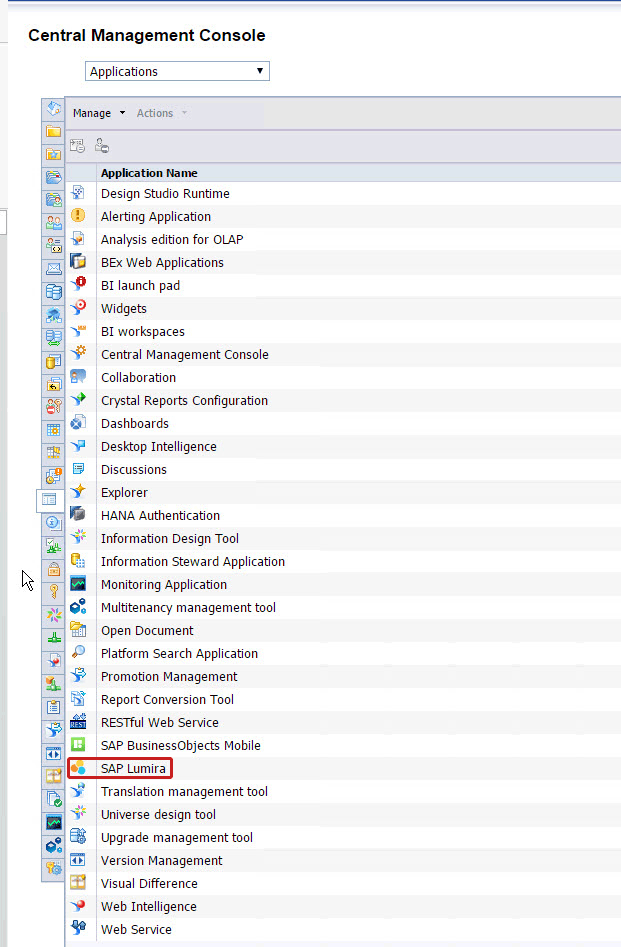
Figure 12
Choose the Applications option
3. In the Application Name list that opens, select the SAP Lumira entry, right-click it, and from the list of options that opens (not shown), select Properties. This action opens the screen shown in Figure 13.
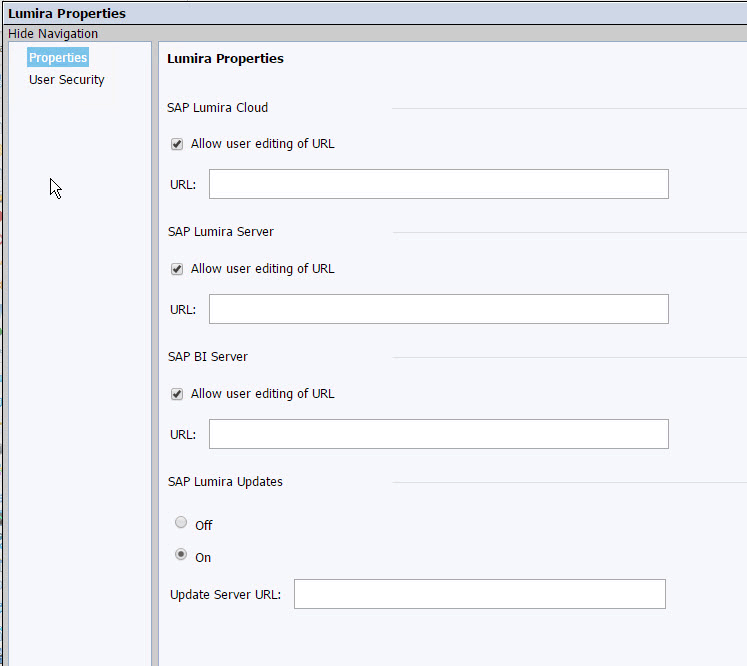
Figure 13
The properties for SAP Lumira
4. In Figure 13, specify the following properties:
- Allow user editing of URL check box: For sharing content, SAP Lumira uses a URL for each of the different destinations. You can allow the users to update this URL for each of the available destinations.
- URL field: Here you can specify the default URL. You should specify the URL for the SAP BI Server so that the user does not have to specify it anymore.
- SAP Lumira Updates radio buttons: Select the On or Off button to specify if automatic updates for SAP Lumira are allowed or not. Especially in a landscape with SAP Lumira desktop and SAP Lumira server you should control the updates as SAP Lumira desktop and SAP Lumira server have to be on the same release level.
5. After you make your desired entries based on your environment, click the Save & Close button (not shown).
Saving, Editing, and Refreshing SAP Lumira Documents
As soon as the SAP Lumira, server for BI platform, add-on has been installed and configured for your SAP BusinessObjects BI landscape, your users can share SAP Lumira documents via the SAP BusinessObjects BI platform. However, before they can connect to the SAP Lumira server, they have to configure a set of preferences. They can do so by following these steps.
1. Start SAP Lumira desktop.
2. In SAP Lumira desktop, select File > Preferences, and the screen in Figure 14 opens.
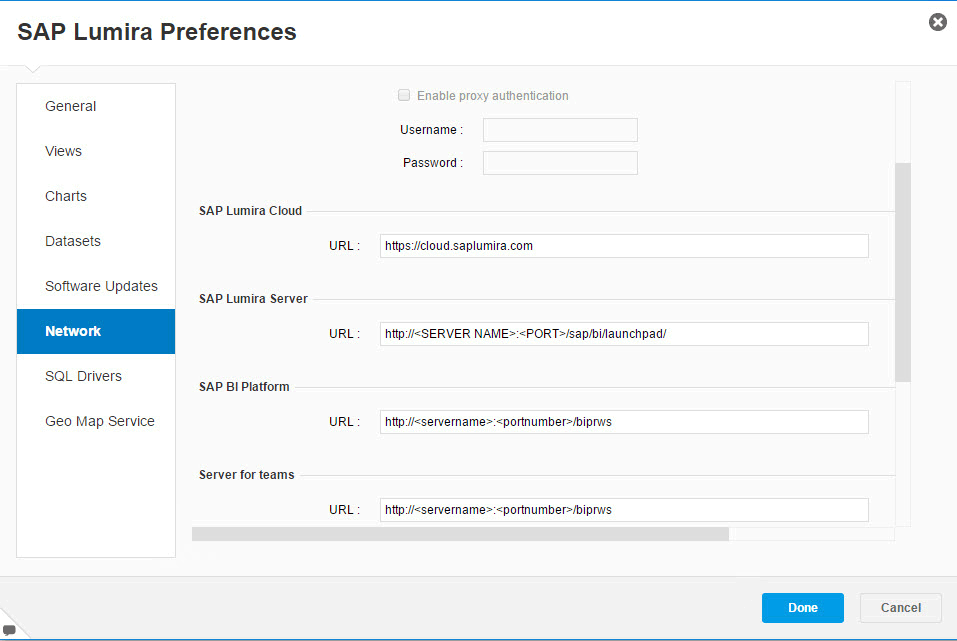
Figure 14
Select Network in SAP Lumira desktop preferences
3. Select the Network option on the left, which expands the right side of the screen.
4. In the Network preferences (on the right), you see the SAP BI Platform section with a URL field. The SAP Lumira Server section is for SAP Lumira servers based on SAP HANA (not based on the SAP BusinessObjects BI platform).
5. Enter the server name and the port for your SAP BusinessObjects BI platform into the appropriate URL fields (for the preference settings for the SAP BI platform). By default the port will be 6405.
6. Click the Done button after you make your entries.
Saving SAP Lumira Documents
With the preferences now pointing to the SAP Lumira, server for BI platform, your users are now able to use SAP Lumira desktop and create a new document, save this document to the SAP BusinessObjects BI server, and view this document via the BI Launchpad. Here’s how.
1. Start SAP Lumira Desktop.
2. Select File > New, and the screen in Figure 15 opens.
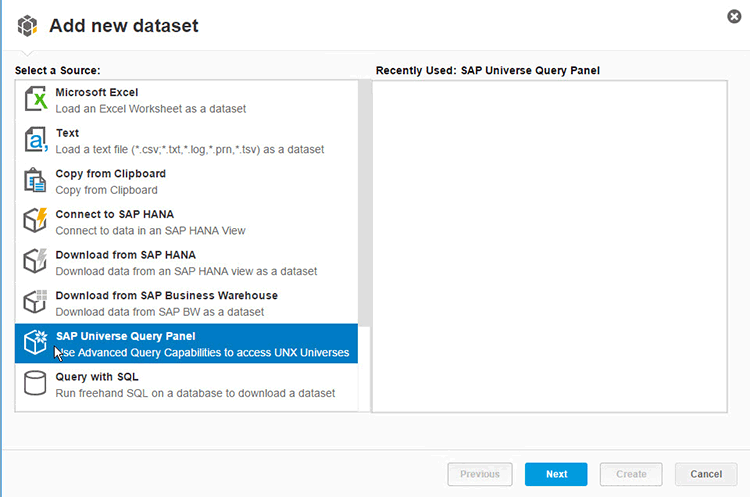
Figure 15
Select SAP Lumira data sources
3. For my example, use the SAP Universe Query Panel option as the data source. Select it on the left and then click the Next button.
4. In the screen that opens (Figure 16) enter the details for your SAP BusinessObjects BI system.
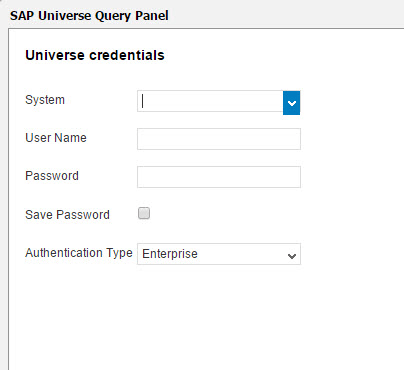
Figure 16
Enter your log-on details
5. Enter the details and click the Next button (not shown), which opens the screen shown in Figure 17.
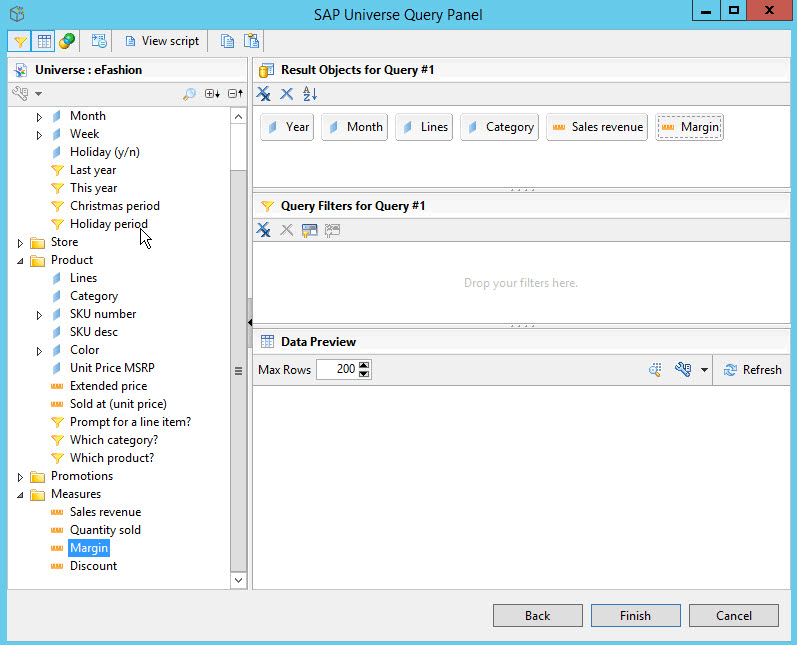
Figure 17
Make your selections in the SAP Universe Query Panel
6. For my example, I am using the universe eFashion with the following dimensions and measures (Figure 17):
- Year
- Month
- [Product] Lines
- [Product] Category
- Sales revenue
- Margin
In the list on the left, double-click each object you wish to add and it is added to the screen on the right into the Result Objects area.
7. After you add all the desired dimensions and measures, click the Finish button.
8. In the screen that opens (Figure 18), select the Column Chart option in the visualize area.
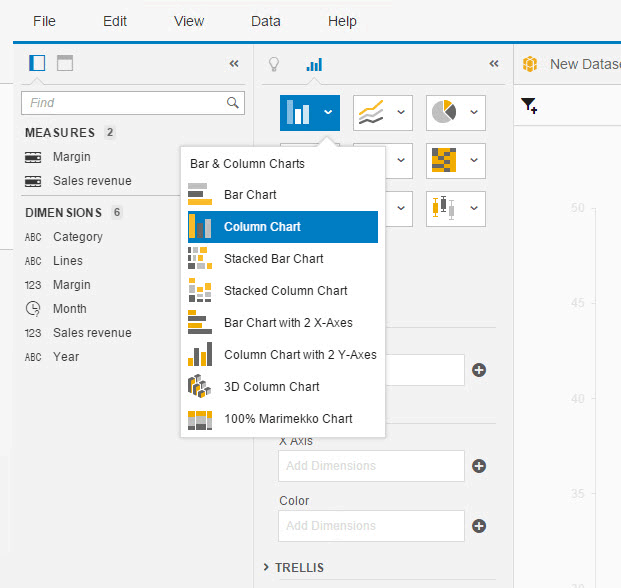
Figure 18
Choose Column Chart in SAP Lumira
9. Add the Sales revenue measure to the Y Axis by dragging and dropping this option from the list on the left to the Y Axis box on the right of the screen.
10. In the same way, add the Month dimension to the X Axis. The result appears as shown in Figure 19.

Figure 19
The column chart displays in SAP Lumira with the new dimensions added
11. Navigate to the menu File > Save and select SAP BI Platform from the options on the left (Figure 20).
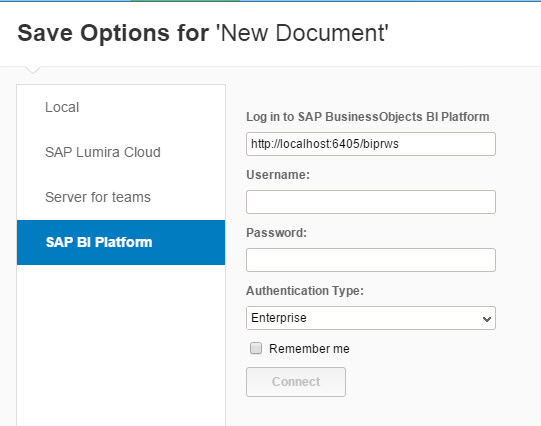
Figure 20
Save your new column chart in SAP Lumira
12. Enter your Username and Password to log on to the SAP BusinessObjects BI platform. Click the Connect button.
13. The user is presented with the list of available folders and subfolders from the SAP Lumira, server for BI platform (Figure 21).
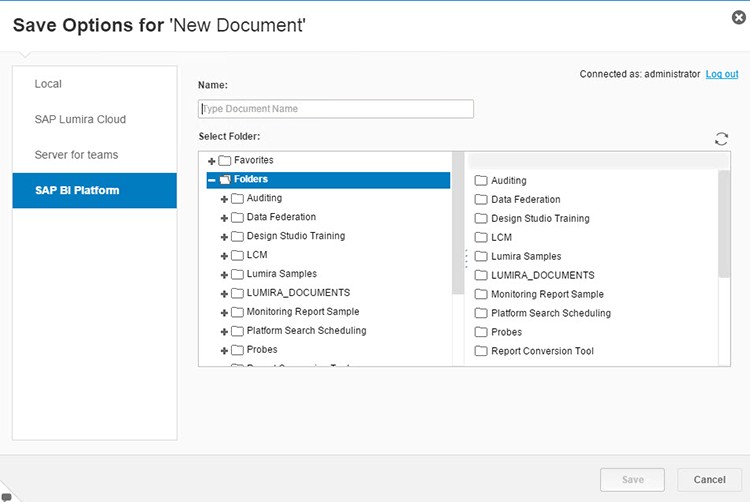
Figure 21
SAP Lumira folder options
14. Select a folder, enter the name for the SAP Lumira document, and click the Save button.
Because the platform is now using the SAP Lumira, server for BI platform, add-on, users are able to save the SAP Lumira document directly to the platform.
Viewing SAP Lumira Documents
Prior to SAP Lumira, server for BI platform, users had to share either an exported PDF file or share the actual SAP Lumira document via email. Now with the SAP Lumira, server for BI platform, deployed, users can save the SAP Lumira document to the platform. Other users are able to view and even edit it (depending on their assigned security rights) by opening the document in the BI Launchpad. To view SAP Lumira documents, you need to complete these steps.
1. Open the SAP BusinessObjects BI Launchpad.
2. Log on with a user who is allowed to view and edit the previously saved SAP Lumira document.
3. Select the Documents tab (Figure 22).
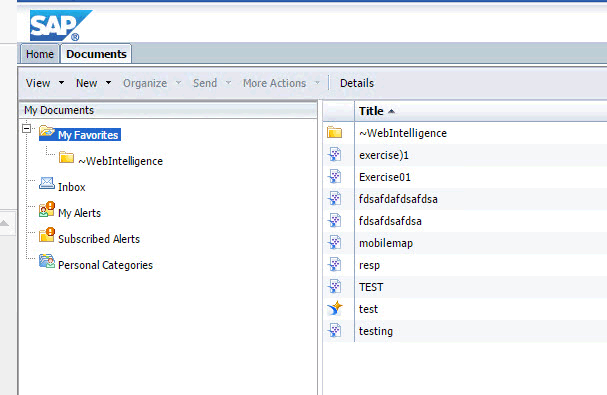
Figure 22
Open the BI Launchpad
4. Click the My Favorites folder and navigate to the folder where you stored the SAP Lumira document.
5. After you double-click the required SAP Lumira document, a screen like the one in Figure 23 opens.

Figure 23
View the SAP Lumira document
The user now has access to the Visualize and Compose areas in SAP Lumira, which means the user can view SAP Lumira documents and SAP Lumira stories.
Note that with the SAP Lumira, server for BI platform, 1.28 release, the following data sources are supported for a refresh:
- Microsoft SQL server
- Oracle 11g, 12c
- Java Database Connectivity (JDBC)
- MySQL
- SAP BW
- SAP HANA
- Universe (UNX)
- Excel (XLS), comma-separated values (CSV), and text (TXT) files
When I state that these data source are supported with a refresh, this means that users may refresh the report in the BI Launchpad without first having to open the document in SAP Lumira desktop. In case of the xls, CSV, and txt files, make sure that the files are available in a shared location and can be accessed by the SAP Lumira Server.
Scheduling SAP Lumira Documents
With the latest release of SAP Lumira, server for BI platform, it is also possible to schedule the SAP Lumira documents on the SAP BusinessObjects BI platform. In the current release (1.28), users can use the destination format SAP Lumira document and schedule the document to be delivered to either an email inbox or to a default destination.
To schedule an SAP Lumira document, follow these steps:
1. Open the SAP BusinessObjects BI Launchpad and log on with a user who is allowed to view and edit the previously saved SAP Lumira document.
2. Select the Documents tab.
3. Click Folders.
4. Navigate to the folder where you stored the SAP Lumira document, select it, and right-click (Figure 24).

Figure 24
Open the context menu and select Schedule
5. From the list of options that appear, select Schedule. This action opens the screen shown in Figure 25.
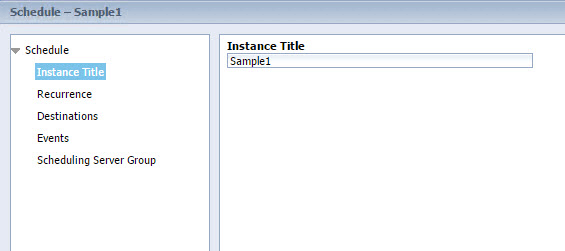
Figure 25
Schedule – Instance Title
6. Under Schedule on the left, select Instance Title, and the screen on the right of the figure expands. Enter a name for the output of the scheduling in the field.
7. Then select Recurrence on the left, and the screen on the right opens (Figure 26).
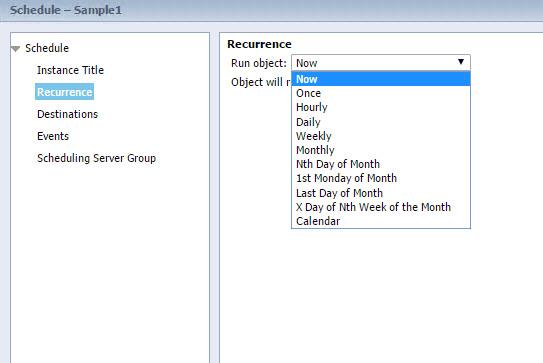
Figure 26
Schedule – Recurrence
8. In the Recurrence area you can configure how often and when the SAP Lumira document should be scheduled. In this example, select the Now option.
9. Again, from the list on the left, select Destinations, and the screen on the right opens (Figure 27).
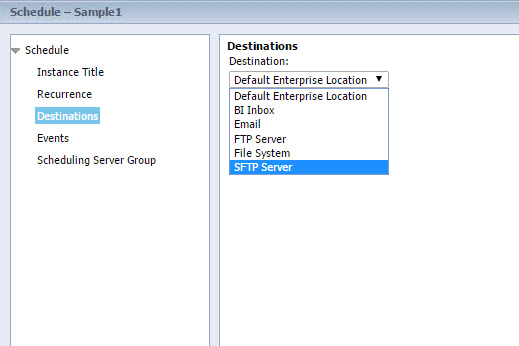
Figure 27
Schedule – Destinations
10. Here you can configure where the actual report is going to be stored or how the report is being sent—for example, via email—to the user.
11. In this example, choose the Default Enterprise Location option, which means that the scheduled instance is stored in the same folder where the SAP Lumira document has been stored.
The two remaining options on the left, Events and Scheduling Server Group, allow you to leverage the eventing from the SAP BusinessObjects BI server or to choose specific servers for scheduling. In this example, skip these two areas.
12. Click the Schedule button (not shown).
The report is now being scheduled and, depending on the data volume, you should see a Success status for the report like the one shown in Figure 28.

Figure 28
Document history
Viewing Document History
When users want to view the document history and access a document instance, follow these steps:
1. Open the SAP BusinessObjects BI Launchpad and log on with a user who is allowed to view and edit the previously saved SAP Lumira document.
2. Select the Documents tab.
3. Select Folders and navigate to the folder where you stored the SAP Lumira document.
4. Select the SAP Lumira document you want and right-click.
5. From the list of options, select History, and a screen like the one shown in Figure 28 opens.
6. Select the document instance from the history and double-click it to open the instance and view its history.
Product Roadmap Disclaimer
The descriptions in this article of future functionality are the author’s interpretation of the publicly available product integration roadmap. These items are subject to change at any time without any notice, and the author is not providing any warranty on these statements.

Ingo Hilgefort
Ingo Hilgefort started his career in 1999 with Seagate Software/Crystal Decisions as a trainer and consultant. He moved to Walldorf for Crystal Decisions at the end of 2000, and worked with the SAP NetWeaver BW development team integrating Crystal Reports with SAP NetWeaver BW. He then relocated to Vancouver in 2004, and worked as a product manager/program manager (in engineering) on the integration of BusinessObjects products with SAP products. Ingo's focus is now on the integration of the SAP BusinessObjects BI suite with SAP landscapes, such as SAP BW and SAP BW on SAP HANA, focusing on end-to-end integration scenarios. In addition to his experience as a product manager and in his engineering roles, Ingo has been involved in architecting and delivering deployments of SAP BusinessObjects software in combination with SAP software for a number of global customers, and has been recognized by the SAP Community as an SAP Mentor for SAP BusinessObjects- and SAP integration-related topics. Currently, Ingo is the Vice President of Product Management and Product Strategy at Visual BI Solutions, working on extensions to SAP’s product offering such as SAP BusinessObjects Design Studio and SAP Lumira. You may follow him on Twitter at @ihilgefort.
You may contact the author at Ingo@visualbi.com.
If you have comments about this article or publication, or would like to submit an article idea, please contact the editor.


