by Dr Marco Sisfontes-Monge, Arellius Enterprises Inc.
Introduction
SAP Analytics Cloud (SAC) is taking business to a new level, resolving lots of the gaps for business users on flexibility, dashboarding, visualization, customer experience, planning, forecasting and more, in an easy-to-use environment with the power of SAP S/4 HANA. Also, with the possibility to integrate programs used in systems such as SAP BPC, SAP BW, SAP S/4 HANA or create your own allows a new set of functionalities such as Data Actions to be deployed.
Read a general overview of the solution here.
In this article we will review SAP SAC capabilities to manage and deploy programs for pre-delivered or customized calculations.
What are SAP SAC Data Actions
Data Actions are a flexible planning tool for making structured changes to model data, including copying data from one model to another, perform allocations, model sequences, and scripted calculations. It allows the end-user to perform simple planning functions and some generic consolidation functions within the SAP SAC environment such as cash flow planning, carry forward operations, and account planning.
Similarly, to the SAP BPC standard model, you can transfer data using data functions between two models such as Headcount and Expense Planning models into a Central Financial Model. Data Actions are quite like planning sequences from SAP BPC where you can create a single program or several programs called steps, to be executed in a sequence or with independent logic. Also, Data Actions are similar to the old SAP BPC Data Management packages part of the SAP BPC Standard model architecture.
It is possible to work with different steps for different workflows that perform different calculations, similar to the SAP BPC BPFs (Business Process Flows) functionality. Data actions are designed by modelers and then run by planners in stories or analytic applications or scheduled to run in the Calendar. In addition, Prompts and Variables are also possible to be integrated into the SAP Data Actions programs in SAP SAC, which are called Parameters, that can be single selections or multiple selections.
The following types of Data Actions are available currently in SAP SAC, and are defined as Steps:
- Copy Step: copies data within the same model based on a set of rules, filters, and aggregation settings. For example, you can use it to copy data from 2018 to 2019 by Product and Company Code.
- Cross-Model Copy step: copy data from one source model to another target model based on a set of filters and automatic or manual mapping between dimension members.
- Allocation step: run an allocation step as part of your data action to allocate values from a source dimension to a target dimension by driver values, or by direct assignment. For example, an allocation step can help allocate overhead costs to different departments based on drivers, square footage, or more criteria.
- Embedded Data Action step: With this step, you can run another data action as a step in your data action. For example, you can quickly reuse a common set of steps in several different data actions, or multiple times within a single data action.
- Advanced Formulas step: Each step lets you create a script of transformations and calculations to apply to the data within defined scopes of the target model. Some formulas from the Modeler are supported, as well as additional advanced formulas. You can build simple advanced formulas using the visual editor, or get full control using a script editor. The language used it is similar to the SAP BPC Logic Script Language from the standard architecture.
Creating a Data Action
To create a Data Action, we need to first have a SAP SAC Model Created with both master data and transactional data, so that we can know what we can use to perform the calculations. These steps will be omitted for now to simplify our explanation, but certainly you can find more details on how to create SAP SAC models in other publications. Once your model is created, the Data Action must be created following the procedure described in
Figure 1 from the Home menu following the
Create/Process/Data Action path.
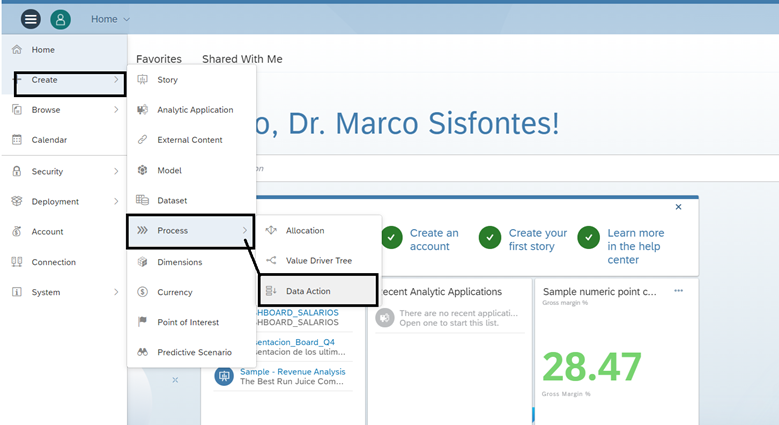 Figure 1— Creating a Data Action
Once you enter in the Data Action menu as shown in
Figure 2, provide the Name, Description, and identify the model that the action would be applicable to. In this case, as shown in
Figure 2, the Default Model as shown is TEST1. Make sure to perform the creation of the name of the Action in the Data Action Settings, save it to make the Steps and Parameter menus to be available to use, otherwise, they will be grayed out.
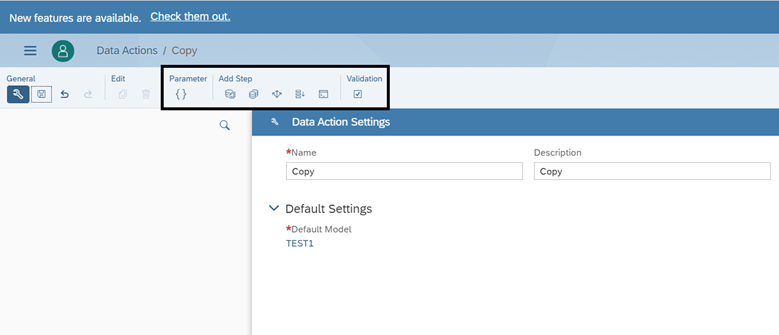 Figure 2— Data Action Settings and identifying the different Data Action Steps
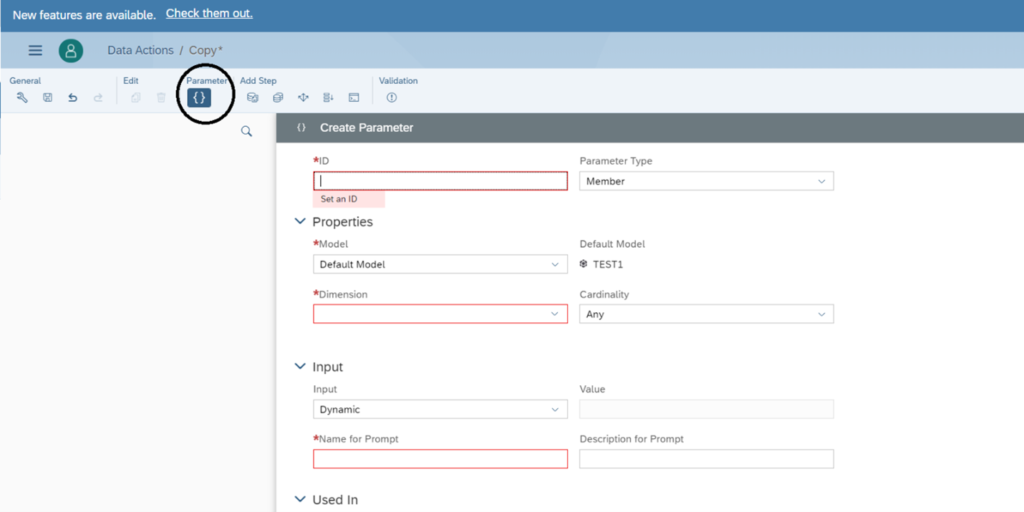 Figure 3— Creating a Parameter
As shown in Figure 3, we entered in the Create Parameter screen to configure the variables to be used as Prompts during the execution of the Data Action. Similar to SAP EPM, SAP BPC, and any other programs, variables are available to be used and changed during run time of the program, and in the case of SAP SAC they are called Parameters. As shown in Figure 4, we are creating the SOURCE_YEAR Parameter to allow the user to select the period or year that it is required to be copied to a target period.
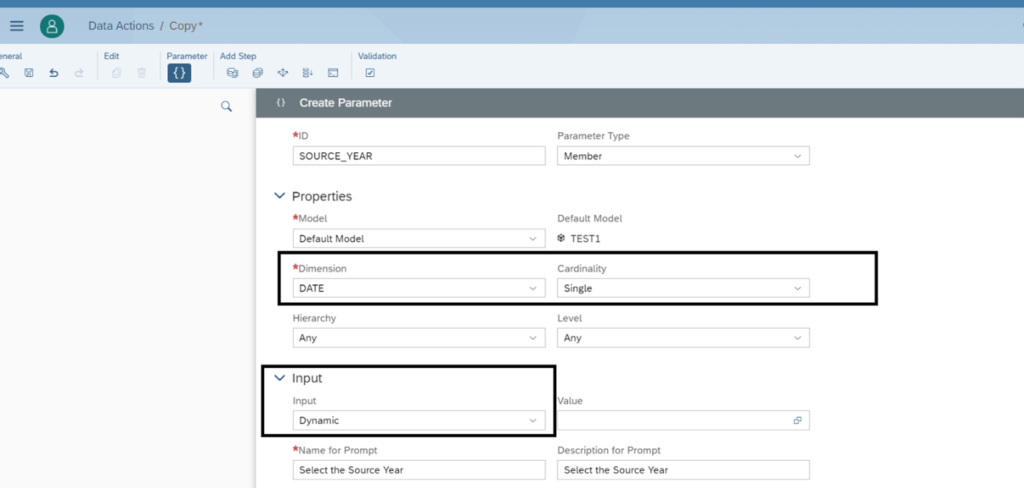 Figure 4— Configuring the Parameter SOURCE_YEAR
As shown in Figure 4, the tool requires you to define the Dimension to be used and its Cardinality or behavior during selection. The DATE Dimension, and Single selection has been set up for the SOURCE_YEAR Parameter. In addition, the Parameter has been configured to be a Dynamic Input, and the name of the screen configured and defined as “Select the Source Year” as shown in Figure 4. As shown in Figure 5, two Parameters have been configured for the user to change during execution: SOURCE_YEAR and TARGET_YEAR.
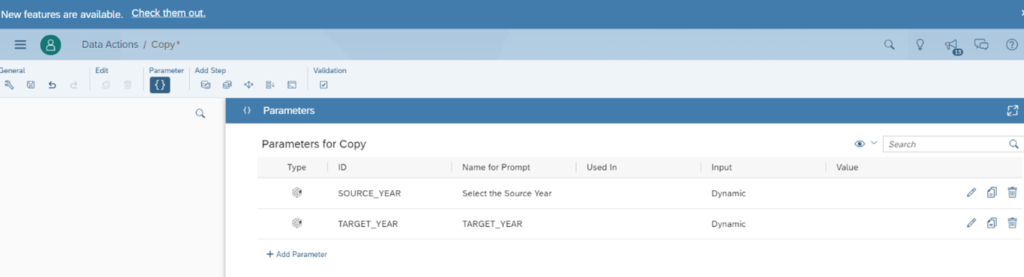 Figure 5—Final Parameters set up for SOURCE_YEAR and TARGET_YEAR
Now, we need to first create the first Step of our Copy logic. For that we need to set up a Copy step. Copy step is set up on the left-hand side as shown in Figure 6,. On the right-hand side the Name and Description has been set up, and then we need to create the Filters, contents or data selection criteria to be used to perform the Copy function. As shown in Figure 6, the Context identifies that the Copy Data Action will apply to the TEST1 model, for the Actual Category, and the Parameters to be used are added in the Copy Rules section. Notice that both Parameters shown in Figure 5 SOURCE_YEAR and TARGET_YEAR are defined in the From and To sections respectively.
 Figure 6— Setting up the Data Selection settings for the Copy Function
Setting Up Parameters (Variables)
At this stage we have performed a Copy Operation with Overwrite. This means that when the Data Actions Step is executed, it will completely replace the target value. In this case we will be using January 2020 as the Source Year and Feb 2020 as the Target Year value for the Parameters. Now we would like to create another process an automatically increase by 10% the value copied in the TARGET_YEAR Parameter. To perform this task, we need to add a new step to our Action, which is an Advanced Formula Step.
An Advanced Formula Step is like the SAP BPC Logic Script Logic, SAP IBP, SAP BW and SAP HANA SQL Script consultants should be familiar with it. For this step, go back to the Actions Menu and add an Advanced Formula Step and click on the Script tab as shown in Figure 7.
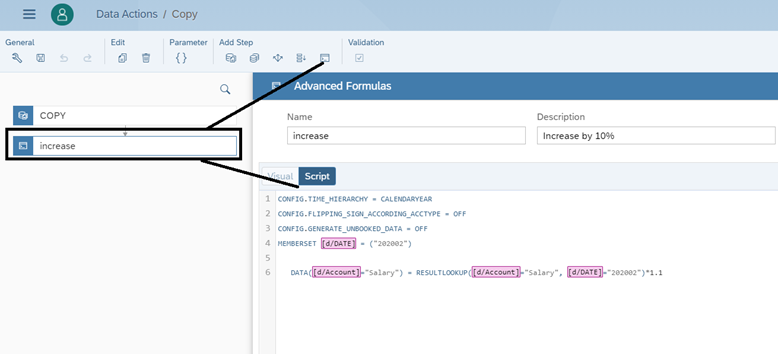 Figure 7—Adding an Advanced Formula Step
As shown in
Figure 7, a new step called Increase has been created with a customized program in the Script tab. The program to be implemented is shown in
Figure 8, notice that we are using the MEMBERSET definition using the
[d/DATE] = (“202002”) to define the data affected to be Feb 2020, and using a single Measure or Key Figure called
[d/Account]=”Salary”, and for we are defining the measure using the Script Data
([d/Account]=”Salary”) and the
RESULTLOOKUP to perform the formula to increase the values of the Key Figure “Salary” by 10% for a particular period, in this case Feb 2020 as shown Figure 8.
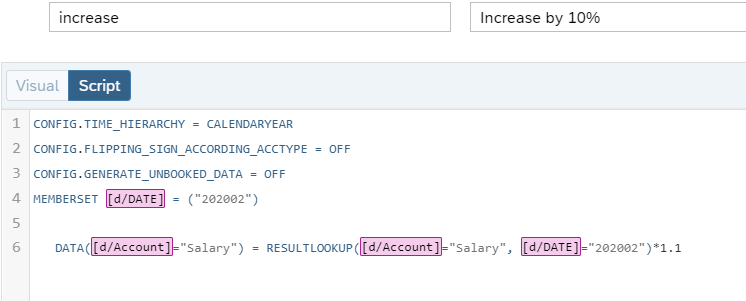 Figure 8—Implementing a Script Program to increase Feb 2020 by 10%
Similar, to SAP BPC Logic Script environment, SAP SAC has a data validation option to review and help you check your code and identify any errors to help you with debugging as shown in Figure 9.
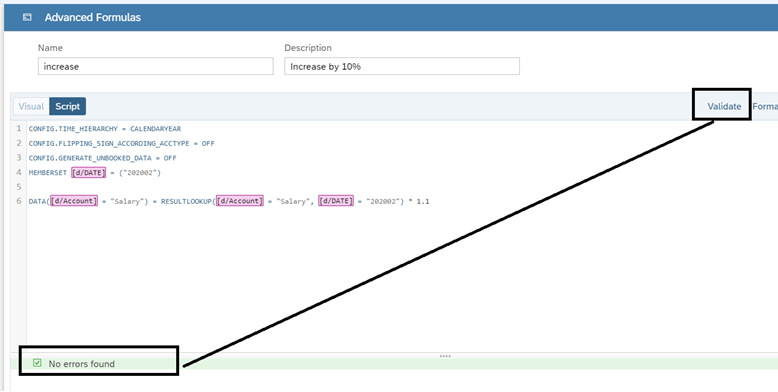 Figure 9—Performing Validations on your Script Program
For reference purposes we have created a model called
TEST1 with the data that we need to perform the Action as shown in
Figure 10. After creating a Model, just create a Story on top of this model and insert the Data Action.
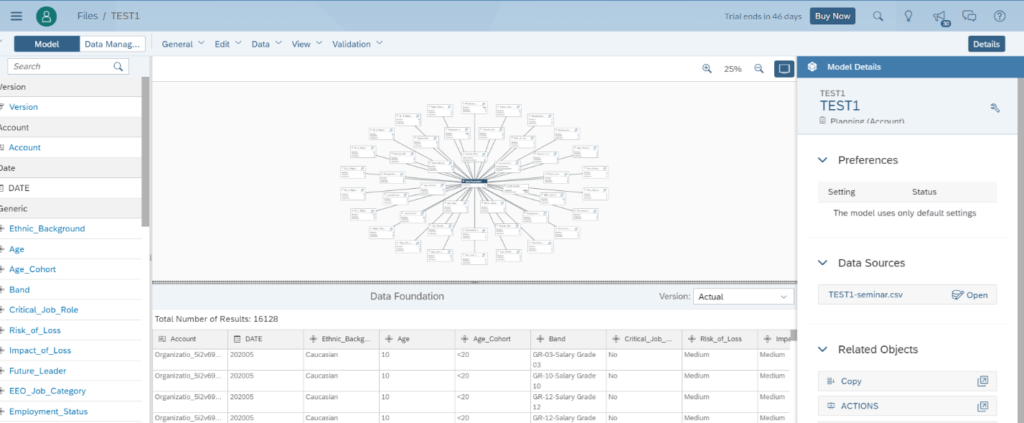 Figure 10— Reviewing the Model created to be used for Data Actions
Deploying your Data Action to a Story
As shown in
Figure 11 I have created a Story linked to the
TEST1 model shown previously in Figure 10 using one of the many Template options available in SAP SAC. The Model TEST1 is linked to this environment ,and we are using the “
Table and content” Story to display the Account dimension on the rows and Date dimension for Jan and Feb 2020 on the Columns as shown in
Figure 11.
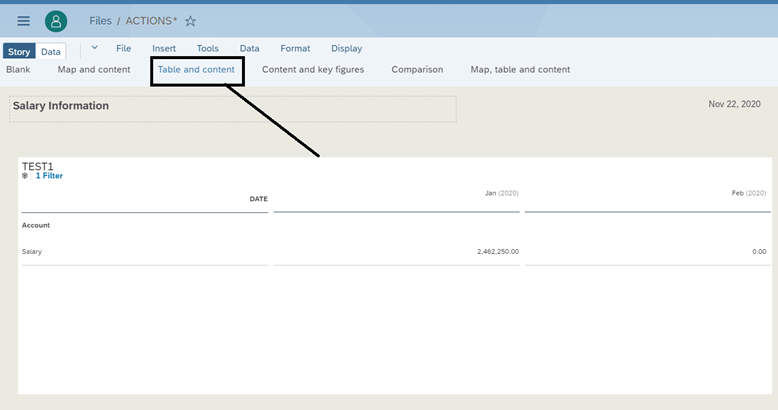 Figure 11— Reviewing the Story to be used for Data Actions
Now in order to insert the Data Action created previously, we must be in
Edit Mode in the Story, and click on the Insert menu as shown in
Figure 12. Then weselect the
Data Action Trigger, which is nothing more than a button added in the Story.
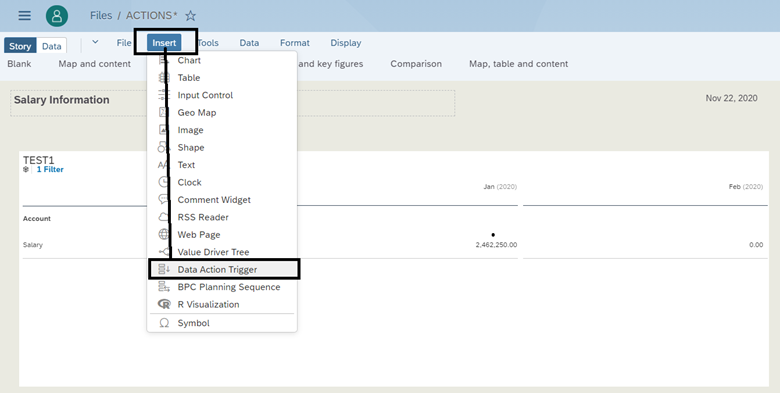 Figure 12— Inserting a Data Action Trigger
Once you click on the Data Action Trigger as shown in
Figure 13 the Data Action Trigger Builder appears on the right hand side of the screen, and an object appears in your Story to provide a name, description, and selection the Data Action Trigger to be inserted into your Story. The Data Action is the one we created previously in Figure 2.
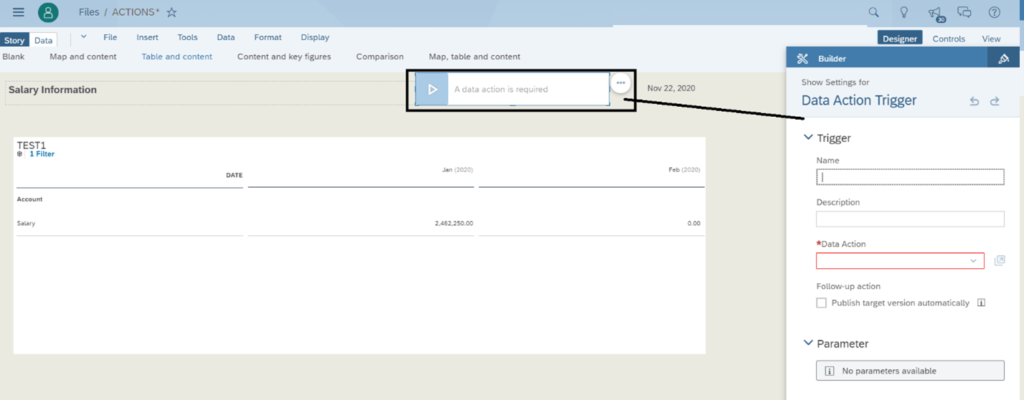 Figure 13— Configuring the Data Action Trigger
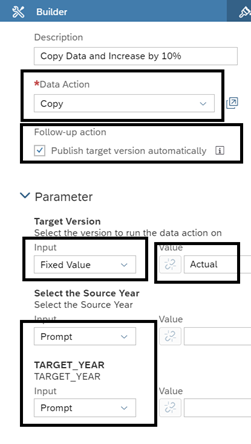 Figure 14— Reviewing the Data Action Trigger Builder
As shown in Figure 14, the Data Action Trigger we have called it
“Copy Data and Increase by 10%”, selecting the Data Action we previously created called
Copy. Remember, a Data Action can have multiple Steps in the case of Copy it has two steps: Copy function and then Advanced Script to increase the value by 10%. In addition, we selected the checkmark “
Publish target version automatically” which means the tool saves the data automatically as shown in Figure 14. At the bottom of the configuration screen in Figure 14 in the Parameters section notice the following:
- Target Version: the Input with a Fixed Value has been set up so during runtime the end-user cannot change it and it is set to a default value. In this case, we set it up to be Actual.
- Source Year and Target Year Parameters: the Input option have been set to Prompt, to allow a message or Prompt to be displayed during runtime.
Once completed, save your story to retain the set up of the Action Trigger defined. The results are shown in Figure 15. Notice the button created on the top of the Story, that you can drag and drop in the proper location, displaying the text that we defined previously in
Figure 14. Notice in
Figure 15, the “Play” bottom look and feel, and ready for execution. Create as many Data Actions buttons as required for your planning processes, and follow the same logic as described.
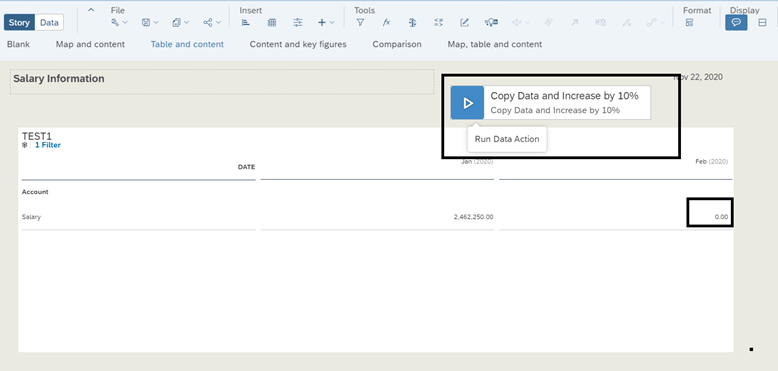 Figure 15—Reviewing the Data Trigger ready to execution
Another interesting feature available in SAP SAC created in this Story is that you can also use it for planning. Yes, you can also plan in SAP SAC by setting up this feature in case you would like to overwrite the values performed by the Data Action. These settings are available in the Story Builder Settings as shown in Figure 16.
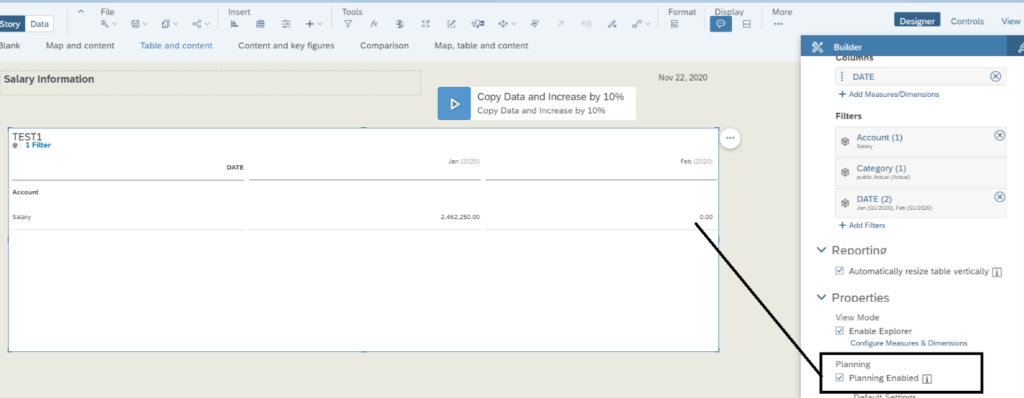 Figure 16—Making your Story Planning Enabled
Executing your Data Action
Now we are ready to perform the calculation to copy data from Jan 2020, and move it to Feb 2020. We also need to increase the values by 10% using the second step of the Data Action. Just click on the button, it works similarly to the MS Office VBA buttons for the Data Action Trigger to begin execution. As shown in Figure 17, the two prompts displayed match the two Parameters created:
Source Year and Target Year. We will be copying data from Jan 2020 to Feb 2020 as shown in Figure 17 and click the Run button, which will display the screen shown in Figure 18.
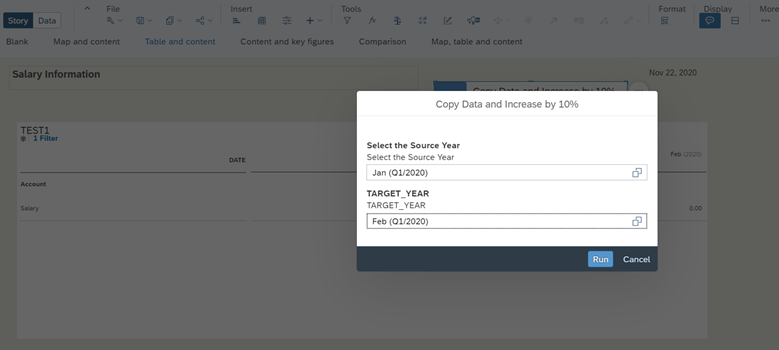 Figure 17— Executing the Data Action
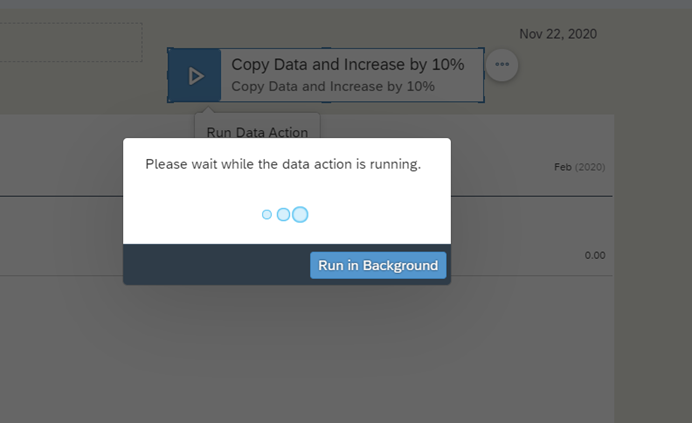 Figure 18— Running the Data Action
Once completed, hopefully successfully based on the messages displayed, the data affected in your story will be displayed in yellow as shown in Figure 19. As shown in Figure, the system copied the data for the Salary Measure from Jan 2020 to Feb 2020 and increased it by 10%, and the data was automatically saved to the database.
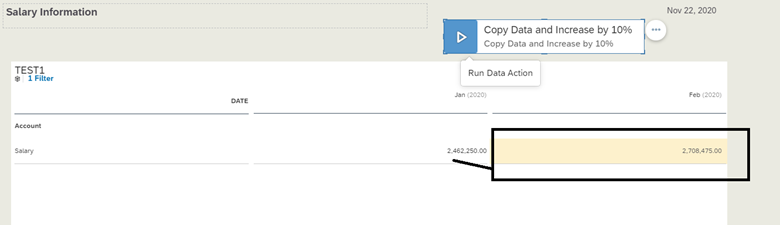 Figure 19— Final Results of the Data Action
To verify it, click on the top left corner on the Data menu as shown in Figure 20 and dimensions linked to the Story will appear so you can perform reporting accordingly from the Model TEST1. Select the Measure “Salary” and then the Date Feb for 2020 as shown in Figure 20, and the figure displayed in your story table is also displayed verifying that the data exists in the model database.
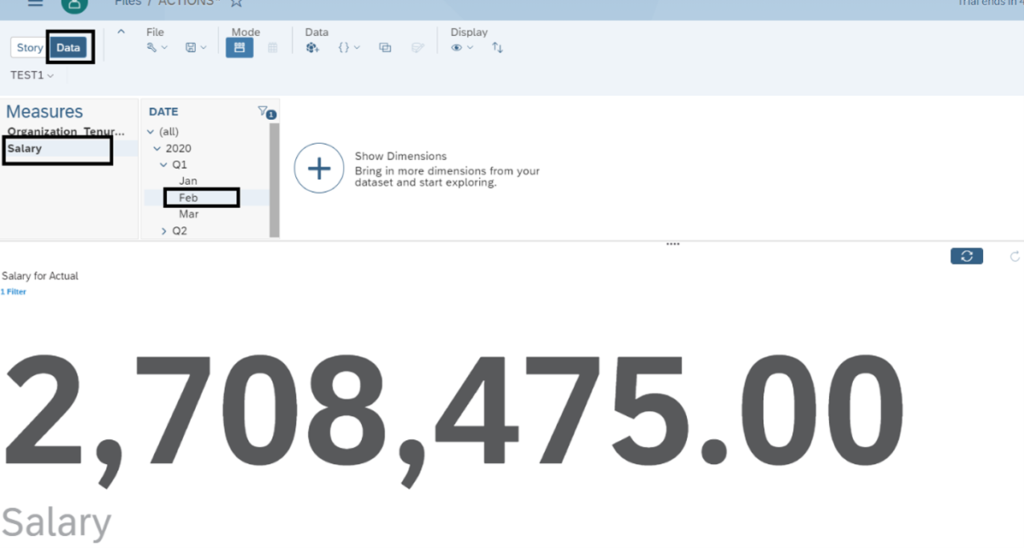 Figure 20— Validating your data was affected by the Data Action
However, if you want to adjust the number and since your Story has been configured to be a Planning Story with the option described previously in Figure 16, go back to the Story, and manually input the data that you desire, and then click on the More/Publish Data menu as shown in Figure 21 to permanently Publish and Save you data in your Story, and your field in Feb 2020 will change from yellow to white.
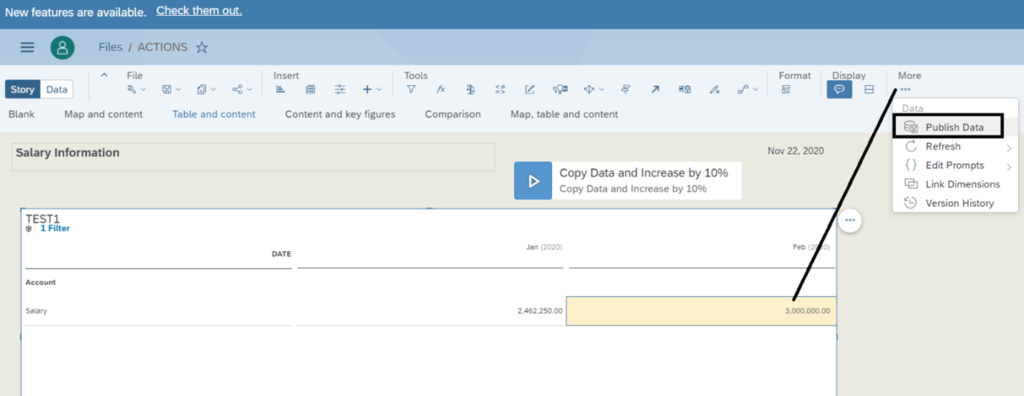 Figure 21—Saving and Publishing your Data after manual input
Clearly if the Data Action button is executed one more time it will overwrite the data and the input value, we entered would be overwritten following Steps pre-defined. You can now perform planning in SAP Analytics Cloud (SAC), implement complex calculations and deploy them to your end-user community using Stories.
Conclusion
We have reviewed how the functionality in SAP SAC can support your planning process with customized calculations and similar planning processes to those performed using SAP BPC and other planning tools. We have explored the features of SAP SAC in order to create complex calculations using steps and Data Actions, and how easy it is to integrate these processes into your Stories in order to support and improve your business users and their customer experience with button similar to those available in MS Office VBA.
It is recommended to review the script formula material available in SAP online manual for SAP SAC, so you can get more familiar with the capabilities and limitations of the Script available in SAP SAC.