Neha Garg and Shilpa Viswanadha show how to configure different services for using the simplified access request and remediation view in SAP Access Control 10.1 and the advantages of using these two new features.
Key Concept
Simplified access request with an advanced role search is a new feature in SAP Access Control 10.1. It allows users to create requests with minimal information compared with the Access Request. The new role search available in the simplified access request provides the option to search the roles with free text. With the new remediation view users now have additional options that were not available in the earlier risk analysis views. That includes the option to do the risk analysis on SU01 attributes of users – for example, by function, department, and parameters.
One major task after implementation of SAP Access Control is creating segregation of duty (SoD) violation-free users in SAP ERP. For this purpose, users and administrators have been using the Access Request and Risk Analysis features provided in SAP Access Control. In the SAP solutions for GRC 10.1, however, the same functionality can be achieved in a more simplified and effective way, which is by using the simplified access request and remediation view. These two new features are implemented using SAPUI5, OData Services, and services for HTTP communication via transaction code SICF.
We cover how to configure SICF and OData services to enable use of these two new features.
In the older releases of SAP solutions for GRC (i.e., versions 5.3 and 10.0), users had to fill in a complex form to create an access request. The forms had many fields that were not required for creating the request. To solve this issue, the product team followed the design-thinking approach and interviewed many customers to understand their day-to-day problems. The result is a screen that gives maximum flexibility and ease of use.
Note
Design thinking is a process that includes the building up of ideas with
few or no limits on breadth during a brainstorming phase.
With a simplified access request, users do not have to fill in all the fields that appear in an access request. A simplified access request form asks for the minimum amount of information to perform the request creation.
The main task after implementing GRC Access Control is to make all users free from SoD violations. To do so you used to have to download a user-level detailed report and then analyze the root cause of any issue to see whether you could remediate it. Analyzing the report and finding a solution used to take a lot of time.
Now SAP Access Control 10.1 has come up with a remediation view that saves users time. In this view, all the Risk Analysis-related operations can be performed from a single screen.
In this article we explain the details of simplified access request and remediation view in Access Control 10.1. After reading this article you will be able to understand what the simplified access request and remediation view are, how to configure and use them, and what benefits can be achieved by using these two features.
Access Request Vs. Simplified Access Request
Following is a comparison of the former Access Request with the new simplified access request.
- In the Access Request creation screen different sets of data appeared under different tabs and there were many fields that were not needed for the initial request creation process. However, the user had to fill them in, including user groups, parameters, and additional user details. As the details were shown in different tabs, the user had to check under each tab to make sure that all fields that were configured as mandatory (as per the end user personalization configuration via transaction code SPRO) were filled in. In simplified access request there is no tab and all the minimum required fields are available on the same page.
- There was no search help available for the request reason in Access Request and no predefined set defined for request reasons. The user could enter any value in the request reason whether it was valid or not. Due to this there was no uniformity in the request reasons and hence reporting was difficult. Simplified access request provides a predefined set of request reasons that are configurable when you execute transaction code SPRO.
- There was no option available to save the request in a draft state in case the Access Request could not be created in one session. In simplified access request an option to save the request in a draft state enables the user to restart the creation process from the point it was left.
- There was no option available to reset the fields in Access Request screen. In case of any modification, the user had to reset the value of each field separately. The reset button option is available in simplified access request.
- There was no option available to configure only required attributes for role search criteria in Access Request. All the Role Search attributes appear on the screen. There was no way to make only key search criteria visible on the screen. Now with the enhancement in the Role Search screen in Access Control 10.1, it is possible to customize the search criteria fields for Role Search while creating the request. This can make only the important search criteria visible. The requester can fill in the details and search the roles.
- In Access Request, there is no option available to search the roles on the basis of free text. This option in simplified access request facilitates the user who is not aware of the exact role details or names to search while creating the request.
Business View and Technical View Vs. Remediation View for Risk Analysis
In the earlier releases there were technical and business views of Risk Analysis. Access Control 10.1 introduces a new view (i.e., the remediation view for Risk Analysis).
1. In older releases of GRC it was not possible to perform risk analysis on SU01 attributes of users (for example, function, department, or parameters). Users could at the maximum do risk analysis on the user group level. In Access Control 10.1 a user can now create a custom group based on SU01 attributes and perform risk analysis on the users belonging to that group.
2. In the business and technical views of risk analysis, there are very few options available to remediate the risk, while in the new remediation view the user has a lot of options to remediate the risk then and there. Mitigation can be done on a risk and a rule from the remediation view screen itself. The user can also remove the role by selecting the Remove Role option. The Remove Role option creates a change request for the removal of roles from the user automatically. That means it is possible to initiate remediation (removing role) or mitigation (assigning control) for users from this screen. There is no need to download the report and then analyze it to make a decision.
System Configuration for Simplified Access Request and Remediation View
In Access Control 10.1, SAPUI5 is used along with HTML, JavaScript, and Cascading Style Sheets (CSS). To supply and receive form data you use JavaScript Object Notation (JSON). Access Control 10.1 should be used with browsers that are HTML5 and CSS3 compliant.
To activate business configuration sets (BC sets), execute transaction SCPR20. In the screen that appears (Figure 1), enter GRAC* in the BC Set field, a description in the Short text field, and press Enter.

Figure 1
View BC Sets
You can view details for all the related business configuration sets (BC sets) as shown in Figure 2.

Figure 2
Details of BC Sets
Following are the BC sets mainly used for displaying data in a simplified access request:
- GRAC_DT_REQUEST_DISPLAY_SECTIONS
- GRAC_DT_REQUEST_FIELD_LABELS
- GRAC_DT_REQUEST_PAGE_SETTINGS
BC sets can be activated by entering the BC set name and clicking the activate icon as shown in Figure 3.

Figure 3
Activate BC Sets
The high-level architecture of GRC application based on SAPUI5 is shown in Figure 4.

Figure 4
System landscape
The details of the system architecture are explained below.
SICF Services
Transaction SICF is used to maintain services for HTTP communication in the SAP system using the Internet Communication Manager (ICM) and the Internet Communication Framework (ICF).
The ICM ensures that communication between the SAP system (SAP NetWeaver Application Server) and the outside world via HTTP, HTTPS and SMTP protocols works properly.
The other way of doing the same operation is to create and use a service URL dynamically. The advantage in the SICF option is that the service can be switched off with ease by administrators in case the situation demands it.
Each service calls at least one handler class. That’s where you put the ABAP logic in a service. The handler is a class, which means use of object-orientated ABAP. Each SICF service can be configured for secure access. Once active, each can be invoked via the following address pattern: https://<host>:<port>/<path to service>
To check the handler class, execute transaction code SICF. In the Maintain Services screen (Figure 5), click the execute icon or press F8.
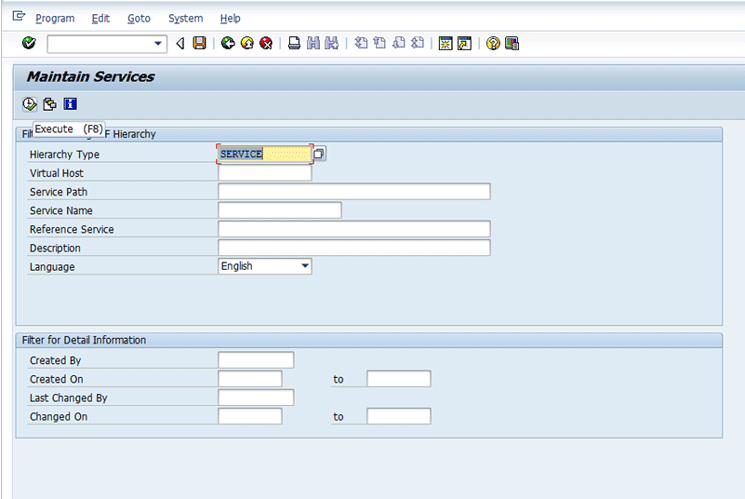
Figure 5
The Maintain Services screen
After you click the execute icon in Figure 5, the screen shown in Figure 6 appears. Navigate to path /default_host/sap/bc/grc/grac/ as shown in Figure 6 to see the list of all the services.

Figure 6
Service maintenance under transaction code SICF
To view the handler class of the service, double-click any service name under path /default_host/sap/bc/grc/grac (Figure 6). For example, if you double-click apinbox, the handler class details are displayed in the screen shown in Figure 7.

Figure 7
Handler class for a service
All the business logic for the service is written in the handler call for retrieving and saving the data. All the services under the grac node as shown in Figure 6 need to be activated before using the simplified access request and remediation view. Activation can be done by right-clicking the service name and selecting the Activate Service option.
Configuration of the SICF service is required for Business Server Pages (BSP)/JS views to be accessed from the web. If the services are not activated then no data is visible under the simplified access request link.
OData Services
You use an OData service for the remediation view in Access Control 10.1. The service should be configured and activated from transaction code SPRO before using the remediation view.
To maintain the ODATA service execute transaction code SPRO and then navigate to menu path SAP NetWeaver > Gateway > ODATA Channel >Administration > General Settings >Activate and Maintain Services. Click the execute icon beside Activate and Maintain Service. This action takes you to the configuration screen shown in Figure 8.
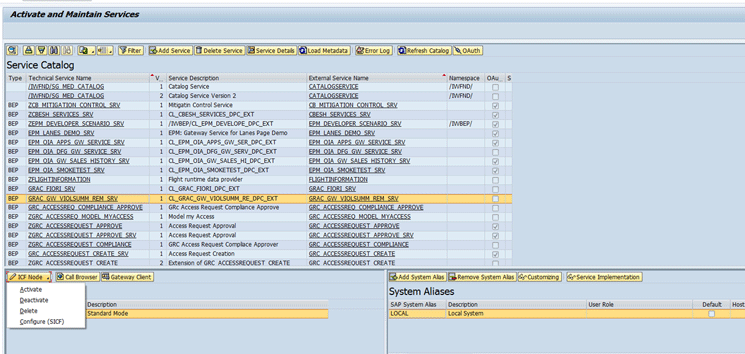
Figure 8
Details of service maintenance
You can add a new service or delete one by clicking the Add Service or the Delete Service button. The highlighted name for the technical and external service for the remediation view is GRAC_GW_VIOLSUMM_REM_SRV.
The OData service for the remediation view should be added in the service catalog as highlighted in Figure 9. The SAP system alias can be added or deleted using the Add System Alias or Remove System Alias button in the right corner of the Window.
With this assignment, an OData request from an SAP NetWeaver Gateway consumer can be routed to the corresponding back-end system. The system(Alias) can correctly identify the SAP system that is responsible for processing (managing and storing) the data of an inbound request.
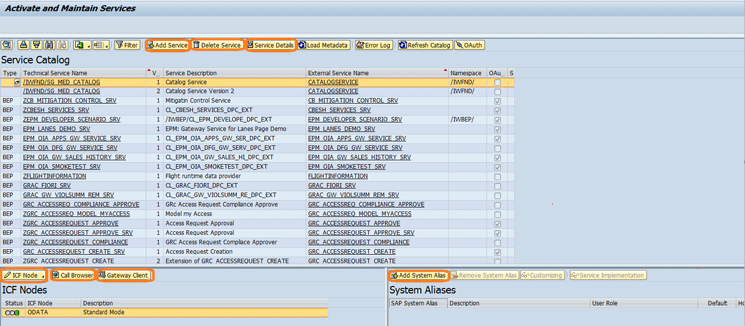
Figure 9
The OData service for the remediation view added to the Service Catalog
The related ICF node for OData can be configured or activated by clicking the ICF Node button and selecting an option from the drop-down list of options as shown in Figure 9.
When you click the Call Browser button (Figure 9), the screen in Figure 10 appears, where you can check or test the service on the browser to be sure it is configured correctly.

Figure 10
Service detail on the browser
If you select a service in Figure 9 and click the Gateway Client button, this action takes you directly to the relevant information for the current service. From there you can click the Service Implementation button in Figure 11 to go to Figure 12.

Figure 11
Details of the service

Figure 12
Detail of service implementation
If you click the Service Metadata button (refer back to Figure 11), the details of the service metadata can be viewed as shown in Figure 13. Metadata provides information such as Entity Type, Key Property, and Property.

Figure 13
Service metadata
The data provider class for the remediation view service is CL_GRAC_GW_VIOLSUMM_RE_DPC_EXT. After you activate the service, the system alias can be added by clicking the Assign SAP System Aliases to OData Service link as shown in Figure 14.

Figure 14
System alias assignment
The GRAC_GW_VIOLSUMM_REM_SRV service can be activated directly from transaction SICF as well, as shown in Figure 15.

Figure 15
Service activation from transaction code SICF
If the above configuration and activation of the service is not done correctly, then the report does not return any results and shows a blank screen when you execute User Level risk analysis in the remediation view. However, the same report returns results for the business and technical views as only the remediation view in Access Control 10.1 uses these services. The business and technical views work as they did in Access Control 10.0.
Model for ODATA Service
To view the details for an OData service model, execute transaction code SEGW. You can view OData service model Entity Types, Complex Types, Associations, Entity Sets, and Function Imports as shown in Figure 16. You need to check the model to make sure that everything is configured correctly. The Registered Model and Registered Service can be checked. The name of the Data Provider Extension Class and Model Provider Base Class can also be verified here.

Figure 16
OData service model
JSON
There is no additional configuration required for JSON from the user point of view. It is a data interchange format based on JavaScript. JSON is not part of any particular programming language, so different systems can pass data very easily using this. You can do serialization and deserialization of the data to make it understandable by both the front end and back end while passing data through JSON.
BSP Applications for Simplified Access Request and Remediation View
All the BSP applications for simplified access request and remediation view are under the GRAC_UI_UTILITIES package. The BSP applications are only used as a repository or storage for SAPUI5 application files. SAP NetWeaver version 740 is required for GRC 10.1.
Advantages of Using OData Service in GRC 10.1
OData is an open data protocol that allows you to retrieve data based on a URL. It supports HTTP as well as the JSON format. It has the support for any type of database so you can use any custom class as well as the data source. In an OData service the user does not need to create a proxy service object, so it is lightweight to use. Due to this the communication between the server and client is fast and thus provides high performance. The main reason of using an OData service for the remediation view is that any user should be able to use or consume it and maintain it with ease, which was not possible in earlier releases.
Simplified Access Request and Remediation View Configuration
In transaction SPRO the entire configuration for simplified access request, which includes Maintain Display Sections, Maintain Field Labels, Maintain Request Page, and Maintain Request Reasons, are available under the simplified access request node.
Simplified access request can be created by clicking the link Create Request – Simplified under My Home tab in transaction code NWBC as shown in Figure 17.
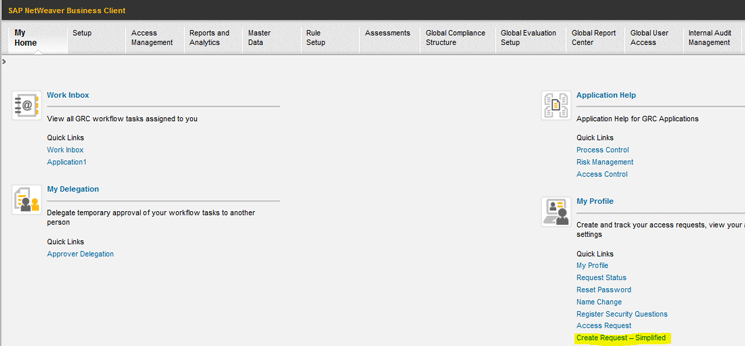
Figure 17
Link for creating a simplified access request
When you click the Create Request- Simplified link the screen shown in Figure 18 opens. The user enters the required information and clicks the Review and Submit button to create the request.
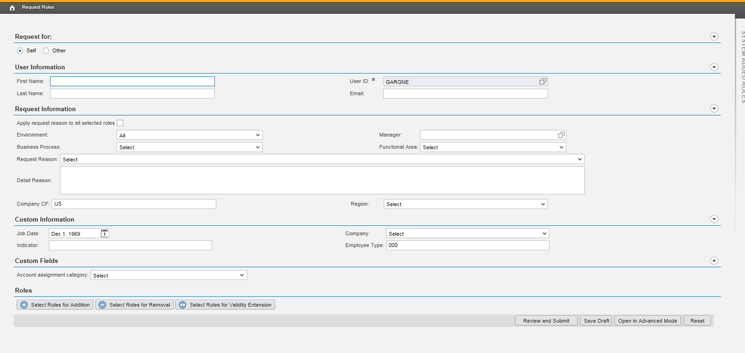
Figure 18
Simplified access request creation page
New configuration parameter 1050 is introduced for a default report view for risk analysis. With the help of this parameter you can set the remediation view as the default report view for Risk Analysis. The menu path for setting this parameter value is SPRO > GRC > Access Controls- > Maintain Configuration Settings as shown in Figure 19. Press the F4 help for the value of parameter 1050 and choose the desired value from the pop-up screen. Click the green arrow icon to close the pop-up screen and click the save icon to save your entry.
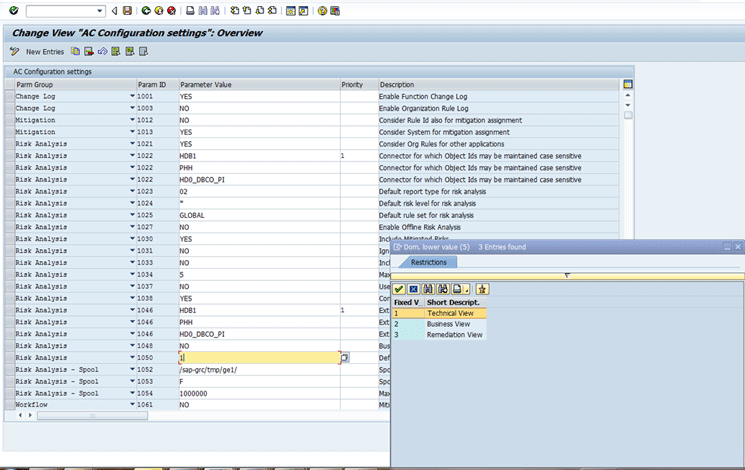
Figure 19
Configuration setting for the Risk Analysis default view
The value 1 for this parameter means the default view for Risk Analysis is a Technical View. Value 2 means that the default view is the Business View, and value 3 means that the default view is the Remediation View.
Click the User Level Analysis link under Access Management tab in the GRC application as shown in Figure 20 to open the Risk Analysis screen shown in Figure 21.

Figure 20
User level risk analysis
In the Risk Analysis screen , the highlighted view appears as the default on opening the screen , depending on the value maintained for parameter 1050 as shown in Figure 21.

Figure 21
Remediation View as the default for Risk Analysis
When you click the Run in Foreground button after entering the required input parameters such as System and User in Figure 21, you see the detail of corresponding risks as shown in Figure 22. In this screen, the user has the option to remove the role if required. Mitigation can also be done from the view itself. This view displays the error in case there is any role that is not maintained in the GRC system.

Figure 22
Remediation View of Risk Analysis
Details of roles and risks (Figure 23) can also be viewed in the right panel by clicking the Role Name or risk name hyperlink.

Figure 23
Details of risks in the Remediation View
There is no additional authorization required for simplified access request and remediation view in 10.1.
Flow Logic for Simplified Access Request and Remediation View
Both simplified access request and remediation view are SAPUI5-based applications.
SAPUI5 applications for simplified access request and remediation view are created using Eclipse. These applications are synced in ABAP systems into BSP applications. Eclipse is integrated with the ABAP system using the add-ons UI_INFRA and UI5_731.
In the development landscape you can use the Tomcat or Jetty server (integrated with Eclipse) besides the SAP NetWeaver server for testing the application locally. In the production landscape, the SAP NetWeaver server is used to fulfill the requests coming from the browser (Figure 24).

Figure 24
Flow of an HTTP request from the browser to the server
JSON is used to serialize and de-serialize the data to make it compatible for both the systems for sending the request/response data to and from the back-end system to the browser. Once the call reaches the back-end system, the related SICF handler provides the result for the incoming requests.
Now with simplified access request, it is easy for a user to create the request with the minimum possible fields. The field labels and the sequencing of the fields can also be changed as per the need. The remediation view facilitates the user to see all role- and risk-related information on the same screen, do the risk analysis, and mitigate the risks with ease.
Neha Garg
Neha Garg, senior developer, SAP Labs India Pvt. Ltd., has nine years of experience in SAP Labs. Neha is currently working with the Installed Base Maintenance Support (IMS) organization, SAP Labs, India, for SAP Access Control 5.3, 10.0, and 10.1. Neha has vast experience and has worked on multiple technologies, including JavaScript, Java, web services, OData services, SAPUI5, HANA, ABAP WebDynpro, Floor Plan Manager with ABAP WD, ABAP OO, SAP ABAP dictionary, and function modules for a broad range of SAP modules and SAP Access Control. Neha has worked in almost all the sub-components of SAP Access Control and has published one patent in the SAP Access Control area.
You may contact the author at neha.garg@sap.com.
If you have comments about this article or publication, or would like to submit an article idea, please contact the editor.

Shilpa Viswanadha
Shilpa Viswanadha. senior developer, SAP Labs India Pvt. Ltd., more than six years of experience in the IT industry with more than three years in SAP Labs. Currently Shilpa is working with the Installed Base Maintenance Support (IMS) organization, SAP LABS India, for Access Control 10.0 and 10.1. Shilpa has vast experience in different technologies including SAP UI5, HANA, ABAP WebDynpro, Floor Plan Manager with ABAP WD, ABAP OO, SAP ABAP Dictionary, function modules for a broad range of SAP modules and SAP GRC Access Control.
You may contact the author at s.viswanadha@sap.com.
If you have comments about this article or publication, or would like to submit an article idea, please contact the editor.


