Learn the key advantages of using the SAP Bank Communication Management module. Discover how SAP Bank Communication Management increases the efficiency and automation of payment processing within organizations.
Key Concept
SAP Bank Communication Management is a relatively new module of SAP’s Financial Supply Chain Management component. SAP Bank Communication Management can be used to efficiently manage inbound (current day reports, prior day reports, payment file, and transaction-level acknowledgments) and outbound (AP, HR, and Treasury payments) communications with banking partners. In addition, SAP Bank Communication Management provides additional capabilities such as payment batching, approval capabilities using SAP standard workflow, digital signature, and payment status tracking.
Before SAP Bank Communication Management, there were gaps in the visibility in the payment and reporting processes in the SAP system. For example:
- It was not possible using standard functionality to combine the output of multiple payment runs into one payment file that was then sent to the bank.
- It was also not possible to report on payments across payment runs.
- The standard functionality also depended on receipt of bank statements to track the status of payments that had been sent to the bank.
- It was not possible to import status messages into the SAP system.
- It was not possible to see from a high-level the status of the bank statements received.
SAP Bank Communication Management fills these gaps.
- Run payment program
- Batch payments
- Approve payments (if required)
- Generate payment files
- Deliver payments files to the bank
- Receive file level acknowledgements
- Upload file level acknowledgements into the SAP system
- Receive transaction-level acknowledgements
- Upload transaction-level acknowledgements into the SAP system
- Receive and upload bank statements
Key Advantages
Using SAP Bank Communication Management provides you with the following advantages:
- The ability to merge payments from various runs using predefined rules and create batches that can be routed for approvals. There are many payment attributes (such as amount, payment origin, company code, payment methods, currency, house bank, and value date) that can be used to batch payments together. However, be aware of the fact that payments from the SAP ERP HCM (Human Capital Management) module cannot be merged with payments from AP and Treasury.
- The optional ability to approve payments before they are delivered to the bank. A payment batch can still be sent to the bank without approval, if approvals after the payment runs are not necessary. SAP Bank Communication Management provides functionality to have as many approvals as required using standard SAP workflow.
- The ability to import both file- and transaction-level acknowledgments into the SAP system. Upon successful import of acknowledgments, the payment batch status is updated in the SAP system. The Batch and Payment Monitor (BNK_MONI) in SAP Bank Communication Management shows all payments and their associated statuses.
- The ability to set up custom alerts if a batch status is not updated as per the agreed upon time frame. For example, if the file-level acknowledgment is not received from the bank within 15 minutes of sending the file to the bank, an alert is triggered.
- SAP Bank Communication Management’s bank statement monitor gives Treasury and bank reconciliation users a quick view of the status of bank statements imported for the day. The report also notifies users of any bank statements missing for the day.
- Payment fraud prevention
- Increase the efficiency and automation of payment processing and payment reconciliation
End-to-End Process Flow Example (Assuming Two Approvals Are Required)
Before reviewing the configuration, we explain the end-to-end process flow when SAP Bank Communication Management is used. You can also review requirements for using SAP Bank Communication Management in the sidebar “Prerequisites to Using SAP Bank Communication Management.”
SAP system users often require an approval process at the batch or payment level on the bank side, after the payment file has been transmitted to the bank. This approval step can now be put in the SAP system before the payment file is transmitted to the bank. Table 1 lists the steps of an end-to-end process flow for a scenario in which two approvals are necessary.
Step
|
Transaction code, program, or report
|
Description |
Automatic payment run is successfully completed
|
F110 or F111
|
If SAP Bank Communication Management is not used, the payment accounting documents and payment file are created. With SAP Bank Communication Management, the payment accounting documents are created, but the file is not created. When SAP Bank Communication Management is used, the payment file is not created until the payment processing and approval are successfully completed.
|
Merge payments
|
FBPM1
|
All AP and Treasury payments that are using identification ID reserved for SAP Bank Communication Management are routed to the SAP Bank Communication Management module for batching.
Now the merge program is run to batch the payments. Merging the payments creates payment batches that are routed for approval.
|
First approval (change and release)
|
BNK_APP
|
At this point, payment batches go through the first approval. There are three possible outcomes:
1. Approve the entire batch
2. Reject the entire batch
3. Partially approve the batch (e.g., approve some payments and reject some payments).
This approver is referred to as the verifier. Only the verifier can reject payments.
The Change and Release tab should be used in this step.
|
Second approval (additional release steps)
|
BNK_APP
|
In this step the payments go through the second, and final, approval step. The possible outcomes are:
1. Approve the entire batch
2. Reject the entire batch
It is not possible at this step to partially approve the batch.
After both required approval steps have been done, the payment file is created. This approver is referred to as the approver. The approver can approve or reject entire batches but cannot reject individual payments.
The Additional Release Steps tab should be used in this step.
|
Payment medium is created and delivered to bank
|
BNK_APP/FBPM
|
After final approval of each batch, the payment file is created. The payment file is now transmitted to the bank. The status of the batch is now payment medium created.
|
File-level acknowledgment is received and imported into the SAP system
|
Program RBNK_IMPORT_PAYM_STATUS_REPORT
|
The file-level acknowledgment confirmations are imported into SAP Bank Communication Management. The SAP system receives the acknowledgment confirmation message and updates the payment status in SAP Bank Communication Management. (This is the file-level acknowledgment.)
This step tells the company the payment file has been received by the bank. Two outcomes are possible:
1. Received by the bank
2. Rejected by the bank
The payment batch status is updated in the SAP system accordingly.
|
Transaction-level acknowledgment is received and imported into the SAP system
|
Program
RBNK_IMPORT_PAYM_STATUS_REPORT
|
The payment-level acknowledgment confirmations are imported into SAP Bank Communication Management. The SAP system receives the acknowledgment confirmation message and updates the payment status in SAP Bank Communication Management. (This is the transaction-level acknowledgment.)
At this step, the payment-level status within a batch is updated. Two outcomes are possible:
1. Payment accepted by bank
2. Payment rejected by bank
The batch status is partially accepted by the bank until positive payment-level acknowledgements are received for all payments in the batch. |
| Bank statement imported |
FF.5 |
Intraday and prior-day bank statements are imported. The bank statements show that the payments have cleared the banks. |
| Bank statement monitor |
FTE_BSM |
The bank statement monitor shows the statuses of the bank statements imported. |
Table 1
End-to-end process flow with SAP Bank Communication Management
One potentially important process step that is not included in Table 1 is the reset of the merging of a batch. If a batch is merged in error, it may be corrected with the Reset a Merge Run program (transaction code BNK_MERGE_RESET). This reverses the merge step.
Approvers can see batches that are in different approval stages and require their approvals using the Approve Payments program. To run this program, execute transaction code BNK_APP. In the screen that appears (Figure 1), the Change and Release tab lets users approve batches that have not gone through the first approval yet. The Additional Release Steps tab lets users approve batches that have gone through the first approval but require additional approvals. The Processed Batches tab lets users view the batched that have been successfully approved. The Dropped Payments tab lets user view batches that have either been rejected or have some errors in payment-medium creation. If digital signatures are used, the approver must sign using the Change Log tab. The Change Log tab shows the change tracking information, which is displayed in the application log after you click the save icon (not shown). The transaction code BNK_LG_SGN can be used to view this digital signature information at a later point. (See step 2 below for requiring digital signatures.)

Figure 1
The initial screen after execution of the Approve Payments program
All payment batches can be viewed using the Bank and Payment Monitor. To access the Bank and Payment Monitor, execute transaction code BNK_MONI. This action opens the screen shown in Figure 2. The New tab consists of batches that are in created status. The In Approval tab shows batches that are going through approval while the Approved tab has batches that are fully approved. The Sent to Bank tab has batches for which acknowledgements have been received.

Figure 2
The Bank and Payment Monitor
Prerequisites to Using SAP Bank Communication Management
Licensing may be required to use the SAP Bank Communication Management module. Check with your SAP account executive before activating SAP Bank Communication Management.
The SAP Bank Communication Management business function (FIN_FSCM_BNK) must be activated using transaction code SFW5. To be able to fully use the functionality offered by SAP Bank Communication Management, the payment method should be defined with the Payment Medium Workbench output option.
How to Configure SAP Bank Communication Management
Outgoing Payments
Step 1. Set up cross-payment-run identifiers. The identifiers entered refer to how the Identification field is populated when running the payment programs. (Each payment run is uniquely identified by a run date and an Identification field that is manually entered by the user.) To complete this step, use transaction code OBPM5 or follow menu path IMG > Financial Accounting (New) > Accounts Receivable and Accounts Payable > Business Transactions > Outgoing Payments > Automatic Outgoing Payments > Payment Media > Define Identification for Cross-Payment Run Payment Media.
In this configuration, you specify the AP/AR (F110), Treasury (F111), and HR payment runs that should be directed to SAP Bank Communication Management for batching of payments and batch approvals. In the initial screen that appears (Figure 3), there are three buttons: one for AP payment runs, one for Treasury payment runs, and one for HR payment runs.
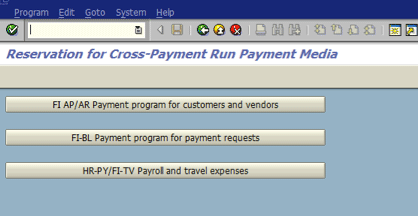
Figure 3
Cross-Payment Run Payment Media configuration
In Figure 3, click the FI AP/AR Payment program for customers and vendors button. The Run indicator field is set based on the button clicked. Do not change it. Enter payment-run identifiers in the fields under the Identifier column and select the BRM (BCM) indicator. Click the save icon.
This action opens the screen shown in Figure 4 in which you enter the payment program identifiers. If you want only payment identification runs that start with numbers to go to SAP Bank Communication Management, set the configuration as shown in Figure 4. Click the save icon to save your entries.
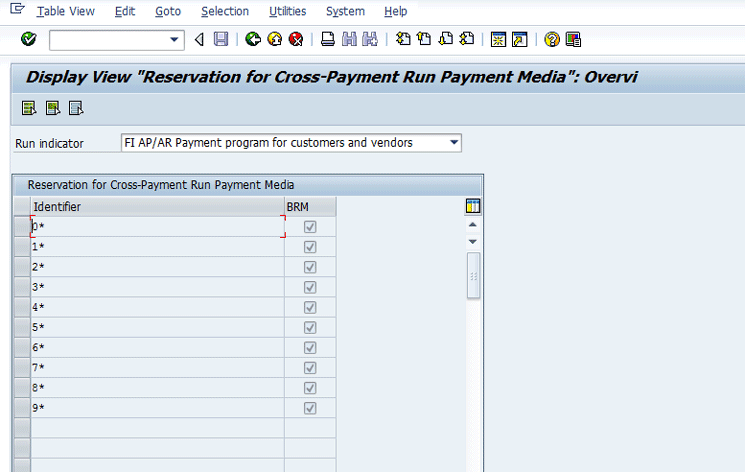
Figure 4
Define identification for Cross-Payment Run Payment Media configuration
Next, instead of clicking the FI AP/AR Payment program for customers and vendors button, click the FI-BL Payment program for payment requests button. This action opens the screen shown in Figure 5.
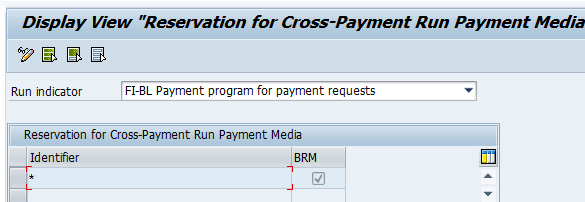
Figure 5
Configuration to send all F111 payment runs to SAP Bank Communication Management
As shown in Figure 5, entering an asterisk in the field under the Identifier column and selecting the check box under the BRM column in this configuration tells the system to send all payment runs to SAP Bank Communication Management. This configuration can be set with an asterisk only if all payments should go to SAP Bank Communication Management. Enter payment run identifiers in the field under the Identifier column and select the BRM (BCM) indicator. Click the save icon when done.
Note
The column header BRM should be BCM. This is a translation issue. When viewing this configuration in German, the column header is BCM.
Note, however, that when entering an asterisk all payments are routed to SAP Bank Communication Management, whether they are payments using the Payment Medium Workbench(PMW) payment methods or payment methods defined with a classic payment medium program, such as RFFs. This is relevant because the payment method used for payments routed to SAP Bank Communication Management should be defined as PMW payments. There are two ways to define a payment method’s payment medium in the SAP system. One is by using the RFF payment programs, which are referred to as classic payment program payment methods. The later generation way of creating payment methods is using the PMW. SAP Bank Communication Management is intended to be used with PMW payments.
If a company is using both PMW and classic payment medium program payment methods, this configuration step is tricky. This is because the non-PMW payment methods should not go to SAP Bank Communication Management yet this configuration step is not set by payment method, and in configuration the driver is only the Identification field of the payment runs. An example of when a company would have both PMW and classic payment medium program payment methods is when the company is using the In-House Cash module, as the payments are sent to the In-House Bank as IDocs (RFFOEDI1), which is a form of classic payment medium payment method.
Company-specific enhancements are needed if not all payments are to be routed to BCM. One possibility is to enter an enhancement point at the top of the merge program (FIBL_PAYMENT_RUN_MERGE) that would exclude any non-PMW payment methods in the batching of payments. Another option is to create an enhancement at the payment program level as the payment program parameters that are entered would contain custom logic to ensure that, based on the payment methods included in the payment run, the Identification field is properly named based on the OBPM5 configuration.
Step 2. Configure basic settings for approval. To complete this step follow menu path IMG > Financial Supply Chain Management > Bank Communication Management > Basic Settings > Basic Settings for Approval. Click the New Entries button and then populate the fields as shown in Figure 6.
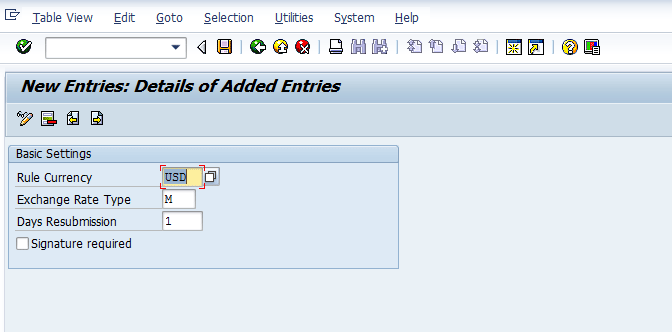
Figure 6
Basic settings for approval
In this configuration, you specify the default currency for the total batch amount, the resubmission days from the current date, and whether a digital signature is needed for payment. In the Rule Currency field, the default currency specifies the currency in which the total batch amount is displayed for approvals. Setting this to USD means that for all batch approvals, the total amount of the batch is displayed in USD, regardless of the currency of the payments.
The value entered in the Exchange Rate Type field (M in our example) is the exchange rate type used to convert payments into the Rule Currency entered.
In the Days Resubmission field, enter the default number of days to be used when batches are resubmitted. During the approval process, if a payment or batch is resubmitted, the system adds this number of days to the current date to compute the proposed resubmission date. In our example, the Days Resubmission is set to 1, so the default resubmission date is the next day.
SAP Bank Communication Management has the ability to put digital signatures on payments. If you select the Signature required check box, a signature box appears during the batch approval process. The digital signature is passed with the payments to the bank. Click the save icon and then the enter icon (the green check mark).
Step 3. Configure rule maintenance. To complete this step follow menu path IMG > Financial Supply Chain Management > Bank Communication Management > Payment Grouping > Rule Maintenance.
This configuration defines the rules for batching payments. Priorities can be given to the rules for the cases when a payment can fall into more than one rule, in which case the payment is included in the rule with the highest priority (the highest priority has the lowest number, so priority 0 is higher than priority 1).
If you want to have all payments of $1 million or more require approvals, you would define one batch containing all payments of $1 million and more, and a second batch of all payments less than $1 million. These batches need to be by bank as well, because, as mentioned, the batching is how the payments are grouped when sent to the bank and you would not send JPM Chase payments to Citibank (Figure 7).

Figure 7
Rule maintenance initial view
If you do not want any approvals in SAP Bank Communication Management, but instead want the payments to flow through SAP Bank Communication Management to the bank, the batching rules would be defined by bank, without the amount attributes.
Figure 8 shows the detailed view of how one of the rules is defined.

Figure 8
Rule maintenance detail view
Keep in mind that the rules do not automatically go into a transport when transports are active in the SAP client. To save this configuration into a transport, execute transaction code SE38, and in the ABAP Editor Initial Screen (Figure 9), enter program RBNK_RULE_TRANSPORT.

Figure 9
Enter the RBNK_RULE_TRANSPORT program
After you click the execute icon in Figure 9, click the right-pointing arrow to enter multiple values, and then enter the rule names in the pop-up screen, as shown in Figure 10.
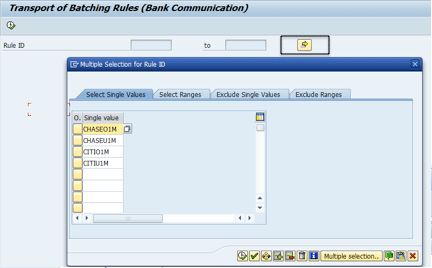
Figure 10
Add batching rules to the program
Next, click the execute icon in the pop-up screen shown in Figure 10, and in the next screen, select the tabs to the left of the Rule IDs, select the transport icon, and enter a workbench transport in the Request field in the pop-up screen, as shown in Figure 11.

Figure 11
Add rules to the transport
You can specify additional criteria for grouping payments in the Additional Criteria for Payment Grouping configuration node. For example, in the grouping of payments above, the payments can be grouped by amount. In the Additional Criteria for Grouping node, the additional criteria of grouping by bank could be done.
Step 4. Mark rules for automatic payments (no approval). To complete this step, follow menu path IMG > Financial Supply Chain Management > Bank Communication Management > Release Strategy > Mark Rules for Automatic Payments (No Approval).
In this configuration, you mark any batching rules that do not require approval. For our example, the rules for payments of less than $1 million are selected for not requiring approval. Figure 12 shows that for the batching rules for payments under $1 million, the auto-approval indicator is set.
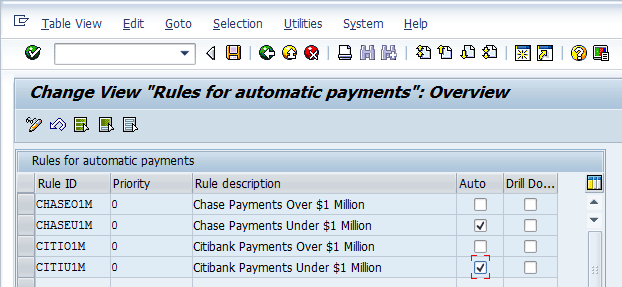
Figure 12
Mark rules for automatic payments
If the Drill Down indicator is selected, then the user must drill down from the batch level to see all the payments included in the batch when approving (transaction code BNK_APP).
Step 5. Assign role to release steps. Follow menu path IMG > Financial Supply Chain Management > Bank Communication Management > Release Strategy > Change and Release > Assign Role to Release Steps (Figure 13).

Figure 13
First approver (verifier) workflow object configuration
This configuration relates to the workflow approval process. SAP Bank Communication Management uses two workflow objects: BNK_INI (verifier) and BNK_COM (approver). As mentioned in Table 1, the verifier (first releaser) has the ability to change batches by rejecting payments. The approver (after the first release) only has the ability to approve or reject at the batch level.
In this step, you assign a standard role to the release step that applies to the verifier release object. (As mentioned previously, the verifier is able to approve, reject, or partially approve batches.) In this example, enter BNK_INI in the field under the Rel.Object (release object) column. Click the save icon. After saving your entry, select the tab to the left of the entry and click the Create Rule button to assign users to the role as shown in Figure 14.
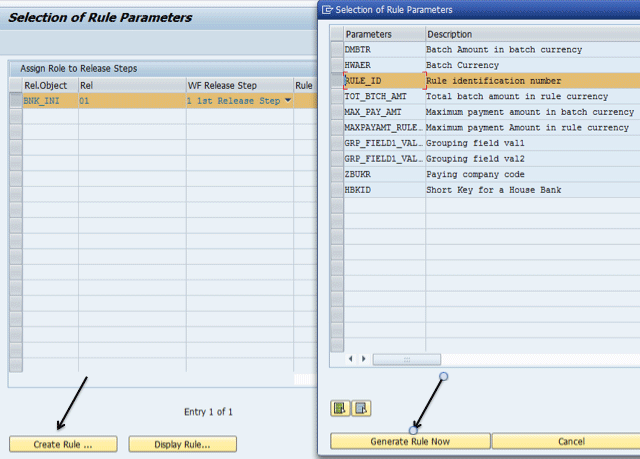
Figure 14
Define first approval workflow rule
From here, you can define the criteria by which the verifier workflow messages are sent. Select the check boxes beside the batch amount, batch currency, and rule ID number parameters (the first three rows in the pop-up screen in Figure 14). Click the Enter key and then click the Generate Rule Now button. In the pop-up screen that appears (not shown), click the Copy Generated Rule button. This action opens the screen shown in Figure 15 in which you assign users to this role. Click the create icon, and then in the Create responsibility pop-up screen, add users to this role as shown in Figure 15.
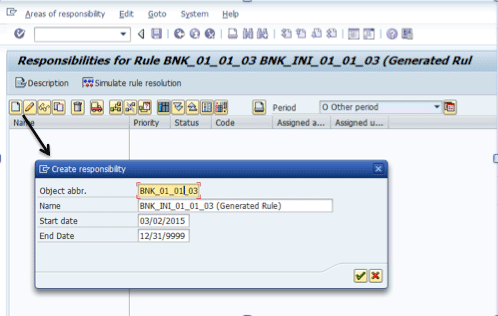
Figure 15
An example of making an assignment date dependent
As with all SAP system workflow, the assignment to the role is date dependent, so add start dates and end dates for the role as shown in Figure 15. Click the green check mark to close the Create responsibility screen.
This process is similar to how it is done for other SAP systems’ standard workflow messages. In this step, any number of users can be assigned as the verifier. Figure 16 shows the screen after users have been added. Click the save icon to save your data. The workflow configuration must be specifically put into a transport by clicking the transport icon  .
.

Figure 16
Assign users to a role
In addition, a work center, job, or position can be assigned, as shown in Figure 17.
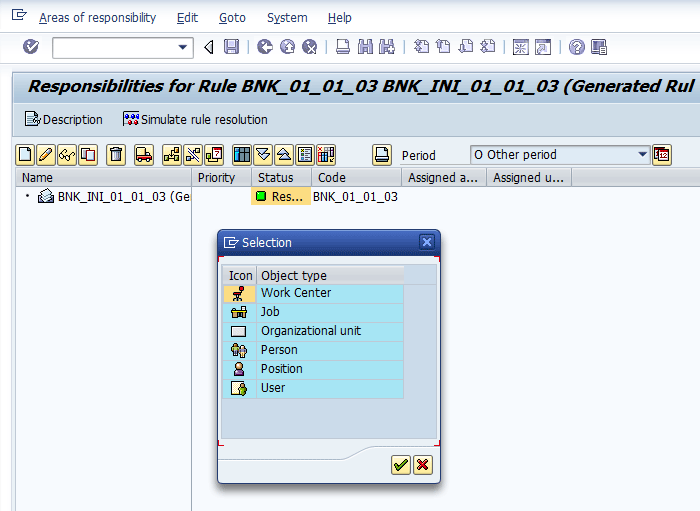
Figure 17
Workflow assignment categories
Note
The standard Basis settings for workflow must be done on the SAP system client. It may be helpful to have a workflow support person involved when activating the SAP Bank Communication Management workflow.
Step 6. Define a release procedure. To complete this step, follow menu path IMG > Financial Supply Chain Management > Bank Communication Management > Release Strategy > Additional Release Steps > Define Release Procedure.
In the screen that appears (Figure 18), specify if a workflow release is always required or if the workflow release is conditionally required. The conditional releases can be based on release procedures and release reasons. Different user groups can be assigned to approve different release procedures.
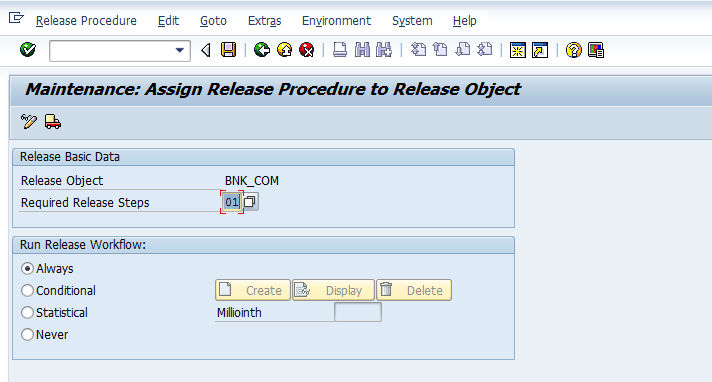
Figure 18
Approver workflow object configuration
Selecting the Never radio button option for the Run Release Workflow resets the value in the Required Release Steps field to 00. When changing the radio button back from Never to Always, you have to make sure that the Required Release Steps field contains a value other than 00. Click the save icon to save your data. Because this configuration step is for the Approver (after the first release), if only one release is required, in this configuration select Never.
Note
If the radio button is changed to Never, all the entries for conditional release workflow are deleted. Therefore be careful when working with the IMG node after you have entered the conditional release workflow configuration.
Step 7. Assign roles to release steps. Follow menu path IMG > Financial Supply Chain Management > Bank Communication Management > Release Strategy > Additional Release Steps > Assign Roles to Release Steps (Figure 19).

Figure 19
Assign a role to the approver workflow object
This step is the same as step 6, except the release object is different. In this step, you assign a standard role to the release step that applies to the approver release object (BNK_COM). This configuration is relevant to all releases after the first verifier releaser. As mentioned previously, the approver releaser can approve or reject at the batch level only.
Step 8. Specify executors of digital signatures. Follow menu path IMG > Financial Supply Chain Management > Bank Communication Management > Release Strategy > Digital Signatures. In this step, you specify the data in the user master record of the person who is to execute the digital signatures. You enter the full name of the user and his or her time zone. When a signature is entered, the system copies the signatory name and the local time for that person according to the signatory’s time zone into the signed payment document.
Note
This is manual configuration that must be entered in each client. Also, if you are working with digital signatures, you should not allow users to maintain their own data in System > User Profile > Own Data, which might not be practical for all user communities.
Incoming Acknowledgments (Payment Status Management)
Incoming acknowledgments (payment status management) requires these configuration steps.
Step 1. Map external status to internal status. To complete this step, follow menu path IMG > Financial Supply Chain Management > Bank Communication Management > Payment Status Management > Map External Status to Internal Status. Click the New Entries button and enter the mappings. The screen should look similar to the screen shown in Figure 20.
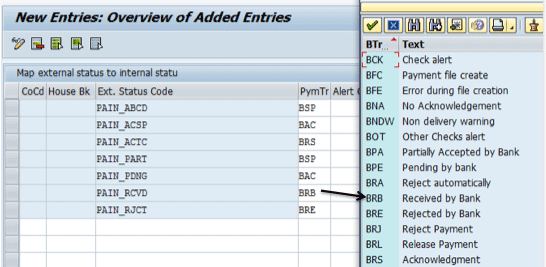
Figure 20
External to internal status mapping
In the Map External Status to Internal Status configuration, the external status code is mapped to an SAP internal status code. The external status codes are the codes in the acknowledgment files sent from the banks. All the external status codes (on the left) need to be mapped to interest status codes. In Figure 20, the SAP system’s internal status codes are displayed on the right. In our example, we mapped the bank status code of PAIN_RCVD to the internal status code of BRB (Received by Bank). After the mappings have been entered, click the save icon.
Note
The PAIN_ABCD status code must be configured and it must be assigned to code BSP. If this is not entered, you will encounter error messages when importing the acknowledgment files.
In this configuration, it is possible to assign an alert to an external status code. For example, if the bank rejects a payment, an alert message is triggered with information about the rejected payment. This is shown in Figure 21.
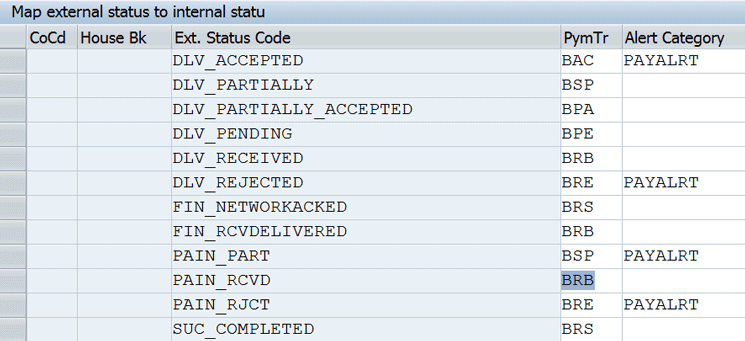
Figure 21
External to internal status mapping with alerts
Step 2. Configure a timeout for a batch status update. To complete this step, follow menu path IMG > Financial Supply Chain Management > Bank Communication Management > Payment Status Management > Timeout for Batch Status Update.
In this step, the maximum time allowed between two status updates is specified. An alert is triggered after the maximum time has been exceeded. This alert notifies users of a missing or delayed payment acknowledgment file. You must enter an Alert Category, which should be Bank Communication Management: Alerts for Payment Status.
To trigger alerts (e.g., emails), if an acknowledgement file indicates a payment file or a payment is rejected by the bank, three BAdIs can be used:
-
ERROR IN FILE CREATION ALERT BADI: This alert is triggered specifically when an error is encountered when the payment medium file is created.
- TIMEOUT ALERT BADI: This alert checks batch status changes of a batch where a reference status to the expected status is indicated. If the status didn’t change for the specific period of time defined, an alert is triggered.
- PAYMENT STATUS ALERT BADI: This alert is triggered upon status changes of a batch that was a result of incoming XML files from the bank.
Note
Alert categories are defined using transaction code ALRTCATDEF.
Incoming Bank Statements
Incoming bank statements require configuration of settings for the Bank Statement Monitor. To complete this configuration step, follow menu path IMG > Financial Supply Chain Management > Bank Communication Management > Bank Statement Monitor > Settings for Bank Statement Monitor.
In this step, you specify the house bank accounts that you want to view in the Bank Statement Monitor (FTE_BSM). To specify the house bank account, enter the company code, house bank ID, and account ID. For each account, indicate the type of monitoring desired by entering the processing status, difference status, serial number status, and reconciliation status.
The processing status is the processing status of the bank statement and is similar to the status displayed in the FEBA and FEBAN bank statement processing transaction codes. There are three processing statuses:
-
Red: The bank statement is not imported, but should have been based on interval setting.
-
Yellow: The bank statement is imported, but some of the items could not be posted.
-
Green: The bank statement has been posted correctly.
Figure 22 shows the Bank Statement Monitor (FTE_BSM) output screen.

Figure 22
Bank Statement Monitor
The difference status is a tolerance amount calculated as the difference between the bank statement balance and the general ledger balance for the bank account. If the bank statement account balance matches the general ledger account balance within tolerance, the difference status is green. Otherwise, the status is red. The serial number status indicates if the sequence of the last five bank statements is complete.
The reconciliation status is green if, for this bank statement, all bank reconciliation items are processed completely. This status is red if there are reconciliation items still to be processed after posting is complete. The factory calendar ID is used to distinguish working days from non-working days.
From the Bank Statement Monitor, the user is able to display the bank statement, display bank statement line items or go to bank statement post-processing for any of the specific bank statements displayed, as is shown in Figure 23.
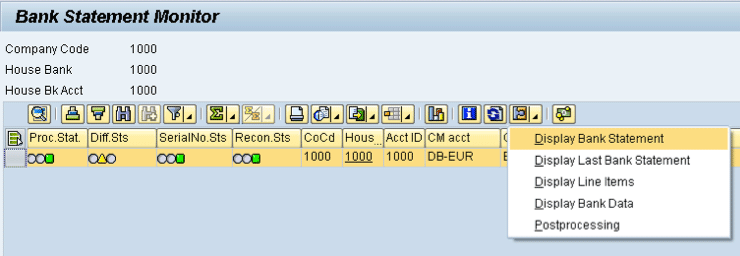
Figure 23
External to internal status mapping with alerts
End-to-End Process Flow (Assuming No Approval Is Required/Automatic Approval)
As mentioned earlier, it is possible to use SAP Bank Communication Management and not have payment approvals after the payment programs are run on the SAP system. If SAP Bank Communication Management payment approvals are not used, the process flow is as follows:
-
Automatic payment runs are successfully completed (transaction codes F110, F111, or HR–PY/FI-TV)
-
Batch payments
-
Payment media are created and delivered to bank
-
File-level acknowledgements are received and imported in the SAP system
-
Transaction level acknowledgements are received and imported in the SAP system
-
Bank statements are received and imported into the SAP system
Other Things to Consider When Implementing SAP Bank Communication Management
You also need to keep a few other points in mind when implementing SAP Bank Communication Management.
CGI_XML_CT (CGI XML Credit Transfers)
CGI stands for Common Global Implementation. As the name suggests, this is an ISO XML version that is developed by a working group of banks, corporations, financial authorities, Society for Worldwide Interbank Financial Telecommunication (SWIFT), and SAP. For credit transfers (payments), the version number is PAIN.001.001.03. For status reporting (acknowledgment file), the version number is PAIN.002.001.03. This is one of the most widely accepted standards and makes payments implementation in various countries and banks less complicated. Refer to the SAP Implementation Guideline for CGI_XML_CT for more details.
SWIFT Network
There are a number of advantages of using SWIFT standards and the SWIFT network for interfacing with banks. The SWIFT network guarantees the secure transfer of files and messages to and from the banks. It is a way to standardize communication to and from the banks, giving the banks less leverage over the company. For more information, visit the SWIFT official site, here: swift.com.
Mary Loughran
Mary Loughran has been specializing in the SAP Financials area since 1997 and has worked with numerous clients throughout North America and Europe in the areas of finance and treasury. She was employed as a consultant with SAP America and was a designated expert within SAP America for treasury before she left SAP in 2004. Mary’s expertise is in the areas of SAP Treasury and Risk Management, SAP In-House Cash, Liquidity Planner, Accounts Payable, payments from SAP in general, Cash Management, and Electronic Banking. Mary was an independent consultant from 2004 to 2016.
You may contact the author at loughran@gmail.com.
If you have comments about this article or publication, or would like to submit an article idea, please contact the editor.

Praveen Gupta
Praveen Gupta has been specializing in the SAP Financials area since 2005 and has worked on numerous projects in the areas of finance, treasury, legal, and product management. Praveen’s expertise is in the areas of treasury and risk management, accounts payable, electronic banking, cash management, payments and SWIFT. Since 2014, Praveen has been a consultant with e5 Solutions Group.
You may contact the author at praveen.gupta@e5solutions.com.
If you have comments about this article or publication, or would like to submit an article idea, please contact the editor.


