Discover how to develop a Web service with Microsoft .NET that you can use to create Xcelsius applications that access SAP NetWeaver BW data dynamically. This allows you to develop applications that are always relevant and current. Downloadable sample data to try out this process is included.
Key Concept
Xcelsius provides a set of design tools to create effective dashboards. The drag-and-drop design environment and the data connectivity make these applications fun and allow designers to import a wide range of information into their analytics. Using the XML data connection in Xcelsius, you can leverage your existing data and systems to provide dynamic dashboards.
Integrating your SAP NetWeaver BW data into an Xcelsius application is an easy way to leverage your existing data warehousing investment and provide a great looking user interface to help drive business decisions. Taking advantage of SAP NetWeaver BW’s delivered remote-enabled function modules, you can create a simple .NET Web service to interface SAP NetWeaver BW and Xcelsius. This enables a dynamic connection between the two applications so that data can be updated in real time.
We will show you how to set up the .NET Web service that reads SAP NetWeaver BW query data. This example provides a basis for creating more complex analytical applications. Although this example is geared towards reading SAP NetWeaver BW query data, you could also apply the process to reading non-SAP data and structure the data in a way that is conducive to Xcelsius reporting.
The prerequisites for our solution are:
- SAP NetWeaver BW 7.0
- Xcelsius 2008
In addition, the .NET Web service prerequisites are:
- Windows Server 2000 or later
- Internet Information Services (IIS) 5.0 or higher
- Versions 1.1 and 2.0 of the Microsoft .NET Framework installed on the server
- IIS configured to run ASP.NET 2.0 applications
Note
For background information about using remote-enabled function modules, refer to the sidebar “Working with the SAP NetWeaver BW Query Remote Enabled Function Modules.”
Solution Overview
The solution contains three basic components: the SAP NetWeaver BW query, the .NET Web service, and the Xcelsius application. Figure 1 shows the relationship among these items. The .NET Web service is connected to SAP NetWeaver BW using the SAP .NET Connector, which is a standard process for connecting .NET applications to SAP applications.
Tip!
The SAP .NET Connector is available for download in the SAP Service Marketplace. Refer to “
SAP .NET Connector” in SAP Help for additional information.

Figure 1
The .NET ExecuteBWQuery Web service extracts data from SAP NetWeaver BW and formats it so that it is easy to consume in Xcelsius
Using the SAP .NET Connector, we created a simple program to provide a generic interface between SAP NetWeaver BW and Xcelsius. We developed this interface to render SAP NetWeaver BW query data in a format that Xcelsius can easily understand. We created a generic user and logon to access SAP NetWeaver BW from the .NET Web service. With this approach, we have a consistent way of calling many SAP NetWeaver BW queries, which we can then embed into an Xcelsius application. Also, to make the solution more flexible, it also handles query variables and filters to make the SAP Query data more dynamic in the final Xcelsius dashboard.
.NET Web Service Overview
We decided to use the Microsoft .NET Framework as the middleware application between SAP NetWeaver BW and Xcelsius because of our team’s experience with the .NET technology. .NET provides access to every node attribute at every node level in an XML document template through a native class, System.Xml. This class also allows the developer to build new XML documents entirely in code without using a template. This functionality was particularly useful in this project because the SAP NetWeaver BW query function module can return results of varying row and column sizes.
In addition, Xcelsius has specific XML document format requirements, so the solution had to be flexible enough to allow us to shape the XML output. The included .NET Web service works with any Windows server configured to run ASP.NET 2.0 applications on IIS 5.0 or higher.
.NET Web Service Set Up
Setting up the .NET Web service in IIS is a fairly simple process. You can find the IIS Manager by going to Control Panel > Administrative Tools. Launch the Web Site Creation Wizard in the IIS Manager by right-clicking the Web Sites folder and selecting New > Web Site. In the first dialog box, enter a descriptive name for the Web site. You use this to locate the Web service in the IIS manager (Figure 2).
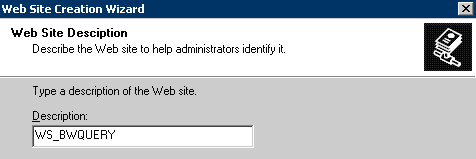
Figure 2
Enter the new Web site’s description
To move through the wizard, click the Next button. In the second dialog box, enter the TCP port your Web site should use (Figure 3). Do not use the default unless the Web service is the only Internet application running on the server.
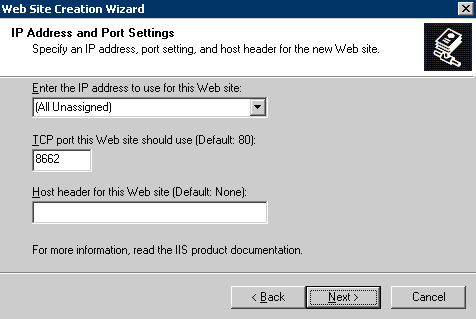
Figure 3
Enter the TCP port for the Web iceserv
Next, enter (or browse to) the location of the Web service files on this server. Make sure Allow anonymous access to this Web site is checked (Figure 4). Xcelsius makes the requests to the Web service, which does not pass user credentials to the server.

Figure 4
Enter the location of the Web service files on the server and allow anonymous access
In the wizard’s last dialog box, check the Read and Run scripts (such as ASP) check boxes in the Web Site Access Permissions dialog (Figure 5).
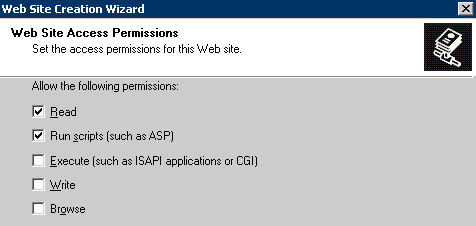
Figure 5
Enable the read and run scripts permission for the Web service
When you complete the wizard, the system lists the Web service under the Web Sites folder. Open the Properties window for the new Web service by right-clicking the description name and selecting Properties in the pop-up menu.
Figure 6 is an example of a typical IIS properties window for a .NET application or Web service. Make sure the Web service is set to run in a dedicated ASP.NET 2.0 application pool if the server is configured to run applications for multiple ASP.NET versions.
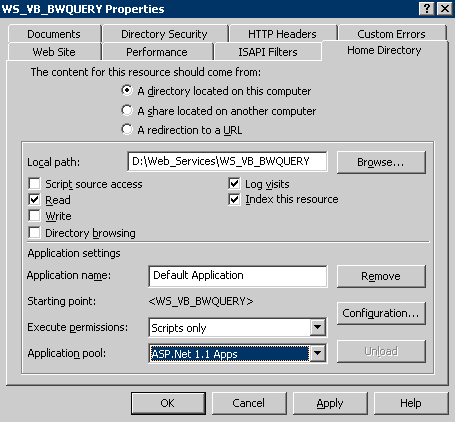
Figure 6
An example IIS properties window for the .NET Web service
For the Web service to function correctly, the ASP.NET version must be set to 2.0.xxxxx. You can set and change the ASP.NET version on the ASP.NET tab of the properties dialog (Figure 7).
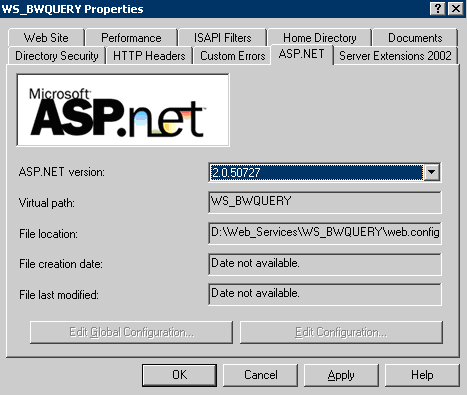
Figure 7
The ASP.NET tab of the properties dialog
SAP .NET Connector Proxy Overview and Setup
An important piece of our .NET Web service is the SAP .NET Connector, which permits .NET applications to run remote-enabled function modules on SAP systems through the use of SOAP proxies. We developed a custom DLL wrapper to make the SAP .NET Connector proxies available to our Web service. This step was necessary for the Web service to run on a 64-bit server because the SAP .NET Connector was only developed to support the Microsoft .NET Framework 1.1. This version of the .NET framework is not supported in 64-bit environments.
Access to the SAP system through the SAP .NET Connector still requires authentication. Our Web service uses a simple connection string to access SAP NetWeaver BW in this example. The connection string contains five attributes:
- Client ID (CLIENT)
- User Name (USER)
- Password (PASSWD)
- Application Server Host (ASHOST)
- System Number (SYSNR)
The connection string is stored in the Web service XML configuration file, web.config, so the connection can be easily rerouted to another server without recompiling the Web service. You can find the connection string in the connectionStrings node of the web.config file (Figure 8).

Figure 8
Locate the connection string in the Web service XML configuration file
To ensure that the dashboard always opens to your personalized view, right-click in the query template to access the Properties screen. Select Web Template from the drop-down list and then click the Web Template Parameters tab. Select the Use Personalization check box to enable the system to always look for your preferred navigation. Personalization can be thought of as an internal (hidden) bookmark linked to your user ID. (Figure 9).
Note
The SAP .NET Connector provides several other options for authenticating users, including Single Sign-On and the SAP Login form, but these methods are beyond the scope of this document.
User Logon Considerations
Any time you extract data from SAP NetWeaver BW, you need to pass security credentials to the application. Aside from using a Single Sign-On solution, there are three basic options for providing authenticating users from SAP NetWeaver BW:
- Generic user and password established by SAP NetWeaver BW technical team
- User supplies user ID and password that is entered in the Xcelsius application
- .NET validates the user for Xcelsius applications embedded into Web pages or Web applications
For applications in which the data is not overly sensitive, setting up a generic user is the best option. However, it is important to restrict the content that is available with this user so that it can only see the appropriate data.
In some of our company’s analytical applications, we combined the second and third strategy of requiring a user ID and password and having .NET validate the user. The key criterion is how the application is published. If it is published as a .swf file that is included in a Web page or an existing application, we use .NET to validate the user. If the application is published as a Microsoft or Adobe file, we typically require a user ID and password to access the information. The particular techniques that we employ are beyond the scope of this paper, but we wanted to introduce the idea in case readers want to expand the solution beyond what we provide.
The Syntax for Calling a BW Query
The .NET interface was designed as a support function for the generic extraction of SAP NetWeaver BW query data. This is important because companies can continue to develop the queries using SAP NetWeaver BW and display them in Xcelsius dashboards. Because the dashboard uses SAP NetWeaver BW queries, the data is consistent in your enterprise.
Figure 9 shows the overall syntax that the .NET Web service uses to call an SAP NetWeaver BW query. In our system, the syntax for extracting data from the SAP demo query 0D_WARENVB from the InfoCube0D_DECU looks like https://{.NET Web service address and port}/BWQUERY.asmx/ ExecuteBWQuery?I_Query=0D_WARENVB&Range_Name=REPORT1.
In our example, we are extracting data from the SAP demo query 0D_WARENVB. This data is passed into the Xcelsius name range of REPORT1 that is included in the design of the dashboard. The name range is important for the steps described in the “Design the Model in Excel” section later in the article. The advantage of specifying a name range when we make the initial data URL is that we can use the same query in an application multiple times without worrying about overwriting the name range.
Test the Generated URL
To test the generated URL simply construct the final syntax in a text editor such as Notepad, and then cut and paste the URL into your Internet browser. If the service returns the appropriate data in XML, your syntax is most likely correct. It is usually best to run the query first in BEx Query Designer just to verify that the InfoProvider is loaded and that the query returns data. Both of these conditions need to be satisfied for the Web service to return any data. Figure 10 provides a partial screenprint of the data our example Web service returned. The output conforms to the Xcelsius XML schema required by the XML data source connection type.
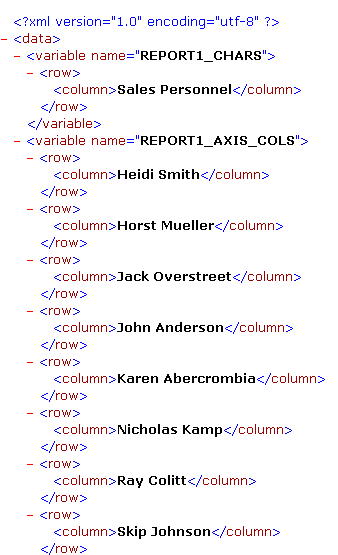
Figure 10
The XML data returned by the .NET Web service
A Simple Scenario
To illustrate how to call an SAP NetWeaver BW query from Xcelsius, we will extract the SAP demo query 0D_WARENVB into an Xcelsius model. Figure 11 shows the output from this query.
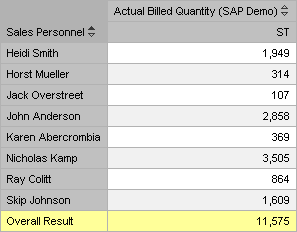
Figure 11
0D_WARENVB query results from the SAP demo content
Figure 12 shows the final analytic that we will develop. This analytical application calls SAP NetWeaver BW and renders the resulting data set. Although we are showing this functionality with an SAP NetWeaver BW InfoProvider, you can easily extend this process to other queries to address your company’s business requirements.
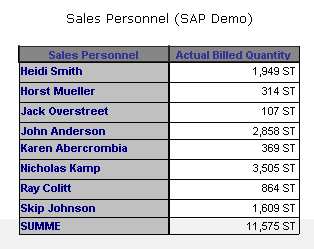
Figure 12
The 0D_WARENVB query results as shown in the resulting Xcelsius application
Design the Model in Excel
Although Xcelsius is not based on Excel, the application uses Excel as a framework to structure the data and relationships with the Xcelsius user interface elements. You can import the Excel file into Xcelsius to make the model work. We have included the spreadsheet that we used in the sample application as part of the 0D_WARENVB.xlf file that you can access via this link.
The Excel file contains three worksheets. The first worksheet stores the selection criteria in our model as well as the Web service URLs (Figure 13). In this example, we are not capturing any selections that the user may make through the use of drop-down lists, check boxes, or by selecting a particular data record. Using the 0D_WARENVB.xlf file, change the contents in cell B4 to reference your company’s .NET application location.

Figure 13
The URL for the Web service call to the .NET function is assembled in cell B6
The next worksheet in the download file contains the report layout (Figure 14). The report layout just contains the formatting to display the results. It has been our experience that when these applications are designed, it is beneficial to import the data on another worksheet and then build the report by referencing the cells from the ranges that are storing the data. This strategy allows the designer more control over the output of the report.

Figure 14
The general formatting is defined on this worksheet that is then output in the Xcelsius application
When the data is dynamically brought in to the Xcelsius application when the application is executed, the data is mapped to the named ranges defined on the data worksheet in Figure 15. Because the Web services populate the named ranges in our spreadsheet, it can be a bit difficult to keep track of where the data is stored. To make this easier, we generally apply a color to the worksheet and then list the ranges we are storing and the actual locations in white cells. This makes keeping track of the various ranges to output a query much easier.
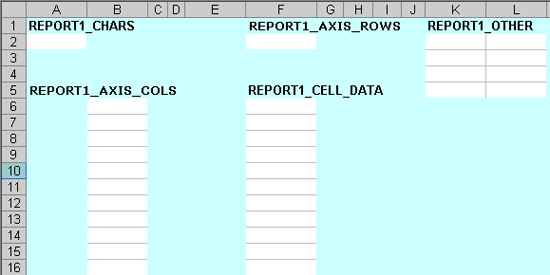
Figure 15
Named ranges defined in the Excel file that store the SAP NetWeaver BW query data
When the named data ranges are defined, we use the range name that was specified in the URL. For this example, it is REPORT1. The ranges that we have included for the output of an SAP NetWeaver BW query include:
- REPORT1_CHARS: Description of the characteristic displayed in the column
- REPORT1_AXIS ROWS: Description of the key figure
- REPORT1_AXIS_COLS: Data stored in each of the report’s columns
- REPORT1_CELL_DATA: Key figure data displayed in the report
- REPORT1_OTHER: General information about the query
When you execute the application, the Web service populates the named ranges in Figure 15 with data. This sheet stores the data as shown in Figure 16.
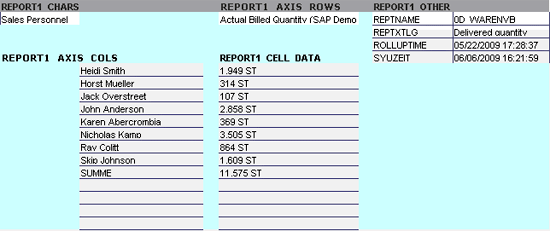
Figure 16
The data worksheet after executing the SAP NetWeaver BW query in Xcelsius
Tip!
An easy way to create an Excel name range is to enter the name range in the top cell and the highlight an area. Next, follow Excel menu path Insert > Name > Create and then select the option to create with the name in the top row. You can then edit named ranges by using the Excel menu path Insert > Name > Define and then selecting the name of the range that needs editing.
Create the Xcelsius Model
Now that the Excel spreadsheet is set up to define how the Xcelsius model should work, the next step is to build the actual Xcelsius application. The first step in building this application is to import the spreadsheet developed in the previous step by opening Xcelsius and pressing Ctrl-Shift-I. Because we have provided the Xcelsius design file 0D_WARENVB.xlf as a download via this link, we have already imported the spreadsheet and the user would need to enter their .NET Web Server information once the .NET service has been installed and configured.
The next step in our design is to design the user interface. We want to show how to display SAP NetWeaver BW data in an Xcelsius application, so we use the Spreadsheet Table object in the final report. You can find this object in the component catalog under the Selectors section as shown in Figure 17. To access the component catalog in the Xcelsius design environment, use menu path View > Components.
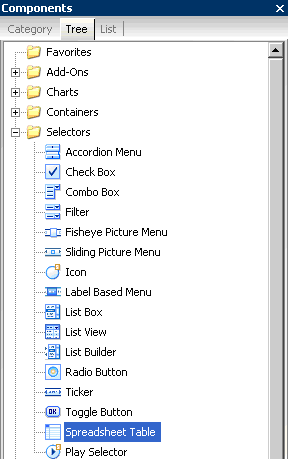
Figure 17
Select the Spreadsheet Table user interface design element
The spreadsheet item is located in the component catalog under the tree item Selectors. The design of the user interface of the Xcelsius application is simply a matter of selecting components and adding them to the design area and then configuring the properties of this object. Double-click any object in the design area to view an object’s properties. Once you add the Spreadsheet Table component to the model, set the Display Data property on the pane to the right to the cells in the Excel spreadsheet that you want to display (Figure 18).

Figure 18
Set the display data for the new spreadsheet table
In our example, we are displaying the contents in Report!$A$5:$B$14 as shown in Figure 18, which is where the final report will be displayed in the Excel workbook that is included in this model. We deselected the row property because we are not taking any action if a particular row is selected. If we were allowing users to select a row for further drilldown, we would enable the row properties so we could track what row was selected. For example, it could be interesting to allow the user to select a particular sales person and see this sales person’s detailed sales values by customer, industry, or other dimension.
Create the Xcelsius Data Connections
Now that we have created the basic user interface of our application, we need to source the data. To make the application dynamic and leverage our Web service, we create a data connection using the Xcelsius menu path Data > Connections > Add to create a new data connection. Although Xcelsius provides several ways to leverage Web services, our application uses the XML data connection to take advantage of the XML that is generated in the .NET Web service. Having the .NET Web service create the XML also allows the query to have a dynamic structure that can easily be added to an Xcelsius application. The dynamic structure is important and queries can be written to have a different number of characteristics and key figure configurations.
Figure 19 shows the parameters that we used to make this connection type work. Although we could have added the URL directly into the connection definition, we decided to reference a spreadsheet cell instead. Adding the URL as a spreadsheet cell, we could update the URL through Excel formulas. This could be important in applications that use the same data connection to call different queries based on some activity taken in the dashboard. If we were to hardcode the URL in the XML Data URL, we could only use this application to display a single report.
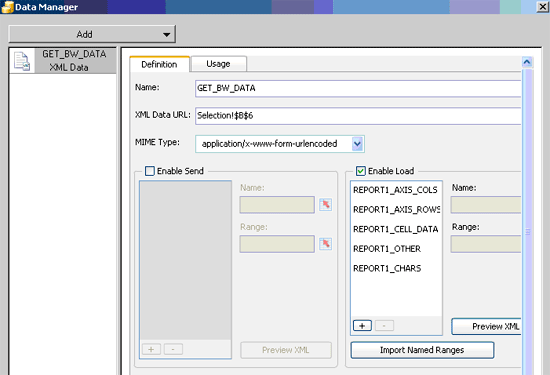
Figure 19
Data connection definition for the XML Data connection type
We set the Enable Load check box and imported the Named Ranges. When we import the named ranges, the system adds all the ranges that exist in the imported spreadsheet. These ranges tell the application where to store the data that it retrieves from the Web service. On the Usage tab, we only select the option to refresh the data on load. In our example, we are only retrieving the results of a single query, where we do not have any logic to change the URL in the analytical model.
If we had developed an application that allowed the user to change the query being executed by changing URL string contained in Selection!$B$6 cell, we could update the Xcelsius dashboard when the value in this cell changed. Being able to refresh the data based on user selections in the Xcelsius application makes it possible to create an exciting analytical application.
To test the model after adding the data connection, click the Preview button in the main design environment. Alternatively, you can follow the Xcelsius menu path File > Preview in the application or File > Export to select one of several output types for the application. If everything works, the output should look like Figure 19.
Working with the SAP NetWeaver BW Query Remote -
Enabled Function ModulesYou can use three basic function modules to access SAP NetWeaver BW query data:
- RS_VC_GET_QUERY_VIEW_DATA_FLAT
- RRW3_GET_QUERY_VIEW_DATA
- RS_VC_GET_QUERY_VIEW_DATA
These function modules use the following information as input parameters:
- I_INFOPROVIDER: Technical name of the query’s InfoProvider (optional)
- I_QUERY: Technical name of the query (required for a query)
- I_VIEW_ID: Technical name of the query view (required to access a query view)
- I_T_PARAMETER: Web API commands that you can use to include additional functions such as populating a variable or filtering data (optional)
Although these three functions modules provide identical results, it is easiest to test the RS_VC_GET_QUERY_VIEW_DATA_FLAT function module in transaction SE37 because the output tables are readily available. Note that the output of the function module is meant to generically output the results of any SAP NetWeaver BW query. This means that the output has to accommodate the layout of any SAP NetWeaver BW query that is developed. As a result, the table format from these function modules is complex and requires it to be transformed into an XML format that is easy for Xcelsius to process.
One minor issue that we did encounter with the SAP NetWeaver BW query function modules was the inability to differentiate queries that showed characteristics as both key figures and text. When this situation occurs, we display the characteristic’s key value followed by the text value. We also have the ability to design how the data is displayed in Xcelsius so having a consistent rule on how to handle this scenario is a good approach.
Oliver Willoughby
Oliver Willoughby is a technical consultant on the Delivery Operations & Technology team at SAP America. He is currently responsible for the design, development, and maintenance of internal applications that support SAP’s consulting organization. Oliver has more than 12 years experience developing solutions with Microsoft technologies.
You may contact the author at oliver.willoughby@sap.com.
If you have comments about this article or publication, or would like to submit an article idea, please contact the editor.
Derek Johnson
Derek Johnson is a program manager on the Delivery Operations Team with SAP America, Inc. He is responsible for the design and development of analytical and reporting applications to support SAP America’s consulting organization. Formerly a platinum consultant with the National Competency Center (NCC), he has more than 10 years experience working with SAP NetWeaver BW. Besides traditional data modeling and reporting, he also has extensive experience with Yahoo! Widgets, SAP NetWeaver Visual Composer, Web reporting, BW data mining, Xcelsius, ABAP, and JavaScript. He holds a BS degree in engineering from the University of Michigan-Ann Arbor, an MS degree in engineering from Wayne State University-Detroit, and an MS degree in management information systems from Case Western Reserve University-Cleveland.
You may contact the author at derek.l.johnson@sap.com.
If you have comments about this article or publication, or would like to submit an article idea, please contact the editor.


