This sample chapter (chapter 5) from Faisal Altaf’s book, "Introduction to ABAP: A Project-Driven Guide," is an overview of the ABAP Data Dictionary. The book uses the example of a point of sale project to introduce ABAP. As a current SAP Experts member you can read the eBook (online or download) with no extra charge at www.insider-books.com. Call SAP Experts customer service at 1- 781-751-8755 or email licenses@wispubs.com to request your free access to the complete eBook today.
Key Concept
The ABAP Data Dictionary is a place where you can define and manage all objects (e.g., data elements, domains, structures, tables [database tables], views, search helps, and table types [internal table types]) and use these objects throughout the system.
In this chapter from my book, “Introduction to ABAP: A Project-Driven Guide” at www.insider-books.com, we start our point of sale (POS) project development. This chapter provides an overview of the ABAP Data Dictionary and its different objects (e.g., data elements, domains, structures, tables [database tables], views, search helps, and table types [internal table types]). We will then go through the process of creating all the main ABAP Data Dictionary objects that we will use in the development of the POS project in the following chapters. Finally, we will learn how to change or delete ABAP Data Dictionary objects.
The ABAP Data Dictionary
The objects we define in the ABAP Data Dictionary have global visibility, so we do not need to redefine objects every time at the program level. We just need to define an object once in the ABAP Data Dictionary, and we can use this object anywhere in the programs, interfaces of function modules, and methods in the current system. The ABAP Data Dictionary is a central place for the definition of all objects, so it guarantees data consistency and eliminates data redundancy.
Whatever object we create and activate in the ABAP Data Dictionary is automatically created in the database we use in our system. The ABAP Data Dictionary shows the logical structure of the created object and displays the mapping of all these objects at the database level.
Let’s review the different ABAP Data Dictionary objects.
Data Elements
A data element is the most basic indivisible unit in the ABAP Data Dictionary. Data elements are used to define the fields of the table and the components of a structure, or they can be assigned to a screen field. A data element has the semantic attributes of the field, such as labels, search help, or parameter IDs. These attributes are automatically available to all fields that refer to the data element. The F1 help of the field also comes from the data element. You can use an elementary or reference type to describe a data element. An elementary type can be a predefined data type or can be copied from a domain. A reference type can be any Data Dictionary object, global class, interface, or predefined type.
Note
Reference types cannot be used in database tables.
Domains
A domain defines the technical attributes of any field. For example, technical attributes are the data type, length, decimal places, conversion routine, or value table of a field. A data object in an ABAP program, a field in a database table, or a structure cannot be declared directly using a domain. You have to assign this domain to a data element and then you can declare data objects in an ABAP program or add a field in a database table or a structure using this data element.
Note
A data object is a place in the memory whose contents can be used during
the program execution using the name of the data object. The contents
of a data object depend on the type of this data object. For example, a
data object of type i can have only integer values, and a data object of
type date can store only a date. The contents of a data object are
stored only during the program execution. In ABAP, a data object should
be declared before its use. A data object can be declared using DATA as a
keyword. It can be a predefined data type or a type of any data
element.
This data object gets all its semantic attributes from a data element and its technical attributes from the domain.
For example, the Sales Invoice Header table has two fields for cash or card payment types. Both these fields have the same technical attributes such as data type, length, and decimal places, so we need to have one domain. These two fields have different semantic attributes. The first field label should be Cash, and the second field label has to be Card. Other attributes, including the help you get after pressing F1, should be different for these fields. Therefore, you need to create two data elements that share technical attributes from the same domain.
If the properties of the domain are changed, then all the fields or components created by the data element that was using this domain are automatically changed. So be careful while changing any domain and check the where-used list of the domain before making any changes.
Structures
Structures consist of fields or other components. An object in a structure can refer to another structure, a data element, and predefined data types. Structures are also called complex data types because they can be nested to any depth. Structures can be used as an interface for function modules, methods, screens, and subroutines.
Tables (Database Tables)
Tables are one of the most important objects in the ABAP Data Dictionary. A table consists of vertical columns and horizontal rows. Columns are called the fields of a table, and rows are the entries of a table. Every field in a table has a unique name and properties. Tables can have one or more key fields. One field or a combination of all key fields is called the primary key of the table. A single value or a combination of values in the primary key uniquely identifies a table entry. You can use a data element to define the field in a table, or a field can be defined using predefined data types. There are three types of tables in the ABAP Data Dictionary: transparent, pooled, and cluster.
Transparent Tables
Transparent tables have a one-to-one relationship between the ABAP Data Dictionary definition and the database. The database table has the same field name, semantic attributes, and technical attributes as the table definition in the ABAP Data Dictionary. Transparent tables are used to hold master or transactional data (e.g., Site Master table, Article Master table, Sales Header table, or Sales Item table). In our POS project development, we use only transparent tables.
Pooled Tables
Pooled tables have a many-to-one relationship between the ABAP Data Dictionary definition and the database. Many small tables at the ABAP Data Dictionary level do not depend on one another and are stored in one table pool in the database. Compared with transparent tables, this type of table has different names, different names of fields, and different numbers of fields in the database, so these tables cannot be accessed using Native SQL. Only Open SQL can handle the data of these tables, and these tables also cannot be used in table joins.
Cluster Tables
Cluster tables are the same as pooled tables in that they also have a many-to-one relationship between the ABAP Data Dictionary definition and the database. Many cluster tables of the ABAP Data Dictionary are stored as one table cluster in the database. Similar to pooled tables, these tables also have different names, different names of fields, and different numbers of fields in the database, so they cannot be accessed using Native SQL and also cannot be used in table joins. However, cluster tables hold functionally dependent data, whereas pooled tables hold functionally independent data. A cluster table is made up of larger tables, but there are fewer of them than in a pooled table. A pooled table has smaller tables, but more of them than a cluster.
Note
An example of functionally dependent data is accounting data that is
distributed in different tables but combined in one cluster table. The
tables share the data of the accounting business process. An example of
functionally independent data is a sequence of different screens and
temporary data that is not part of any business process. The data is
used for system configuration, so one pooled table can have data for
different screens that are not related to each other.
Views
The data for any business process is often stored in one or more tables. Most of the time we need to display a specific field or all the fields of this distributed data in one place. Views help to join all these tables and display all or specific fields as per business requirements. If a view has only one table, then we can insert, modify, or delete table records using a view. However, we can display data only if the view has more than one table. We can also apply some conditions in the selection (e.g., display specific fields from the Sales Header, Sales Item, and Article Master tables for sales invoices only). In this case this view does not display return invoices.
Search Help
Search help is a standard SAP function that allows users to display a list with possible input values in the screen field. The value selected from the display list automatically populates that screen field. The F4 key is used to display that possible input value list if search help is available on a field. Search help is an independent ABAP Data Dictionary object that you can attach to screen fields using standard development tools. Possible input values can be enhanced by adding more informative fields in this pop-up search help window. For example, in the Article Number field search help, we can add the article description, unit of measure, or any other properties for a better search.
Table Types (Internal Table Types)
Internal tables are in-memory tables that hold data during program execution. Few of our ABAP Data Dictionary objects can be created locally in a program (e.g., structure, search help, or table type). An internal table can also be defined in a local program, but it does not have global visibility. Objects defined in the ABAP Data Dictionary can have global visibility across the system. We can define a line or structure of a table type and access the type and key fields of this table in the ABAP Data Dictionary. In an ABAP program we can create an internal table with reference to this table type using DATA as a keyword.
Let’s start creating the required ABAP Data Dictionary objects for the POS project development.
Development of an ABAP Data Dictionary Object for the POS Project
Regardless of the project you are doing, at the end of the day you have to save some master and transactional data in the database. In our POS project development, we also need to save site master data, the site assignment to user master data, article master data, invoice header transactional data, and invoice detail transactional data in the database. We need to create relevant tables in which to save this data. In this section we create those tables and other objects that are required to create the fields of a table (e.g., data element, domain, and structure). All these types of objects are called ABAP Data Dictionary objects. Most of time we start the creation of the ABAP Data Dictionary object from the smallest unit, such as a domain or perhaps a data element. This is time-consuming because first you create the domain, then the data element, and finally the table. During the development of your POS project, I suggest you start by creating the table and getting the advantage of the best SAP navigation tool. When you add any data element that does not exist in the ABAP Data Dictionary, the system automatically pops up a message for creating this missing object, thus saving a lot of time.
Let’s figure out the required tables for the POS project development:
- Site Master
- Site Assignment to User
- Article Master
- Invoice Header
- Invoice Detail
The Site Master table holds the master data of the site or branch. The Site Assignment to User table maintains the site link with the salesperson’s SAP user name. The Article Master table stores all information related to articles, and the Invoice Header and Detail tables save all invoice data.
How to Create ABAP Data Dictionary Objects
There are many ways to create ABAP Data Dictionary objects. For instance, we can use transaction code SE11 to create these objects, but this process is more involved, so the best way to create an ABAP Data Dictionary object is by using the ABAP Development Workbench transaction code SE80, which is easier and quicker. Also we will create the table first rather than creating the domain or data element, because from the table we can create data elements and a domain easily using the SAP navigation option. When you try to navigate to a data element or domain that does not exist, the system automatically proposes that you create this object.
Let’s start creating tables now.
How to Create a Table
Execute transaction code SE80 for the ABAP Development Workbench and select the package ZPOS that we created in chapter 3. Right-click the package name and select Database Table from the context menu path Create > Dictionary Object > Database Table (Figure 5.1). The system displays a Create Table pop-up window for entering the table name (Figure 5.2).
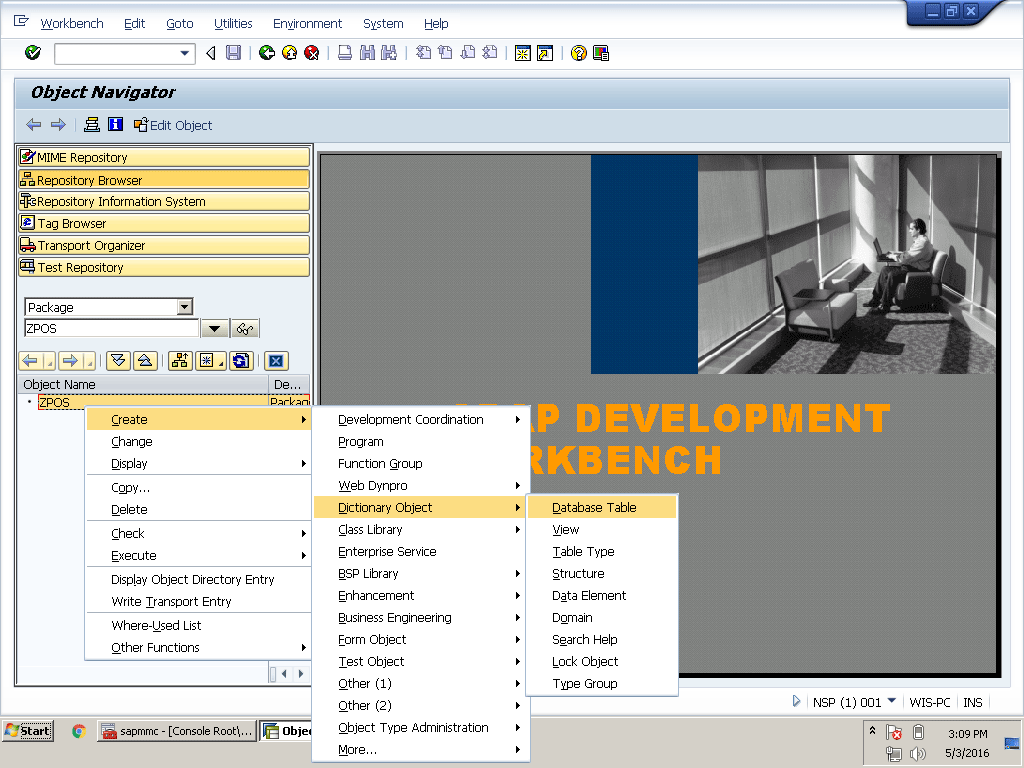
Figure 5.1
ABAP Development Workbench table creation
We can also select any other object name (e.g., View, Table Type, Structure, or Data Element) if we wish to create those objects, as shown in the context menu of the Dictionary Object in Figure 5.1. If you have not yet created the package, review Figures 3.19 to 3.24 in chapter 3.
Create a Site Master Table
The Site Master table has five main fields: Site Name, Site Description, Site Address, Site Telephone Number, and Site Status. However, we will add some more fields to track changes. For example, we can include which user creates, changes, or deletes Site Master records on which date or time. In this chapter we are only going to create tables. In the following chapters we will design screens for data entry.
Video 5.1 shows how to create a Site Master table and other dependent objects, such as the data element, domain, and structure.
How to Create a Site Master and Other Dependent Objects
Type ZSITM in the Table Name field of the table creation pop-up window and click the green checkmark icon as shown in Figure 5.2.
Note
The names of all custom-developed objects in an SAP system should start
with Y or Z. All other characters are reserved for SAP use only. In our
POS project development, we start the name of all objects with Z.
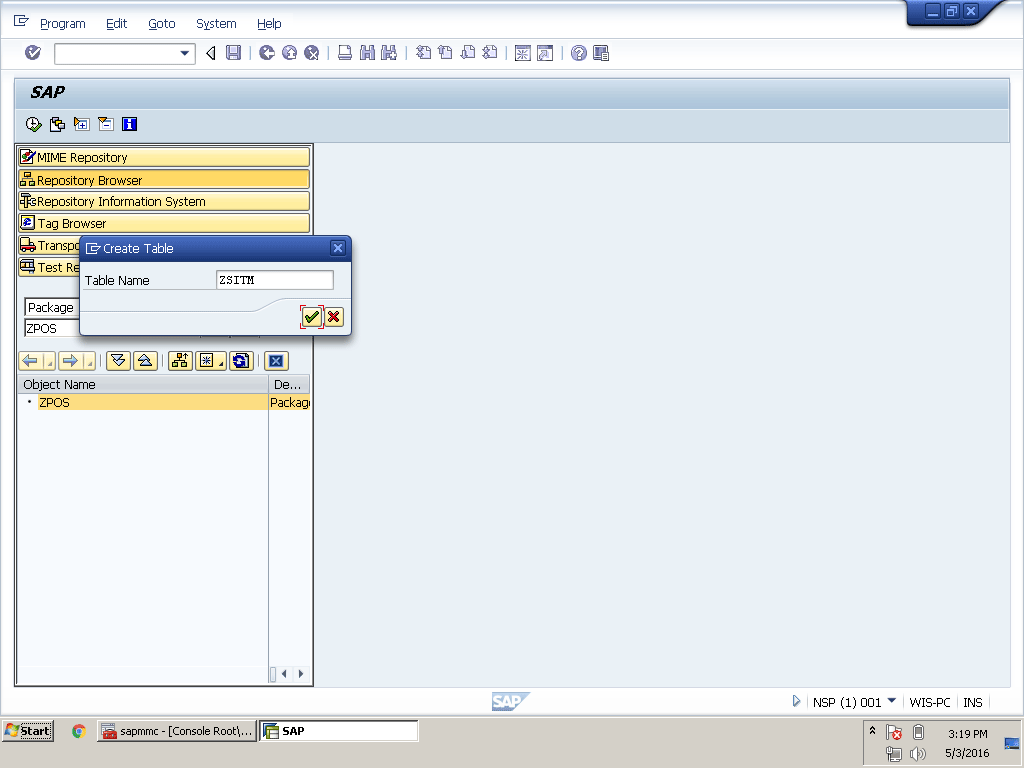
Figure 5.2
Create a table
Enter a short description of the table. This is a POS application table, so in the Delivery Class field in the Delivery and Maintenance tab, type A (Application table [master and transaction data]). Leave Display/Maintenance Allowed with Restrictions in the Data Browser/Table View Maint. field as shown in Figure 5.3.
Note
Keep the Delivery and Maintenance tab setting as it is for all tables.
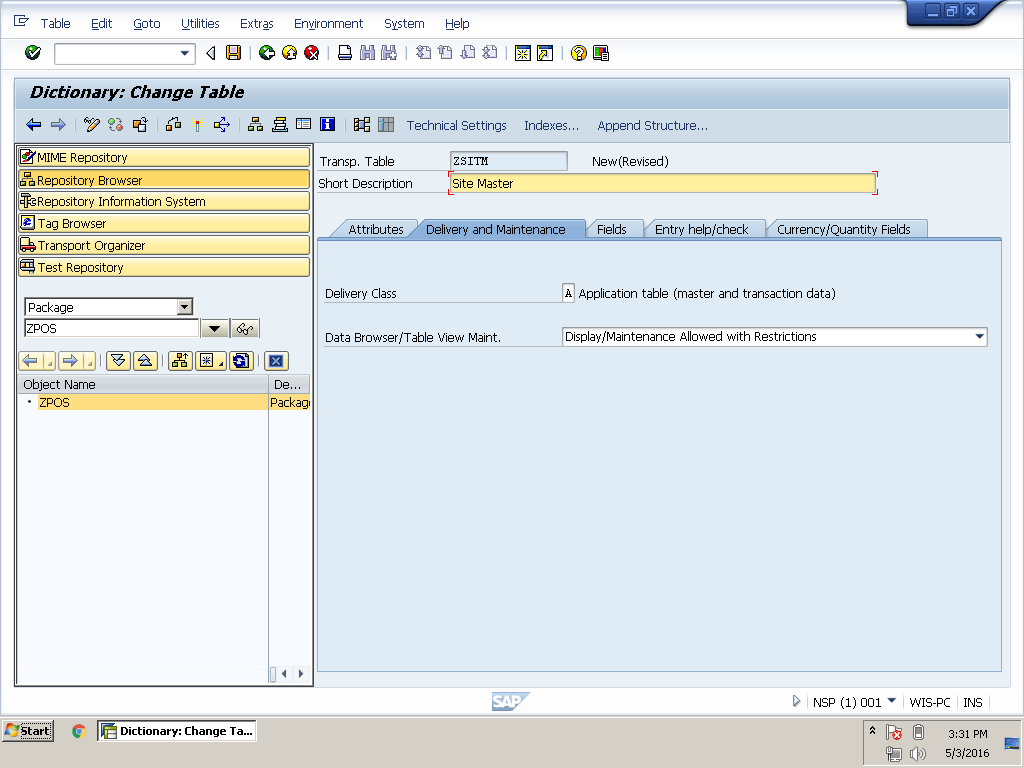
Figure 5.3
Delivery and Maintenance tab
The tables we are going to create are client dependent, so we need to add a MANDT field as the first key field in the tables mentioned above:
1. Go to the Fields tab and type MANDT in the Field and Data element columns
2. Check the Key check box to make this field a table key field
3. Check the Initial Value check box, thus adding the first column in the table
How to Create a Data Element Using Navigation From a Table
To add fields in a table you can use predefined data types, but this is not a best practice because every field has some semantic attributes such as Field Label. In the future, if you need to change the label of the field that is being used in many screens and reports and you used a predefined data type to define this field, then you have to change each screen and report manually. On the other hand, if you use a data element, you just need to change the labels in the ABAP Data Dictionary and it takes effect automatically everywhere. As you have already read, an ABAP Data Dictionary object has global visibility, so you do not need to define it again and again. You can define it once and use it anywhere throughout the system.
Follow these steps to create a data element using navigation from a table:
1. Type SNAME in the second line of the Field column (Figure 5.4)

Figure 5.4
Site Name field in Site Master table
2. Type ZSNAME in the second line of Data element column
3. Double-click ZSNAME in the Data element column
4. The system pops up a request for saving before navigation, so click the Yes button to save the table
5. The system pops up a request again for selecting a package (ZPOS) in which to save the table
6. Since we have created the package earlier, type ZPOS in the Package field and click the save icon 
7. The system displays a pop-up window for putting this object in a transport request that we already created (refer to Figure 3.23 of chapter 3)
8. Leave this transport selected and click the green checkmark icon
9. Since the ZSNAME data element does not exist in the system, a pop-up message from the system prompts you to create this data element
10. Click the Yes button to create the data element as shown in Figure 5.5
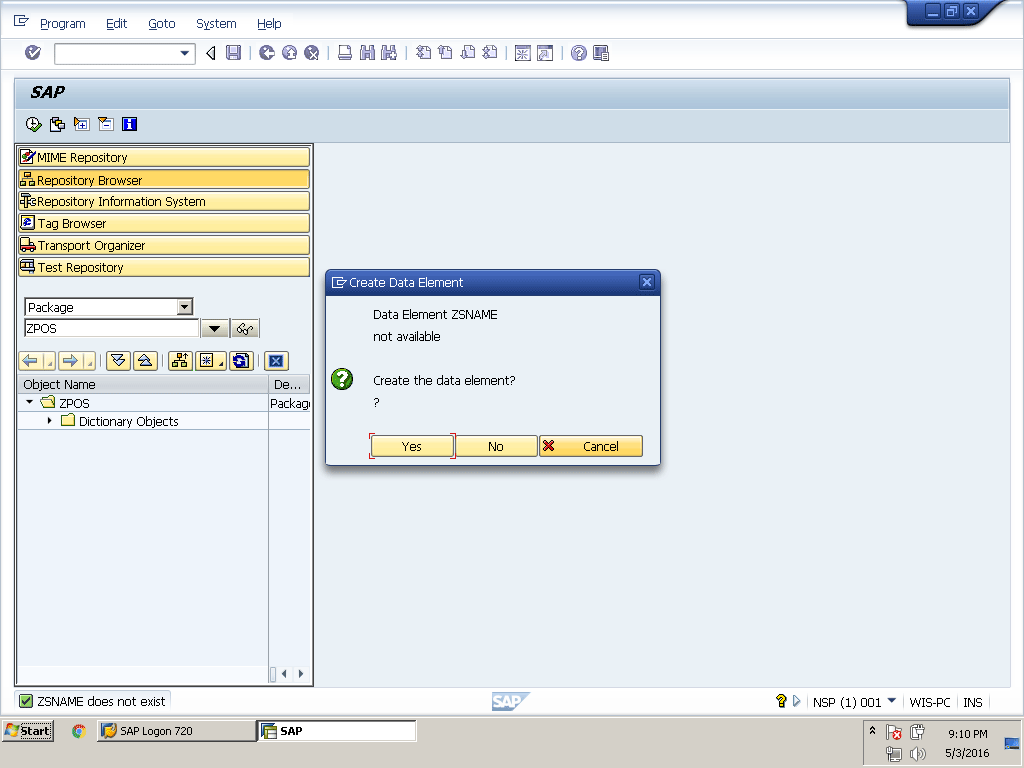
Figure 5.5
Create a data element
11. The system automatically navigates to the data element creation window
12. Add a Short Description
13. Go to Field Label tab and add Field labels as shown in Figure 5.6
14. These labels automatically display when we use this data element. The system automatically selects the label type short, medium, or long depending on the available space on the screen.
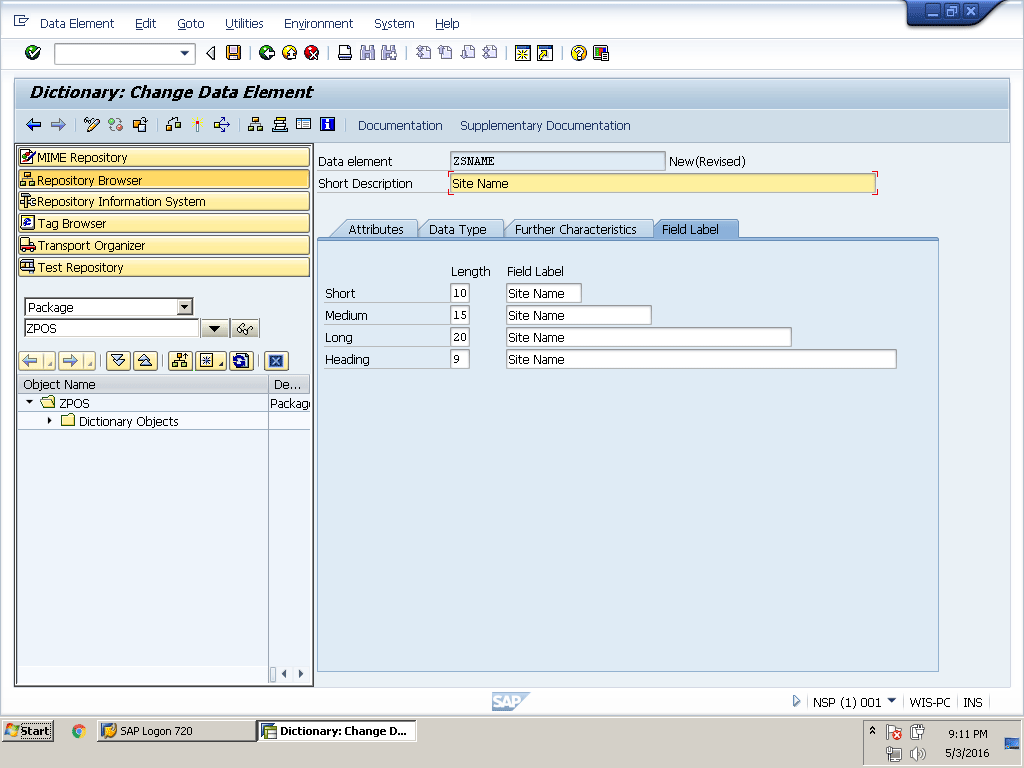
Figure 5.6
Field labels for the data element
How to Create a Domain Using Navigation From a Data Element
To define a data element, you can also use a predefined data type, but again it is not recommended, so we are following the best practice of creating a domain for the data element. Let’s create a domain using navigation from the data element.
Follow these instructions to create a domain using navigation:
1. Go to the Data Type tab in the data element creation window
2. We can use predefined data types, but we need to get the technical attributes of the data element from the domain, so type ZSNAME in the Domain field (Figure 5.7) and double-click it
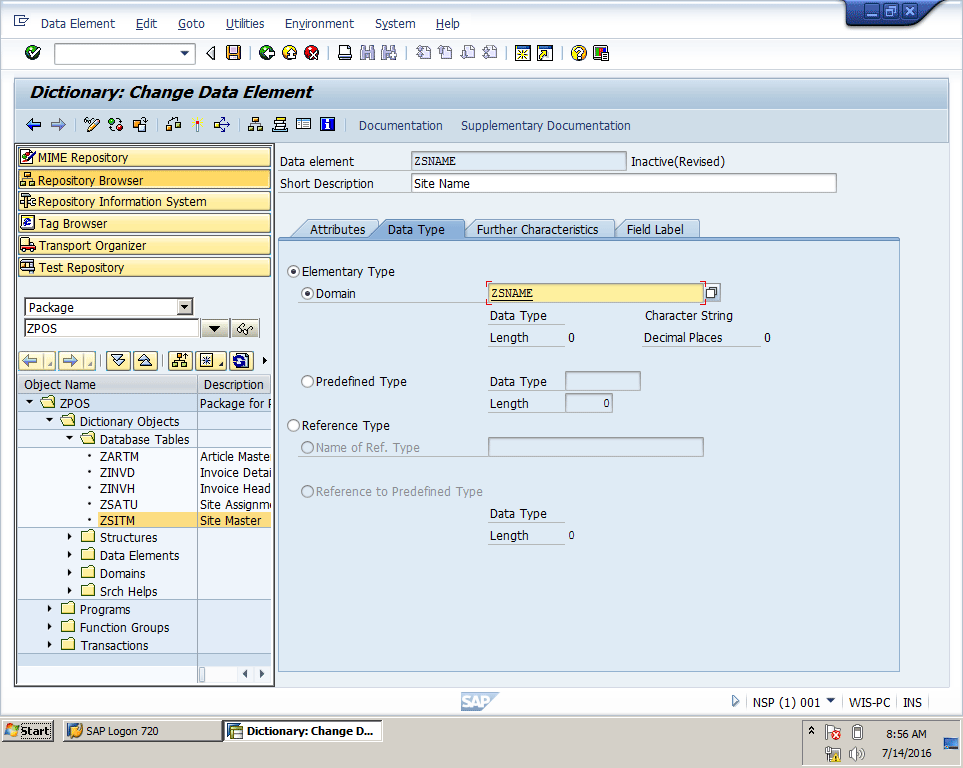
Figure 5.7
The Data Type tab in the data element creation window
3. The system pops up a request to save the data element before navigating to the domain
4. Click the Yes button to save the data element
5. Use the same package and transport request to save the data element that we used for the table
6. This domain is not available in the system, so we get a pop-up message to create the domain
7. Click the Yes button to create the domain as shown in Figure 5.8
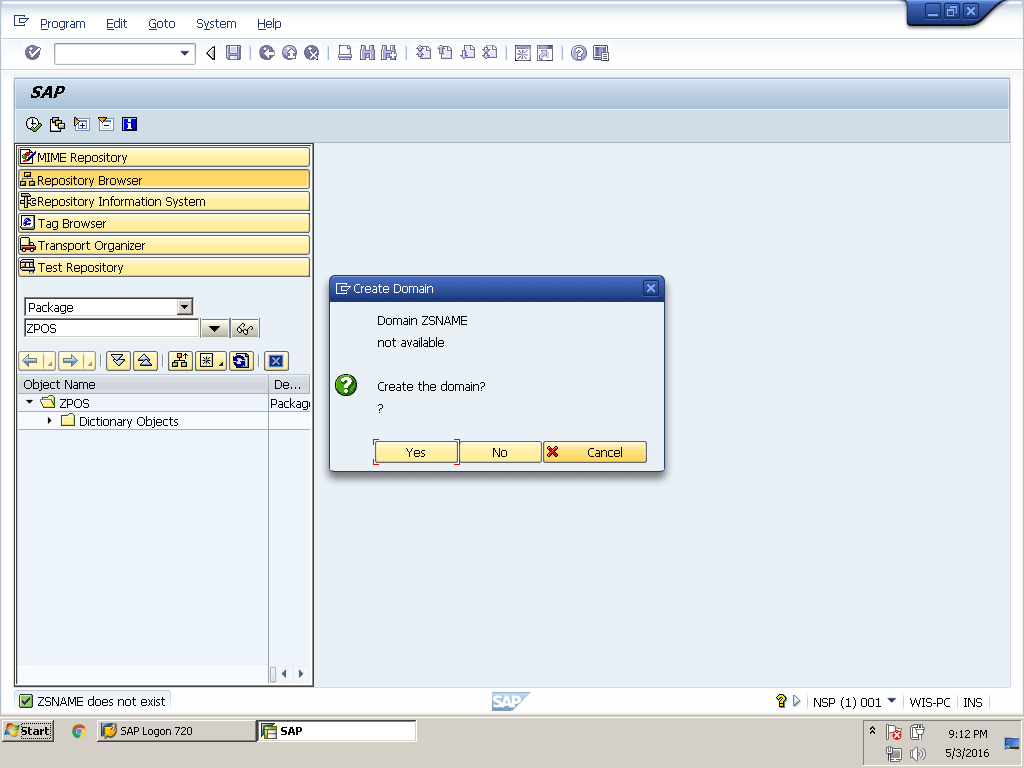
Figure 5.8
Create a domain
8. Type a short description
9. We need the site name of the character type with the length 4, so in the Definition tab type CHAR in the Data Type field and 4 in the No. Characters field
10. When you press Enter, the system automatically adds 4 in the Output Length field as shown in Figure 5.9. It is a character type, so the output length will be the same.

Figure 5.9
Domain definition
However, output length can be different in some cases. For example, in the case of type DATS, the number of characters is 8, but the output length is 10 because of the semicolons needed to display the proper date format.
We do not need lower-case characters in the site name, so leave the Lower Case check box unchecked. In this case, even if we enter the site name in lower case, the system still considers those characters as upper case—for example, the system considers site name wis1 as WIS1.
Go to the Value Range tab and type ZSITM in the Value Table field as shown in Figure 5.10. This custom value table automatically proposes F4 help for the field that uses the ZSNAME data element.
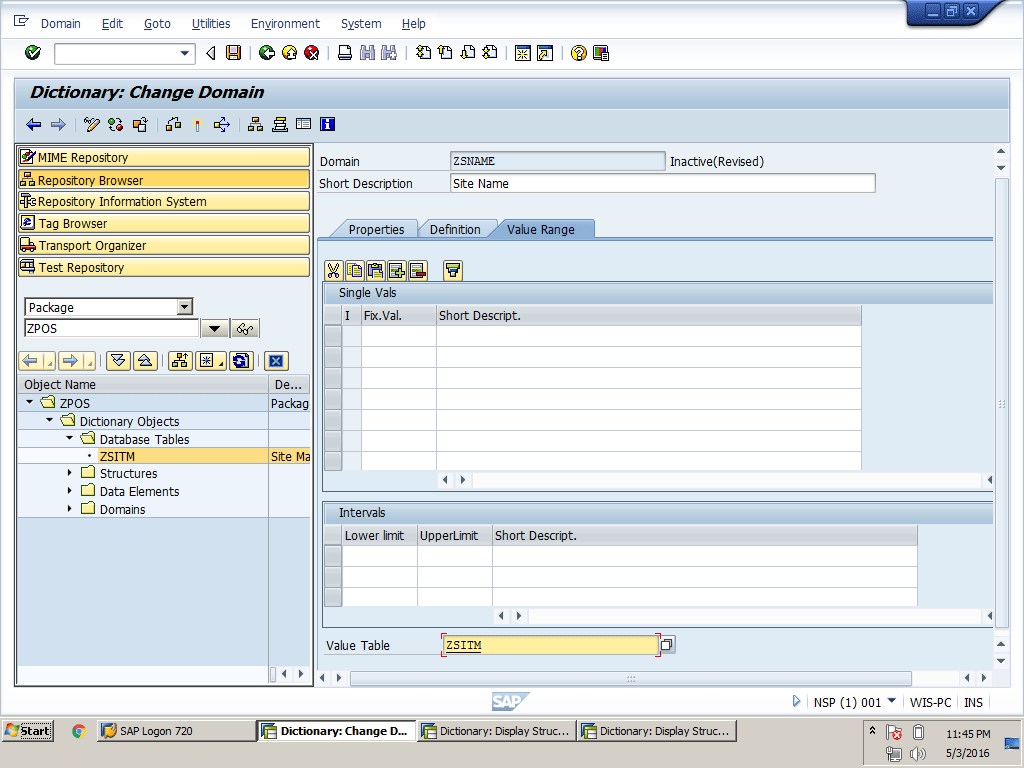
Figure 5.10
Domain Value Range table
Here are the next steps in this process:
11. After creating the domain, click the save icon in the system toolbar
12. Save this domain to the same package and transport request
13. Remember before using any object you have to activate it, so click the activate icon  iin the application tool bar or press the shortcut key Ctrl+F3 to activate the domain
14. The system pops up a window where you can see three objects. These three objects are TABL (table), DOMA (domain), and DTEL (data element). They are all inactive, so the system is displaying all inactive objects.
15. The system selects the domain, so press Enter to activate the domain as shown in Figure 5.11

Figure 5.11
All inactive objects for BCUSER
16. Press F3 or use the back icon  in the system toolbar to return to the data element creation window
17. Press Ctrl+F3 or click the activate icon in the application toolbar to activate the data element
18. Keep the data element selected from the pop-up window of inactive objects and press Enter
19. After activating the data element, press F3 or use the back icon in the system toolbar to return to the table creation window (Figure 5.2)
20. Add one more field, SDESC, to the Fields column and ZSDESC in the Data element column (not shown)
Create a data element ZSDESC and domain ZSDESC by following the same steps we used before, except this time for a new field (SDESC). You only need to change the Short Description and field labels at the Data Element level, and the No. of Characters at the Domain level. You need to have lower case in the site description, so check the Lower Case check box at the Domain level as shown in Figure 5.12. Save and activate the domain and data element in the same way as described in the instructions above. This field is for the site description so we have to use both upper and lower case. For the site name (Site ID) we use only upper case. For example, for the country key we use only upper case as in US, and for the country name, we use both upper and lower as in United States.
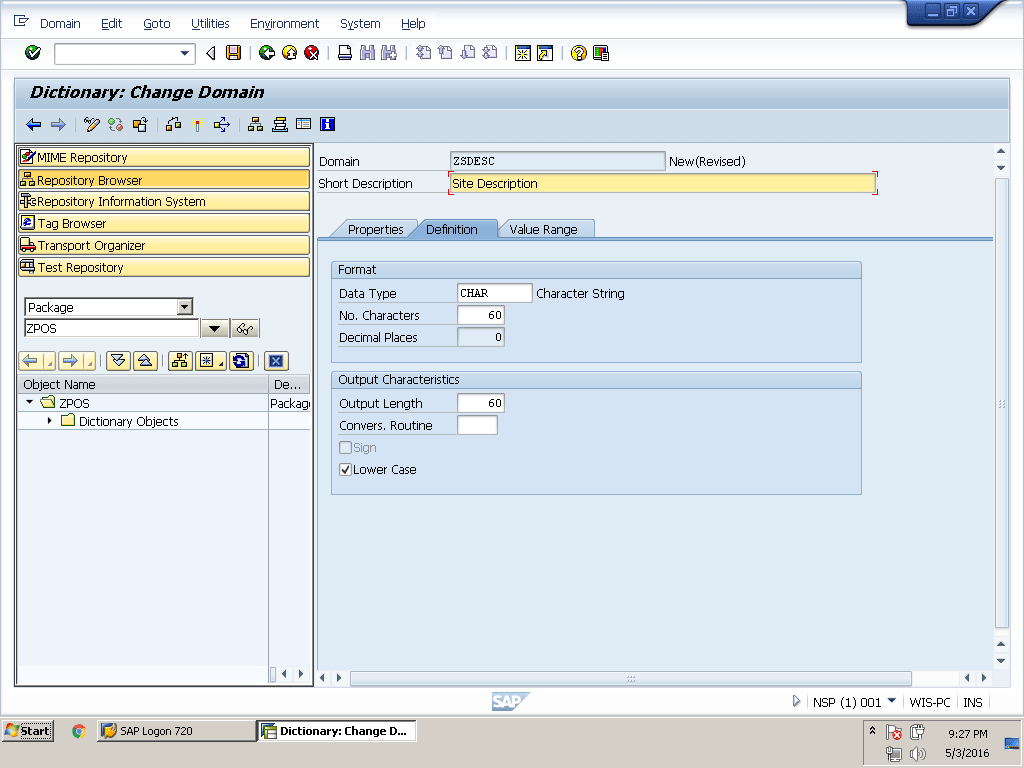
Figure 5.12
Domain definition
Add two more fields, SADDR for the site address and STELN for the site telephone number as shown in Table 5.1. Create the required data element and domain using the same steps we used before.
| Field name |
Data element |
Field label |
Domain |
Data type
|
Length
|
| SADDR |
ZSADDR |
Site Address |
ZSADDR |
CHAR |
60 |
| STELN |
ZSTELN |
Site Telephone Number |
ZSTELN |
CHAR |
30 |
Table 5.1
Site address and telephone number fields in table ZSITM
Now follow these directions:
1. Add one more field, SSTAT, which shows the status of the site
2. We need this field’s length to be only one character. Create a ZSSTAT data element and domain using the same process as before. Go to the Value Range tab of the Domain and add 1 for Active and 0 for Inactive (Figure 5.13). Save and activate both the domain and data element and then go back to the table creation window.
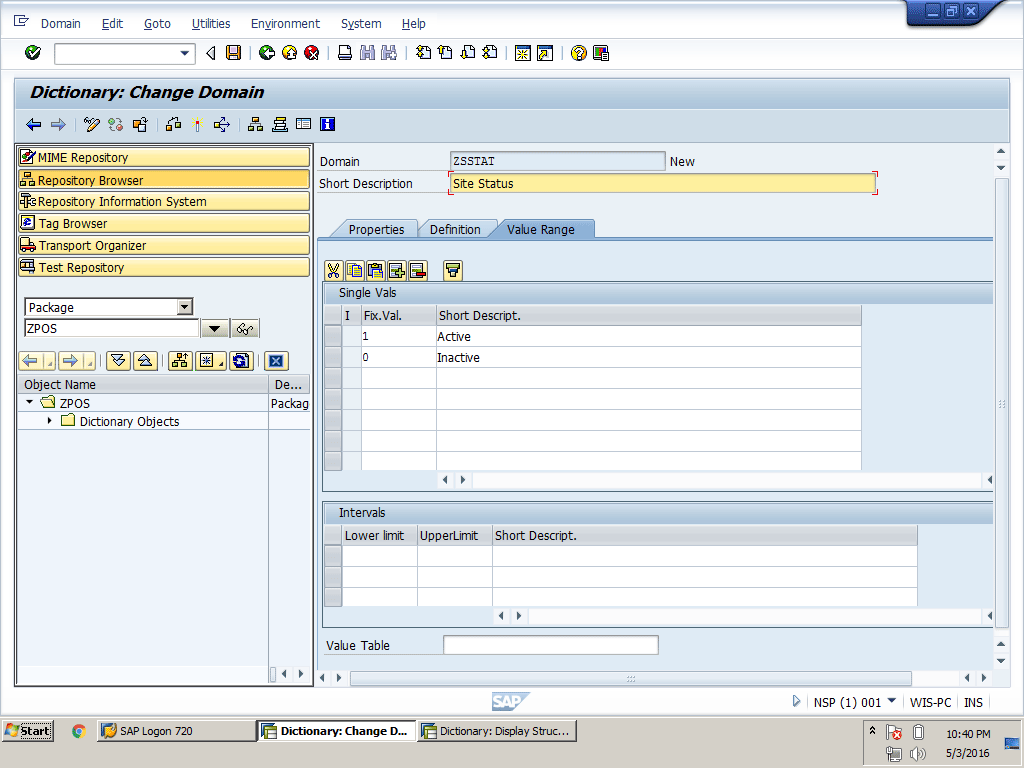
Figure 5.13
Domain value range with a single value
We have added the required data field in the table, and now we need to add some fields for tracking record creation, changes, and deletions. We need these data-change-log fields in the Site Assignment to User table and the Article Master table. The best idea is to create one structure and use this structure in all these three tables using an .INCLUDE keyword to save time.
Note
It is possible to include the fields of a structure to a table using the
.INCLUDE keyword. If the included structure changes, all the tables and
structures included this structure automatically change. For example,
we are going to include structure ZDCLOG to three tables (ZSITM, ZSATU,
and ZARTM). If we add any field to structure ZDCLOG, it is automatically
added to these three tables.
3. In the future, if we need to add more fields for the change log, we just need to add a field to the structure. The system automatically adds this field to all tables where we include this structure.
Create a Structure Using Navigation from a Table
You may need a set of fields to add in many tables, as in our example. We need to add about nine fields in three different tables. The first option is to add all these fields one by one to every table, which is a time-consuming job. A best practice is to create one structure and include this structure in all three or more tables.
Follow these instructions to create a structure using navigation from a table.
Type the keyword .INCLUDE in the Field column under SSTAT. Type, for example, ZDCLOG n the Data element field (Figure 5.14). You can use any name of your choice, but it must begin with Z.
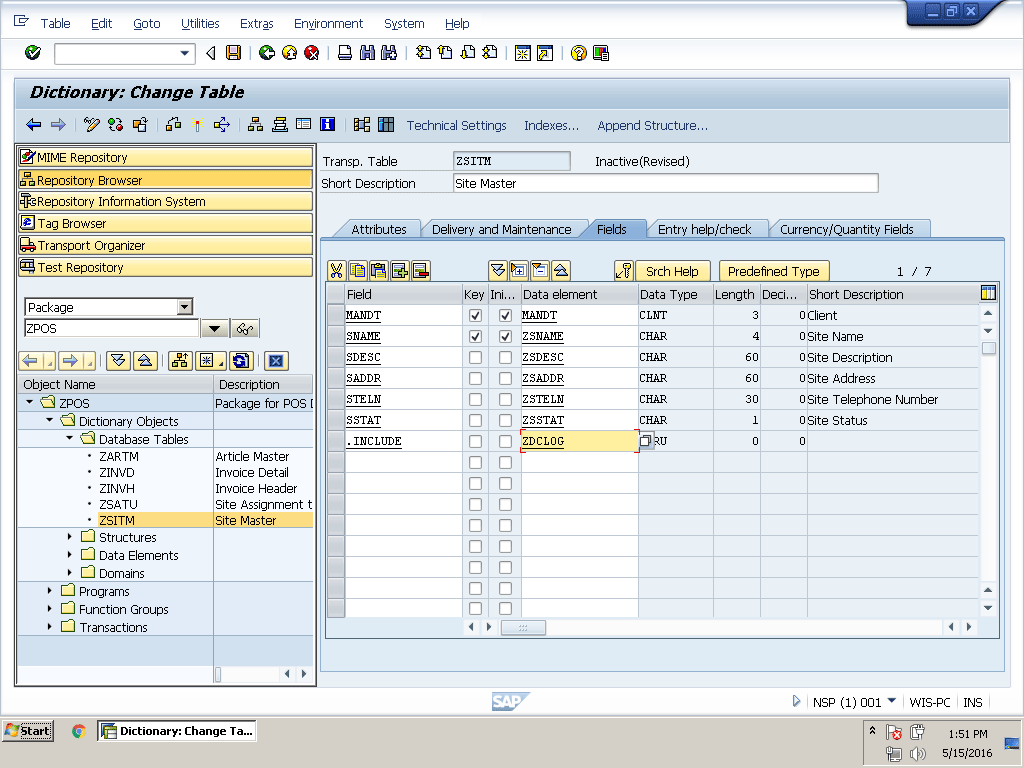
Figure 5.14
Include structure
1. Save the table and double-click ZDCLOG
2. This time the system shows a pop-up for creating a structure, not a data element, because the system automatically understands that the .INCLUDE keyword is not for a data element, but for a structure. Click the Yes button in the pop-up window (Figure 5.15).

Figure 5.15
Create a structure
Create data elements and domains using the same navigation method we just used for table creation. We need nine fields in the data-change-log structure. Semantic attributes such as field labels are different for all fields, so we need to create different data elements for each field. However, technical attributes for the three fields are the same, so we can create three domains and assign these domains to the relevant data elements as shown in Table 5.2.
|
Field name
|
Data element
|
Field label
|
Domain
|
Data type
|
Length
|
|
CRUNA
|
ZCRUNA
|
Create By
|
ZUNAME
|
CHAR
|
12
|
|
CRDAT
|
ZCRDAT
|
Create on Date
|
ZDATE
|
DATS
|
8
|
|
CRTIM
|
ZCRTIM
|
Create on Time
|
ZTIME
|
TIME
|
6
|
|
CHUNA
|
ZCHUNA
|
Change By
|
ZUNAME
|
CHAR
|
12
|
|
CHDAT
|
ZCHDAT
|
Change on Date
|
ZDATE
|
DATS
|
8
|
|
CHTIM
|
ZCHTIM
|
Change on Time
|
ZTIME
|
TIME
|
6
|
|
DEUNA
|
ZDEUNA
|
Delete By
|
ZUNAME
|
CHAR
|
12
|
|
DEDAT
|
ZDEDAT
|
Delete on Date
|
ZDATE
|
DATS
|
8
|
|
DETIM
|
ZDETIM
|
Delete on Time
|
ZTIME
|
TIME
|
6
|
Table 5.2
Data-change-log structure fields
Then follow these steps:
3. Add all those fields in Table 5.2 to the structure and create a data element and domain using the navigation option the same way we used it in the table creation window. The final look of your structure is the same as in Figure 5.16.
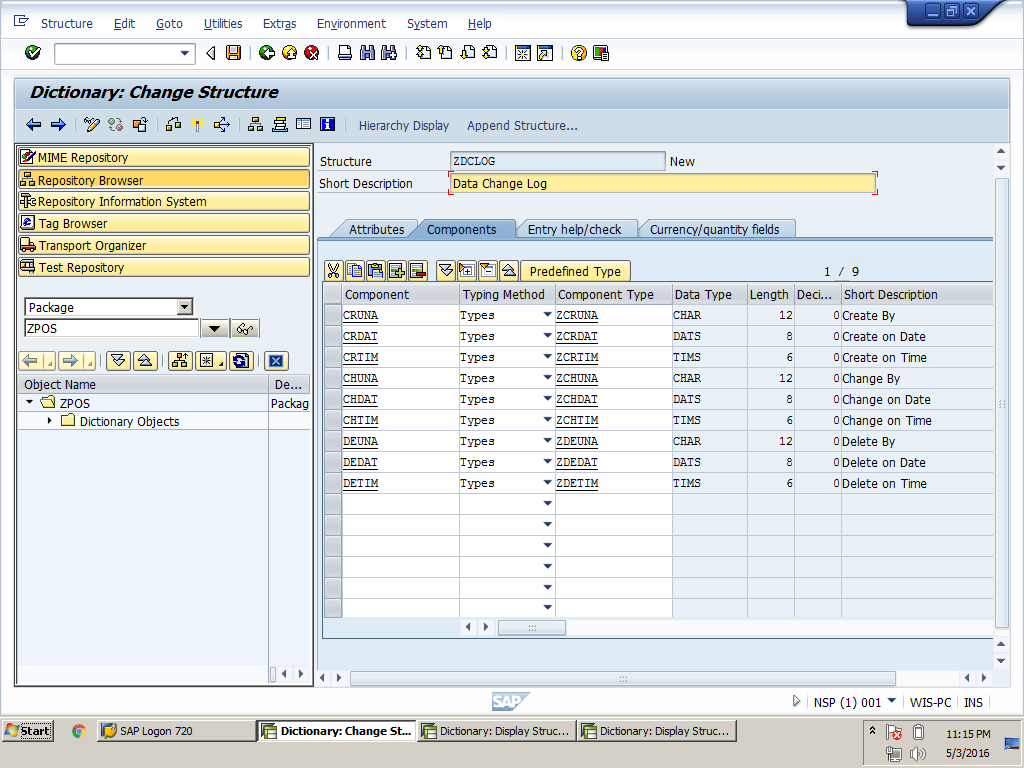
Figure 5.16
Structure data change log
Note
If you are working with an SAP standard table, you cannot add any custom
new fields directly to that table. You have to check to see if SAP
provides a table enhancement. If so, then you can use the Append
Structure… button on the application toolbar (Figure 5.16) to add new
fields of the provided enhancement type. A custom object can be changed
directly, so in our POS project, we are not going to select any
enhancement for our table or structure. Therefore, we use the Cannot be
Enhanced option for all tables and structures.
4. We do not want to enhance any of our tables or structures because these are custom objects and we can make changes at any time. So for all tables and structures, select the Enhancement Category… option from the Extras menu as shown in Figure 5.17.

Figure 5.17
The Enhancement Category option
5. The system displays a pop-up window with a message that this table or structure is not classified for an enhancement category. Click the green checkmark icon to select the enhancement category.
6. Select the Cannot Be Enhanced radio button and click the Copy button from the pop-up window (Figure 5.18)
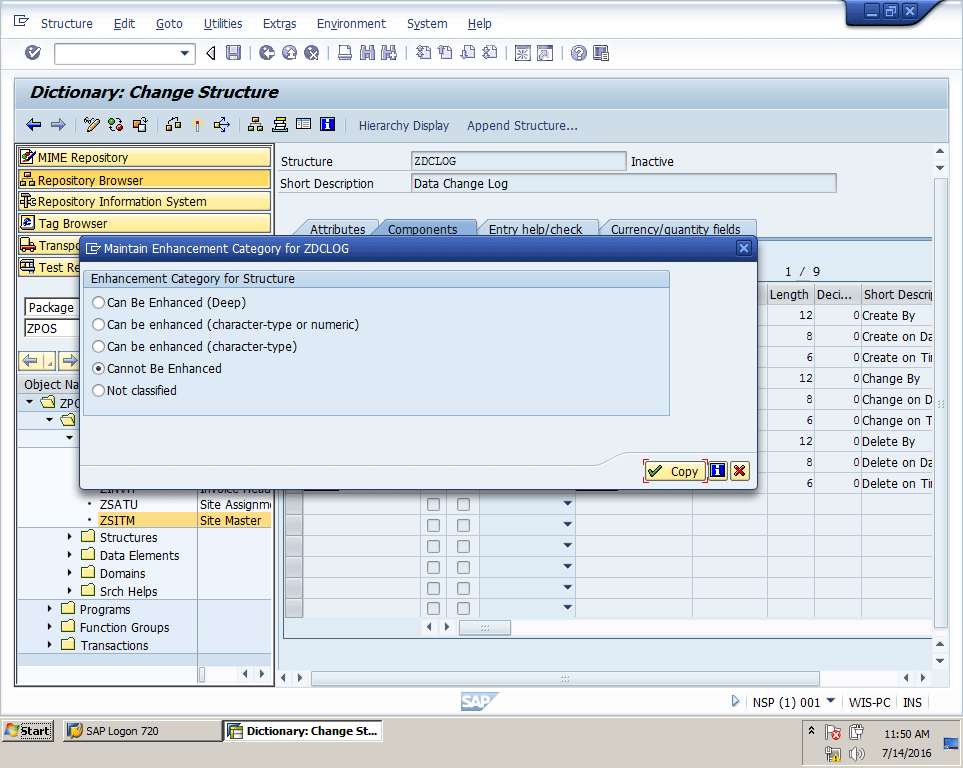
Figure 5.18
The Maintain Enhancement Category pop-up
7. Save and activate the structure using the save icon in the system toolbar and activate icon in the application toolbar
Note
You can directly use the activate icon to save and activate any object.
8. Go back to the table creation window by using the back icon in the system toolbar
9. To change the enhancement settings of the table, follow steps 4 to 6 in this list of steps. Finally, you have a table as shown in Figure 5.19.
10. Save this table using the save icon in the system toolbar
11. Click the Technical Settings button in the application toolbar as shown in Figure 5.19 or press Ctrl+Shift+F9 to open the technical settings of the table. This action takes you to Figure 5.20.
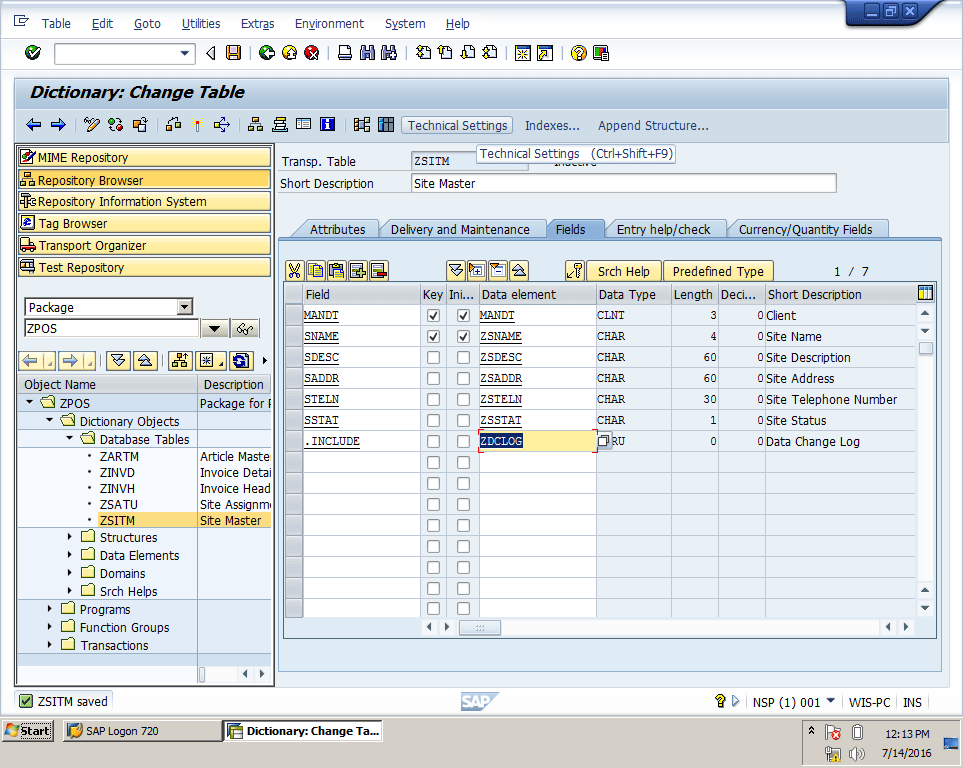
Figure 5.19
Site Master table
12. Since this is our master table, select APPL0 from the F4 search help or type it in the Data class field in Figure 5.20. APPL0 is a data class provided by SAP to assign to master data tables. Master data tables do not change very frequently. Therefore, master data tables are handled differently at the database level by the system with this option.
13. This table stores the name of sites that are not expected to be great in number, so type 0 (zero) in the Size category field in Figure 5.20. Leave the other settings as they are. Having the expected data records range from 0 to 4,500 does not mean that this table stores a maximum of 4,500 records. It means that the system allocates memory for 4,500 records initially, and if the records increase, another memory allocation of 4,500 will be assigned to this table. You have to select the correct size category as per the expected data size or it can affect your system’s performance.

Figure 5.20
Table Technical Settings
14. Save the technical settings and go back to the table creation window using the back icon in the system toolbar, or press F3
15. Now we are ready to activate the table. Remember that actual table creation in the ABAP Data Dictionary database happens when you activate the table. Just saving a table doesn’t mean that it is created in the database. Click the activate icon in the application toolbar to activate the table. Because we have already activated all objects one by one, there is no inactive object, so the system does not display any window with inactive objects. You can see table activated in Figure 5.21.
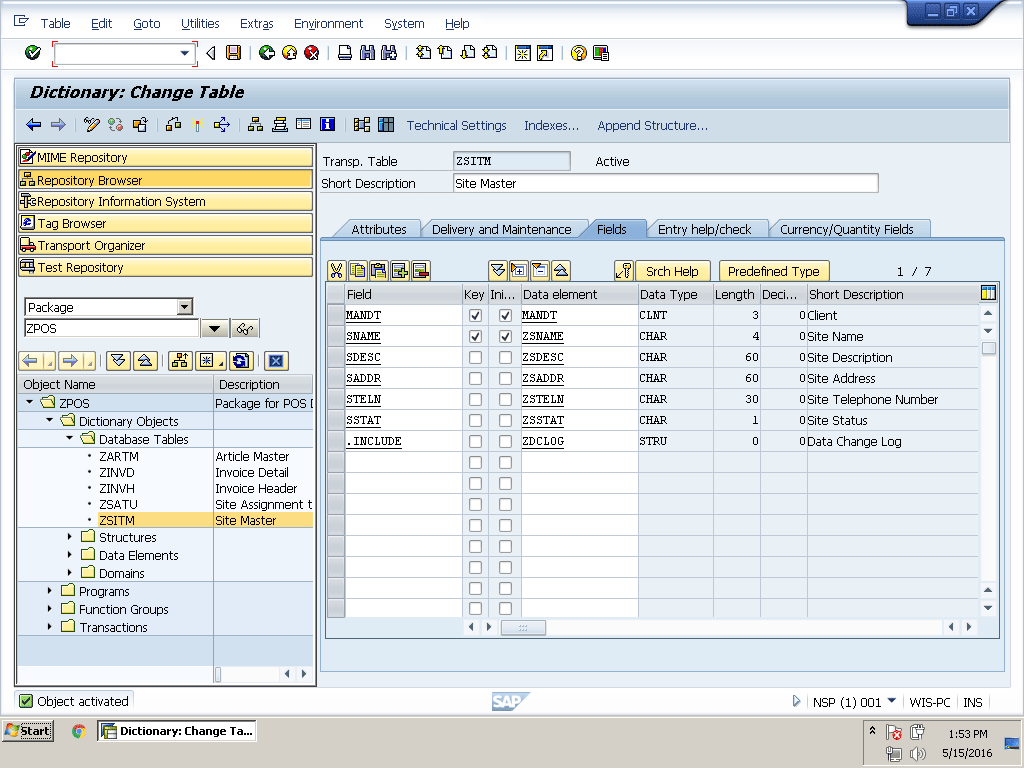
Figure 5.21
Activate the Site Master table
Create a Site Assignment to a User Table
We use the Site Assignment to a User table to assign a site to a user. For example, if we assign site S001 to salesperson SP01, that means salesperson SP01 is working in site S001. The system then automatically adds invoices created by salesperson SP01 to site S001. One salesperson can be assigned to one site only, but one site can have multiple salespeople. I explain how to configure settings for this business process in chapter 6. We will use screen validation to stop a user from assigning one salesperson to multiple sites.
A salesperson without any site assignment cannot sell. We need to have two fields, User Name (key field) and Site Name, in this table. In addition, we need to include the ZDCLOG structure to this table for the change log. Create table ZSATU using the same method we used for table ZSITM. We need to create one data element for the User Name as ZUNAME. We have already created the User Name domain, so we will use the same domain in the data element. We have already created data element ZSNAME for the site name, so use the same name. The structure of this table looks like Table 5.3.
Video 5.2 shows how to create a site assignment to a user table.
How to Create a Site Assignment to a User Table
|
Field name
|
Data element
|
Field label
|
Domain
|
Data type
|
Length
|
|
MANDT
|
MANDT
|
Client
|
MANDT
|
CHAR
|
3
|
|
UNAME
|
ZUNAME
|
User Name
|
ZUNAME
|
CHAR
|
12
|
|
SNAME
|
ZSNAME
|
Site Name
|
ZSNAME
|
CHAR
|
4
|
|
USTAT
|
ZUSTAT
|
User Status
|
ZUSTAT
|
CHAR
|
1
|
|
.INCLUDE
|
ZDCLOG
|
|
|
|
|
Table 5.3
Structure of table ZSATU for site assignment to a user
The table in the SAP system is the same as shown in Figure 5.22.
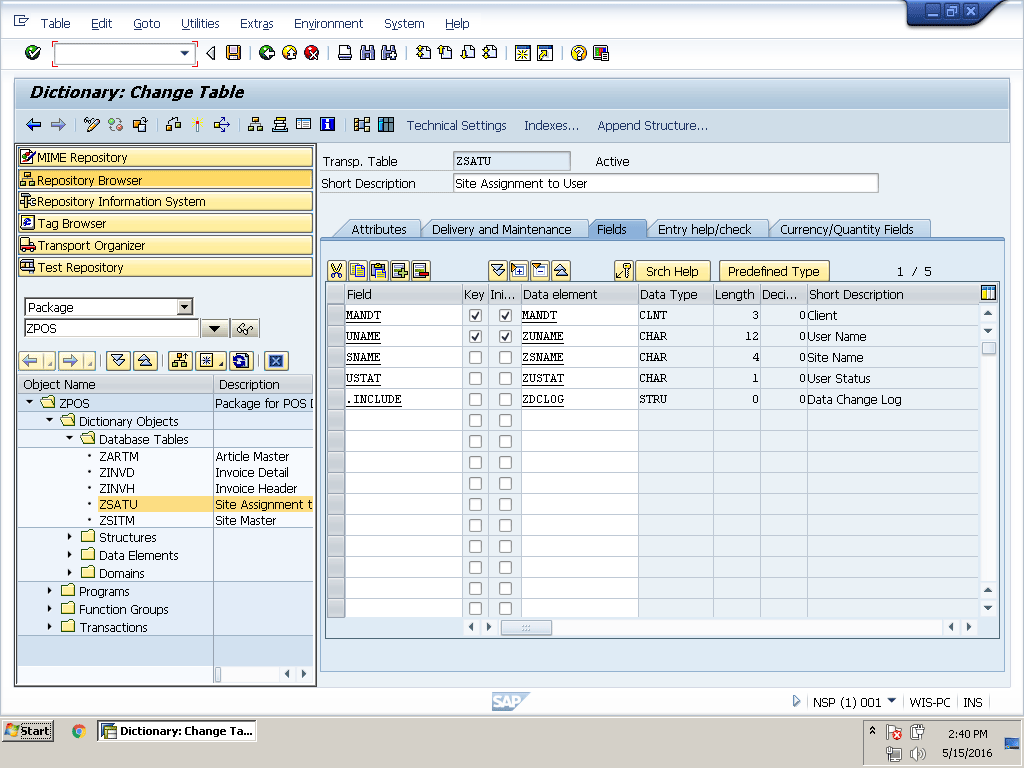
Figure 5.22
Site assignment to a user table
Create the Article Master Table
The Article Master table is one of the most important tables in our POS project. This is where we save complete article details (e.g., site name, article number/Global Trade Item Number [GTIN]), unit of measure, article description, sales price, discount price, and article status). The article price may be different from site to site, so we will also add the Site Name as a key field in this table.
In some cases, the SAP system stores certain fields in internal formats with the output in different external formats. For instance, the unit of measure for piece is PC, which is the external format as displayed to users, but the system stores it as ST, which is an internal format. To handle this auto conversion, we use some standard conversion routines. You type the conversion routine name in the Convers. Routine field of the Definition tab in Domain. These conversion routines are function modules that automatically convert the internal format to the external format, and vice versa. As you can see in Table 5.4, we are going to use two conversion routines, so you have to add these to the relevant domain, as you can see in Figure 5.23 for domain ZGTIN.
Video 5.3 shows how to create an Article Master table.
How to Create an Article Master Table
|
Field name
|
Data element
|
Field label
|
Domain
|
Data type
|
Length
|
Dec.
|
Convers. routine
|
|
MANDT
|
MANDT
|
Client
|
MANDT
|
CHAR
|
3
|
|
|
|
SNAME
|
ZSNAME
|
Site Name
|
ZSNAME
|
CHAR
|
4
|
|
|
|
AGTIN
|
ZAGTIN
|
Global Trade Item Number
|
ZGTIN
|
CHAR
|
18
|
|
EAN11
|
|
ARUOM
|
ZARUOM
|
Unit of Measure
|
ZUOM
|
UNIT
|
3
|
|
CUNIT
|
|
ARTDE
|
ZARTDE
|
Article Description
|
ZARTDE
|
CHAR
|
60
|
|
|
|
SPRIC
|
ZSPRIC
|
Sales Price
|
ZTOTAL
|
CURR
|
18
|
2
|
|
|
DPRIC
|
ZDPRIC
|
Discount Price
|
ZTOTAL
|
CURR
|
18
|
2
|
|
|
ARTST
|
ZARTST
|
Article Status
|
ZARTST
|
CHAR
|
1
|
|
|
|
.INCLUDE
|
ZDCLOG
|
|
|
|
|
|
|
Table 5.4 Structure of the Article Master table
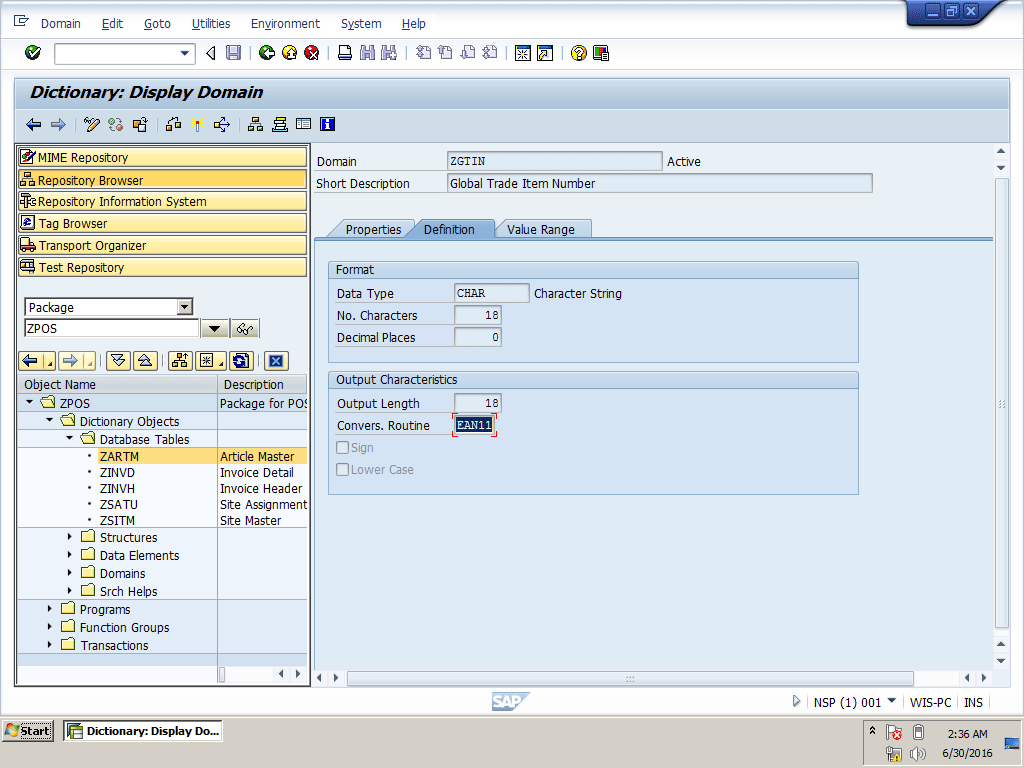
Figure 5.23
Conversion exit for ZGTIN domain
Because this table is expected to have more data, type 4 in the Size category field in the technical settings of this table (Figure 5.24). Because this is an Article Master table, it will have all the article information available in the store. If you are talking about a supermarket, you could have more than 50,000 articles.

Figure 5.24
Size category in the Technical Settings screen
Your final look at the Article Master table is the same as shown in Figure 5.25.
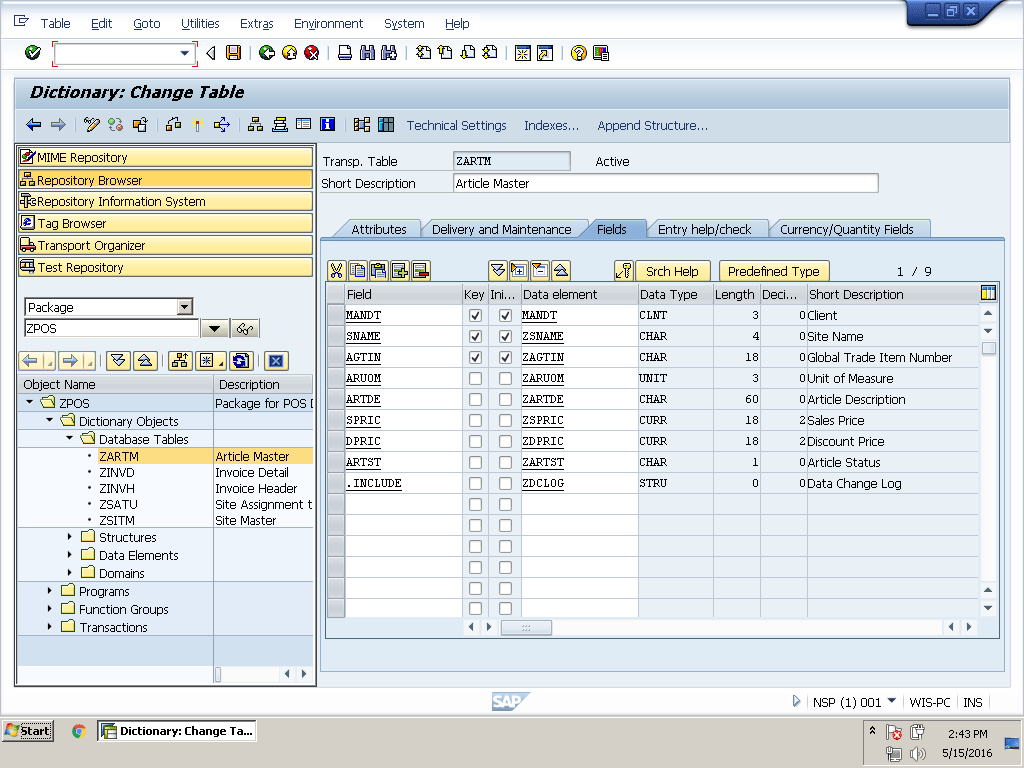
Figure 5.25
Article Master table
When you try to activate this table, the system shows an error message as shown in Figure 5.26.
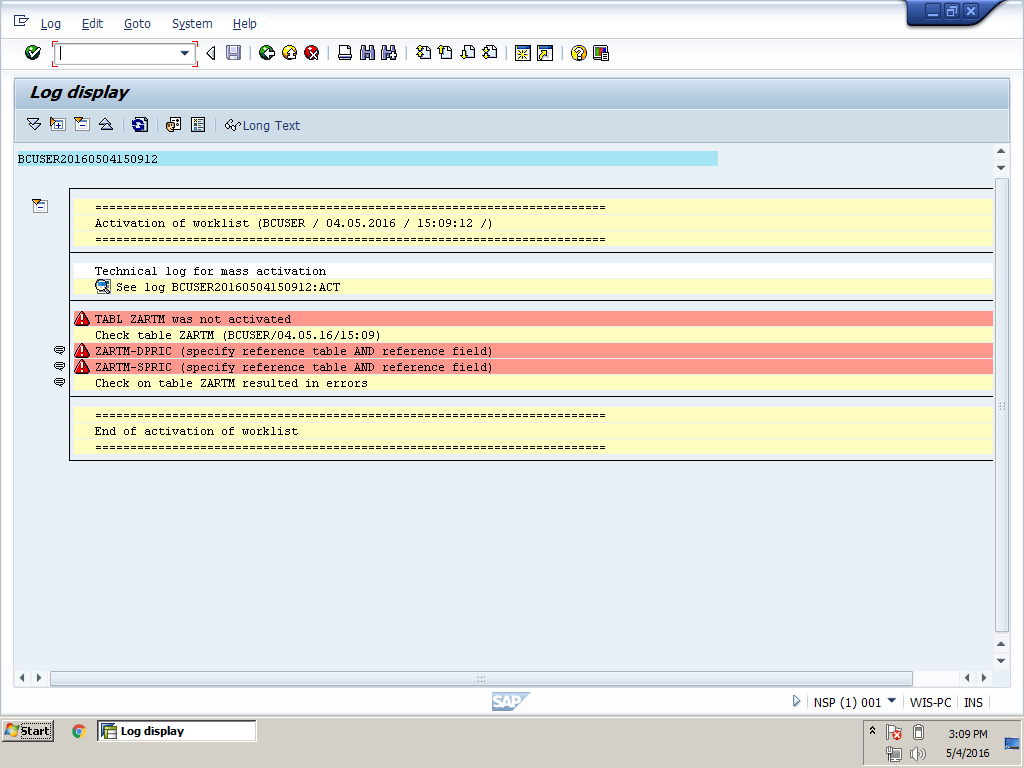
Figure 5.26
Table activation errors
That is because we used two currency fields, SPRIC and DPRIC. Whenever we add a currency field we have to use a reference table and field of the currency key. This applies to the quantity field. Also, whenever we use any quantity field in our table, we have to add the reference of the table and the Unit of Measure field.
Go to the Currency/Quantity Fields tab and add the Reference table and Reference field for both currency fields. Now try to activate this table again. It will activate successfully as shown in Figure 5.27.
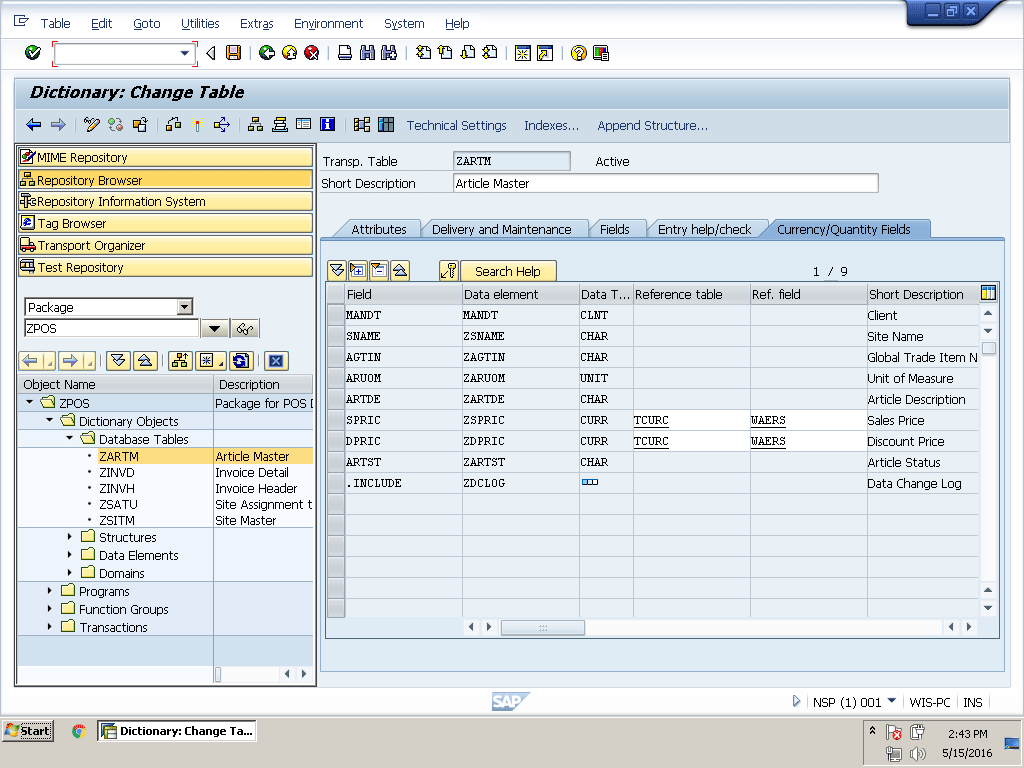
Figure 5.27
The Currency/Quantity Fields tab in the table creation window
Let’s create the final and most important Invoice Header and Detail tables.
Create the Invoice Header and Detail Tables
The Invoice Header and Detail tables hold transactional data of sales and returns. For example, when a customer purchases any article or item, the system generates an invoice with a unique invoice number. These two tables hold the data related to this invoice. These are the most important tables because most of our reports depend on these two tables. Use the structure displayed in Table 5.5 to create your ZINVH Invoice Header table.
Video 5.4 shows how to create the Invoice Header and Detail tables.
How to Create the Invoice Header and Detail Tables
|
Field Name
|
Data element
|
Field Label
|
Domain
|
Data Type
|
Length
|
Decimal
|
|
MANDT
|
MANDT
|
Client
|
MANDT
|
CHAR
|
3
|
|
|
SNAME
|
ZSNAME
|
Site Name
|
ZSNAME
|
CHAR
|
4
|
|
|
INVNO
|
ZINVNO
|
Invoice Number
|
ZINVNO
|
NUMC
|
10
|
|
|
UNAME
|
ZUNAME
|
User Name
|
ZUNAME
|
CHAR
|
12
|
|
|
INVTY
|
ZINVTY
|
Invoice Type
|
ZINVTY
|
CHAR
|
3
|
|
|
INVDA
|
ZINVDA
|
Invoice Date
|
ZDATE
|
DATS
|
8
|
|
|
INVTI
|
ZINVTI
|
Invoice Time
|
ZTIME
|
TIMS
|
6
|
|
|
INVTO
|
ZINVTO
|
Invoice Total
|
ZTOTAL
|
CURR
|
18
|
2
|
|
CASHT
|
ZCASHT
|
Total Cash Received
|
ZTOTAL
|
CURR
|
18
|
2
|
|
CASHA
|
ZCASHA
|
Actual Cash Received
|
ZTOTAL
|
CURR
|
18
|
2
|
|
CARDA
|
ZCARDA
|
Actual Card Received
|
ZTOTAL
|
CURR
|
18
|
2
|
|
CASHR
|
ZCASHR
|
Cash Return
|
ZTOTAL
|
CURR
|
18
|
2
|
|
DISCT
|
ZDISCT
|
Discount
|
ZTOTAL
|
CURR
|
18
|
2
|
|
CHRTY
|
ZCHRTY
|
Charity
|
ZTOTAL
|
CURR
|
18
|
2
|
Table 5.5 Structure of the Invoice Header table
The Invoice Header table should be the same as Figure 5.28.
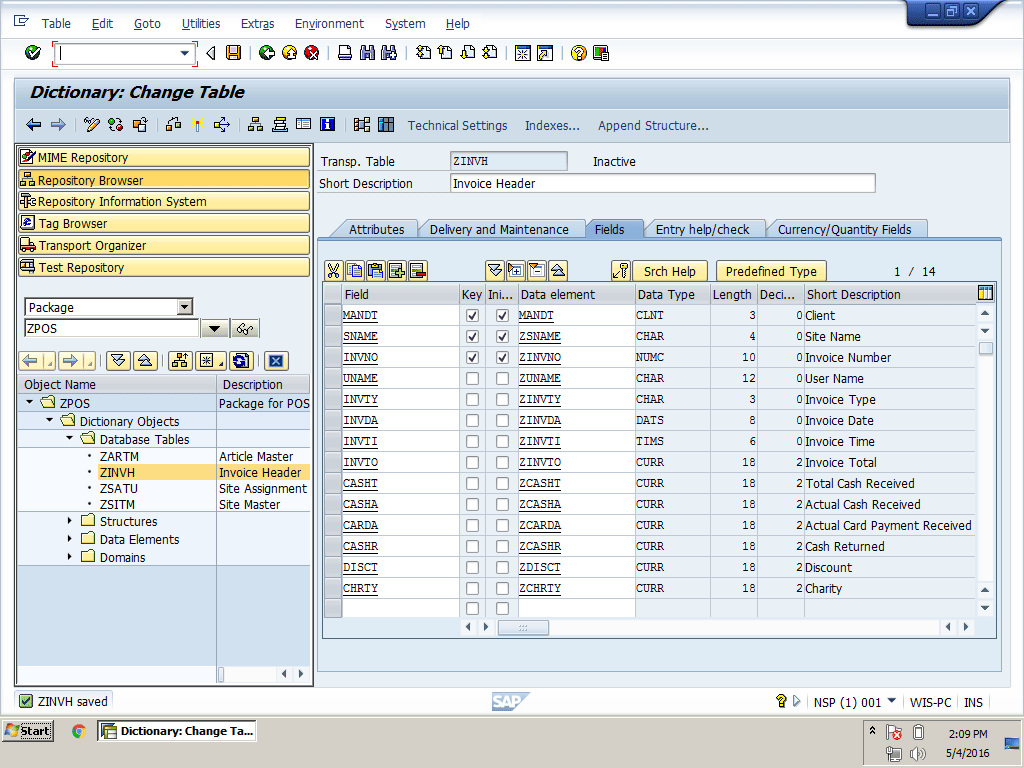
Figure 5.28
Invoice Header table
Do not forget to add a reference table and reference fields for all currency fields before activating the Invoice Header table as shown in Figure 5.29.

Figure 5.29
Currency reference table and reference field
These two tables hold transactional data so enter APPL1 in the Data class field. This data increases on an hourly basis depending on sales. Therefore, the table is expected to be large. For both of these tables use 8 in the Size category field in Technical Settings. You can see this in Figure 5.30.
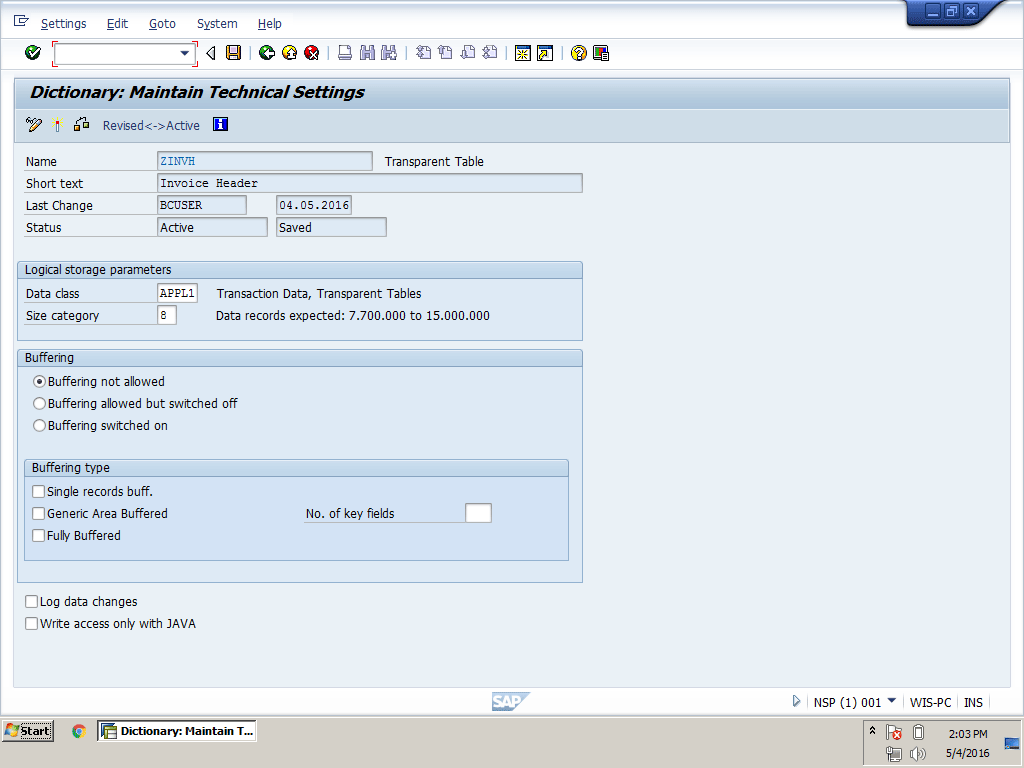
Figure 5.30
Technical Settings for the Invoice Header and Detail tables
Create the ZINVD Invoice Detail table using the structure shown in Table 5.6.
|
Field name
|
Data element
|
Field label
|
Domain
|
Data type
|
Length
|
Decimal
|
|
MANDT
|
MANDT
|
Client
|
MANDT
|
CHAR
|
3
|
|
|
SNAME
|
ZSNAME
|
Site Name
|
ZSNAME
|
CHAR
|
4
|
|
|
INVNO
|
ZINVNO
|
Invoice Number
|
ZINVNO
|
NUMC
|
10
|
|
|
INVIT
|
ZINVIT
|
Invoice Item Number
|
ZINVIT
|
NUMC
|
6
|
|
|
AGTIN
|
ZAGTIN
|
Global Trade Item Number
|
ZGTIN
|
CHAR
|
18
|
|
|
ARQTY
|
ZARQTY
|
Quantity
|
ZQUATY
|
QUAN
|
13
|
3
|
|
UNPRI
|
ZUNPRI
|
Unit Price
|
ZTOTAL
|
CURR
|
18
|
2
|
|
UNDIS
|
ZUNDIS
|
Unit Discount
|
ZTOTAL
|
CURR
|
18
|
2
|
|
NTPRI
|
ZNTPRI
|
Net Price
|
ZTOTAL
|
CURR
|
18
|
2
|
Table 5.6 Structure of the Invoice Detail table
Add a reference table and a reference field for the quantity and currency fields as shown in Figure 5.31.
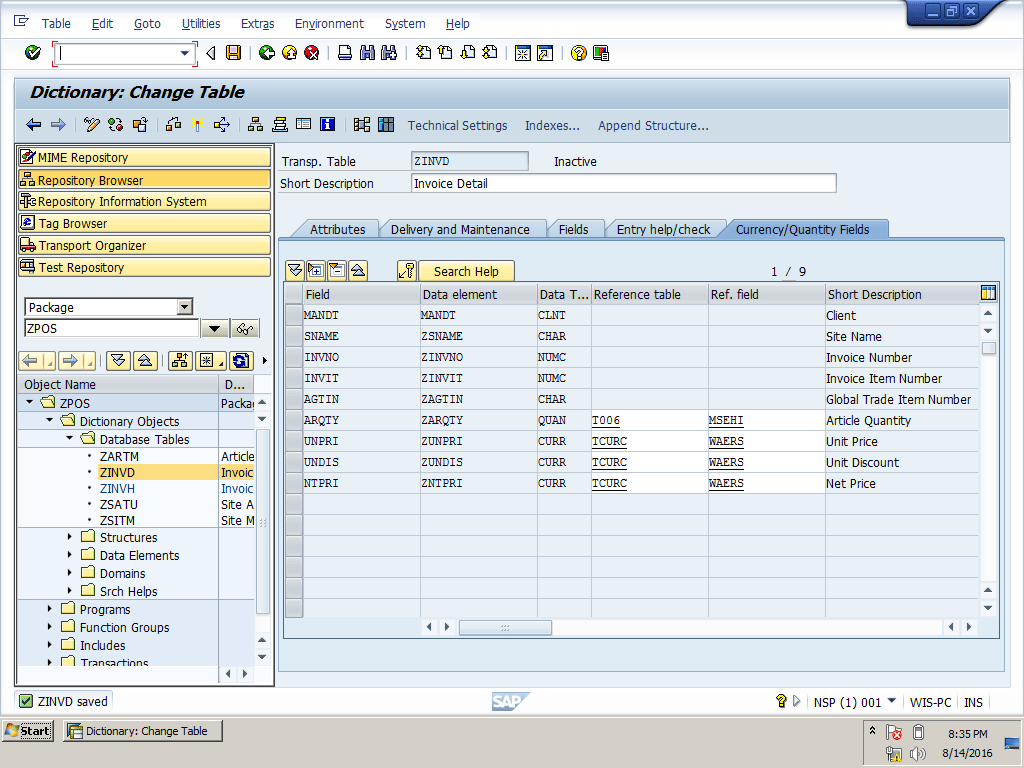
Figure 5.31
Currency and Quantity reference table and reference field
The Invoice Detail table should be the same as Figure 5.32.

Figure 5.32
Invoice Detail table
Let’s go through the process of creating a search help.
How to Create Search Help
As you have read before, search help is used to display possible input values for any field on a screen. In our POS project, the site is our main focus because each record in our database will be site dependent. In the next chapter, when we design the Master Data Management screen, the site name will be part of every screen. Let’s create a search help for the site name, which we will use in chapter 6 for the Site Name input screen field.
Video 5.5 shows how to create search help.
How to Create Search Help
1. Execute transaction code SE80. This action displays the screen shown in Figure 5.33. Right-click the package name ZPOS and select Search Help from menu path Create > Dictionary Object.
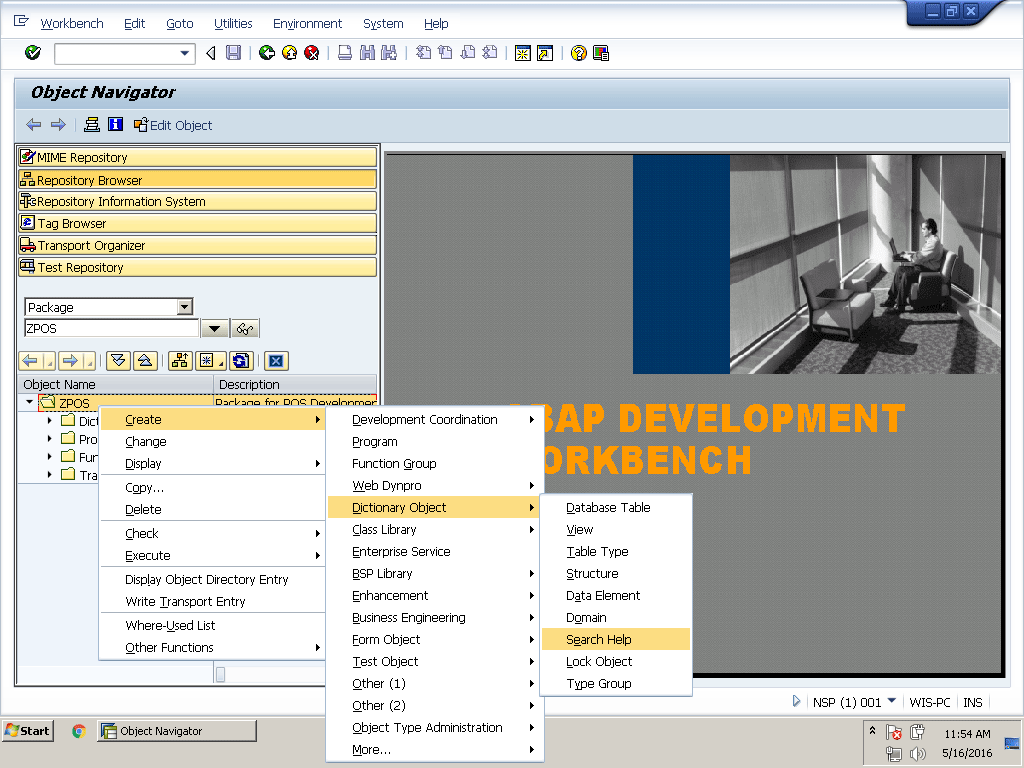
Figure 5.33
Search help
2. In the Create Search Help pop-up window, type ZESH_SNAME in the Search Help Name field, keep the Elementary search help radio button selected, and click the green checkmark icon in Figure 5.34
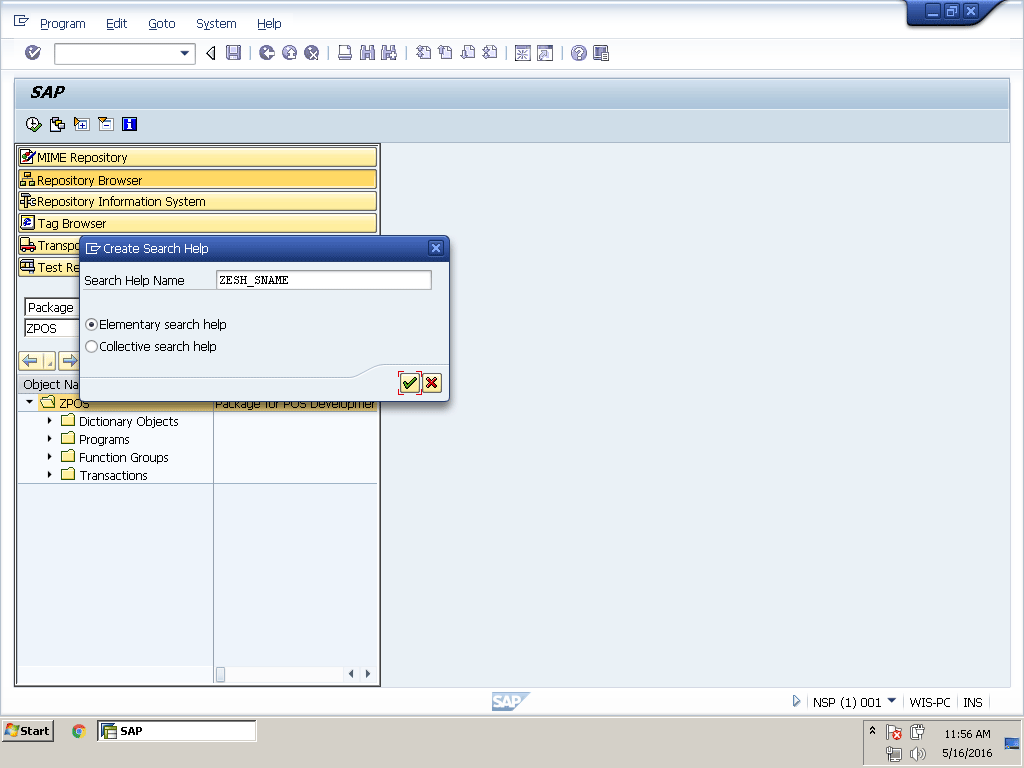
Figure 5.34
Create search help
3. Type a Short description, Selection method, and Search help parameter as shown in Figure 5.35. I added SNAME, SDESC, SADDR, STELN, and SSTAT in the search help parameter column of the parameters table. The Selection method can be a table or view. In this example we are creating a search help for the site name, so use ZSITM (Site Master table). In the Search help parameter column, the system automatically displays all the fields of the ZSITM table when you press F4 in this column. The system shows all the fields you added in this column in the search help pop-up display. The system does not allow you to add fields using any method other than the selection method. It allows you to add only fields that are available in selection method ZSITM.
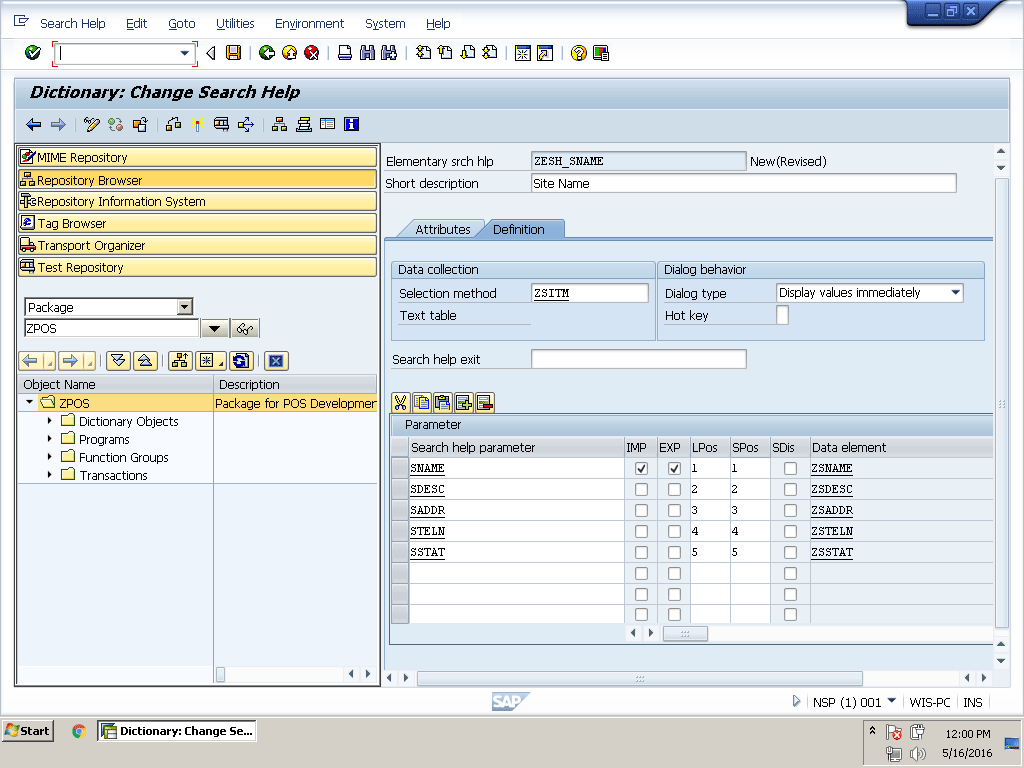
Figure 5.35
Create the elementary search help
4. Save this search help in the same package and transport request we used before
5. Activate search help by clicking the activate icon in the application toolbar or pressing Ctrl+F3
6. We can test search help by clicking the test icon  in the application toolbar or by pressing F8 (Figure 5.36)
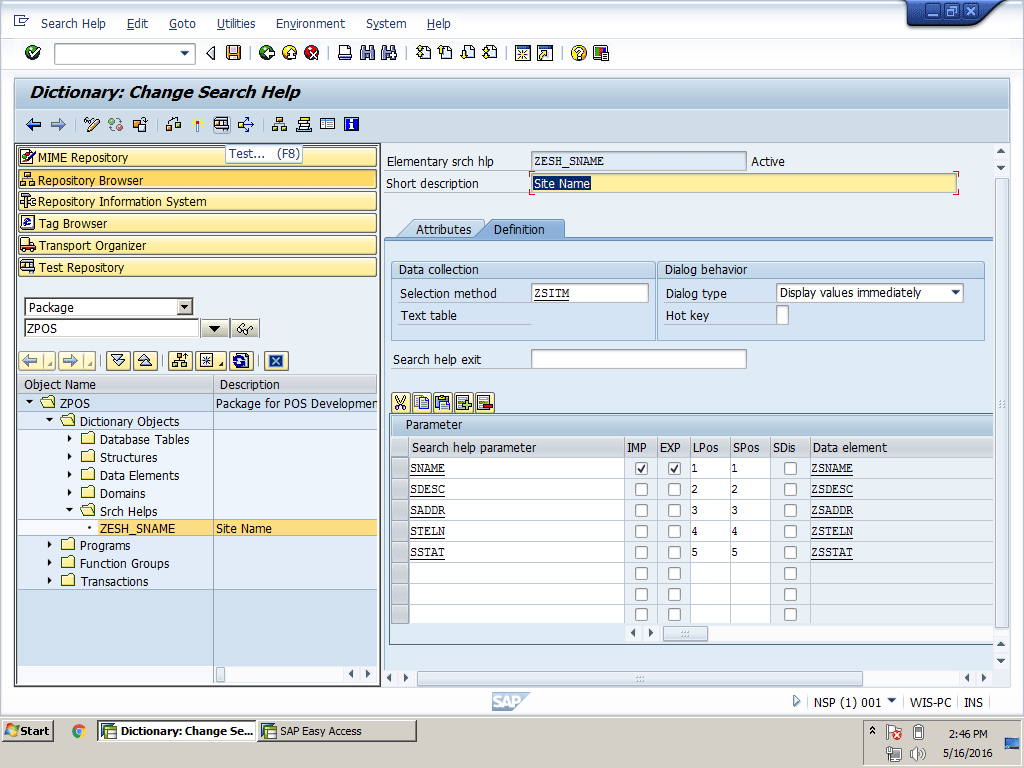
Figure 5.36
Test search help
7. The Test Search Help pop-up window appears. This window has one field, SNAME (Figure 5.37).
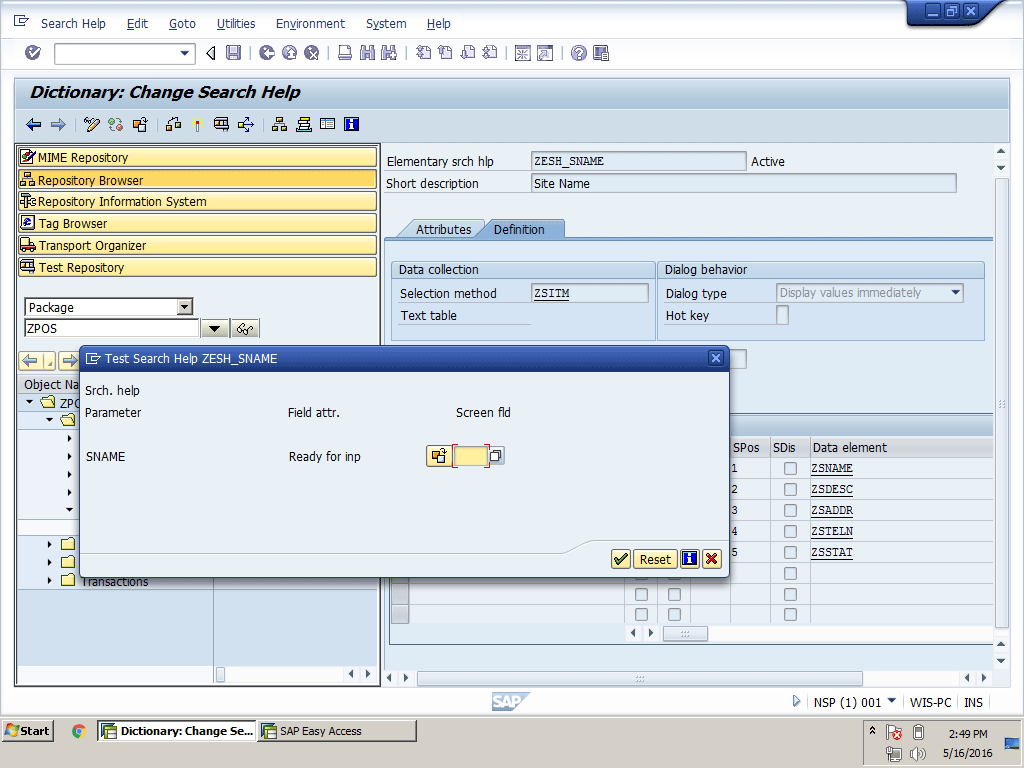
Figure 5.37
The pop-up window for the test ZESH_SNAME search help
Click the small search help icon  on the right side of the field or press F4 to display the possible input values. For testing search help I just added two values in table ZSITM, so the system displays those two values in a pop-up window (Figure 5.38).
Note
The table maintenance generator option can be used from the Utilities
menu of the table creation window to create a table maintenance view.
This view can be used after executing transaction code SM30 to add
values in the table directly.
8. If you do not add any values to the table, then the system shows the message No value found
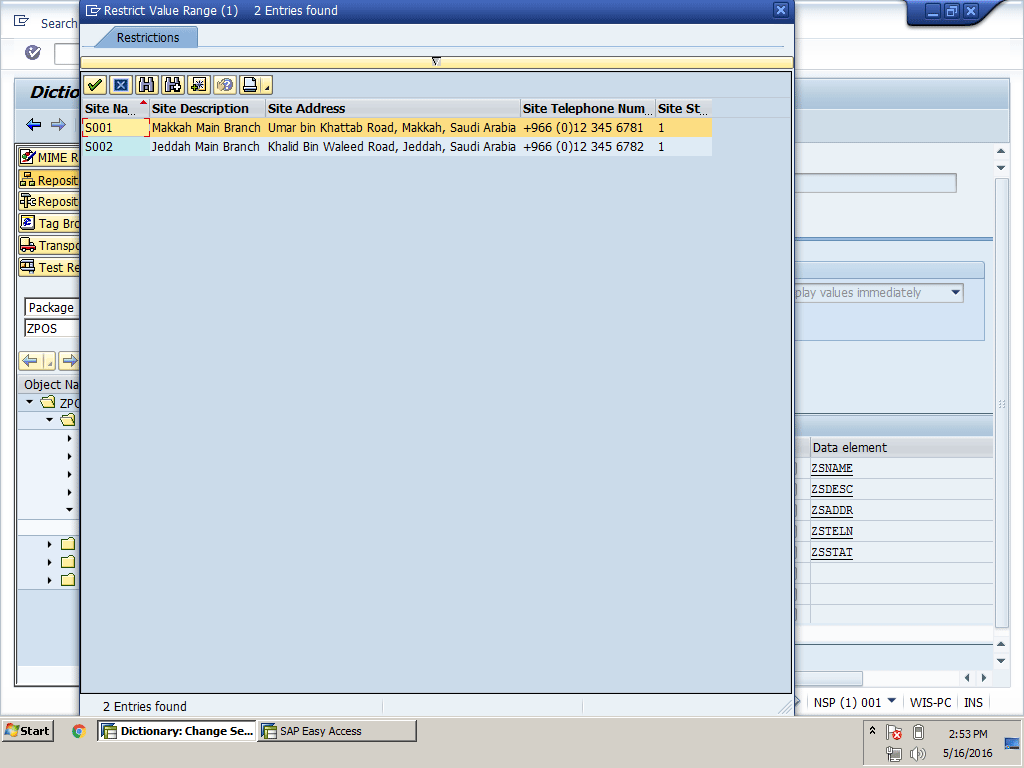
Figure 5.38
The search help pop-up window
9. Whatever site name we select from the pop-up window in Figure 5.38 is automatically filled back into the SNAME field of site S001 (Figure 5.39). To select a site name, either left double-click or select the site by single left-clicking and pressing Enter.
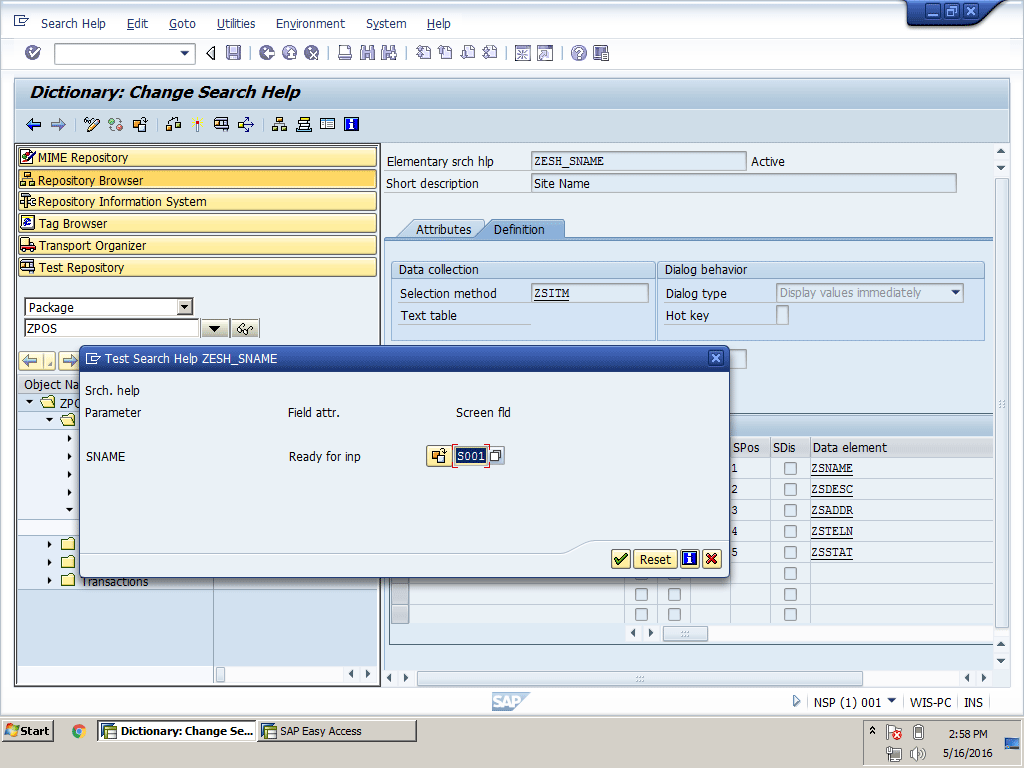
Figure 5.39
Search help with the selected value
10. We will use this search help in the next chapter on the POS Master Data Management screens for the Site Name field.
Let’s get an idea of how to change ABAP Data Dictionary objects.
How to Change ABAP Data Dictionary Objects
Changing an ABAP Data Dictionary object is easy, but also very critical. You have to be very careful before making any changes to an ABAP Data Dictionary object because any change without proper investigation can destroy important data. For example, if you change the length of any domain that is already being used in tables from 10 characters to five characters, this change can damage all or part of the data of that field. So do a proper study before making any change. Note that the system would send you a warning if you try to make a change to an ABAP Data Dictionary object that will damage data.
Video 5.6 shows how to change an ABAP Data Dictionary object and use the where-used list.
How to Change an ABAP Data Dictionary Object and Use the Where-Used List
Let’s see how to change any ABAP Data Dictionary object in the ABAP Development Workbench.
Run transaction code SE80 and open the POS project development package ZPOS. The system displays all created objects under Dictionary Objects in the ZPOS package. Review Figure 5.40.
Figure 5.40
All dictionary objects in the ZPOS Package
Double-click any object you want to change. The ABAP Development Workbench automatically loads this object on the right side of the tool area window. Click the display or change icon  in the application toolbar or press Ctrl+F1 to switch between display and change modes as shown in Figure 5.41.

Figure 5.41
ZSNAME domain in change mode
The Where-Used List of Any Object
Before making any changes, make sure you know how many data elements are using this domain by clicking the where-used list  icon in the application tool bar or pressing Ctrl+Shift+F3. From the Where-Used List Domain pop-up window select the Data elements check box and then click the green checkmark icon (Figure 5.42).
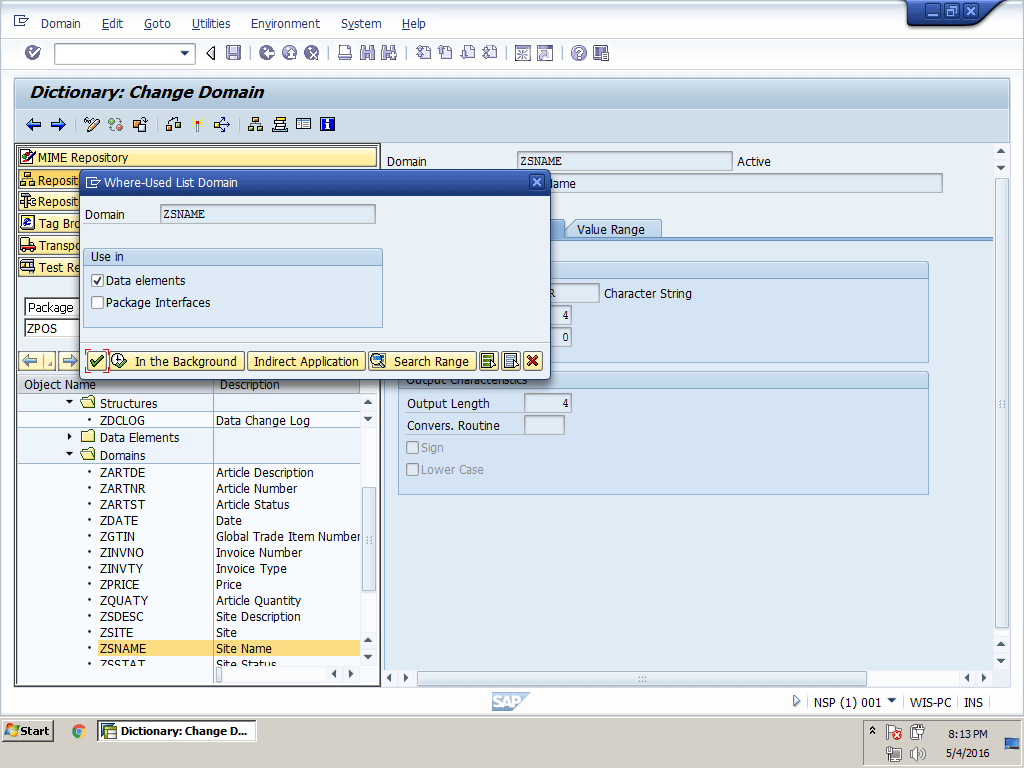
Figure 5.42
The Where-Used List Domain pop-up window
The system displays all the data elements that are using this domain. We can use this data element now to search for tables or any other objects using this data element by using this same where-used list. Figure 5.43 shows the where-used list of data elements in all tables.

Figure 5.43
The where-used list of data elements
In change mode you can make any changes. When you try to make any change to any object, the status of that object changes to Inactive. To apply your changes, you have to make this object active using the same method we used while creating the object.
How to Delete ABAP Data Dictionary Objects
You can delete an ABAP Data Dictionary object only if it is not being used by any other Data Dictionary object. If you are using this object in the program, the system displays the message that this object is being used. However, you can still delete this object. So be careful before deleting any object because it can create problems with your developed objects. It is very rare that you would delete any Data Dictionary object. Sometimes, for example, we create a data element and domain that we later discover has the same properties that already exist in the system. It is better to delete the newly created item and replace it with the already created one to eliminate data redundancy.
Video 5.7 shows how to delete ABAP Data Dictionary objects.
How to Delete ABAP Data Dictionary Objects
Let’s try to delete an ABAP Data Dictionary object.
Right-click any object in the ABAP Development Workbench. Select Delete from the context menu. As an example, we will try to delete the ZSNAME data element. Right-click ZSNAME and select Delete from the context menu. You get the message that you cannot delete this object because it is being used by a Data Dictionary object as you can see in Figure 5.44.
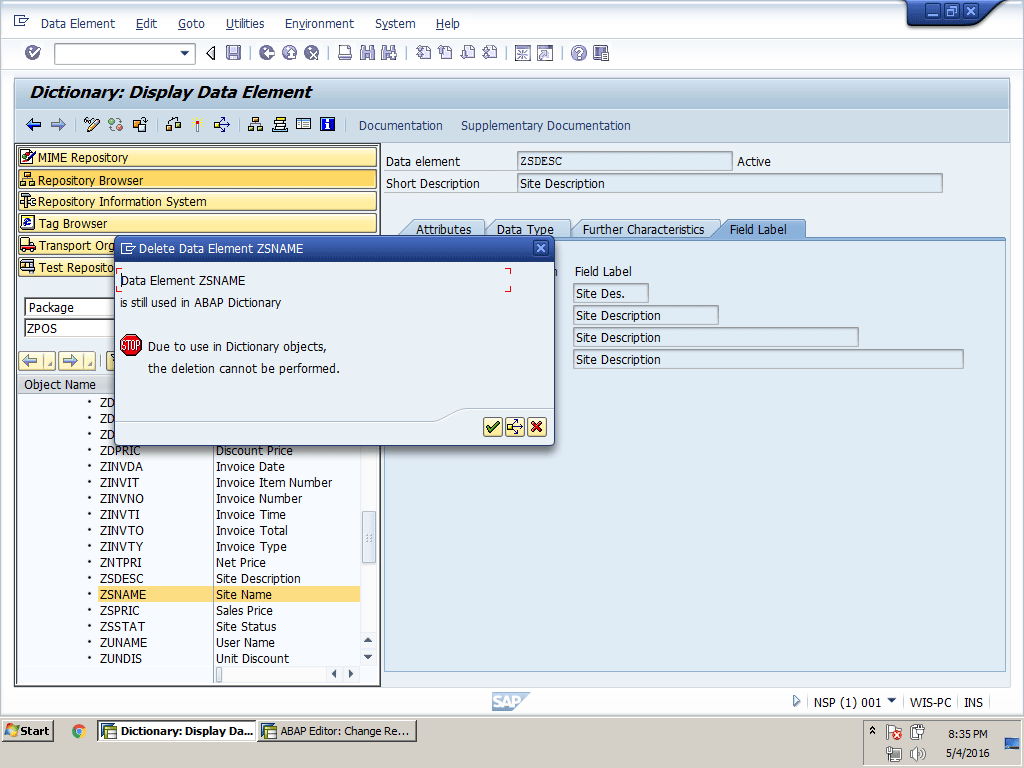
Figure 5.44
Delete data element ZSNAME
You can delete the object easily if it is not being used by any other object in the system by using the same method we used before to delete the ZSNAME data element. If you try to delete any object that is not being used, you get a pop-up message for confirmation. After your confirmation, the system deletes the object.
Conclusion
In this chapter we provided you with a complete overview of ABAP Data Dictionary objects. We needed some ABAP Data Dictionary objects—for example, tables to save data and search help for possible input values for users in the POS project development. We also created most of the objects we are going to use in the upcoming chapters as we develop our POS project. We learned the best and quickest method of developing all these objects using the ABAP Development Workbench. We also learned about navigation from one object to another in the ABAP Development Workbench. In addition, we examined the process of changing these developed objects and also learned how to use the where-used list before making any changes to an object. This, of course, ensures that any change does not affect our data. At the end we learned how to delete an ABAP Data Dictionary object. We have completed the first development step toward our POS project that was related to the database. We created all the tables that we use to save data related to our POS business processes.
In chapter 6, we will start screen programming and will design a screen for Site Master Data, Site Assignment to User, and Article Master Data. We will create transaction codes to create, change, or display master data. In screen development we will go through using different screen elements and changing properties of these elements. We will also learn about screen validation by applying input checks and get an idea of how to deal with database tables by reading or writing data from or to them.
Faisal Altaf
Faisal Altaf is a certified development consultant. He has more than seven years of experience and currently is working with Al Yamamah Steel Industries Co., Saudi Arabia, as the SAP technical division head. He completed his MS in software engineering and intends to complete his Ph.D. in the field of SAP.
You may contact the author at faisalatsap@gmail.com.
If you have comments about this article or publication, or would like to submit an article idea, please contact the editor.