The creation of a transport (shipment) document represents a very important step in the distribution chain. Generation of this document is based on numerous factors. Learn how using collective processing can help you save time when creating a shipment document.
Key Concept
Collective processing allows the generation of documents (shipment documents). This functionality enables you to establish selection criteria for an outbound delivery, grouping criteria, and shipment document data to be generated.
Figure 1
- Definition of selection variants: Define which deliveries are to be considered in the creation process. At this stage the same fields are available that are used in the transaction for creating an individual shipment (transaction code VT01N [Create Shipment]).
- Definition of grouping criteria: You can define which fields in the deliveries must be identical so that those deliveries can be grouped together into one shipment. You can also define in which order the deliveries appear in the shipment and enter capacity limits for those shipments that are to be considered. To define grouping and sort criteria, you can choose from more than 80 delivery header fields in the field catalog.
- Set default shipment data: You can define shipment data, such as forwarding agents or deadlines, that should appear in each shipment you create.

Figure 1
Collective processing steps
To begin to create values for a shipment with collective processing, execute transaction code VT04. Follow menu path Logistics > Logistic Execution > Inbound Process > Goods Receipt for Inbound Delivery > Transportation > Create > VT04 Collective Processing.
This action displays the screen shown in Figure 2.
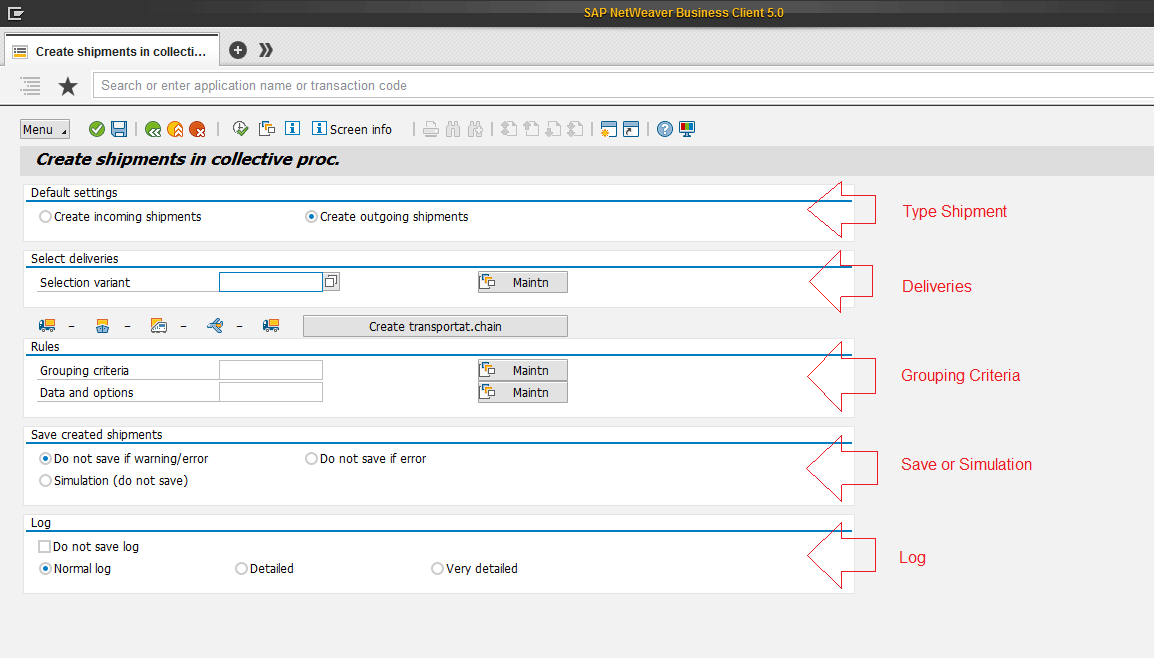
Figure 2
Segments of the transaction
This screen consists of five sections:
- Default settings in which you indicate what the shipment type is (for my example, select Create outgoing shipments)
- Select deliveries
- Rules
- Save created shipments
- Log
Create a Selection Variant
To create a selection variant, execute transaction code VT04 or follow menu path SAP Menu > Logistics > Logistics Execution > Transportation > Transportation Planning > Create > VT04 – Collective Processing. Variants used in this transaction allow you to determine the criteria with which the SAP system runs or processes the transaction.
In the screen the system displays (Figure 3), enter a name in the Selection variant field (e.g., ZITRA_01) and then click the Maintn (maintain) button.
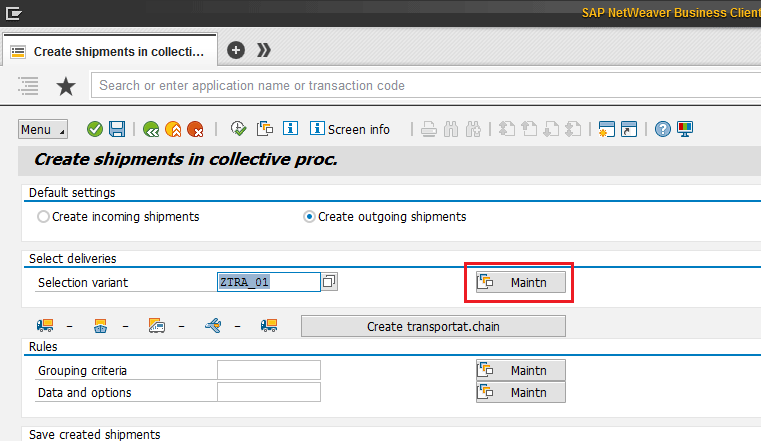
Figure 3
Create a selection variant
After you click the Maintn button, the Maintain Variant: Report SAPLV56L screen appears (Figure 4). In this screen, you choose the criteria for selecting the delivery documents that conform to transport documents.

Figure 4
Selection for outbound delivery
For my example, populate the following fields:
Click the back icon  . This action opens the screen in Figure 5.

Figure 5
Save the selection variant record
Click the Yes button to save the selection variant record.
Create Grouping Criteria for a Selection Variant
To create grouping criteria, execute transaction code VT04 or follow menu path SAP Menu > Logistics > Logistics Execution > Transportation > Transportation Planning > Create > VT04 – Collective Processing.
In the Rules section of the screen that appears (Figure 6), enter the name of the selection variant you created in the previous section in the Grouping criteria field and then click the Maintn button.
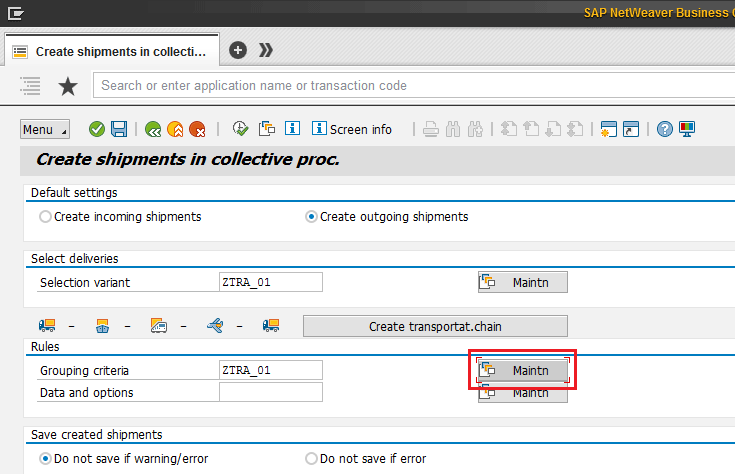
Figure 6
Create a variant for grouping criteria
This action displays the Maintain Variant: Report RV56TRSP screen (Figure 7). This screen contains the selection settings for Grouping criteria for the creation of transport documents. They indicate the selected fields that are the criteria to which you want to group the transport documents.
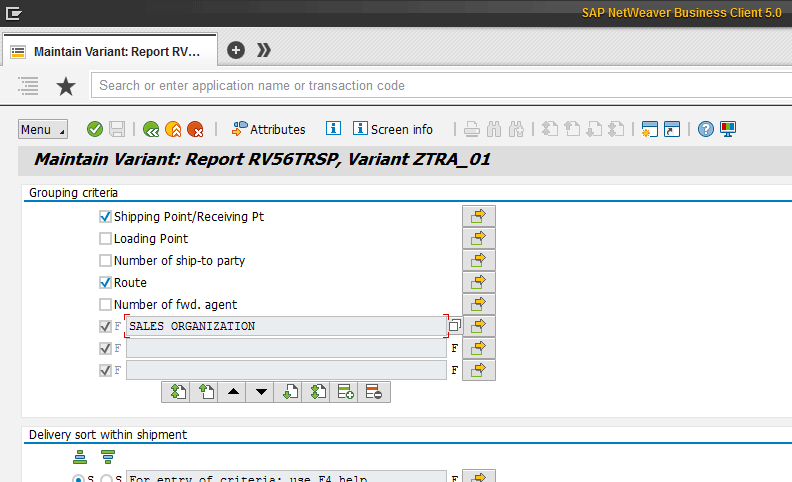
Figure 7
Grouping criteria
Select the check boxes for the following settings (Figure 7):
In the Delivery sort within shipment section (Figure 8), press F4 and then enter the following criteria:
• Delivery Number
For Delivery Priority select the second radio button to instruct the system to sort from high to low (You can assign a delivery priority to either a particular material or to a combination of customer and material in the data master). For Delivery number (the range number generated when creating the document), select the first radio button to instruct the system to sort from low to high.

Figure 8
Delivery sort within shipment
In the Capacity limits per shipment section (Figure 9), enter the minimum and maximum values for Weight and Volume. For my example, in the Weight field, enter 2000 KG for the minimum and 4000 KG for the maximum. In the Volume field, enter 5 M3 (cubic meter) for the minimum and 12 M3 for the maximum.
The above criteria establish rules for capacity limits per shipment.
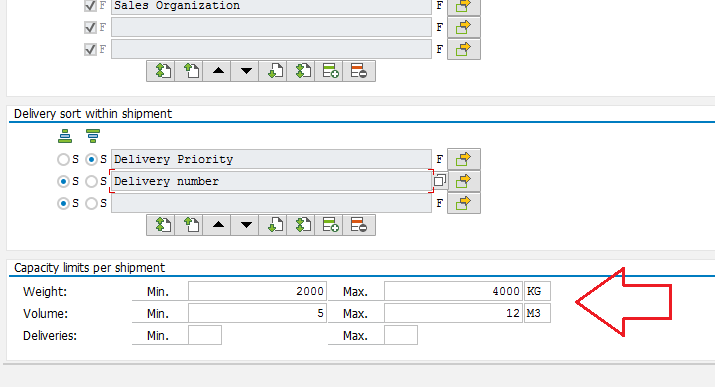
Figure 9
Capacity limits per shipment
Now click the back icon. This action opens a pop-up screen that prompts you to save your values for the variant record. Click the Yes button (Figure 10).

Figure 10
Save the values for the variant record
Create Data and Options Settings for the Selection Variant
To create data and options for the selection variant, execute transaction code VT04. In the screen the system displays, enter the name of your selection variant in the Data and options field (e.g., ZITRA_01) and click the the Maintn button (Figure 11).

Figure 11
Data and options
In the next screen (Maintain Variant: Report RV56TRTR ), enter criteria for the data and options for the creation transport documents (Figure 12). The criteria you enter indicate how you want to group the transport documents. In Figure 12, populate the following fields:
• Service agent: For my example enter 9927900246 in this field for service transport company

Figure 12
Date and option of processing
After you click the back icon, the system displays a pop-up window that prompts you to save your values for this variant (Figure 13).

Figure 13
Save your values
After you click the Yes button in Figure 13, the system displays a screen (not shown) in which you need to enter the date fields (for example, Planned, Check-in, Loading started, and Scheduling end). The date and time values are dynamic. For example, you want the Planned Date field to always display the current date. Click the save icon to save your data.
In the Variant Attributes screen (Figure 14), go to the Planned date CheckIn row and enter the option D in the field under the Selection variable column. (D stands for dynamic date calculation.)
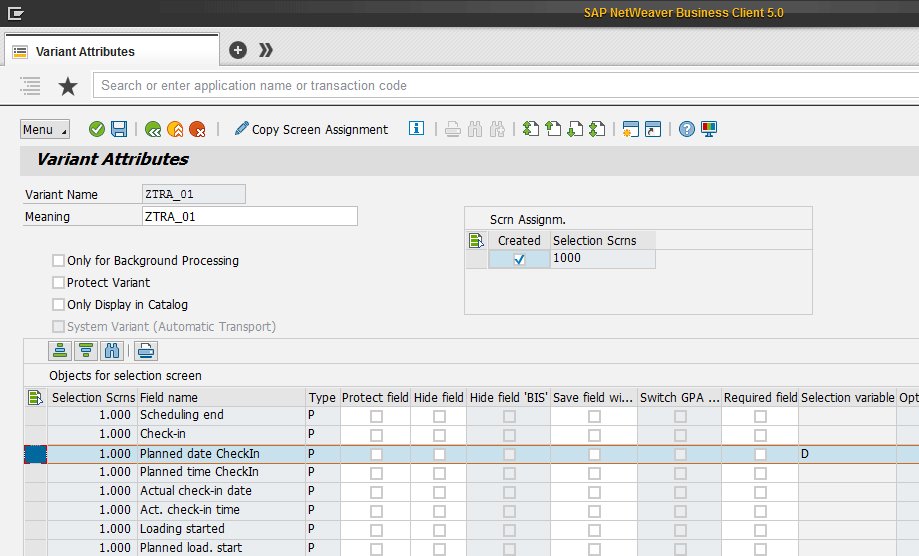
Figure 14
Variant attributes with dynamic date calculation
In Figure 14, remain in the Planned date CheckIn row and scroll to the right until you see the Name of Variable (Input Only Using F4) column. In the field under this column enter the criterion for calculating a dynamic date. In my example the option is Current Date (Figure 15).

Figure 15
Choose Current Date as the criterion for dynamic date calculation
Start the Shipment with Collective Processing
Now you are ready to start the shipment with collective processing for the variants created in each segment (Select Deliveries, Grouping criteria, and Data and options). To complete this step, execute transaction code VT04.
This action displays the screen in Figure 16. In this screen you see the selection variant that you created earlier in the Select deliveries section. You also see your variants for Grouping Criteria and Data and Options in the Rules section. In addition to these sections, the screen in Figure 16 has two additional sections: Save created shipments and Log.

Figure 16
Option to save created shipments
In the Save created shipments section, some errors prevent a document from being created. For example, you cannot create a document with a shipment type that does not exist. Other errors or warnings do not necessarily indicate an inconsistent document, but the system indicates that you may want to reconsider creating the document in its current state. For example, you may not want to create the document if log determination could not be carried out, if the service agent could not be transferred from the delivery, or if the maximum weight has been exceeded. Indicate here whether the system should save shipments if one of the aforementioned minor errors occur. If you select the Do not save if warning/error radio button, shipments will only be created when all necessary data was entered (when no corrections are necessary).
In the Log section you indicate whether you want a log to be created and how detailed it should be.
After you finish making your selections in Figure 16, press the F8 key or click the execute icon (Figure 17).
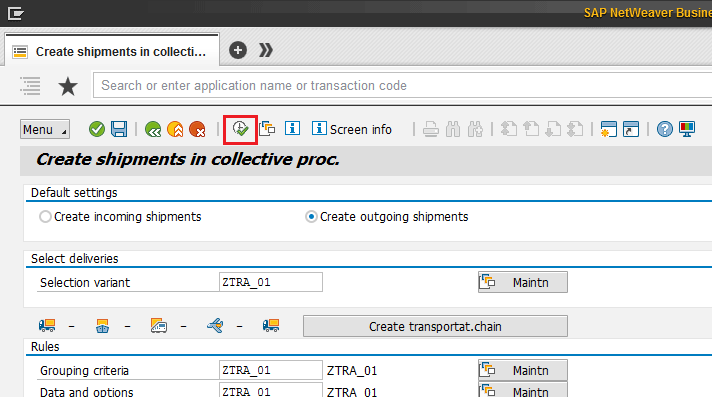
Figure 17
Execute the transaction
After you execute the transaction, the log is issued (Figure 18). The log indicates the selected documents’ delivery and transport documents that were generated. The log allows you to know the result of the execution. In my example the log indicates that 17 transport documents (shipment documents) were created.
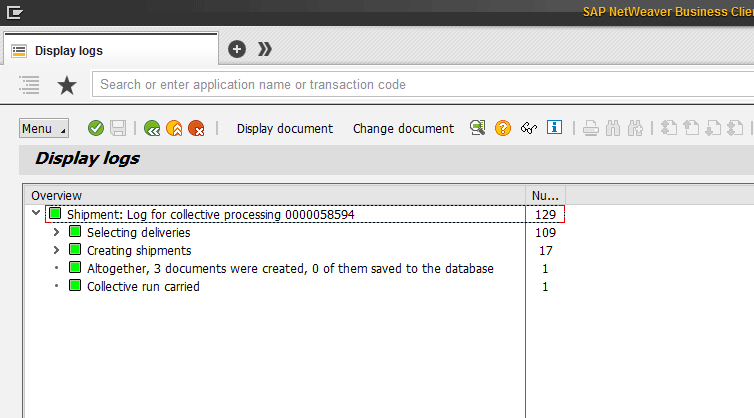
Figure 18
Display logs
Collective Processing in the Background
To perform collective processing in the background, execute transaction code VT07 and follow menú path Logistics > Logistic Execution > Inbound Process > Goods Receipt for Inbound Delivery > Transportation > Create >VT07 Collective Processing In BackGround. This action displays the screen shown in Figure 19.

Figure 19
Collective transports in the background
To generate the background job, first you generate a variant of execution. In Figure 19, click the Variant button. In the pop-up window that appears, enter a name in the Create variant field. For my example, enter ZTRA_001 and click the Create button.
A pop-up window appears in which you can indicate whether the variant will be for all screens (For All Selection Screens) or for individual screens (For Indiv. Selection Screens). For my example select the For All Selection Screens setting and click the Continue button (Figure 20).
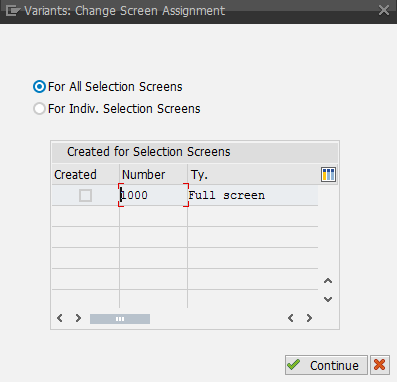
Figure 20
Screen assignment
This action displays the screen shown in Figure 21. This screen is the same screen that the system displays when you execute transaction code VT04. Note that the variants that you created in the previous sections are displayed in the Select deliveries and Rules section of Figure 21. Click the back icon.

Figure 21
Variant used in the creation collective transport background
Now that you have created your version, you can proceed to its execution planning. To complete this step, click the Schedule button (Figure 22).

Figure 22
Start schedule
After you click the Schedule button, the system displays a schedule in which you enter the date and time of the execution of your variant (Figure 23). To run this transaction regularly, click the Schedule periodically button.

Figure 23
Schedule the start time
This action displays the screen in Figure 24. Among the options for Period Duration, select Days and enter 1. After you make your selection for a Period Duration, click the Create button.
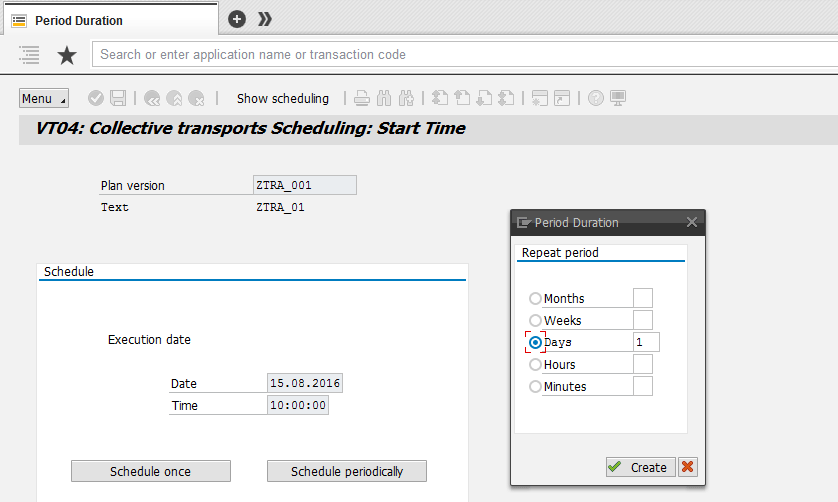
Figure 24
Period duration
With these indications your variant will run every day automatically with the values that you entered in the previous sections. For example, the personnel transport area should only list the transport documents created (transaction code: VT11 Shipment List) and proceed to load vehicles, with outbound deliveries that make up the shipment document created.
Diony J. Ruiz R.
Diony J. Ruiz R. is an SAP architect and senior consultant at Group Intellego. He has 12 years’ experience in SAP Sales and Distribution and SCE (Supply Chain Execution), Logistic Execution (LE), transportation, and warehouse management picking. He has additional knowledge in SAP MM (Materials Management).
He has worked in industries such as manufacturing, pharmaceuticals, logistics, third-party logistics distribution, services, public government, chemical, maritime and customs, metallurgy, automotive, and mining industries.
His roles have included SAP Consultant Specialist, Project Leader, and Area Leader.
He is an SAP Certified Professional.
You may contact the author at dionyruiz@gmail.com.
If you have comments about this article or publication, or would like to submit an article idea, please contact the editor.