Learn how to configure the SuccessFactors Compensation module to use it for a quarterly, monthly, or weekly progression process for hourly employees. Learn how to configure the standard SuccessFactors Compensation application (i.e., for the merit-pay process) to use it for the progression process of hourly employees. Gain instruction for designing compensation worksheets with formulas and drop-down options to help managers carry out progression-related changes.
Key Concept
The progression plan process (also known as job-step progression) for hourly employees is different from the annual merit plan process for salaried employees. The annual merit process typically happens once a year, whereas the progression plan process happens throughout the year, based on a company’s specific requirements.
The SuccessFactors Compensation module is designed for an annual merit process that includes merit pay, bonus, and stock awards, and currently does not have a module that addresses the needs of hourly employees. Unlike salaried employees who receive merit increases once a year, hourly employees’ performances are sometimes evaluated monthly, bi-weekly, or quarterly, and they are moved from one hourly rate to another in the pay scale structure. In this article I show how, with custom configuration, you can achieve this functionality.
Most manufacturing companies with an hourly workforce use a deliberate progression process to increase or decrease the hourly wages of these employees. This process, commonly referred to as job-step progression, is where hourly employees move from one step to another with a commensurate change in hourly wage. This progression process can be monthly, semi-monthly, weekly, bi-weekly, or quarterly depending on the payroll cycle for these employees. This means that a new worksheet needs to be launched monthly (or semi-monthly), weekly (or bi-weekly), or quarterly to evaluate and change the hourly employees’ pay rate.
The progression process can also differ based on the location or division within the same organization. It is a consistent process in organizations with hourly workforces, with which the compensation team designs different processes and compensation plans for hourly progression.
This article discusses different options to configure hourly progression in the SuccessFactors Compensation module, which can vary based on an organization’s process. The Pay for Performance tool is critical for helping companies achieve great financial results and reward the right candidates.
Note
This article focuses on the SuccessFactors Compensation module configuration based on Release 1408 with the new v12 worksheet.
The SuccessFactors Compensation module is concentrated around how companies allocate salary, bonus, stocks, and one-time, lump-sum disbursements. However, my focus is on the hourly progression cycle and how a company can build its progression processes into the SuccessFactors Compensation module plan template. In this article I give step-by-step instructions for how to effectively create an hourly progression compensation plan.
Note
The configuration and processes described in this article are relevant
to the version 12 user interface (UI) and assumes that you have already
enabled all the required Compensation settings in PROVISIONING. I do not
discuss any of the basic PROVISIONING-relevant settings or
configurations in this article.
Any certified SuccessFactors user who has completed the SuccessFactors
Compensation Academy training can understand and take advantage of these
methods and implement these changes.
Designing a SuccessFactors Compensation Plan Template
A compensation plan template, often referred to simply as a compensation plan, is an XML file that contains all the guidelines, eligibility rules, and configuration applied to a compensation process. The compensation plan template is the basis for compensation worksheets. Usually the best practice or standard compensation plan template is organized into three sections (or tabs):
- Salary
- Bonus
- Stock
Note
In this article I use the acronym HRIS, which stands for Human Resource
Information System, used to store employee master data (e.g., SAP ERP
HCM, PeopleSoft, SuccessFactors, and ADP).
Configure the Compensation Plan Templates
The hourly progression process does not need to include the bonus or stock tabs. You can comment out these two sections in the XML template or delete the XML lines altogether. Figures 1 and 2 show the lines of codes that need to be removed or commented out to hide the bonus and stock tabs.

Figure 1
Comment out (delete) these lines of XML code to hide the Bonus tab
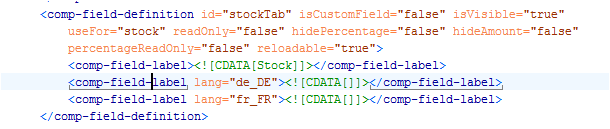
Figure 2
Comment out (delete) these lines of XML code to hide the Stock tab
You also may want to comment out or remove the boxed lines of code in Figure 3 to remove the bonus and stock information from the summary section of the compensation statement.
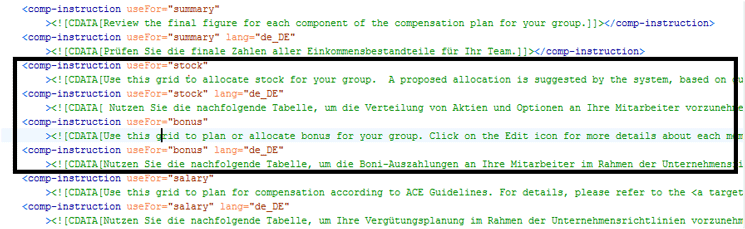
Figure 3
Comment out (delete) these boxed lines of XML code to hide the bonus and stock summaries
In general, it is advised as an HR process best practice that you create only one compensation plan per process (e.g., one compensation plan for the hourly progression, one plan for merit, and one plan for annual incentive bonus) and address delta differences via eligibility rules and guidelines. However, many companies follow different processes for their hourly employees and one compensation plan may not accommodate all of them. It is essential to sit down with your team at the beginning of the project to find out about the different processes across location, domain, or business functions. Once these options have been scoped out and taken into consideration, you will have a better idea of how many compensation plans need to be created to meet the company’s requirements.
Design Compensation Worksheets
Let’s discuss the design of the compensation worksheet. Hourly progression cycles vary from organization to organization. Also, in the same organization there could be different progression cycles based on location or business function. There are a few basic differences in an hourly progression cycle worksheet as compared to a merit process worksheet. For example, some key components of compensation, such as compa-ratio and budget allocation, are extremely important for a standard merit process but not required in an hourly progression worksheet. Table 1 lists some basic differences between a merit worksheet and a progression worksheet.
Field options
|
Merit worksheet
|
Hourly progression worksheet
|
Current and new annual salary
|
Yes. Current annual salary and new annual salary are two important required fields in the merit process.
|
Yes. The current hourly rate and new hourly rate are required fields for hourly employees.
No. The new annual salary field is often not used for this type of employee.
|
Compa-ratio and range penetration
|
Yes. Compa-ratio and range penetration are two important required fields in the merit process.
|
No. The compa-ratio and range penetration fields are not required for hourly progression plans.
|
Link with performance forms
|
Yes. Merit worksheets are normally linked to annual Performance forms to gather performance ratings/review information.
|
No. Hourly progression worksheets are rarely linked to performance forms. Usually, custom fields are created to store progression-relevant eligibility requirements or ratings.
|
Budgets
|
Yes. Budgets are an integral part of the merit process.
|
No. Budgets are not relevant for hourly employees.
|
Proration
|
Yes. For merit pay, proration is relevant so this field should be included.
|
No. Proration is not relevant for hourly employees.
|
Merit determination
|
Yes. The salary increase amount is calculated according to the merit pay guidelines.
|
No. If eligible, hourly employees move to the next applicable hourly rate. Eligibility is calculated via a custom ratings field.
|
| Guidelines |
Yes. The guidelines for the salary increase amount are configured to calculate the merit increase amount. |
Yes. A combination of lookup tables and XML formulas is used to select the new hourly rate. |
Table 1
Differences between the hourly progression and merit-pay processes
Identify Standard Fields and Create Custom Fields
When using SuccessFactors, you need to work with your project team to decide the fields that you need to display in the hourly progression compensation worksheet. A merit compensation worksheet can have multiple tabs (e.g., Employee Information, Current Salary, Merit, Promotion and Lump Sum). However, an hourly progression compensation worksheet only has two main tabs:
- Employee Information
- Progression Information
Figures 4 and 5 show examples of standard merit worksheets, and Figure 6 shows an example of an hourly progression worksheet.
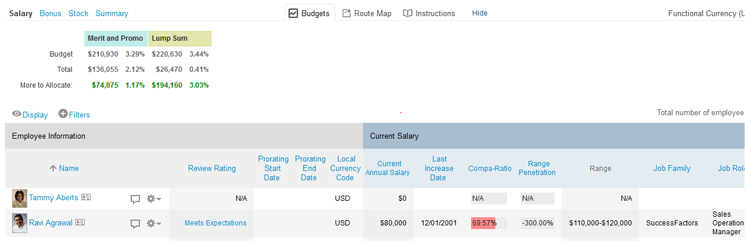
Figure 4
Example of a merit worksheet with multiple tabs displayed
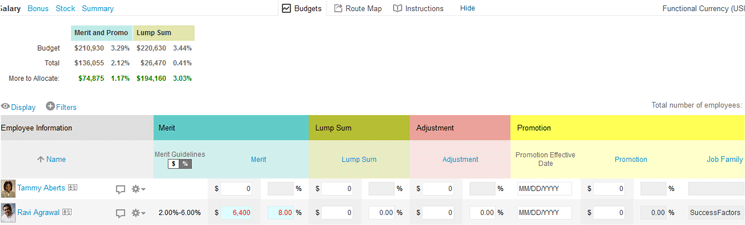
Figure 5
Example of a merit worksheet (continued)

Figure 6
An example of an hourly progression worksheet
In Figure 6, apart from the Employee Information for hourly employees, you need to display the Progression tab (e.g., weekly, bi-weekly, quarterly, or monthly) and the Final Hourly Rate. Table 2 lists some examples of fields (with attributes) that make up a Progression tab in a worksheet.
| Examples of fields |
Attribute |
| Pay Scale Area |
Read-only field; populated from the HRIS via a user data file (UDF). |
| Pay Scale Group |
Read-only field; populated from the HRIS via a UDF. |
| Pay Scale Level |
Read-only field; populated from the HRIS via a UDF. |
| Job Code |
Read-only field; populated from the HRIS via a UDF. |
| Job Family Code |
Read-only field; populated from the HRIS via a UDF. |
| AAP/FLSA code |
Read-only field; populated from the HRIS via a UDF. |
| Workers Compensation Code |
Read-only field; populated from the HRIS via a UDF. |
| Current Hourly Rate (with currency) |
Read-only field; populated from the HRIS via a UDF. |
| New Pay Scale Group and New Pay Level |
Editable fields; select from a drop-down menu. |
Table 2
Examples of fields included in an hourly progression compensation worksheet
Note
The fields in Employee Information tabs are always read-only and the
project team can decide what information it wants to display here. These
fields are populated from the HRIS application via a UDF.
Create a Lookup Table and Attach It to the Worksheet Fields Using Formulas
It is very important to display the current pay scale structure for hourly employees in the compensation worksheet. A regular pay scale structure consists of pay scale area, pay scale group, pay scale type, and pay scale level. The hourly amounts are tied to different pay scale levels (also known as steps). Supervisors can select the new pay scale group or level and employees should be moved to a new group or level based on the employee’s evaluation.
In this example I show how to:
- Store the pay scale structure in the New Level field with a lookup table named PayStructure.
- Create another lookup table (named PayScaleHourly) to store the calculations for step progression.
- Create a hidden field named newLevel and reference the lookup table from this field.
- Write a formula to make sure that, when a new pay scale level is selected for an employee from the New Level field, an amount automatically defaults (based on the lookup table) in the New Level Amount field in the compensation worksheet.
Note
A lookup table is a custom table where HRIS data can be stored and then
shown as drop-down values in the compensation worksheet for specific
fields. Lookup tables are created in Admin Tools under Actions for all
plan > Lookup Tables; however, in this article I do not discuss the
specific steps for creating a lookup table.
Step 1. Store the Pay Scale Structure in the New Level Field
Pay scale structures are stored in SuccessFactors via lookup tables. A lookup table can be referenced in the Design Worksheet tab for the field where these values need to be shown as drop-down options.
The first step is to create a lookup table named PayStructure (not covered in this article) and to store all the new play level names in this table. To store the pay level names in the table, go to Admin Tools > Compensation >Action for all Plans >All Plans > Lookup Table (Figure 7).
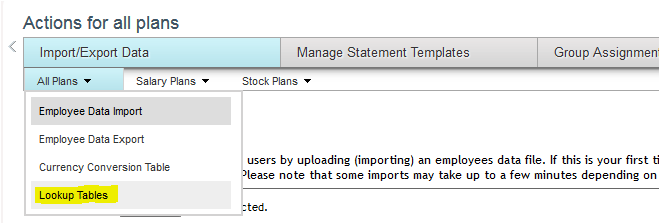
Figure 7
Create a lookup table in Admin Tools
In this example, a Lookup table named PayStructure has been created with an hourly pay scale structure. This is referenced for the New Level field in the compensation worksheet (i.e., when this option is chosen from the New Level field drop-down options in the design worksheet the Pay scale structure loaded in the PayScaleHourly lookup table appears).

Figure 8
The lookup table for PayStructure in Admin Tools
Reference a Lookup Table for a Specific Field in the Compensation Worksheet
Now let’s go to the design worksheet for a specific compensation plan in Admin Tools to reference a lookup table in the compensation worksheet. In Admin Tools, go to Compensation Home > select the plan name on the left side (Figure 9) > Plan Setup > Design Worksheet (Figure 10).

Figure 9
Select the compensation plan
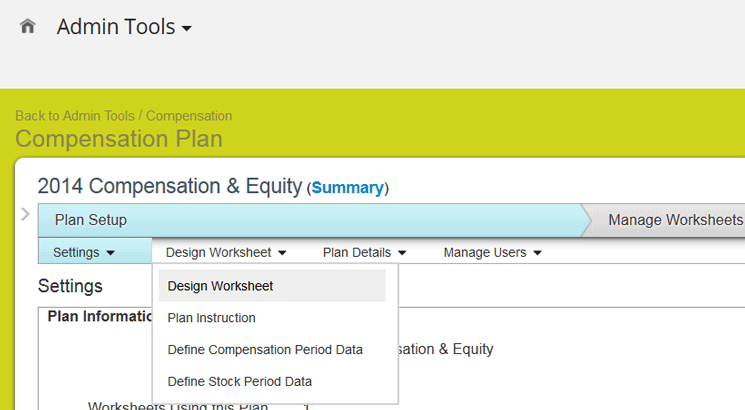
Figure 10
The Design Worksheet for a new compensation plan
Open the Design Worksheet tab and select Design Worksheet (Figure 10) and you see configuration options for all worksheet form fields (Figure 11). Select the field from where you want to reference the lookup table. In this example I selected the New Level field, and also the Read-only Yes radio button and the String Column type. In the Formula box you can see that the lookup table (PayStructure) is referenced.

Figure 11
The PayStructure lookup table is referenced by the field New Level
When the compensation plan is launched (Figure 12) and the drop-down values are selected for the field New Level, the values stored in the lookup table show up in the plan worksheet (Figure 13).

Figure 12
The Quarterly Progression section of the compensation plan worksheet

Figure 13
Choose the new pay level
Figure 13 shows the Quarterly Progression section of the compensation plan worksheet with the drop-down value selected from the field New Level. This drop-down is displayed from the lookup table created in Figure 7.
Step 2. Create a New Lookup Table Named PayScaleHourly
Next I create another Lookup table, named PayScaleHourly by following the steps described above for creating a new Lookup table. In this lookup table to store the new step or level name, the start hourly value, the maximum hourly value, and the increase value. Some examples are shown in Table 3.
Step (level)
|
Start amount
|
Maximum amount
|
Increase amount
|
0 (Manufacturing Specialist)
|
11.15
|
13.25
|
0
|
2 (Manufacturing Specialist I)
|
11.15
|
13.25
|
0.36
|
4 (Manufacturing Specialist I)
|
11.15
|
13.25
|
0.71
|
6 (Manufacturing Specialist I)
|
11.15
|
13.25
|
1.06
|
8 (Manufacturing Specialist I)
|
11.15
|
13.25
|
1.42
|
Table 3
Sample lookup table for calculating the new PayScale level
Step 3. Reference the Lookup Table PayScaleHourly From a Hidden Field
Next, let’s go to the design worksheet for the compensation plan in AdminTools (Figure 14). Again, the Column Name field on the right is auto-populated. Select the Read-only Yes radio button and the String column type. In this example this lookup table is referenced from a custom hidden field named newLevel.

Figure 14
The lookup table is referenced from the custom hidden field newLevel
Note
A hidden field is a custom field used in the worksheet for calculations,
but it is not visible to end users in the compensation worksheet when
the plan is launched.
Step 4. Reference a Lookup Table for a Specific Field in the Compensation Worksheet
In this example, this lookup table value is compared with the New Level field (Figure 12), and the New Level Amount defaults in the New Level Amount field as shown in Figure 14.

Figure 15
View of the new compensation worksheet with the custom fields
In Figure 15 you see the compensation worksheet with New Level selected and with the default amount in the New Level Amount field from the lookup table PayScaleHourly.
Tip!
I recommend that you create lookup tables for storing hourly pay
scale structures. Do not use either the standard Salary Ranges or the
Job Code & Pay Grade Mapping options available under the Salary
Plans tab (Figure 16) as these two options are only used for merit plans and for salaried employees.

Figure 16
Standard Salary Plans available options
Define Eligibility Rules
Eligibility rules are defined in Admin Tools. Eligibility rules are important and need to be defined correctly to make sure a supervisor or manager can only see hourly employees listed in the hourly progression worksheet. A supervisor or manager could have direct reports made up of a mixture of salaried and hourly employees. An eligibility rule should be created to filter only hourly employees to ensure that only this type of employee is displayed in the worksheet. You can filter hourly employees based on fields used to define the employee grouping. This requirement of defining a filter may differ from organization to organization and also from one HRIS application to another.
Here are few examples of fields that are typically used to define employee grouping:
- Job Code
- Employee Group
- Employee Sub Group
- Employee Type
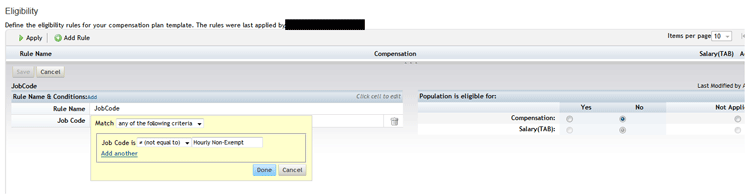
Figure 17
An example of an eligibility rule to filter hourly employees via the Job Code field
Note
The fields used for eligibility rules must exist in the UDF file. In this example (Figure 17) hourly employees are filtered via the Job Code field.
Best Practices for Creating a Route Map for the Job-Progression Process
For hourly progression compensation worksheets, there are usually two levels of operators involved in the route map: compensation administrators and supervisors. In some instances, based on company processes, second-level managers may be involved as the final approvers. The operators listed in Table 4 are usually involved in a typical hourly progression route map.
| Operators |
Description of route-map activity
|
| Compensation administrators |
Launch forms |
| Supervisors |
Make changes and assign new hourly rates |
| Second-level managers |
Review and approve the change (optional) |
| Compensation administrators |
Give final approval and complete the worksheet; the HR representative receives a notification email only. |
Table 4
Progression of approval steps
Note
The actual process for how to define a route map is out of the scope of this article.
Tips and Tricks for Designing Custom Fields
In an hourly-progression or job-step progression worksheet there is a need to create many custom fields since the standard compensation process in SuccessFactors is designed to cater only to the merit process. Here are some helpful tips for creating custom fields to meet your company’s requirements.
Design a Custom Field to Store Eligibility Rules for Progression or Ratings
Hourly progression employees are not usually evaluated based on merit ratings. Every organization has its own process for evaluating hourly employees’ eligibility for progression. Unlike in the merit-pay process, a performance form template is generally not linked to an hourly progression worksheet (although this may be the case if the organization’s process requires it to do so). Additional custom fields can be created to store eligibility ratings and they can be populated via the UDF.
Design a Custom Help Text Field
Custom help or warning text fields can be configured to help the supervisor take appropriate action in evaluating an employee’s progression. In this example, the organization’s compensation policy doesn’t allow the increasing of an employee’s rate by more two steps during one progression cycle (Figure 18). To achieve this requirement, a Warning Message field is configured to warn supervisors who try to increase an employee’s salary level by more than two pay levels. If an employee is currently in Pay Scale Level 2, for example, and the supervisor wants to move this employee to Level 8, a warning message is displayed to deter the supervisor from taking this action.
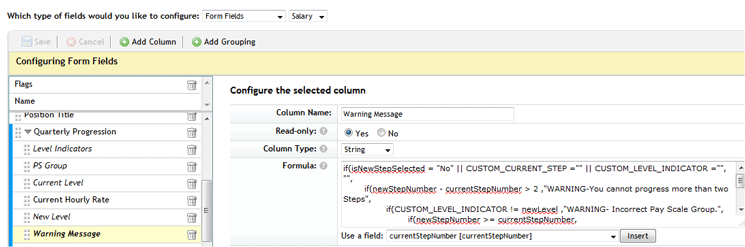
Figure 18
A custom field Warning Message is created to warn supervisors if they try to increase the hourly rate for any employee by more than two steps
In this example (Figure 19) the employee is in PS Group 8 with a Current Level of 0.
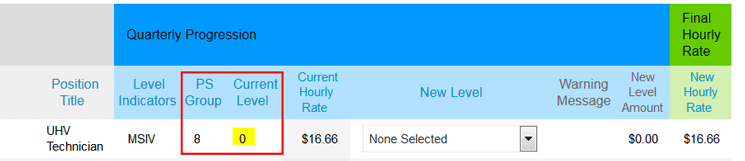
Figure 19
The current compensation worksheet view before the change
In Figure 20 if the supervisor tries to add more than two levels from the New Level field drop-down values, the system gives a warning message for any level selected above Level 12.

Figure 20
Select the drop-down value from the New Level field
In Figure 20, PS Group 08, Level 24 is selected and a warning message is displayed (Figure 21).

Figure 21
A warning message is displayed when Level 24 was selected
Similar warning messages or help text fields can be configured to help supervisors create a better evaluation process and to reduce the likelihood of errors when evaluating employees.

Rinky Karthik
Rinky Karthik serves as a Project Manager, HCM SuccessFactors, for the People LoB for itelligence and has 16 years of SAP HCM and SuccessFactors experience. This includes many global implementations, including support and upgrade of various SAP on-premise modules and SuccessFactors modules in diverse roles, like Solution Architect, Lead Consultant, and Project/Program Manager. Rinky has an MBA in Human Resources and she comes with a strong project management background; as such, she has managed a variety of global projects for clients in different domains. She has extensive experience with SAP SuccessFactors’ SAP Launch and SAP Activate implementation methodologies, and is a Certified SuccessFactors consultant in Recruitment Management, Recruiting Marketing, Learning Management Solution, and Employee Central. Rinky is a frequent contributor to SAP SuccessFactors blog forums, HR Expert, and a regular speaker at a variety of SAP/SuccessFactors conferences.
You may contact the author at rinky.karthik@itelligencegroup.com.
If you have comments about this article or publication, or would like to submit an article idea, please contact the editor.


