Learn how to use status management functionality to support business process requirements that are not supported by SAP ERP Central Component (SAP ECC). This approach can save time and money during the implementation, support, and upgrade phases of a project.
Key Concept
Status management controls the business transactions that can be performed (with or without warning) or prohibited for an object (such as production order, inspection lot, or quality notification) with a particular status (or combination of statuses). The status of an object can be set by the system, based on some business transaction triggered by a user or set manually by a user.
During the requirement-gathering phase of a project, businesses share a number of processes that at first glance appear unsupported by standard SAP ERP Central Component (SAP ECC). Many functional experts start exploring user exits, Business Add-Ins (BAdIs), or customization to support these processes without any further attempt to meet these requirements using standard SAP functionality. Customizations and implementation of user exits not only involve time and budget during the implementation phase of a project but also are costly to maintain during the support and upgrade phases of a project.
I discuss business process requirements that are not supported by SAP ECC, but that can be supported through status management. This approach avoids the development of custom objects, resulting in faster realization and lower maintenance/support and upgrade costs.
Object Status
The status of an object indicates the business processes that are completed and controls which activities are allowed (with or without warning) and which are prohibited.
An SAP system includes two status types: system status and user status. System status is set by the system when a particular business transaction is completed. Changing the system status configurations is not recommended as per SAP best practice. Any change in system status affects all the object types where the status is being used. For instance, if you change the behavior of system status CRTD for a business requirement related to a production order, it also affects the maintenance order and other objects in which this status is used by the SAP system. User status can be configured to be set for an object manually or configured to be set upon completion of a particular business transaction.
To navigate to the display production order screen, execute transaction code CO03 or follow menu path Logistics > Production > Shop Floor Control > Order > Display (Figure 1). This screen shows the status of order 100004393. The status codes reveal several details about the order, including REL (released), MPST (material shortage), DLV (delivered), PRC (pre-costed), BASC (batch assignment complete), BCRQ (the order is to be handled in batches), GMPS (goods movement posted), and MANC (material availability not checked). The asterisk after MANC indicates there are more statuses than can be displayed in the status field. Click the status detail icon to check these.

Figure 1
The production order screen showing the status of order 100004393
In the Business processes tab of the next screen you can view the business processes that are permitted for a second object (Figure 2).

Figure 2
Business process allowed overview
Business Process
I now present a couple of business process requirements and explain how they can be supported with status management and without any customization or code. Consider a scenario in which a company needs to implement the following business processes:
- Once a production order is released (status: REL), it cannot be changed or marked for deletion.
- Once an order is marked as technically complete (status: TECO), no additional goods receipt (GR) is allowed against the order, but goods issue (GI) is allowed to match the physical component stock left on the production line with GI done during production.
A standard SAP system allows changes in an order even after it is released and also allows GI and GR against an order with a status of TECO. However, instead of writing custom code inside user exit PPCO0002 (the exit for setting a delete mark or deletion indicator), PPCO0008 (enhancement in the adding and changing of components), PPCO0009 (enhancement in goods movements for orders), or BAdI WORKORDER_CONFIRM and WORKORDER_UPDATE, you can implement the necessary controls and restrictions in status management by following the steps I now describe.
Use transaction code BS02 or follow menu path SPRO > Production > Shop Floor Control > Master data > Order> Define Status profile. In the screen that appears (Figure 3) click the new entries icon to create a new status profile.

Figure 3
Make a new entry in the Status Profile Overview
In the next screen enter ZPP (the status profile key) in the Status Profile field or any key starting with Z or Y. (SAP recommends names or code starting with Z and Y for any custom objects.) Enter a description in the Text field and click the Continue button (Figure 4).

Figure 4
New Status Profile code, description, and maintenance language
In the next screen enter the status profile ZPP and click the details icon (Figure 5).

Figure 5
Status profile overview
In the next screen click the Object Types button (Figure 6).

Figure 6
Assign an object type to a status profile
In the next screen (Figure 7) select PP/PM: operation and PP/PM: order header. This indicates that you can use this status profile for the production planning (PP) and plant maintenance (PM) order at header and operation level. Click the Save button.

Figure 7
Object types assigned to the status profile
In the next screen (Figure 8) select the status profile ZPP and click the Details button.

Figure 8
Navigation to status profile detail
The next screen shows the initial status details (Figure 9). Maintain the user status ZCRT (or whatever name you want that starts with Z or Y) and the other information shown in this screen. Click the box in the Init. st … (initial status) column to mark this status as initial, meaning it is activated by default when the production order is created.

Figure 9
The initial status details
Enter one more status as ZREL. This status is activated when the production order is released (Figure 10). This status prohibits any changes and does not allow you to set the deletion flag after an order is released.

Figure 10
Subsequent status ZREL details
Position the cursor on the status ZREL and then from the menu bar select Goto > Transaction Control (Figure 11).

Figure 11
Navigation to transaction control
In the next screen (not shown), click the new entries icon. In the next screen that appears maintain the selections as shown in Figure 12. This action sets the user status ZREL as active when the order is released and, as long as status ZREL is active, changes to the order and marking the order for deletion are not permitted.

Figure 12
The transaction control detail screen for status ZREL
In the same way that the user status and transaction control are maintained for status ZREL (Figures 10 through 12), maintain one more user status and corresponding transaction control for status ZTEC. Again, select Goto from the menu bar and then Transaction Control. Enter ZPP in the Status Profile field and ZTEC in the Status field. Leave the radio buttons selected as shown in Figure 13.

Figure 13
Transaction control detail screen for status ZTEC
With this configuration, user status ZTEC is set when an order is marked as technically complete (TECO). Once this status is set, the goods issue is prohibited. Next, assign the status profile to an appropriate order type. Execute transaction code OPJH or follow menu path SPRO > Production > Shop Floor Control > Master data > Order> Define Order Types (Figure 14). Enter 10 (the order category code for PP production order) in the Order category field. In this example you enter 10 because the current business is related to a production order. Enter PP01 in the Order Type field. In the status management section enter ZPP in the Status Profile Header field and ZPP in the Oprtn (operations) status profile.
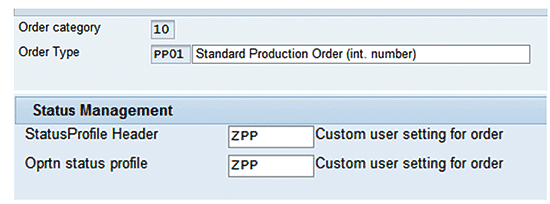
Figure 14
Assign the custom status profile to an order type
This completes the configuration required to support the business process. To check whether all the stated business requirements are met, create a production order and test it.
Execute transaction code CO01to create a production order. In the screen that appears enter the information as shown in Figure 15 and click the save icon (not shown). In transaction codes CO02 (to change details of a production order) and CO03 (to display a production orer), you can see that the user status ZCRT is active (Figure 15) as soon as an order is created. (Transaction codes CO02 and CO03 open the same screen as the one shown in Figure 15).

Figure 15
15 Production order status with User Status active
Note
The SAP system shows a user status that is active as shown in Figure 15. The inactive statuses are not shown.
As soon as you release the order (use transaction code CO03 to set the system status as REL), the user status is automatically changed to ZREL (Figure 16) as per the configuration. You can display the detail system and user status by clicking the detail status icon in the production order status header screen. Note that the button selected beside ZREL indicates that this user status is active.
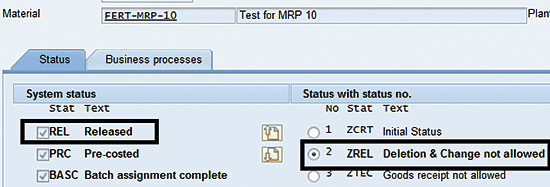
Figure 16
Production order system and user status overview
After you save the order, the system does not allow any changes to the order details through change order transaction code CO02 (Figure 17). This satisfies the business process requirement of not allowing any changes to released orders.
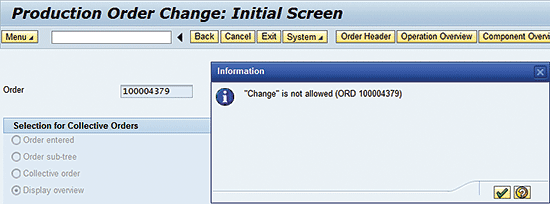
Figure 17
Change production order (not allowed for released orders)
Further, if you try to set the deletion flag to the order, the system doesn’t allow it because the user status ZREL is active (Figure 18). This satisfies the business process requirement of not allowing the deletion flag for orders with an active released status.

Figure 18
Order deletion flag log
As production progresses, few GRs are done against the order. You can view the GR done against the order by executing transaction code CO03. In the screen that appears enter your order number in the Order field (Figure 19). Click the status detail icon.

Figure 19
Production order header
When the order is set to TECO, the user status automatically progresses to ZTEC (Figure 20), as per the configuration (Figure 13).
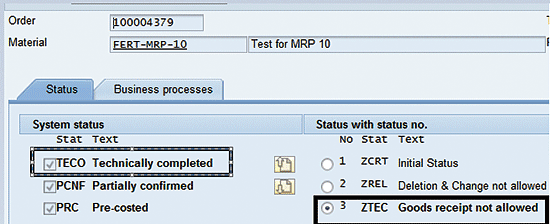
Figure 20
Order system and user status overview
Now if you try to perform a goods receipt against an order (transaction code MB31 – goods receipt for order) with TECO status, the system does not allow it because the goods receipt is restricted when the user status ZTEC is active. The system sends an error message (Figure 21). This satisfies the business process requirement of not allowing the goods receipt against a technically complete order.
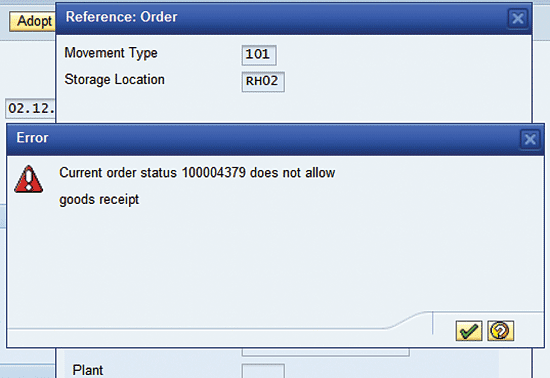
Figure 21
Goods receipt for order (not allowed for an order with TECO status)
However, you can still perform a goods issue against an order with TECO status, as per the business requirement. To complete this step, execute transaction code MIGO or follow menu path Logistics > Inventory Management > Goods Movement > MIGO). Execute movement type 261 (Goods Issue for Order) and key in the quantity of the component to be issued against the order (in this case 10 EA is entered against the production order 100004370) as shown in Figure 22.

Figure 22
Goods issue against a production order
Note
If the business transaction restrictions related to order statuses vary among different plants for an order type, then you must define different order types for each plant because the status profile is assigned at the order type level. If the system statuses are revoked, then the relevant user statuses must be activated or deactivated manually.
Usage Decisions
Consider a business process that requires that the quality department be restricted from performing any stock posting linked to an inspection lot unless a usage decision (UD) has been taken for the lot. In a standard SAP system, stock posting is allowed even if a UD is not taken for the lot through transaction QA11. However, you can ensure a UD precedes stock posting through status management configurations in the following manner.
To complete this step execute transaction code BS02. In the screen that appears (Figure 23) enter ZQQ in the Status Profile field and select the object types shown in this screen. Press Enter. The navigation and process to maintain a new status profile and object type selection is explained earlier in the “Business Process” section (Figures 3 through 6).

Figure 23
Assign an object type to a status profile
Maintain two user statuses: ZCRT, which is an initial status, and a status ZPNA, which is inventory posting not allowed (Figure 24). I explain how you access this screen in the “Business Process” section (Figure 8 and 9).

Figure 24
User Status details
Select the status ZPNA and click Goto > Transaction control (Figure 11). Click the new entries icon (not shown) and maintain the selections as shown in Figure 25. These settings indicate that user status ZPNA will be set (made active) when the inspection lot is released (status REL) and inventory posting is prohibited before a UD is taken for the inspection lot.

Figure 25
The transaction control detail screen for status ZPNA
To assign the status profile ZQQ to the appropriate inspection type use transaction code SPRO and follow menu path > Quality Management > Quality Inspection > Inspection Lot Creation > Maintain Inspection types. Click the execute icon beside Maintain Inspection types (this screen is not shown in this article).
In the next screen (Figure 26) select the appropriate inspection type and click the details icon (the magnifying glass). In my example inspection type 04 is selected.

Figure 26
Maintain inspection type configuration overview
In the next screen (Figure 27) assign the status profile ZQQ to the inspection type.
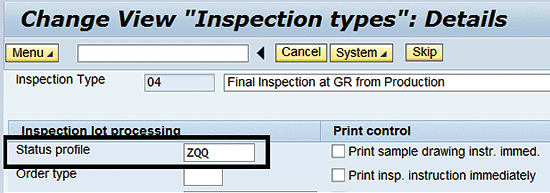
Figure 27
Inspection type configuration
This completes the configuration required to support the business process requirement of not allowing stock postings linked to an inspection lot unless a UD has been taken for the lot. To check that the configuration works, attempt a stock posting to an inspection lot with no UD.
Create a new production order (transaction code CO01) and release it. As soon as the order is released, the inspection lot is created and released (as the Control insLot field is maintained as early lot creation for the order item in the material master). As soon as the inspection lot is released, the user status is set to ZPNA (Figure 28), as per the configuration. You can view the status detail of an inspection lot using transaction code QA03 and clicking the status detail icon.

Figure 28
Inspection lot – system and user status overview
Perform the result recording (i.e., record the characteristics against the inspection lot after quality inspection). To complete this step execute transaction code QE51N or follow the menu path SAP Menu > Logistics > Quality Management > Quality Inspection > Inspection Result > Result Recording (QE51N). In the screen that appears (Figure 29) enter the inspection lot for the result that is to be recorded. Click the execute button or press F8.

Figure 29
The selection screen for inspection lot result recording
In the next screen (Figure 30) record the results mention number of inspected sample units in the fields inspected for the characteristics. In my example I have entered 10 samples inspected for the characteristics Test Quality. Key in the results in the Result column and click the valuate icon. To save the result recording press the save icon (not shown) or Ctrl+S.

Figure 30
Inspection lot results recording
If you try to perform any stock posting through a record UD (transaction code QA11) before a UD is taken for the lot, the system does not allow it (Figure 31). This satisfies the business process requirement.

Figure 31
Inspection lot stock posting with no usage decision
After a UD is taken for the lot (transaction code QA11), the system allows stock posting. You can view the status detail of an inspection lot using transaction code QA03 and clicking the status detail icon (Figure 32).
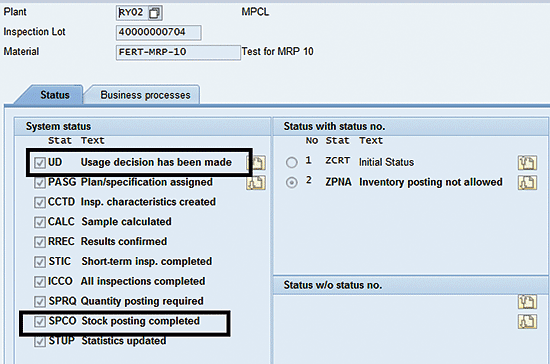
Figure 32
Inspection lot system and user status overview after UD and stock posting
Kaushik Choudhury
Kaushik Choudhury is a senior consultant in the supply chain management field with more than a decade of experience in supply chain consulting in principal positions for leading brands across the globe. His focus is on business transformation, business reengineering, proof of concept and solution design, and end-to-end implementation. He has a proven track record of delivering in alignment with business expectations and possesses a unique combination of profound business process understanding, consulting skills, hands-on SAP system experience, and effective management capabilities. Kaushik has operated seamlessly in highly agile and iterative environments in which solutions are implemented incrementally with ongoing design changes. He has extensive experience in Agile and Waterfall delivery methodologies in large SAP supply chain implementation programs.
You may contact the author at Kaushik.choudhury@outlook.com.
If you have comments about this article or publication, or would like to submit an article idea, please contact the editor.


