Learn some tips on how to optimize the implementation and testing of the BA12 electronic bank statement file format for financial reporting.
Key Concept
The BA12 electronic bank statement file format is used to transfer financial data to perform electronic cash management balance reporting. Balance reporting transmissions include data describing hundreds of different types of account activities.
Even the most experienced experts struggle when implementing the BAI2 electronic bank statement file format because creating a file from scratch or editing an existing file can be cumbersome and prone to errors. I describe some simple tools that make this process more effective and error free. This process is used in the SAP Banking (FI-BL) submodule in SAP ERP Financials. SAP offers two standard programs, both of which enable you to simulate the actual transmission process within an SAP system and validate the file format. These programs not only ensure that the testing is done correctly but also eliminate the risks of wasting time and money.
I explain how to create sample test files out of SAP transactional records using program RFEBKAT5 and how to save time by deleting the buffer with program RFEBKA96. Deleting the buffer allows you to bypass a system check and lets you reuse the test files.
Generate Test Data for a BAI2 Bank Statement and Create Open Items
Program RFEBKAT5 provides data to test bank statement customization and generates open items on either the bank clearing accounts or the designated customer receivable accounts. Start this process by executing program RFEBKAT5 via transaction code SA38 (Figure 1).
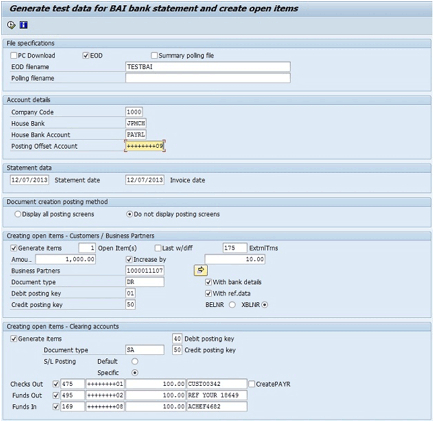
Figure 1
The initial screen after program RFEBKAT5 is executed
In the File specifications section, select the EOD check box and fill in the test file name (e.g., TESTBAI) in the EOD filename field.
In the Account details section, enter the Company Code (1000), bank account (House Bank, JPMCH), and the general ledger (G/L) account (House Bank Account, PAYRL) in which all created open items offsetting entries are made.
In the Statement data section, enter the date for the created statement (12/07/2013 Statement date) and the documents generated (12/07/2013 Invoice date).
In the Document creation posting method section, if you select the Display all posting screens radio button you are able to step through the screens during the creation of each document. You select the Do not display posting screens radio button if this is not needed or no document generation error occurs.
In the Creating open items Customers / Business Partners section, you can generate open items on customer accounts for a specific external bank transaction. To execute this activity you need to complete the following fields:
- Generate items: Select this check box to enable open item generation
- Open Items: Enter the number of open items to be created
- ExtrnlTrns: Enter the external transaction number that you want to test. For example, BAI2 code 175 (check deposit) refers to the bank’s BAI2 code listing.
- Amount: Enter the test amount to be posted
- Increase by: Select this radio button and specify the amount if creating more than one open item and if you want to have different amount for each open item
- Business Partners: Enter the customer number
- Document Type: Enter the customer document type
- Debit and Credit posting keys: Enter the appropriate posting key
- With bank details: Select this check box to include bank details
- With ref.data: Select this check box to include reference data
- BELNR: Select this radio button if you decide to use document number as the clearing algorithm
- XBLNR: Select this radio button (In my example the reference document number is used as the clearing algorithm when importing the electronic bank statement)
In the Creating open items - Clearing accounts section, various common clearing account activities can be posted with these selections. To create open items in clearing accounts the BAI2 external transaction code of each clearing account item is required. Also, for creating the open items on the clearing accounts, the document type, posting keys, amounts, and clearing account is required.
Now execute the program by clicking the execute icon to generate test data. After you execute the program, a log is created to display created file details, which includes the document numbers and the postings.
After you create the file, you can process it via transaction code FF_5 (Import Electronic Bank Statement). In the File specifications section of the screen that appears (Figure 2), select the Import data check box, choose BAI Format as the Elect. bank statement format, and enter the same file name that you used to create the test file. In my example the Statement File name is TESTBAI.

Figure 2
Import electronic bank statement
In the Posting parameters section, select the Post Immediately radio button and the Assign value date check box. Select a batch input session name (by default select 1 [the name derived from the house bank and account ID]).
In the Algorithms section, enter XBLNR number interval 1999000000000000 to 2000999999999999 (this is the algorithm type you chose when generating the test file). If you decide to use BELNR as the clearing algorithm when creating the test file, enter the document number range for the document types (DR and SA) that you selected to create the open items.
In the Output Control section, select the Print bank statement, Print posting log, and Print statistics check boxes to display detailed information after importing the electronic bank statement.
Use Program RFEBKA96 to Delete Buffer
To reuse the same test file, the statement needs to be deleted from the buffer. For this step, first identify the short key for the statement by accessing table FEBKO via transaction code SE16 (Figure 3). In the selection screen that appears enter 0001 (electronic and manual bank statement) in the Application field and enter the appropriate date in the Statement Date field. Now execute the program by clicking the execute icon.
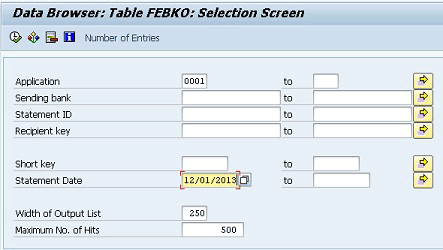
Figure 3
The selection screen for table FEBKO
After you execute the program, a result screen is displayed with the short key (Figure 4).
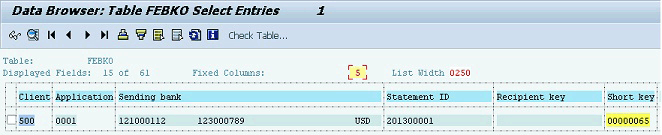
Figure 4
The FEBKO table result screen
Execute program RFEBKA96 via transaction code SA38. In the selection screen that appears enter the short key that you retrieved from the previous step along with the Application number (0001). Execute the program by clicking the execute icon (Figure 5).
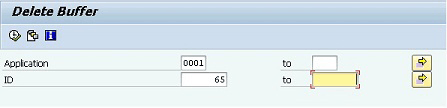
Figure 5
The program RFEBKA96 (Delete Buffer) selection screen
Select the row by clicking the check box and click the trash icon next to Delete statements to delete the statement (Figure 6).

Figure 6
The program RFEBKA96 (Delete Buffer) results screen
Seyed Omar Zeirideen
Seyed Omar Zeirideen is a finance- and logistics-oriented SAP solution architect who has a wide range of industry experience. He specializes in playing a pivotal role within projects to realize the best solution from the client’s side and an effective solution from the project side. His forte is deploying business-centric SAP finance solutions.
You may contact the author at ozeirideen@gmail.com.
If you have comments about this article or publication, or would like to submit an article idea, please contact the editor.