Learn how to configure the calibration capability in SuccessFactors, which helps to achieve objective and fair employee performance reviews.
Key Concept
Compa-ratio is short for comparative ratio. It is calculated by dividing an employee’s current salary by the current market rate. Compa-ratios are position specific. Each position has a salary range that includes a minimum, a midpoint, and a maximum, and these three values represent industry averages for the position. For example, a Compa-Ratio of 1.00 (or 100%) means that the employee is paid exactly what the industry average pays and is at the midpoint for the salary range. A compa-ratio of 0.75 means that the employee is paid 25% below the industry average and therefore is at risk of seeking employment elsewhere at a higher pay that is perceived as equitable. A compa-ratio of 1.15 means that the employee is paid above the industry average.
For talent-driven organizations, performance is the biggest factor in determining an employee’s success within the company. As a result, the performance review process has become increasingly vital as an evaluation tool. A big challenge facing these companies is how to keep these important employee performance reviews fair and balanced. SuccessFactors’ employee performance review calibration functionality makes this process objective and removes any bias.
Performance reviews have a wider impact than just measuring the performance of employees. Since promotions, increments, bonuses, and other key career decisions are based on the results of the performance-review process, it is important that consistent and equitable measures are used throughout the organization to rate all the employees fairly. A well-designed calibration process can ensure that this happens. Here are some problems that can crop up when evaluating employees when a strong performance calibration process is not in place:
- Managers not following a bell-curve process consistently when rating employees. (The bell-curve concept is commonly used by companies when rating employee performance; it enables them to track and rate employees by best—and worst—performers, and reward them accordingly.)
- The pay-for-performance strategy is ineffective because the underlying performance review process is tainted.
- Managers introduce bias into the process when evaluating the performance of their own team members, either by being too tough or too soft when awarding ratings.
- Employee performance is not compared fairly with their peers or colleagues who are doing similar work across the organization, either on the same or different teams.
- There is no way to accurately identify top performers; as a result, top performers are not rewarded appropriately.
- There is no succession plan in place for the organization.
- Opportunities for growth are not identified and shared with employees during the performance-review process.
These problems can create a situation of distrust and have a very negative effect on morale throughout an organization and demotivate employees. This potential damage can be avoided when a strong and fair employee calibration process is in place to rate employees objectively and fairly, as well as clearly communicate the expectations and goals for the employee.
Success Factors BizX suite offers a lot of this functionality in the talent management space. Calibration is one such out-of-the-box capability offered by SuccessFactors, which, when used with the Goals and Performance Management, Compensation Management, and Succession Planning modules, ensures that the kinds of problems listed above do not occur. In addition, calibration through SuccessFactors is made very simple with a minimum amount of configuration.
This article focuses on SuccessFactors’ ready-made calibration capability and its required configuration.
Prerequisites
Calibration has to be enabled through Company Settings for your own instance in the provisioning account (Figure 1).

Figure 1
Enabling SuccessFactors’ calibration capability
For performance ratings calibration, appraisal forms should have reached the stage at which ratings awarded to employees can be used for calibration. This stage can be configured as Completed or Calibration or something else depending on company policy. The appraisal functionality of SuccessFactors has to be implemented in order to do this.
Configuration
Admin tools (Figure 2) is in the backend of SuccessFactors. This is the place where administrators complete the configuration. Drawing an analogy with an on-premise SAP ERP HCM solution, admin tools is comparable to transaction SPRO. For any kind of SuccessFactors-related configuration, you need to access the admin tools option inside the given instance. Then you need to select the required module in order to start configuring (Figure 2) – for example, Performance Management, 360 Review, Compensation, or Learning.
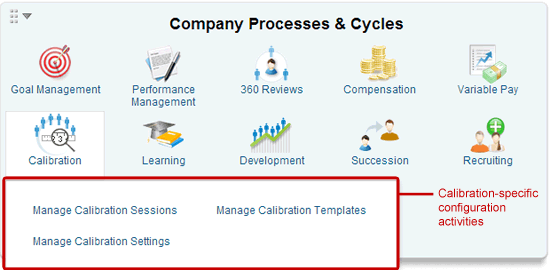
Figure 2
Configuration capabilities of the different modules
Manage Calibration Templates
You first need to create different calibration templates. SuccessFactors has the capability to allow calibration for the Performance, Compensation, and Succession Planning processes.
Click the Manage Calibration Templates option (Figure 2). This activity asks you to configure four different pieces of information for a calibration template (Figure 3):
- Basic Info
- Data
- Views
- Advanced
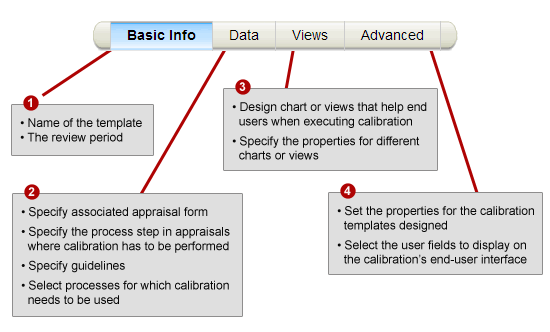
Figure 3
Configuration required for creating calibration templates
Note
Data is one of the sub-configuration activities for managing calibration templates. In this context, the word data refers to selecting the source of the data elements (performance, compensation, or talent) you want to calibrate.
Example 1: Activate the Performance Ratings Calibration Process
In step 1 in Figure 4 you choose the performance template (which acts as a source of performance ratings) for calibration by selecting the Data option. Here you must also choose the appraisal process step where the form’s performance ratings are considered for calibration. This can be done by selecting the appropriate routing, highlighted in red in Figure 4. In my example, the routing step selected is Calibration, which means that the employee performance rating from the appraisal template only can be used once it is at the calibration stage.

Figure 4
Example of configuration of template for calibrating Performance Ratings
In step 2 in Figure 4 you select a rating from the appraisal template that needs to be calibrated. In my example, the Overall Form Rating check box is selected, which means that the system pulls the ratings configured with the appraisal template selected in step 1 of Figure 4.
The calibration of performance ratings provides out-of-the-box functionality to drag and drop employee names in order to change their final performance ratings. For example:
- The performance appraisal ratings shown in step 2 of Figure 4 are populated based on the template chosen in step 1.
- The options shown in step 2 of Figure 4 are standard and cannot be changed to include company-specific options.
- You can specify the distribution guideline as an optional step when defining the source for the performance ratings. However, it makes more sense to define the guidelines in such a way that managers stay within specified limits when rating employees. This way, the final performance ratings follow the bell curve when they are distributed. Although this is an optional activity, I advise that it always be configured to ensure the best result. This means, as shown in Figure 4, that only 10% of the employees under a particular manager can receive a rating of Unsatisfactory and 20% can get a rating of Needs Improvement, and so on.
Note
It is important to keep in mind that these guidelines are purely informational; therefore, they do not trigger error or warning messages if the actual performance rating distribution is different than the distribution shown by the guidelines.
Example 2: Activate the Compensation Calibration Process
In step 1 in Figure 5, you choose the compensation plan, which acts as a source for the salary elements to be calibrated. This step also requires you to pick a routing step (highlighted in red in Figure 5) in the compensation planning process, where the amount for the salary, stock, or bonus elements are set for calibration. This means that employee salary, stock, or options can only be used in the calibration process when you reach the Complete Compensation Planning status in the compensation planning process.

Figure 5
Example of configuration for calibrating the compensation template
Step 2 in Figure 5 requires you to pick a salary, stock, or bonus element to be calibrated. This step also involves setting up the range group amount for the salary, stock, or bonus element selected.
Note
Unlike the calibration of performance ratings, compensation calibration does not have a drag-and-drop feature to move people from one compensation ratio to another or from a lower range group of merit to a higher range group. Changes to employee compensation elements in the calibration chart can be made by navigating directly into the employee’s compensation sheet and making them there. The salary, stock, and bonus elements shown in step 2 of Figure 5 are populated based on the template chosen in step 1 of Figure 5. Unlike in the previous step for setting up a calibration template for performance ratings, the compensation guidelines can’t be specified by the salary, stock, or bonus elements selected.
Views
There are several options for setting up how users can view the calibration options for Performance and Compensation Management.
Views are used to graphically represent selected calibration elements to the end user. Views can be one dimensional or two dimensional. You can select the Enable Drag and Drop option (Figure 6) to change the ratings when calibrating employee performance. This option, however, is disabled by default when calibrating employee compensation elements.
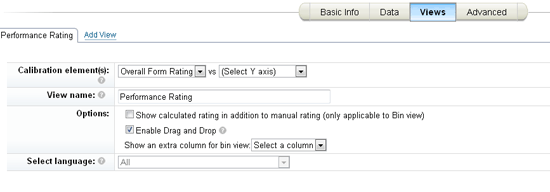
Figure 6
Example of Performance Rating chart view (one dimensional)
In the example Pay vs. Performance view configuration (Figure 7), the X-axis calibration element has Compa-ratio and Y-axis calibration element has performance ratings stored in the employee profile by the managers. This is for plotting the nine-box matrix for employees, shown in the bottom of the screen in Figure 7. Each of the boxes has a name (Label) and can be color coded for ease of use. These features allow managers to quickly identify employees who may have incorrect compensation amounts in relation to their performance appraisal ratings; for example, high performers who are being paid too little or low performers who are being paid too much.
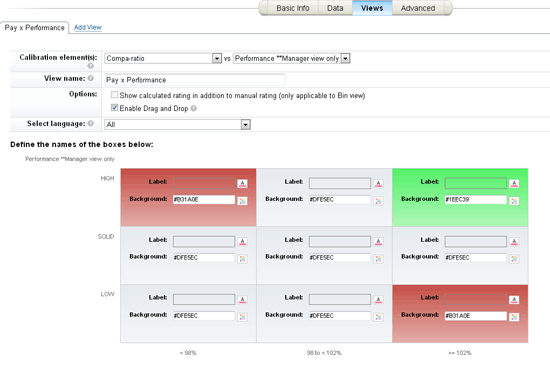
Figure 7
Example of Pay vs. Performance chart view (two dimensional)
Note
Employees can only be moved vertically to change their performance ratings; they cannot, however, be moved horizontally. In addition, any changes to their compensation at this stage have to be done through individual compensation sheets, discussed later in this article.
Manage Calibration Settings
You would make changes to the Manage Calibration Settings configuration (Figure 8) because you want to do one of two of the following:
-
Grant permission to users, facilitators, and managers and also to calibration sessions that are in progress or have been approved.
-
Select the fields that appear for each employee when you are searching for participants and subjects to be discussed during a calibration session.

Figure 8
Search Results Fields configuration while creating calibration sessions
Manage Calibration Sessions
In this step (managing calibration sessions), administrators or super users can create a calibration session and make it active. This session also can be used by owners and participants for calibration, but only after it’s been activated. A calibration session would typically need the inputs listed below before being activated:
- Calibration template
-
Name of the session
-
Owner of the session (typically the department head)
-
Participants (leads reporting to department heads)
-
Subject or employees to be discussed during the calibration session (either direct or indirect reports to the leads)
-
Facilitators (HR representatives for the department)
There are some important features that administrators and super users should keep in mind when creating calibration sessions. First, there is no limit on the number of calibration sessions that can be created by administrators or super users.
Choosing the option Select subjects and participants automatically according to the owners (Figure 9) adds participants and subjects to a calibration session automatically based on which owner is selected. This means that managers reporting to a session owner would automatically become participants and individual contributors reporting to these managers would become subjects.
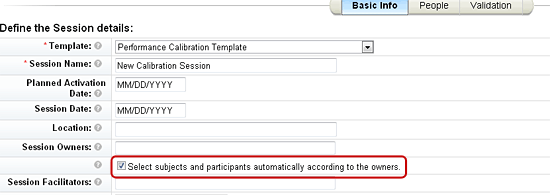
Figure 9
Example of the configuration to derive participants and subjects automatically from the owner’s name
Participants and subjects also can be picked from the organizational charting tool. Simply start with the name of the owner entered by the administrator (Figure 10).
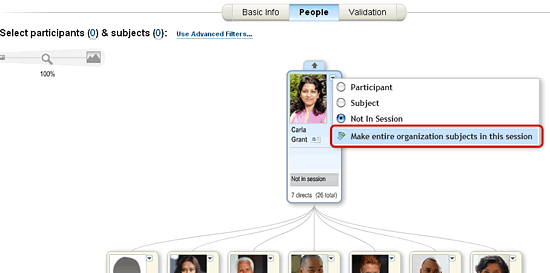
Figure 10
Picking employees to be calibrated from the organizational structure
Participants and subjects also can be added into a session manually by searching for employees based on filter criteria such as division, department, location, first name, user name, and job code (Figure 11). Unlike on-premise SAP ERP HCM, these SuccessFactors’ predefined search criterion can’t be customized, removed, or supplemented with other customer search criteria. This is because SuccessFactors solutions use a no-customization approach unless the change has broad appeal and is desired by a majority of users.

Figure 11
Manually picking employees to be calibrated based on different selection filters
Depending on the need, administrators and super users can create individual calibration sessions for different categories, such as division, department, location, or job code.
Keep these key details in mind when managing calibration sessions:
- Calibration sessions also can be created from the end-user interface directly for direct as well as for second- or third-level reports of the logged-in manager.
- Division, department, location, and job code are the foundation objects defined in the Employee Central (EC) module of SuccessFactors.
- Before activation, SuccessFactors validates the newly created calibration session against:
- The appraisal forms (in case of performance rating calibration) of subjects or employees
- The inactive or active employment status of subjects and employees
- The individual employee calibration status within the system to determine whether subjects or employees are part of any other active calibration session
- The appraisal process stage for employees to determine whether appraisal forms of subjects or employees are where they should be in the process as configured in the calibration templates
How to Use the Calibration Functionality of SuccessFactors
After configuring the calibration process in admin tools (the backend of SuccessFactors), it is now time for end users to perform the actual calibration. The following lists the steps end users need to take in the SuccessFactors’ calibration process.
The Performance Calibration Process
The Performance Calibration process is where managers discuss and compare employees with similar backgrounds, job responsibilities, or teams using various parameters to identify best and worst performers.
Managers can view calibration sessions prepared for them by administrators or super users on the calibration dashboard (Figure 12). Managers can view only those calibration sessions where they are designated as owners or facilitators.

Figure 12
Sample calibration dashboard
By clicking any of these sessions in the first column (Figure 12), managers can go inside a particular calibration session and execute the associated activities.
Figure 13 shows the dashboard view for a manager (Carla Grant, in my example). The dashboard view can be activated when creating the calibration templates. You can summarize the performance rating calibration through the bell-curve-like distribution shown on the right side of the screen. Managers can calibrate ratings according to guidelines set by management (and configured by administrators).
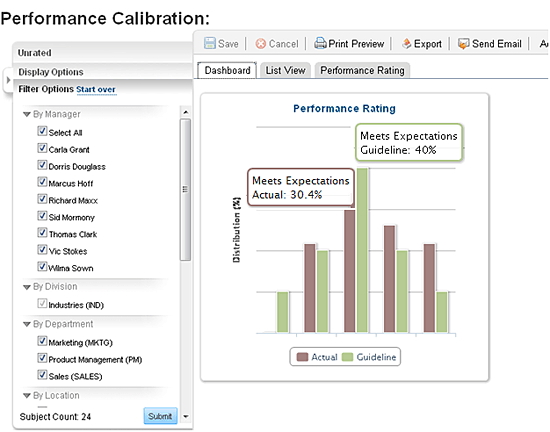
Figure 13
Dashboard view of performance calibration bell-curve distribution
For managers, the objective of the calibration exercise is to match the actual ratings given (brown bars) with the guidelines set (green bars). For example, the guidelines set for the Meets Expectations performance rating is 40%, and there are only 30.4% of employees who received this rating (Figure 13). This lets managers know that they have to normalize — calibrate — the ratings in such a way that they match management guidelines.
Employees or subjects with similar competencies or work goals are evaluated in order, with managers referring to the individual performances exhibited throughout the year. Employees can also be rated using a stack-rank view, and relative comparisons can be made for overall ratings and competencies (Figure 14).

Figure 14
Stack-rank view of selected employees
Sometimes discussion may lead to a change in performance rating for employee. Discussions between managers or supervisors and HR help in ranking employees with similar performance ratings. In cases where there are across-the-board examples of employees overshooting the established guidelines, the employee with the lowest rank can be moved to a lower rating or the employee with highest rank can be moved to a higher rating, where the guidelines’ settings allow only a fixed number of additions or deletions. SuccessFactors has a drag-and-drop functionality to move employees to different ratings based on these calibration discussions. Any changes to performance ratings are only made effective after the Finalize button (Figure 15) is clicked in the calibration screen.

Figure 15
Snapshot of performance rating distributions and guidelines
Individual performance contracts can also be edited through the view shown in Figure 15. Each rating box groups employees with similar performance ratings (defined through the calibration template). Guidelines are also shown with an indicative numbers of employees to be added or removed to suit management-defined guidelines for a department or group.
The Compensation Calibration Process
Figure 16 shows a sample chart where an employee’s compensation can be calibrated. As stated previously, compensation can only be changed in the calibration chart itself, and only when there are no set compensation guidelines. However, managers can directly edit compensation plans for employees through a link on the calibration chart (Figure 16).
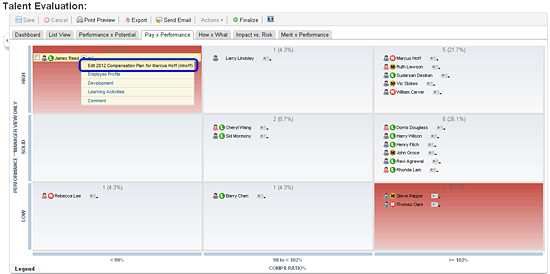
Figure 16
Sample compensation calibration chart
Prashant Rastogi
Prashant Rastogi works at Accenture as an SAP HCM associate manager. He has been working in SAP ERP HCM for the past seven years in various assignments. Prashant has experience in implementing ESS, MSS, SAP ECM, Performance Management, Succession Planning, Talent Management, OM, PA, and Nakisa. Prashant has an MBA (HR) along with a master’s in law and labor welfare. He is also an engineer in IT.
You may contact the author at prashant.rastogi@accenture.com.
If you have comments about this article or publication, or would like to submit an article idea, please contact the editor.


