By combining the display variant log with a custom subschema that prints out just the results tables you need, you can investigate and resolve payroll problems more quickly.
Key Concept
When you run payroll, you can use the display variant log within the payroll selection screen to select which parts of the payroll schema you want to display. This allows you to see detailed information without the long processing time of running payroll with the full log on.
Many SAP Payroll users know that you can run the payroll with the payroll display log off to process all employees or run it with the log on for just the employees with issues so you can find out where the problems exist.
However, few users are aware that you can also use the display variant log function in payroll processing to show selected parts of the payroll log for all employees without the long processing time that the full display log creates. The display variant log within payroll allows you to run the payroll for an employee or all employees, only showing the detail of the parts of the schema in which you are particularly interested.
For example, if you are having trouble with Personnel Time Management (PT) for a group of employees or you need to check the loan calculations for all your employees, you can create a view of the payroll display log with only the loan processing subschema shown in detail. You can then process all employees quickly and spot check the detail of the processing as needed.
Because R/3 only builds up the detail for a small part of the schema, it is still able to process the employees quickly, allowing you to run it for larger groups of employees and still have the detail of the schema to review. This display variant log becomes even more useful if you set up your own subschema to show just the information that you need often (e.g., the pay results table, the cumulated results table, and the WPBP table) and then use the custom display log variant to show only that.
Note
The display variant log is not system configuration and so you can perform it directly in your production client without transports. The log hasn’t changed since R/3 4.0B.
Combining the display variant log and a custom subschema is a great way to introduce your payroll team members to the payroll schema. By giving them a quickly accessible subschema, you can build up their knowledge of the schema and soon you will have them clicking merrily away within the schema — allowing them to identify more issues more quickly!
First I will show you how to set up the display variant for the payroll log and then I’ll show you how to set up a custom subschema to print out just the payroll results you need most often for payroll analysis. I assume that users have a reasonable level of familiarity with payroll schemas and schema processing. I’ve tested this technique with R/3 4.6.
Part 1: Use the Display Variant for Log Setting to Show the Results for All Employees
Step 1. Edit the Display Variant Log
Within your payroll driver for your country, you should see the Display variant for log field in the Log section of the screen (Figure 1). This example uses the UK Payroll driver (menu path Human Resources>Payroll>Europe>Great Britain>Payroll>Start payroll). If you cannot see this field, check the variant of the program you are running to see if the field is hidden. If so, unhide it.
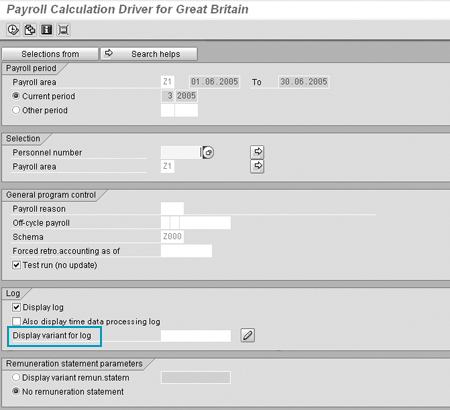
Figure 1
Great Britain Payroll Driver with Display variant for log field
Select the change pencil icon to the right of the field. This takes you into the setup screen for the Change Log Variant screen (Figure 2).
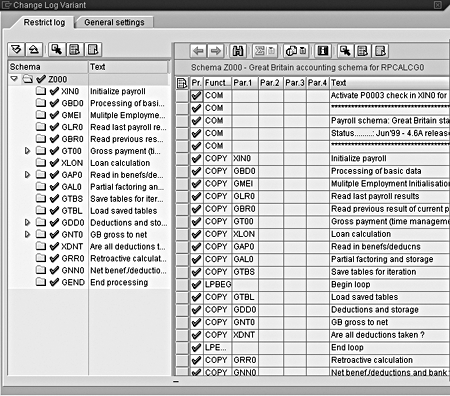
Figure 2
Display screen for changing the payroll log variant
Step 2. Select the Parts of the Log You Want to Display
The display screen has two tabs. The first, Restrict log, enables you to select the parts of the payroll schema that you wish to show or hide. On the left side of the screen is an overview of the schema you are running. The right side shows a more detailed breakdown of the schema.
When you first go into this selection screen your whole schema shows as selected. (Selected parts of the schema have a green check mark  . Deselected parts have a red cross
  ). Initially the easiest thing to do is to deselect the whole schema (with the deselect all icon
  ) so that the entire schema shows with red crosses. Then select the parts of the schema that you want to show in detail by individually selecting the parts of the schema with the select icon
  .
.
As you can see in Figure 3, I deselected the entire schema. Then, I specifically selected just the subschema for loan processing (XLON) to show the detail of the Loan calculation and the final subschema GEND to show the detail of the End processing step of the payroll.
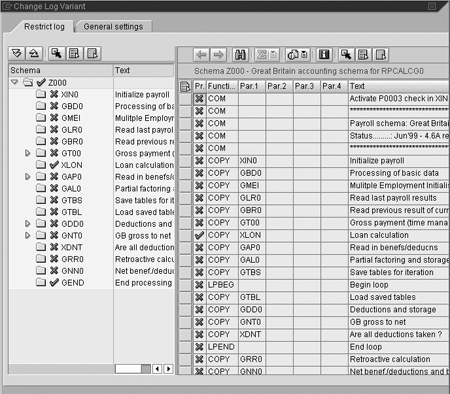
Figure 3
Payroll schema showing selected subschemas
Step 3. Set Up Your Other Display Log Options
Go to the second tab of the screen from Figure 2, General settings. This tab is blank except for three settings — Log tree, Detail view, and Further settings — and allows you to set parameters so you can control other parts of your shortened payroll log. Open the relevant section and select the expand data areas icon  .
.
The General settings tab includes Log tree, which controls the layout of the tree that appears when you run payroll with the display log setting active. Detail view controls the information detailed in the log. You can use it to set the log to expand every display message or to expand every step of the payroll schema processing. Further settings controls the search settings of the log and other more technical display settings. I will now explain the functions of each of the sections in more detail.
Log tree allows you to make parts of the tree behave differently. For example, you can set the log to optionally expand for successful employees, show detail down to log messages for unsuccessful employees, and set the payroll statistics part of the schema to expand.
Figure 4 shows that the Log tree section contains the following tabs:
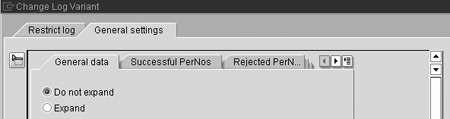
Figure 4
The Log tree section of the General settings tab
- General data is the area at the top of the log showing the period that ran, the selection set of employees, the general program controls, and log settings.
- Successful PerNos shows the employees for whom you’ve successfully run payroll.
- Rejected PerNos shows the number of employees not successfully processed in payroll processing.
- Messages lists the messages that payroll processing generated (click on the right arrow icon to see this tab).
- Statistics lists the payroll summary including the number of employees processed, numbers rejected, and periods processed (click on the right arrow icon to see this tab).
The Expand detail view section controls the detail view of the payroll schema, allowing you to set which parts of the schema to expand (Figure 5). However, any selections you make in step 2 overwrite these settings.
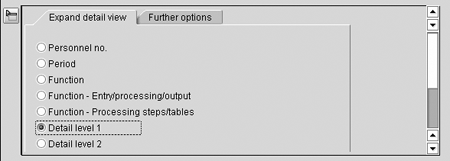
Figure 5
The Expand detail view section of the General settings tab
The Further settings section controls search rules and even more settings for displaying the detail of the log (Figure 6). The Search in log tab directs the content of the search in log icon on the payroll log screen . This icon allows you to control what to include when you search within the log (standard searches look for personnel numbers). The Global parameters tab gives you the option to turn on or off the display of function names and parameters within the payroll log.
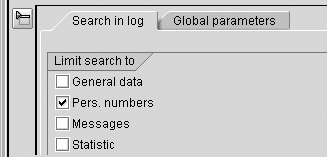
Figure 6
The Further settings section of the General settings tab
Step 4. Save Your Newly Created Variant
Access the variant through the payroll schema and display it in the payroll results. Select or deselect all of the options you require for your payroll log variant, and save it by clicking on the save icon. R/3 prompts you to enter the Variant name and Meaning (long name) so that you can save it as a variant and reuse it next time you run payroll. Select the check mark icon to save it (Figure 7).
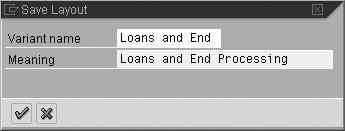
Figure 7
Save your new variant of the payroll log
You have now created your custom display variant log. Before you run payroll, select your new display variant log from the payroll selection screen to see the selection box in the Log section of the screen shown in Figure 1. Run payroll to display your log.
When R/3 processes the payroll, it applies all of your settings from the General settings tab to your layout. Most importantly, only the parts of the schema that you selected show detail while the other parts display in summary form only (Figure 8). As you can see, you can only drill down into the functions and rules within the loan processing subschema. The other parts of the schema appear only in summary form.
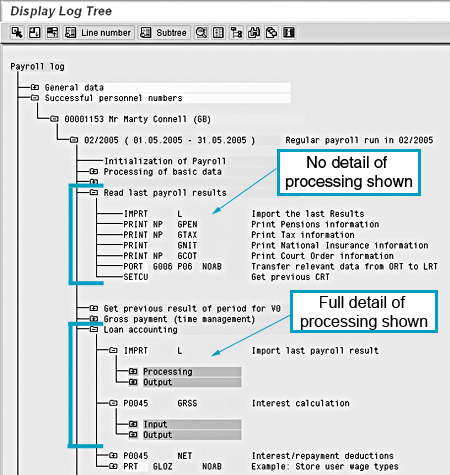
Figure 8
Display the cut-down version of the payroll log
Part 2: Create a Payroll Subschema That Gives You the Payroll Data You Need
Now I will show you how to create a simple subschema that you can attach to the bottom of your existing payroll schema. You can tailor the contents of this subschema to your requirements — for example, to show you the contents of the payroll tables that you most commonly use to check payroll results and investigate payroll errors.
Note
Schemas are part of system configuration, so you must complete this configuration in your development client and transport it into your test or production instances.
The advantage of this custom subschema is that you do not need to hunt the whole way through the schema to check different results from the schema. Instead, at the end of payroll processing, you see specific subschema that you can access and analyze quickly and simply. Table 1 shows which tables you can print. This custom schema becomes especially useful when you combine it with a custom display log variant.
| Cumulated results table (CRT) |
The cumulated results of all employees’ payroll results processed over a set period (usually a year) |
| Work center/basic pay (WPBP) |
All the payroll-relevant master data (e.g., hiring date, company code, cost center) |
| Cost distribution (CO) |
Cost spread from infotype 0027 (cost distribution) |
| Cost distribution (C1) |
Cost distribution from other infotypes (e.g., 0014, 0015, 2001, etc.) |
| Arrears (ARRRS) |
Details of any areas that carry over to the next period |
|
| Table 1 |
The tables you can print using a custom subschema |
Step 1. Create a Custom Subschema
Use transaction PE01, the schema editor. Rather than creating a new subschema from scratch, it’s faster to copy an existing subschema because it gives you a structure to use as the base for the new schema. However, you can create a new one if you want. For this example, I’ll copy subschema GEND as a base for my new subschema, as shown in Figure 9. Enter schema GEND in the schema field, then select the copy icon.
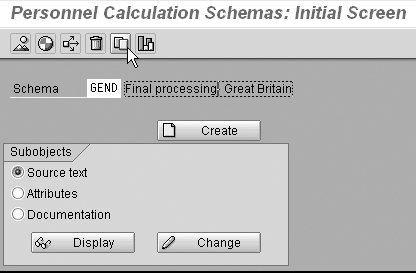
Figure 9
Create a custom subschema via PE01
As shown in Figure 10, enter the schema name for your custom subschema. Use an internal business convention, usually starting with a Z or a 9, to differentiate it from standard SAP schemas. Select the check mark icon and then save your new subschema into a transport.
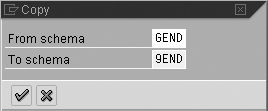
Figure 10
Copy an existing schema to create your custom one
Step 2. Edit the Schema and Include Your Required Tables in It
Select your new schema and choose the Attributes button. Select the Change button, and in the following screen in Figure 11, change the text of the schema to describe the new subschema, and save.
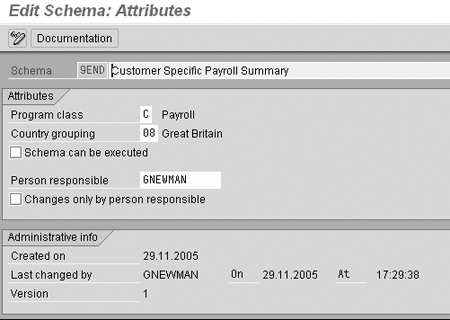
Figure 11
Change the text of the copied schema to reflect the new subschema’s role
Next, edit the content of the copied schema so the right tables appear in the new schema. Begin by selecting the Source Text button, and then the Change button to arrive at the schema editing screen shown in Figure 12.
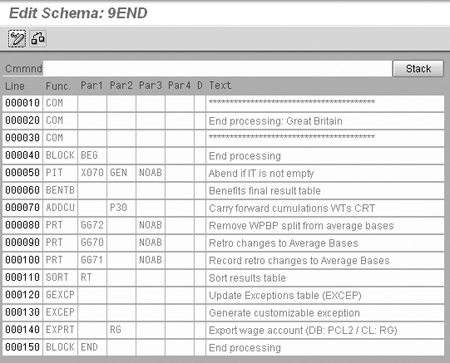
Figure 12
The unchanged version of the custom schema
Although editing the contents of a schema can seem quite daunting, this one is very simple. First, let me explain what the various vertical columns in Figure 12 do (Table 2). My schema contains only three functions, explained in Table 3.
| Line |
The sequential line number of the schema |
| Func. (function) |
Gives the schema a command or task to do |
| Par1 |
First parameter, used in combination with the function |
| Par2 |
Second parameter, used in combination with the function |
| Par3 |
Third parameter, used in combination with the function |
| Par4 |
Fourth parameter, used in combination with the function |
| D |
Comment line, used when a line is commented out (not processed) |
| Text |
Free text field to describe what is going on in the function |
|
| Table 2 |
The functions of the columns in Figure 12 |
| COM |
Comment lines with no processing |
| BLOCK |
Signals the beginning or end of a block of work for the schema |
| PRINT |
Displays the contents of a specified table into a schema for you to view |
|
| Table 3 |
Three functions that the custom subschema uses |
As shown in Figure 13, edit the schema so that it prints the required tables. You can see a full list of the available tables by selecting F4 in the Par 2 field. Make sure to enter the table that you want to display in the Par 2 field. Also, note that the text you enter in your BLOCK BEG line of the schema is the description that displays in your payroll results. After you have added all the tables you want to see in your schema, save the schema. Then, add this custom subschema as the last line in the main schema so the system executes it after completing all other processing, as shown in Figure 14.
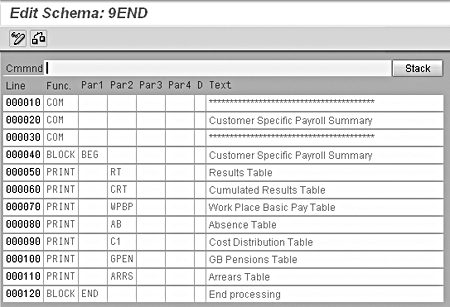
Figure 13
The edited version of the custom schema
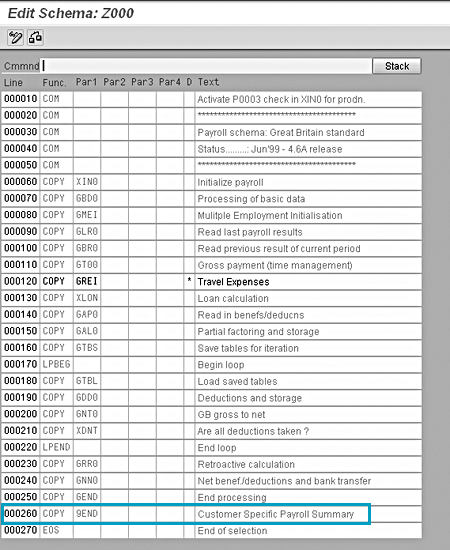
Figure 14
Insert the custom subschema at the bottom the main schema
Now when you run payroll, you can cut straight to the bottom of the log and quickly review all of the important tables and results. This is especially useful when you combine it with a custom display variant log that only shows the detail of the custom subschema (Figure 15). You can run payroll quickly for all employees and check their results, doing away with the long running time and having to click through the entire schema to get to the tables you require.
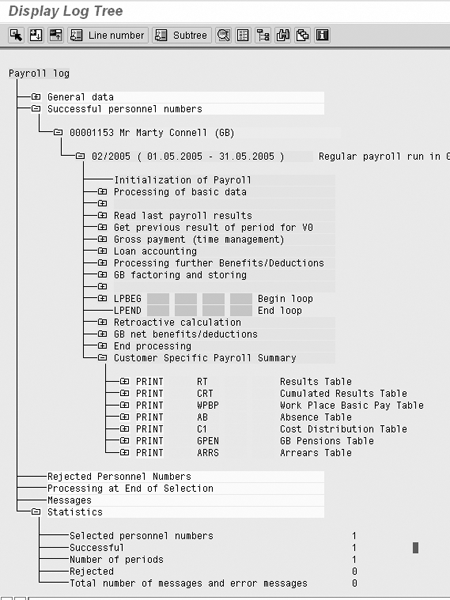
Figure 15
Combine your custom subschema with the display variant log tip in part 1 to expedite your payroll processing
Greg Newman
Greg Newman is originally from New Zealand, and has been implementing and supporting HR and Payroll systems since 1999. He has worked on numerous SAP HR and Payroll implementations for Great Britain, the Republic of Ireland, Australia, New Zealand, and several other international rollouts. Currently Greg is a managing consultant working for Newhit HR and Payroll Solutions in England.
You may contact the author at greg.newman@saphr.com.
If you have comments about this article or publication, or would like to submit an article idea, please contact the editor.