Discover how to implement SAP’s classification system with minimal effort. Walk through a step-by-step configuration, and learn how to use the available master data settings.
Key Concept
SAP uses the classification process to group data objects through the concept of classes and characteristics. The characteristics defined for these objects through the classes are used to find and group them. Characteristics are essentially the properties of the object. The module in SAP that enables the classification of objects is the cross-application system called Classification system.
SAP Classification system is a cross-component application in SAP ERP Central Component (ECC). You can use
it to classify and group similar master data objects based on common characteristics linked to master data objects.
Some typical business scenarios in which you would want to use SAP Classification include classifying laptops with a
DVD write capability, classifying cars with leather upholstery, and classifying computer monitors with inbuilt
speakers, just to name a few.
I’ll discuss the versatility of the classification methodology and introduce several key advantages and
relevant factors for your consideration. Then I’ll introduce the configuration steps that control the standard
and customized classification objects and provide an overview of master data settings. This article applies to SAP R/3
4.7, ECC 5.0, and ECC 6.0. I will use different examples for different functionalities to show the breadth of usage of
the classification system.
Basic Concepts
Three key entities constitute the SAP Classification: object, characteristic, and class. The different
entities that are to be classified are known as objects. Characteristics are the properties on which the object is
classified. A collection of characteristics logically grouped together is a class. Each class is assigned to an object
in the classification system. Characteristics are assigned to classes, and classes are linked to objects. For example,
the material is an object that can be assigned to a class, say laptops, and the laptop color could be a characteristic
assigned to this class.
Figure 1 displays some of the important standard objects and their descriptions as
defined in SAP ECC. You can add non-standard objects to the standard ECC list by following IMG menu path Cross-
Application Components>Classification System>Classes Configuration>Maintain Object Keys. I’ve
detailed these configuration steps in subsequent sections. You usually don’t need to create customized objects
because most of the master data objects are covered in the standard configuration. In rare scenarios, you might want to
create customized objects if you were implementing customized master data objects. To illustrate this, I’ll use
table CRHD (work center), which is circled in Figure 1.

Figure 1
Standard classification objects
Customizations in SAP Classification
In this section, I’ll walk you through the customization steps in SAP Classification so you can
learn which master data settings are available, which classification objects they control, and the various parameters
that control the behavior of the classification objects.
Step 1. Create the classification object key. Follow the IMG menu path Cross-
Application Components>Classification System>Classes Configuration>Maintain Object Keys to begin the
classifications-related configuration steps. Figure 2 shows the various steps in configuring the
classification systems. The object table of work center is CRHD, and the transaction code is
CR03. The object table and the key fields have to be defined by updating the object keys. The
Key Field indicator denotes how this object can be uniquely identified (Figure 3).

Figure 2
Configuration steps

Figure 3
Object table configuration steps
Standard classification objects are predefined as standard settings. Field names, parameter IDs, and key
fields are defaulted and should not be changed. However, if you need to create customized object keys, you must define
the field names and key fields in a specific way so that the object can be uniquely identified. The parameter ID is
used to identify the SAP memory where the proposed values of the fields reside. For example, say company code
BUKRS is the field name. BUK is the parameter ID that stores the values of the
company code. You can find these details in the TCLO table. This table stores the key fields of the
object. The reference here shows you which table stores the data. You get there by choosing Maintain Object
Keys.
Step 2. Maintain class types. The object table is linked to the classes through the
class type in the configuration step Maintain Object Tables and Class type in the same configuration
node (refer back to Figure 2). I’ll give you another example of work center. As shown in Figure
4, the standard class type is predefined for Work Center Class 019. If the Multiple
objs allowed indicator is set for a class type, further object types that can be classified under this class
type are entered as objects. Standard Objects sets this indicator automatically, although users can
change it if necessary. Many other tables can be assigned to class type 019, including tables:

Figure 4
Class type configuration
- CRHD (work center header)
- AFVC (operation within an order)
- PLPO (task list operation or activity)
Class Status indicates if the class type is ready for use and can be maintained, while
the Classification Status indicates the various statuses that you can assign to a classification
record. The Organization Areas indicates the areas to which the class type is restricted. The
ECH and Change Docs check boxes in the class type definition
determine whether the changes generate a change document or are controlled through the engineering change management.
You have an option of choosing one or both, but preferably only one. They control how changes should be tracked. SAP
ECC has the flexibility to build a class hierarchical system. Consider a product hierarchy of computer components
consisting of chips, a motherboard, and a keyboard, among other parts. Instead of assigning all these parts under one
class called Computer Components, you can build a hierarchy of class by creating four different classes, such as
Computer Parts, Chips, Motherboard, and Keyboard. Then you can build a hierarchy by assigning the other classes to the
Computer Parts Class.
This is enabled through the Hierarchy allowed check box in the
Class Types configuration as shown in Figure 4. Once this is enabled, you can build the class hierarchy by
assigning classes to classes through the transaction CL24N. This assignment provides the flexibility
of identifying objects through different class and characteristic options.
Master Data Settings
Now I’ll explain master data configuration settings. In this section, I’ll use a new example
to give you a better sense of the classification system through the use of a characteristic for a different class.
The master data menu for the classification system is defined under Cross Application
Systems>Classification systems in the main SAP menu. As I mentioned earlier, characteristics define the
properties of the classification object. For example, consider a case in which you want to define characteristics to
assign to the batch class. You plan to use them as search criteria when searching for batches.
Characteristics are created in the system and then are assigned to classes. You can overwrite a
characteristic that is assigned to a class. Say you want to search batches based on a property such as color.
I’ll explain the sequence of master data required to enable this functionality.
Note
Characteristic COLOR is not related to work center. I’ve intended to provide another example to illustrate master data settings. However, you could use the same characteristic for different class types, including work center.
Step 1. Create the characteristic. First, you set the characteristic
ZCOLOR using transaction CT04. Some of the key data you enter in the screen shown in
Figure 5 are the characteristic name and the characteristic type, which can be a character, number,
currency, date, or time. Through the value assignment, you can determine if the characteristic has single or multiple
values assigned. You can also restrict the values and the class types the characteristic can be assigned to through
this master data. For example, you can restrict that only the colors yellow, blue, and red can be assigned to this
characteristic. Through this transaction, you can also restrict the class types to which this characteristic can be
used by assigning them in the Restrictions tab.
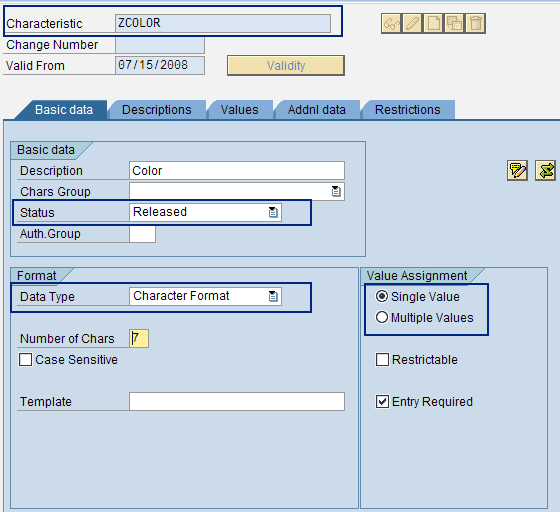
Figure 5
Characteristics master data settings
Step 2. Assign object dependencies. You can assign object dependencies to
characteristics and characteristic values by clicking on the object dependencies icon  . Object dependencies ensure that the values assigned
are complete and consistent.
. Object dependencies ensure that the values assigned
are complete and consistent.
The dependencies can be of many types, such as:
- Action (subsequent to selection of values). For example, if one characteristic value is dependent on
another characteristic value.
- Procedure (used for internal calculation which can be used in constraints). For example, the value of
one characteristic is inferred based on the other characteristic values.
- Preconditions (before values are presented to the user). For example, if a characteristic has to be
applicable only for a specific sales org or material type.
- Selection conditions (linked to the bill of material [BOM] components). For example, assign a
specific value to a characteristic based on the company code.
- Constraints (to give exceptions). For example, to restrict characteristic values based on some
business logic.
Object dependencies can be either global or local objects. To assign dependencies, choose the menu path
Extras>Object dependencies>Assignments from transaction CT04. In the assignment
screen that appears, enter the name of your dependency.
To launch the dependency editor, choose the menu path Extras>Object
Dependency>Editor from the CT04 transaction. The editor view is shown in Figure
6. The editor is where the ABAP programming logic is written. You can also create object dependencies directly
from the assignment screen of a characteristic by choosing the menu Edit>New
Dependency>Global/Local from the dependency editor screen.

Figure 6
Object Dependency Editor
Step 3. Create a class. Once you’ve created the characteristic, the next step is
to create a class, say ZBATCH, and assign this characteristic to it (Figure 7). The
class creation is done through transaction CL01. You can assign more than one characteristic to a
specific class through this screen. If there is a need to overwrite the values of the characteristics assigned in this
class, you can use the overwrite characteristics option in this screen as shown in Figure 7.

Figure 7
Create a custom class similar to ZBATCH
Step 4. Assign the object to the class. The next step in setting up the master data is
assigning the objects to the classes via transaction CL20N (Figure 8).
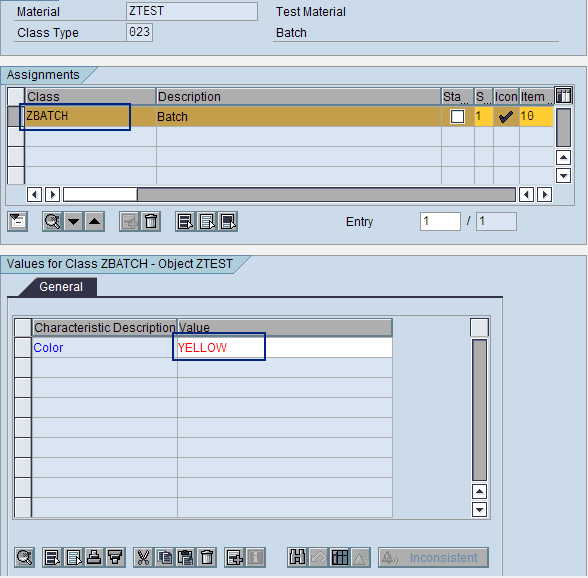
Figure 8
Object to class assignment
In my example, I assign value YELLOW to material object ZTEST. You can
assign multiple classes in this screen. For example, in addition to the Batch class (class type
023) you could also assign the Material class (class type 001) and
so on. You can view the assignment details through the Classification tab in the material master
screen.
Once you have defined the class and the characteristics and assigned them, you can use them in the
master data to assign characteristic values. You can subsequently use these values to search the master data objects
and condition records to automatically default in the transactions.
Key Tables in SAP’s Classification System
Several standard tables are available to help you customize SAP Classification. Table 1
details important characteristics and their descriptions. Table 2 lists class types and objects with
descriptive text. Table 3 includes various links and their respective functions.
| CABN/CABNT |
Stores the characteristic’s name and description. This table is updated after the
characteristics are defined in transaction CT04. |
| CAWN/CAWNT |
Contains the characteristic’s name. This table is updated with the values assigned to
the characteristics in transaction CT04. |
| AUSP |
Includes the characteristic’s values. This table is updated once the characteristic
value is assigned to the master data object. |
| CBN EXCL |
Provides a list of characteristics excluded from type matching. This table is updated if some
of the characteristics should be excluded from type matching in variant configuration during sales order creation. |
|
| Table 1 |
Available SAP characteristics tables |
| TCLAO |
Stores several class types for an object. This table is updated after the class type and
object are linked in the object and class type configuration. |
| TCLA |
Contains the class types. This table is updated after the class type is defined in the object
and class type configuration. |
| TCLAT |
Records the class type text and definitions. |
| TCLT |
Includes all classifiable objects. This table is updated with all the classifiable objects
defined in the object key configuration. |
| TCLC |
Provides a list of classification statuses. This table is updated once the class type is
defined in the object and class types configuration. |
|
| Table 2 |
SAP class types and object tables |
| INOB |
Contains the link between internal numbers and objects. |
| KLAH |
Stores the class header data. This table is updated with the class header data that is
defined via transaction CL01. |
| KSSK |
Records the object to class assignments. |
| KSML |
Records the object to class assignments. Lists the characteristics for a class. This table is
updated after the characteristics are assigned to a class. |
|
| Table 3 |
Standard SAP classification links table |
For more information on the classification system, refer to SAP Note 943559 (FAQ: Frequently asked
questions about the classifctn. system).
Ganesh Sundaramoorthy
Ganesh Sundaramoorthy is a logistics consultant with more than seven years of consulting experience. He holds a bachelor’s degree in chemical engineering and a master’s degree in business administration. He has worked in high-tech manufacturing, the watch industry, and retail.
You may contact the author at ganesh_s01@infosys.com.
If you have comments about this article or publication, or would like to submit an article idea, please contact the editor.