SAPexperts'SCM
Subcontracting purchase orders (POs) can provide a major relief for those struggling to adapt standard POs in R/3 for work outsourced to vendors or subcontractors. Subcontracting POs allow a two-way flow of materials to and from the vendor. Little information, however, is readily available on how to use this indispensable tool. Learn how to put it to work as you walk through a real-life example.
Key Concept
Regular purchase orders (POs) are used to order materials or services from a supplier or vendor. To provide materials or components, a subcontracting PO is used. The vendor performs a service or adds value to your process, while providing its own finished product. The subcontracting PO enables an outbound process in addition to the receiving process involved in regular POs.
Unlike a regular PO, a subcontracting PO involves sending material
or items to the vendor and receiving them back after the contracted
service is performed. This calls not only for a tracking mechanism
for the material, but for a process to perform the shipping functionality
as well.
In a sales order delivery note, for example, you can allocate
a material and identify the shipping process (which, in turn, initiates
the transportation). You then perform the follow-on function, such
as picking, packing, or post-goods issue. The shipping function
allows you to do transportation planning, route determination, service-level
selection for the carrier, tracking the outbound activity through
deliveries, planning and scheduling the picking and packing, and
reporting on the in-progress deliveries.
Note
With R/3 Release 4.0B and lower, SD shipping was part of the core SD module. With 4.5B and higher, it is part of the Logistics Execution (LE) module.
Although documentation and help information are available for setting
up subcontracting POs and enabling shipping functions in general,
what is lacking is information on how to make use of shipping function
for subcontracting POs. Only a few scattered SAP notes mention piggybacking
on the shipping functionality available in SD and offer scant information
on how use it for the subcontracting process. I'll provide
the missing links, using the business scenario of a plant located
in Rotterdam, Germany.
The German plant has to send a component for subcontracting work
to Los Angeles in the US. I will walk you through how to make use
of this SD shipping functionality and how to make it available in
MM for use in the subcontracting PO process. I will go over the
complete setup (configuration and master data) and transactional
processes.
Customizing Steps
To elaborate on the business scenario, the plant in Rotterdam
is known as the Rotterdam Distribution Center. It is defined in
the system as the supplier of the components to the vendor. Since
you are moving the shipping function from purchasing, you need to
identity the vendor as a customer to mimic the data for the SD process.
Let's call the plant Adecon SA. You have to create this customer
in the selling sales area. The selling sales entity is the company
or customer sending the part to the vendor.
Step 1. Assign the sales area and customer to the plant.
As you know, a sales area consists of sales organization,
distribution channel, and division. They must be assigned to the
plant from which the components should be delivered. In my example,
the selling entity is in Germany. You do this via the Customizing
menu path Materials Management> Purchasing>Purchase
Order>Set up Stock Transport Order>Define Shipping Data for
Plants. In this step, you assign the customer number associated
with the plant supplying the component to the subcontracting vendor
and the sales area data (organization, distribution channel, and
inter-company billing division). See Figure 1.
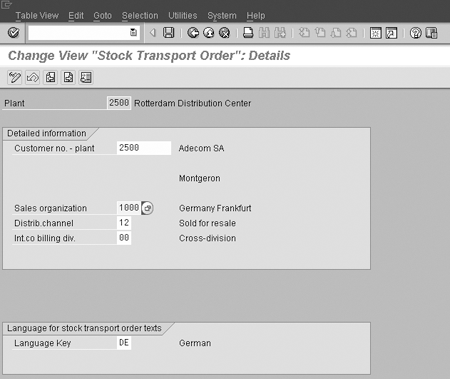
Figure 1
Assign the plant to a customer number (representing the vendor receiving the part for performing subcontracting work) and to the sales area
Step 2. Define the delivery document type. Use
Customizing menu path Logistics Execution>Shipping>
Deliveries>Define Deliveries Types or transaction OVLK.
The standard-delivered delivery type is LB (delivery
for subcontracting or subcontracting). You can copy with reference
to that. Make sure the Order required indicator
is set to Delivery for subcontracting (Figure
2).
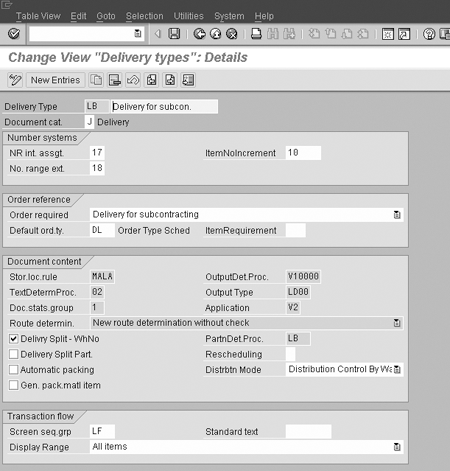
Figure 2
Designate the type of order
Step 3. Assign a partner schema to the delivery type.
As a vendor is one of the functions within the subcontracting delivery,
you need to define and assign it as part of the procedure. The delivery
type should be assigned to a partner schema containing the partner
function “vendor.” Do this via Customizing step Logistics
Execution>Shipping>Basic Shipping Function >Partners>Set
Up Partner Determination for Deliveries or via transaction
VOPA (Figure 3). In the Partner
Determination Procedures folder, click on the Partner
Functions in Procedure sub-folder.

Figure 3
Set up Partner Determination for Deliveries. Partner Functions in Procedure is defined within Partner Determination Procedure.
This brings up all the partner functions assigned to the procedure,
which are assigned to the delivery type. Make sure partner function
vendor (VN) is included and that the mandatory
(M) function is checked (Figure 4).
Once Partner VN is assigned, maintain the assignment
of procedure to the delivery type within the folder Partner
Determination Procedure Assignment. Define the partner
function within Partner Functions. In this case,
VN is standard-delivered, so I don't have
to create it. In Account Groups>Function Assignment,
you would define the Customer Account Group, if
you have any, to the partner function. If you need to maintain a
non-standard partner function code, do so within Partner
Function Conversion.
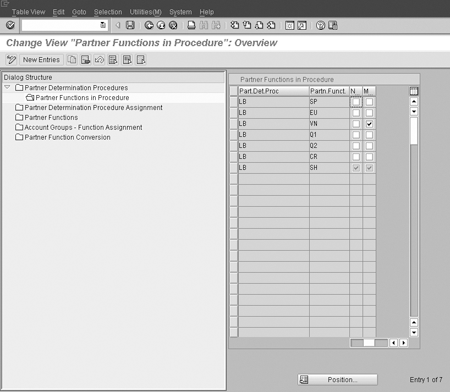
Figure 4
Include Partner Function VN (vendor) and check M (mandatory function)
Step 4. Assign a supplying or issuing plant to the delivery
type. The supplying plant is the entity from which the
components are supplied to the vendor or supplier. In my example,
the supplying plant would be the plant located in Germany, identified
by the number 2500. The delivery type must be maintained for the
provision of materials from a plant. Use the Customizing menu path
Material Management>Purchasing>Purchase Order>Set
up Subcontract Order. Delivery type LB
is delivered in the standard system (Figure 5).
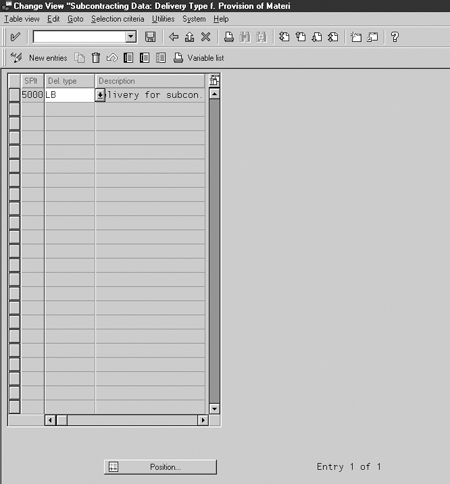
Figure 5
Establish the plant and delivery type relationship
Step 5. Maintain shipping condition mapping to shipping
point determination. A shipping condition maps the shipping
point determination. In other words, a shipping point must be assigned
to the combination shipping condition, loading group, and the plant.
Shipping conditions are maintained at the customer master data record,
which is shown later in the section on master data maintenance.
The customers, representing vendors, are assigned to the plant,
as seen in the earlier customizing step. Follow menu path Logistics
Execution>Shipping>Basic Shipping Function>Shipping Point
and Goods Receiving Point Determination> Assign Shipping Points
(Figure 6).
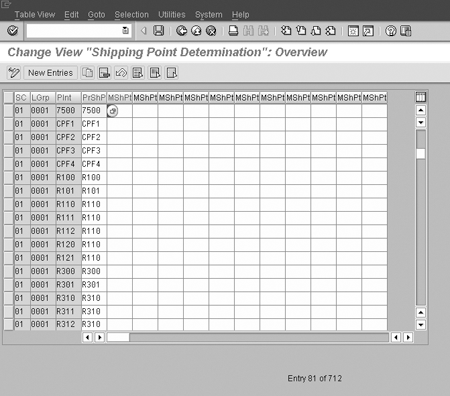
Figure 6
Map the loading group, plant, and primary shipping point to the shipping condition
Step 6. Maintain the route determination. The
route helps you define the physical movement of the material from
your company to the vendor. Route determination is based the country
and departure zone, shipping conditions, transportation group of
material, and country and transportation zone. In my example, the
route defines the stages it goes through to be shipped from the
plant in Germany to the vendor located in Los Angeles. As you know,
one of the criteria for route determination is based on the shipping
condition, so in this configuration step you maintain the appropriate
route determination (Figure 7). Follow the menu
path Logistics Execution>Shipping>Basic Shipping Functions>Routes>Route
Determination> Maintain Route Determination.
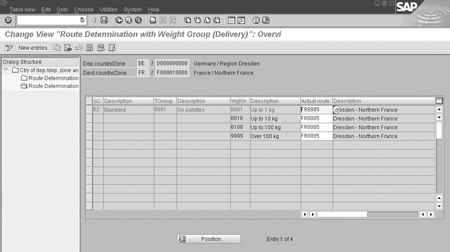
Figure 7
Define the route determination
In Figure 7, you see the route determination as well as the shipping
condition 02 (standard), transport group 0001
(on palettes), and weight groups (0001 up to 1
KG, 0010 up to 10 kg,
and so on).
Master Data
Having defined necessary configurations, you need to maintain
a few prerequisite master data records for the shipping function.
I'll walk you through the steps involved in setting up the
master data.
Step 1. Create the customer number representing the vendor.
The vendor that performs the subcontracting work must be
maintained as a customer for use in the shipping function. In other
words, you need to tell the system that the vendor will be receiving
the part from the supplying plant. Create the vendor receiving the
part as the sold-to party and ship-to party.
Shipping conditions are maintained in the customer master data record
(shipping view). Shipping point and route are determined by the
shipping condition through that configuration setting. Transaction
V-09 allows you to maintain the shipping point
(Figure 8). You could also use transactions VD01
or XD01 (Customer create).
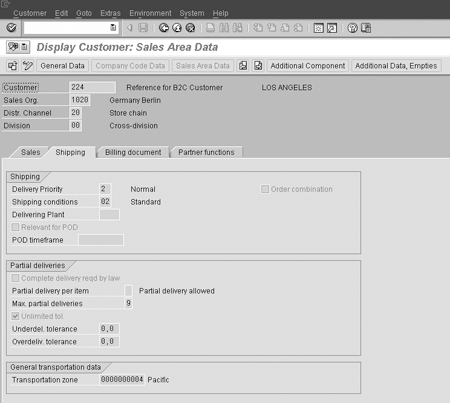
Figure 8
Display of customer created with the Shipping tab within the sales area data for shipping condition maintenance
Step 2. Set up the debtor (vendor customer) partner function.
The or vendor, acting as customer here, is considered a debtor (component/material
issuer) to the subcontracting vendor in the master record. This
debtor must be created for the sales organization, distribution
channel, and division of the delivering plant. Go to the customer
master create screen or change transaction, which is within the
partner function screen. Maintain the partner function VN and enter
the existing vendor number (Figure 9). Use transaction
XD02 or VD02.
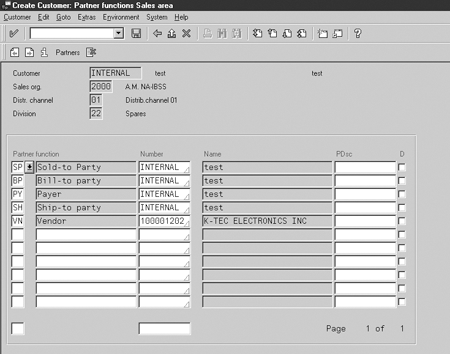
Figure 9
Partner function screen for customer master data
Step 3. Maintain the material master. The component
to be issued to the vendor from the delivery plant in Germany has
to be extended to the Germany sales order. Create or extend the
component or the material for the sales organization, the distribution
channel, and the division of the delivering plant (Figure
10). Use transaction MM01 or MM02.

Figure 10
Create Material master within the supplying plant, sales organization, and distribution channel
Transactional Data
Now that the configuration steps and the master data setup are
complete, you must create a delivery. I'll go over the steps
for creating a delivery, which helps you perform the shipping functions.
This will help you understand the implementation aspect of this
change in terms of training and the different groups that are affected
by the process.
Step 1. Create deliveries. These are outbound
deliveries for sending the part or component to the vendor from
your plant through the regular shipping process, like your sales
transactions. Use transaction ME2O to create a
delivery. The standard delivery type is LB and
the relevant item category is LBN (material provided
item). Once the delivery note is created through the above transaction,
the rest of the function is the same as SD activities.
Step 2. Process deliveries. Once you have created
a delivery, you may want to take it further by, for example, adding
details to the delivery note related to the shipment. The processes
for changing the delivery note (VL02), creating
a transfer order (LT03), confirming transfer, creating
shipment, assigning to deliveries, post goods issue (VL02),
and printing delivery note are the same as those used in the sales
order delivery process.
Even though you use the shipping function from the SD module,
only some of the SD functionality is transferred to the subcontracting
process. The document flow of sales orders allows you to see the
delivery notes created. With subcontracting purchase orders, you
are not able to see the deliveries. However, the delivery note has
a link to the purchase order, so if you want to see the deliveries
in a report form, you could write a Z-program for reporting purposes.
Once you pick, pack, and post the goods issue the delivery note,
it is shown as having been transferred to the subcontracting inventory.
This outbound delivery allows you to ship the component out of your
area through the regular shipping process. You can refer this delivery
for the shipment through your carrier or freight forwarder. It can
also be used to notify the vendor of the component they may expect
at their door.
Rajen Iyer
Rajen Iyer is the cofounder and CTO at Krypt, Inc. Rajen has written several in-depth, best practice articles, white papers, patents, and best-selling books on SAP Logistics and SAP Global Trade Services, including Effective SAP SD and Implementing SAP BusinessObjects Global Trade Services. He is also an invited speaker at industry conferences.
You may contact the author at Rajen@kryptinc.com.
If you have comments about this article or publication, or would like to submit an article idea, please contact the editor.