Although area menus have been around for a while and are simple to use, many people are unfamiliar with what they can do or how to set them up. Find out the two approaches you can use to create area menus and learn tips for maintaining them.
Key Concept
Area menus provide convenient access to all activities that pertain to a particular area by grouping them together in a hierarchy of nodes and sub-nodes that contain transaction codes (including transaction codes for reports) and other area menus.
Area menus have been a part of standard SAP since the earliest release. They allow you to simplify access to custom
applications. You enhance them or design new ones to group similar customizing and reporting-related activities that are
specific to your enterprise.
Say the implementation or maintenance team members are tasked with designing a custom application or are asked to
enhance standard SAP functionality. This may result in creating new configuration steps, reports, or programs, for
example. For convenient access, maintenance, and execution, you could put all these activities — and their
respective transaction codes — in an area menu. Or, if your application adds additional features and functionality
to an existing area, you could include your new area menu in the standard SAP area menu.
I’ll introduce two methods you can use to create area menus, and then highlight some tips for using them.
I’ll also list some helpful references to consult when designing area menus. The screenprints in this article are
based on an SAP NetWeaver 2004s system running SAP ERP Central Component (ECC) 6.0. However, the concepts presented are
general in nature.
Area Menu Maintenance
You can use two different approaches to maintain area menus. The first approach is the non-technical, standalone
approach to area menu maintenance. You create or edit the area menu you are interested in and you are not required to know
much technical information.
Run transaction SE43 or SE43n, which takes you to the screen that lets you
create, maintain, copy, and delete area menus (Figure 1). After you enter the technical name of the area
menu, a pop-up window appears that is pre-populated with the technical name of the area menu. Enter a meaningful
description and then press Enter. This takes you to the area maintenance creation screen as shown in Figure
2.
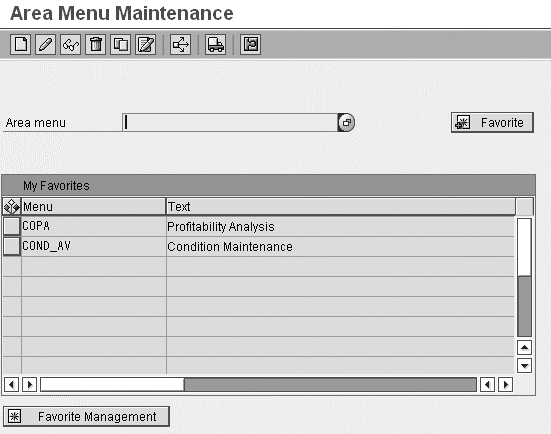
Figure 1
Area menu initial screen via transaction SE43 and SE43n
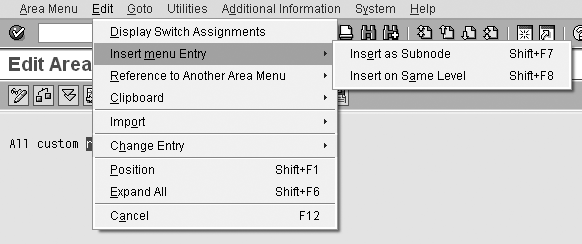
Figure 2
Area menu maintenance
It is very easy to add nodes and sub-nodes — all you need to do is go to the Edit
menu item, choose Insert menu Entry, and then insert the desired item as a node or a sub-node. You can
also select Reference to Another Area Menu to insert a reference to another area menu.
The second approach is what I call a more technical and integrated approach. This is the preferred
approach for developers who usually use Object Navigator to create and maintain objects in their SAP systems. It is
advantageous in that it allows you to create area menus within the context of other related developments and is therefore
a more integrated approach. The one prerequisite to using this method is that you need to specify the name of a package
(formerly known as development class). Here are the steps you need to execute for this method:
Step 1. Run transaction SE80. This takes you to the Object Navigator
Workbench.
Step 2. Click on the Repository Browser tab. Select Package from the
drop-down menu for the object category.
Step 3. Enter the name of the package in which you want to create the new area menu — for
example, ZCUST1. Click on the display icon .
Step 4. Highlight the package name and right-click to access the context menu. Follow
menu path Create>More>Area Menu. A pop-up window prompts you to provide a technical name and a
short description for your area menu. Press Enter to go to the area maintenance creation screen shown in Figure 2 and
follow the described process to add nodes and sub-nodes.
Now that I’ve shown you where to go to create area menus, let me share some tips for using
them.
6 Tips for Using Area Menus
Tip 1. You can save your most frequently used area menus. Click on the
Favorite button in Figure 1 each time you specify the name of an area menu in the maintenance mode. As
you can see, I saved a couple of the area menus that I use frequently. Next time, all I need to do is double-click on the
desired item from the list of My Favorites.
Tip 2. Display transaction codes in the area menus. Transaction codes are indispensable
— displaying them is good for printing and for taking screenprints. Also, if users cannot run certain transactions
in an area menu, they need to provide the transaction code to the security administrator.
The toggle switch in Additional Information>Transaction Code Display On/Off allows
users to toggle their view of the transaction codes for each activity in the area menu maintenance screen that is
displayed once you carry out the steps outlined earlier for either of the two methods. Figure 3 shows an
example for the SAP standard user menu COND_AV in which the Technical Key column shows
the transaction codes.
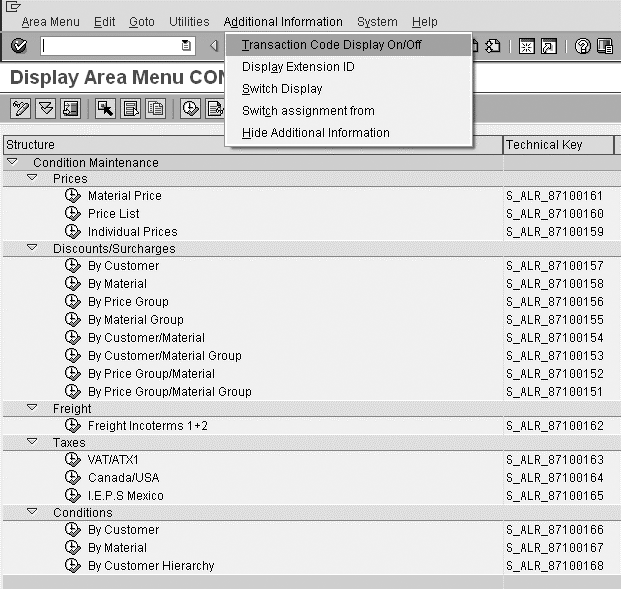
Figure 3
Toggle between transaction code display on and off
Tip 3. Note the Buffering active flag. When you select
Goto>Attributes in Figure 3, a pop-up screen appears that lists the technical attributes of the
particular area menu. Pay extra attention to the Buffering active flag at the bottom of the pop-up
screen, as shown in Figure 4. The area menus are relatively stable entities, so SAP allows you to buffer
these in an effort to improve performance. When you buffer the area menus, the system does not have to retrieve the server
version each time you access it.
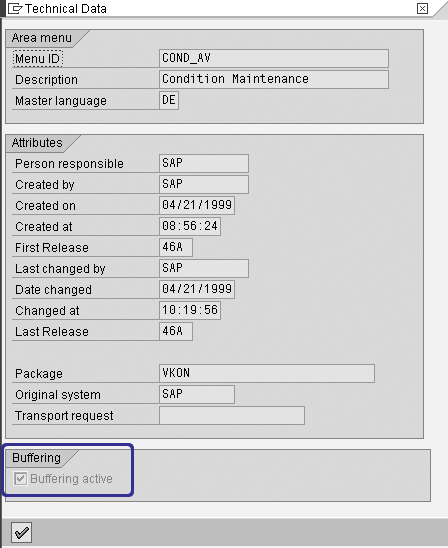
Figure 4
Buffering of area menus
Tip 4. Your security administrator needs to set up access to the area menu. Creating a
user menu does not mean that other users have automatic access to it. To roll this out to the appropriate groups of
people, you need to use SAP’s role-based security setup. Basically, you must include the area menu in a role, which
you in turn assign to the user in the user’s profile maintenance. This is the SAP security administrator’s
domain, so you’ll need to enlist this person to carry out all of the security-related steps.
Tip 5. Important tables for area menus. A few important tables in your SAP system
(regardless of the release you are on) contain information pertinent to area menus. These are TMENU01,
TMENU01R, and TMENU01T. They contain an abundance of technical information about area
menus. For example, table TMENU01 stores information relevant to the hierarchy of area menus — all
in the form of technical IDs such as the ID of the parent, child, and sibling nodes. TMENU01R is a very
useful table that among other things contains the referenced information of each of these nodes (e.g., what transaction
codes each node points to and what kind of transaction it is). TMENU01T is the text table for area menus
and contains the text for each of the nodes in your area menu.
Tip 6. You can transport area menus to other systems. The cleanest way to do so is by
clicking on the transport icon on the initial area menu screen shown in Figure 1. This ensures that all components of that
particular area menu are transported. When you click on this icon, the system prompts you for a change request or a
transport number. Provide a suitable change request or transport number. Note that if you have saved your area menu as a
local object, you are not able to transport it.
Note
SAP enhanced the area menu capabilities significantly in R/3 Release 4.6A. Starting with this release, you can insert reports into an area menu. In fact, the convenience and the security that area menus provide render report trees obsolete. Before, you could add a report to a report tree and all users could execute it, circumventing the SAP security setup. With area menus, you can insert reports only as transaction codes. As a result, user access is always checked automatically.
Important References and SAP Notes
Good documentation on area menus is available at the SAP Help Portal at https://help.sap.com/saphelp_nw70/helpdata/en/a3/5fc53796421e38e10000009b38f842/frameset.htm. Here you
can find details about area menu maintenance and related topics.
You will find several SAP Notes if you search on “area menus” in the SAP Service Marketplace.
For your convenience, Table 1 provides a list of four SAP Notes that should help you enhance your
understanding of different features of area menus.
| 576434 |
Performance problems with area menus |
| 193251 |
Customer enhancement in area menus |
| 688720 |
Where-used list for transactions in area menu |
| 559444 |
Authorization checks for area menu creation & deletion |
|
| Table 1 |
Four important SAP Notes for area menus |
After you set up area menus and grant the proper authorizations to the transaction codes, you can use
them. Flexibility is one of the key features of area menus — you can enhance both SAP-delivered area menus and your
customized ones on an ongoing basis or design new area menus.
Anurag Barua
Anurag Barua is an independent SAP advisor. He has 23 years of experience in conceiving, designing, managing, and implementing complex software solutions, including more than 17 years of experience with SAP applications. He has been associated with several SAP implementations in various capacities. His core SAP competencies include FI and Controlling FI/CO, logistics, SAP BW, SAP BusinessObjects, Enterprise Performance Management, SAP Solution Manager, Governance, Risk, and Compliance (GRC), and project management. He is a frequent speaker at SAPinsider conferences and contributes to several publications. He holds a BS in computer science and an MBA in finance. He is a PMI-certified PMP, a Certified Scrum Master (CSM), and is ITIL V3F certified.
You may contact the author at Anurag.barua@gmail.com.
If you have comments about this article or publication, or would like to submit an article idea, please contact the editor.


