While you can handle most custom extraction needs with a generic extractor over a table or view, it’s handy to have another method for a more complicated extraction. This example shows how to create a generic extractor that uses a function module to gather and deliver data to BW.
Key Concept
A generic extractor using a function module has two pieces; the extract structure and the function module. The extract structure defines the layout of the data (the fields and field types) to provide to BW. The function module gathers and delivers the data to BW.
One of the advantages of using BW in conjunction with an R/3 source system is the wealth of standard content available to provide data from R/3 to BW. However, in many circumstances the standard content extractors do not provide all the necessary data. For these situations SAP has provided the tools to create your own custom or generic extractors in R/3.
Generic extractors can have several different sources of data. By far the easiest and most popular is creating an extractor over an existing table or view. A second alternative is to create an extractor over an SAP query. The third and probably least-used alternative is to create a custom extractor that uses a function module to provide data to BW. That is the focus of this article.
A custom extractor that uses a function module can create a much more summarized set of data than what exists in transactional data. You could load all the detailed data into BW and summarize as the data goes into the InfoProvider. However, because BW disk space is at a premium, it is preferable to summarize the data before it leaves R/3. That’s where the function module becomes very helpful. You can build logic into your function module to summarize the transactional data and only return that summarized data to BW.
I will use the venerable SAP-provided flight scheduling sample tables in this illustration. I’ll describe the process for creating a generic extractor that uses a function module to provide data to BW.
Introduction to Function Module-Based Generic Extractors
When BW triggers a load to a DataSource based on the function module, it calls the function module several times, once for initialization purposes and then again for each packet of data sent to BW. Once the function module has sent all the data, it alerts BW that the extraction is finished.
SAP provides a sample function module you can use as a template and customize for your own purposes. This sample function module is RSAX_BIW_GET_DATA_SIMPLE. I’ll use this function module as the foundation of my article.
The generic extractor function module has a specific interface; it has predefined imports, tables, and exceptions. Table 1 describes the interfaces of the function module.
The generic extractor function module has a specific interface; it has predefined imports, tables, and exceptions. Table 1 describes the interfaces of the function module.
| Parameter |
Description |
| I_REQUNR (import) |
BW provides this request identifier. It is a system-generated identifier in the form REQU_XXXXXX. BW uses this same identifier in all function module calls that relate to a single load. |
| I_DSOURCE (import) |
The name of the generic extractor |
| I_MAXSIZE (import) |
The maximum number of records that BW expects to be in each data packet |
| I_INITFLAG (import) |
A Boolean flag that indicates if this is the initialization (first) call to the function module |
| I_READ_ONLY (import) |
A test flag not needed in most extraction scenarios |
| I_T_SELECT (table) |
This table holds any selections from the BW InfoPackage. The function module should examine these selections and only return data that matches the selections. |
| I_T_FIELD (table) |
This table holds the fields that BW requests |
| E_T_DATA (table) |
The function module fills this table with data records. These records then return to BW as data packets. This table has the same structure as the extract structure defined in the generic DataSource. |
| NO_MORE_DATA (exception) |
The function module raises this exception when no more data is available |
| ERROR_PASSED_TO_MESS_HANDLER (exception) |
The function module raises this exception if an error occurred during the extraction. It alerts BW to check for error logs. |
|
| Table 1 |
Function module interfaces |
The process flow for the function module goes like this:
Step 1. BW executes an InfoPackage. This starts a background job in the source system to extract the data from the source system.
Step 2. The background job in the source system then executes the function module with the I_INITFLAG set to X. This alerts the function module to gather the initialization values and store them in static variables in preparation for later calls. If problems occur, the extractor can return an error log to BW.
Step 3. Once the function module has stored the initialization values, it passes control back to the source system background job.
Step 4. The source system background job calls the function module a second time with the I_INITFLAG set to blank. This is the first call for data. The extractor function module is responsible for gathering the necessary data and handing back the first data packet to BW.
Step 5. The source system background job then calls the function module repeatedly until no more data is available to return to BW. The extractor then raises the NO_MORE_DATA exception, which alerts BW that the extraction is done.
When BW makes the initial call to the extractor (step 4) it passes to the extractor any selections from the InfoPackage. The extractor stores these selections in static variables for use later.
The Scenario
In this example I’ll take advantage of the flight scheduling tables that are a standard part of R/3 (and BW). I’ll use two of the tables in particular, SFLIGHT, which holds flight schedule information, and SBOOK, which holds flight booking information.
The SBOOK table holds individual passenger bookings. These are stored at the individual passenger level and include data about the flight number, the date of the flight, the weight of the passenger’s baggage, and the actual price the passenger paid for the flight. The SFLIGHT table holds details about the planned flights, including the expected revenue for each flight.
I’m interested in reporting on summarized data to answer the following question:
For each calendar week, what is the total number of passengers, the total luggage weight, the total actual revenue, and the total expected revenue by class?
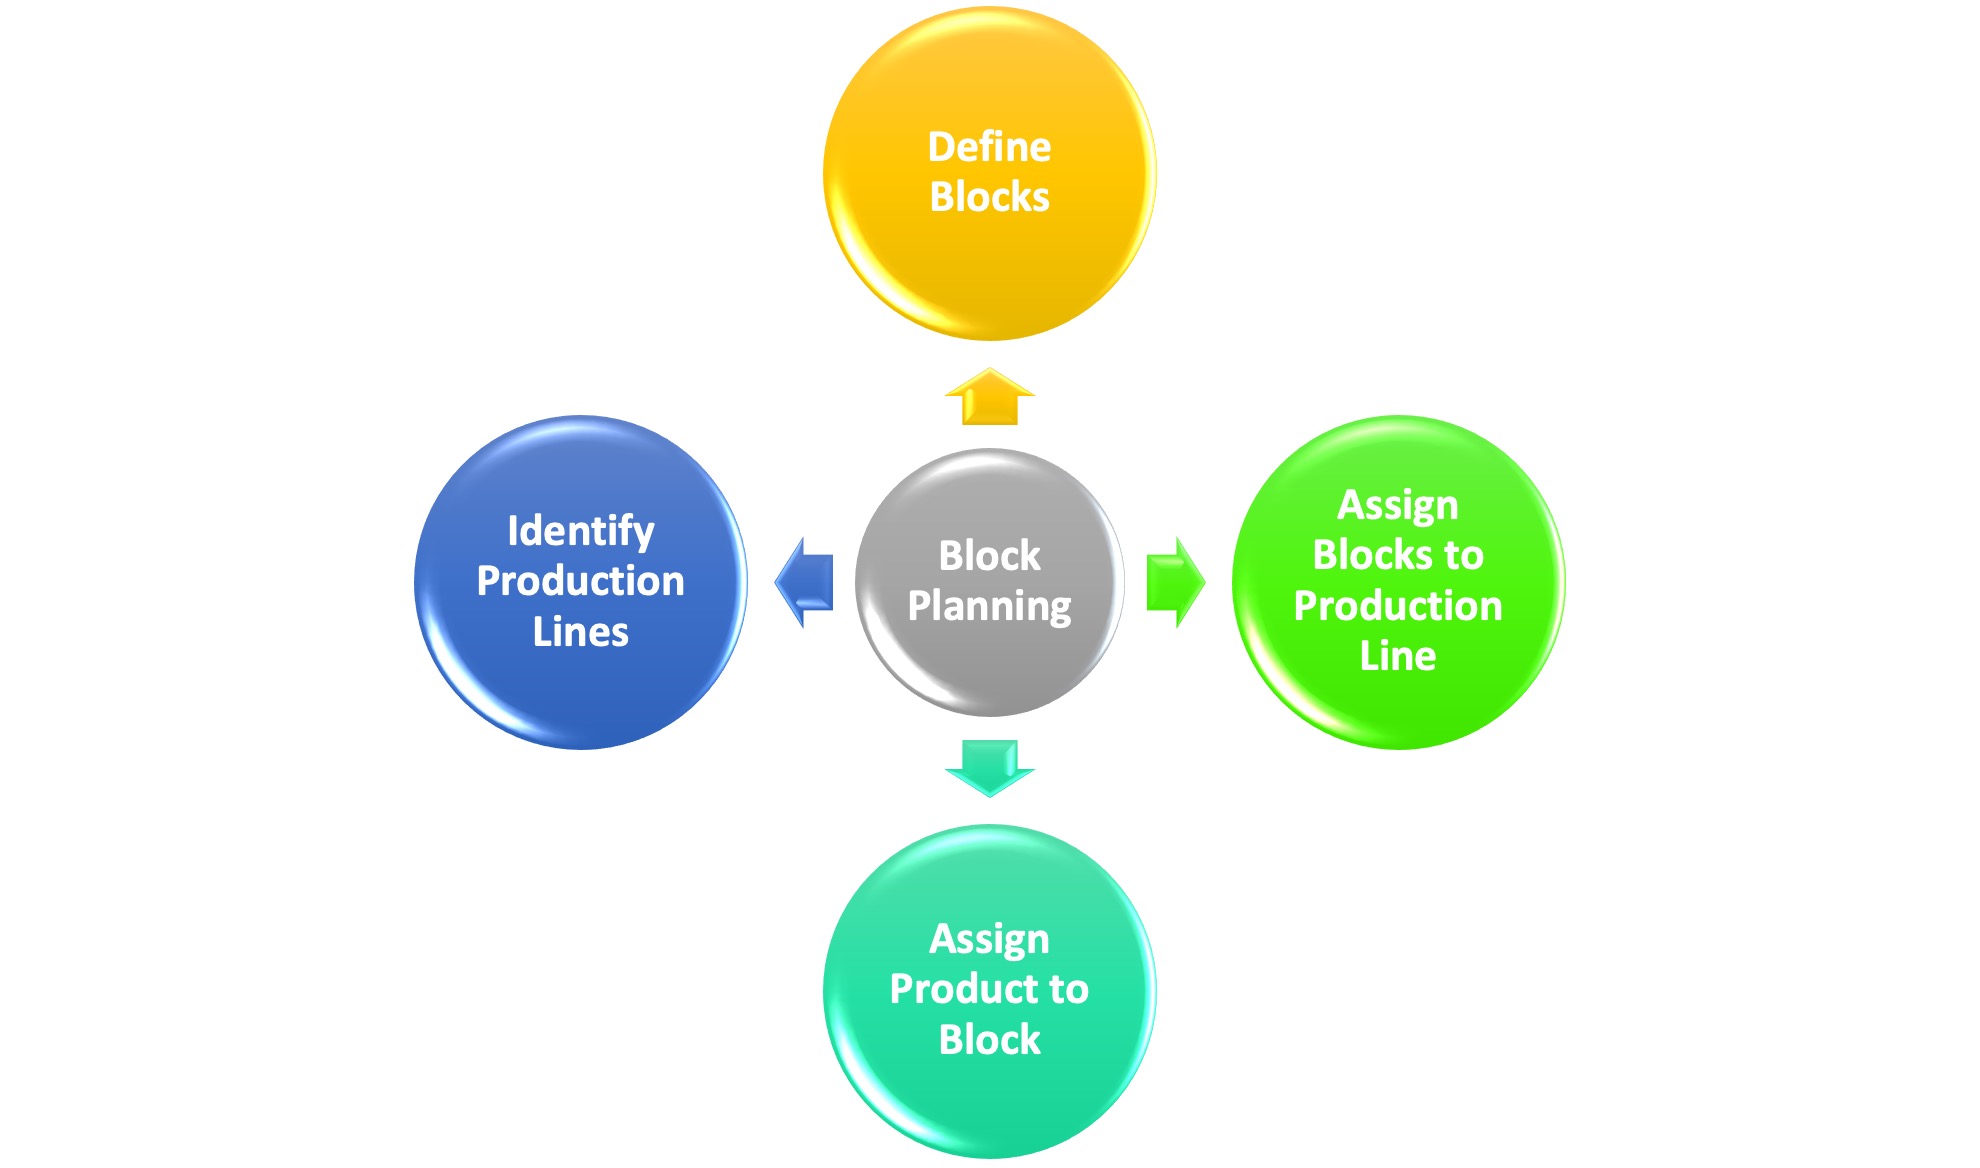
Take these four steps to create the new generic extractor:
Step 1. Create the extract structure in the source system. Create a new database table as your extract structure. This new table serves two purposes. It defines the fields that you return to BW and it stores the actual summarized data between calls to the generic extractor. I’ll name the new table ZBW_SFLI001_DS.
Step 2. Create the function module in the source system. Copy the RSAX_BIW_GET_DATA_SIMPLE function module and modify it for your specific requirements. To make it easier to relate all the different objects together, give your function module the same name as your database table: ZBW_SFLI001_DS.
Step 3. Create the generic extractor in the source system. Create a new transactional data generic extractor based on your extract structure and function module. Stick with your consistent naming and call the generic extractor ZBW_SFLI001_DS.
In my example I’ve given all three objects (the database table, the function module, and the generic extractor) the same name. While this makes it easier to keep the relationship straight, it might be confusing for some developers. It’s not necessary to name all the objects the same name.
Step 4. Test the extractor.
Step 1. Create the Extract Structure
The first part of a generic extractor is the extract structure. This is typically a database table that defines what information to send to BW. Since you are looking for a very specialized subset of data, you need to create your own database table using transaction SE11. The database table should contain the fields in Table 2.
| Field |
Type |
Description |
| MANDT |
CLNT (3) |
The database client |
| ZREQUNR |
CHAR (30) |
The BW request identifier |
| ZCALWEEK |
NUMC (6) |
The calendar week in the format YYYYWW (e.g., 200526) |
| ZCLASS |
CHAR (1) |
The passenger class
F – First class
Y – Business class
C – Coach |
| ZTOTPASS |
INT4 (10,0) |
The total number of passengers in this class this week |
| ZTOTREV |
CURR (15,2) |
The total revenue for all passengers in this class this week |
| ZEXPREV |
CURR (15,2) |
The expected revenue for all passengers in this class this week |
| ZCURRENCY |
CUKY (5) |
The currency key (USD) |
| ZTOTBAGWT |
QUAN (8,4) |
The total baggage weight for all passengers in this class this week |
| ZWTUNIT |
UNIT (3) |
The baggage weight unit (LB) |
|
| Table 2 |
Fields required for database table |
|
It’s crucial to include the request identifier (ZREQUNR) in the extract structure definition (and in your function module logic) because it’s possible for BW to have multiple data loads with your generic extractor happening at the same time. If multiple loads from BW happen at the same time, the request identifier is the key that separates the data loads.
|
Create this new database table using transaction SE11 (Figure 1).
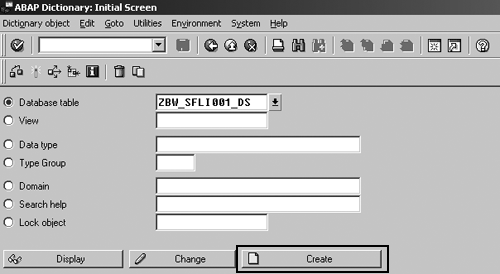
Figure 1
Create the database table
Enter the text description of the database table and fill in the initial settings as shown in Figure 2. The Delivery Class setting indicates that this is a normal data table (for example, not a customizing table or a control table). Choose the X Display/Maintenance Allowed option for the Data Browser/Table View Maint. setting so that you can modify the table contents (add/change/delete records) using the SE16 transaction. This is especially helpful in cleaning up the data in the table during the development process.
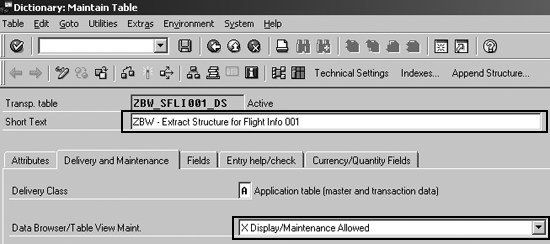
Figure 2
Initial settings to create the database table
The next step is to define the fields in the table. When possible, use existing data elements to define the fields. This helps ensure consistency with similar fields in other tables and makes the table a better participant in the upgrade process.
If an existing data element doesn’t suit your needs, you can explicitly define the field using the built-in data types. In Figure 3 you define most of the fields using existing data elements. However, several fields don’t have a good match with an existing data element. Define those fields by clicking on the Built-in type button.
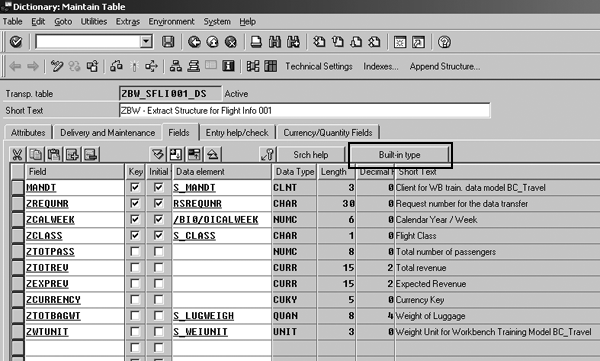
Figure 3
Define fields with Data element
In Figure 4, define the remaining fields using built-in data types INT4, CURR, and CUKY.

Figure 4
Define remaining fields
Two of the fields (ZTOTREV, ZEXPREV) are currency-type fields (they need a currency code to specify exactly the currency being used). In addition, ZTOTBAGWT is a weight-type field and needs a weight unit of measure associated with it. Click on the Currency/Quantity Fields tab to enter currency and unit fields.
In Figure 5, complete the definition of the currency and weight key figures by assigning a currency key to ZTOTREV and ZEXPREV and assigning a unit of measure key to ZTOTBAGWT.
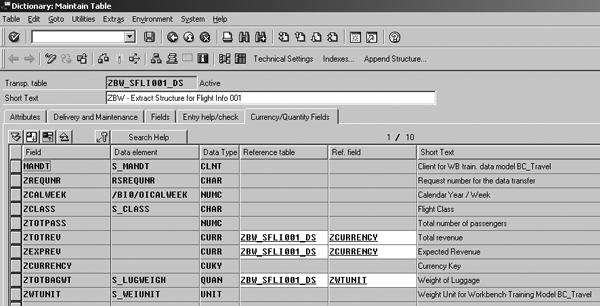
Figure 5
Define the reference fields for currency and weight key figures
That concludes defining all the fields in the table. The last step is to define the storage parameter settings. This setting includes an estimate of how many data records will be in the table at one time, which allows the system to make the appropriate settings in the underlying database system. In my example, I’m loading a small number of records during each load. The function module empties the table between loads so the number of records in the table at any one moment is small.
Click on the Technical Settings button in Figure 3 to complete the definition on the screen shown in Figure 6. Save and activate the new table, as shown in Figure 7. When you activate the new table, the system may prompt you for a transport request. If you are unsure how to proceed, contact your Basis team.
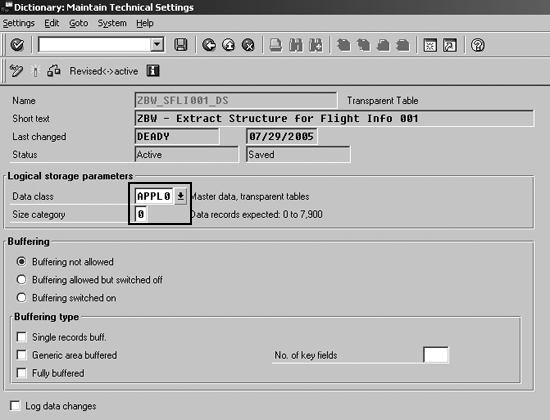
Figure 6
Technical settings for the table
Figure 7
Activate the new table
Step 2. Create the Function Module
The next step is to create the function module that BW will execute. Recall from my earlier discussion that the function module needs a very specific interface (imports, exports, tables, exceptions). You could create the function module from scratch, but it’s much easier to copy the template provided by SAP. To copy the template function module, execute transaction SE37. Enter the template function module name (RSAX_BIW_GET_DATA_SIMPLE) and click on the copy icon (Figure 8).
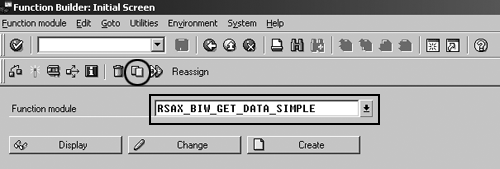
Figure 8
Copy the RSAX_BIW_GET_DATA_SIMPLE function module
BW asks you to supply the new function module name and a function group (Figure 9). If you’re not sure about the function group, your ABAP team can provide assistance.
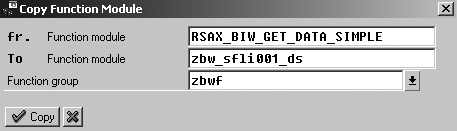
Figure 9
Add function module name and group
Next, BW prompts you for a transport request. Create a new transport to hold the new function module. If you are unsure how to proceed, contact your Basis team. Now, edit the new function module. Click on the Change button you saw in Figure 8.
Change the table specification that transfers the data to BW. On the line containing the definition of the E_T_DATA table, change the type to ZBW_SFLI001_DS (the name of your extract structure) as shown in Figure 10. This format of the data that the function module returns must match the extract structure you define in the generic extractor.
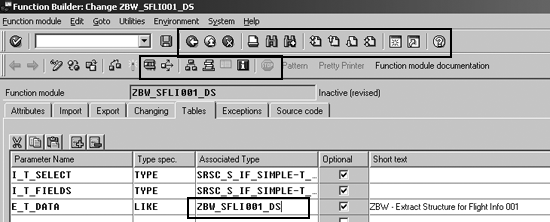
Figure 10
Define the function module Tables interface
Next you customize the source code for your purposes. You can find the complete source code available via this link. The flow chart in Figure 11 shows the function module’s logic.
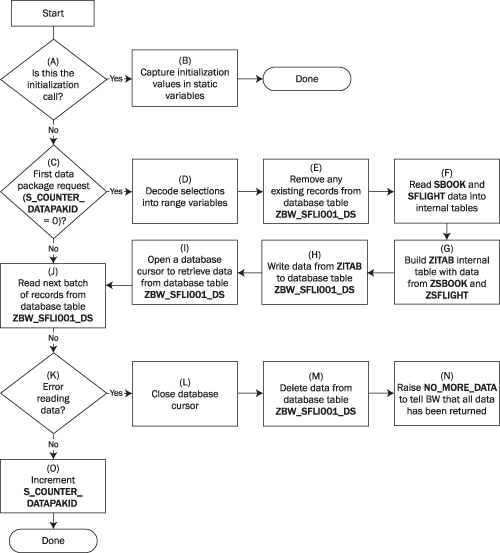
Figure 11
Function module logic
Parts of the function module are generic and work with slight modifications for other function module extractor projects. For example, sections A through C check to see if this is the first call to the function module and handle the initialization steps. Sections J through O handle any errors that the function module encounters while reading data. Other sections are specific to the particular task at hand. Sections D through I are the core of the function module and are responsible for reading the flight information, summarizing it, and putting the summarized results into the ZBW_SFLI001_DS table.
The logic in sections F, G, and H reads all of the flight information and fills the ZBW_SFLI001_DS table with the summarized information on the first non-initialization call of the function module. Once the system gathers the data and places it into the ZBW_SFLI001_DS table, then subsequent calls to the function module simply read the next chunk of data from the table.
In many cases, a generic extractor provides selections that BW uses to specify a subset of the data. Recall the question that I’m seeking to answer: For each calendar week, what is the total number of passengers, the total luggage weight, the total actual revenue, and the total expected revenue by class? A natural extension of this exercise is to specify for which calendar weeks and passenger classes you want to extract data. Do this using selections. When you define the actual extractor, indicate that ZCALWEEK and ZCLASS are selections. You then need to put code into the function module to decode these selections and select the data appropriately (section D).
Step 3. Create the Generic Extractor
The final step is to create the actual extractor in the source system. Execute transaction SBIW and navigate to the Maintain Generic DataSources option. Click on the execute icon.
Enter the name of the new extractor (Figure 12) and click on the Create button. In this example I’ve given the extractor the same name as the database table and the function module, but that’s not a requirement.
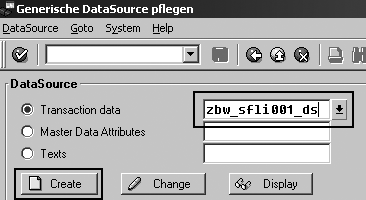
Figure 12
Specify the generic extractor name
By default the extractor pulls from a database table or view. However, you want the extractor to use a function module to gather and deliver the data. Fill out the required fields and then click on the Extraction by FM button (Figure 13).
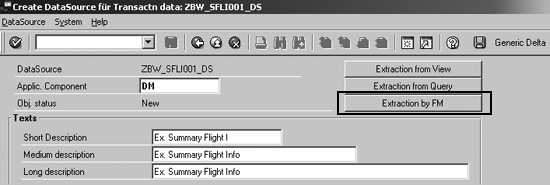
Figure 13
Settings for the generic extractor
Enter the database table to use as the extract structure and the function module that is responsible for extracting the data (Figure 14). Once you’ve specified the extract structure and function module, click on the save icon.
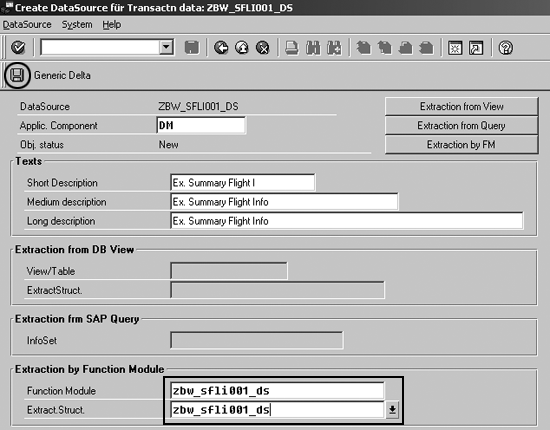
Figure 14
Specify the function module and extract structure
Finally, select the fields that will be available as selections in the InfoPackage. Calendar Year/Week and Flight Class should be the selections (Figure 15).

Figure 15
Specify generic extractor selections
Click on the save icon. You have created the extractor. BW may prompt you for a transport when you save the extractor. If you are unsure about how to proceed, contact your Basis team.
Step 4. Test the Extractor
The final development step is to test the extractor. Use transaction RSA3 to execute a test load (Figure 16).
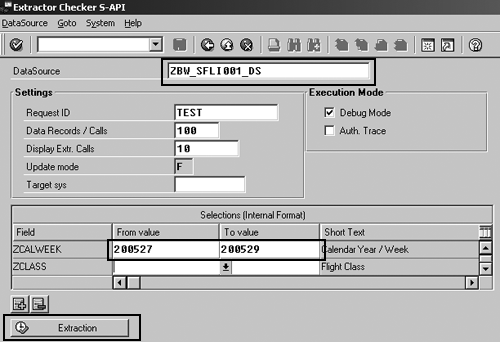
Figure 16
Test the extractor using transaction RSA3
Notice that you must enter the calendar week in system format (YYYYWW). This is required when using the extraction tester.
You can use the Debug Mode check box in Figure 16 to debug your function module. Check this box and then click on the Extraction button. The extraction starts and immediately enters debug mode just before making the first (initialization) call to your function module. Press F5 twice to step down into your function module.
Now the execution is inside your custom function module as shown in Figure 17. From here you can set breakpoints and check variable values. If you need assistance in debugging the function module, contact your ABAP team.

Figure 17
Debug your generic extractor function module
Once the extractor is done and you test it, you can replicate DataSources in the BW system, create a transfer structure and communication structure (InfoSource), and create an InfoPackage to load the data. After you execute the InfoPackage, the BW system requests data that triggers the execution of the function module.
David Eady
David Eady is the reporting team lead of the SI Corporation MIS team headquartered in Chattanooga, TN. The reporting team is responsible for all aspects of SAP information delivery. David has been with SI Corporation for six years and has been involved with BW for the last four years. He has a BS degree in industrial engineering from Mercer University and lives with his wife and two daughters in the foothills of northwest Georgia.
You may contact the author at eadydd@comcast.net.
If you have comments about this article or publication, or would like to submit an article idea, please contact the editor.