Compare InfoProviders between two systems using a custom export program, InfoProvider Remote Comparison program, and Remote Function Call connections. Acquire the needed code, configure your system, and learn how to use this program.
Key Concept
The InfoProvider Remote Comparison program evaluates InfoProvider changes between systems (e.g., from a development system to a quality assurance system). You can create this program using custom configuration and ABAP code. Some people may need help from a developer to install the utility.
Have you ever wanted to compare an InfoProvider in development to the same one in quality assurance (QA) or production, or between QA and production? There is not an easy or reliable way to see the changes between the systems. A program I developed highlights items that are added or removed, which helps reduce transport errors by showing the changed objects.
The normal procedure for comparing programs is to review the transport logs or flip between the screens trying to identify new and changed objects. Another option for doing this is to download certain tables and compare them using Microsoft Excel, but there are so many tables with this option that it’s difficult to cover all of the properties.
These manual comparison methods lend themselves to one-off scenarios, and using these methods or similar methods is labor intensive and difficult. In addition, it is impossible to see all the InfoProvider properties. The complexity increases with multiple InfoProviders, types of InfoProviders, complex landscapes, and multiple project phases.
In this article, I show you how to use a custom InfoProvider Remote Comparison program to compare InfoProviders across systems. I explain how the process works and how to configure it in your SAP system. The program is built on a SAP NetWeaver BW 7.01 system, and I have seen the same classes or function modules in a 7.0 system. As far as I know, this is the first program of its type.
How the InfoProvider Remote Comparison Utility Works
The InfoProvider Remote Comparison utility identifies what has changed in a given InfoProvider in one system compared to another. It can analyze InfoCubes, DataStore Objects (DSOs), MultiProviders, InfoSets, aggregation levels, and InfoObjects that are listed as an InfoProvider. The analysis is based on the InfoProvider type and can check more than 100 different properties for each InfoProvider. For this reason, I recommend selecting the Differences Only option on the main screen when running this utility.
The utility can directly access any system using a Remote Function Call (RFC) connection. This is the preferred method because the program retrieves all the data without any user involvement. This is an easy method for comparisons between development, quality assurance, and preproduction. Sometimes there are limitations for creating RFC connections between production and all the other systems. To overcome these limitations, there is a second comparison program in the utility that you can run in the target system. It exports all the necessary files to a directory on a user’s PC.
The program has two comparisons for each InfoProvider. The first pass compares the base system (where the program is started) to the target system. During the first pass it identifies the additions or deletions between the two. The second pass focuses on objects or settings that are removed in the base system, because the first pass identified all the common settings that are changed. It highlights in red any second pass change in which the setting is removed.
Due to the number of parameters that can change, the largest number of verifications occurs with InfoObjects. One unique feature is the additional settings that can be made under the Attributes tab. This forces the report to show additional lines that are subordinate to the attribute. The program groups the properties together (e.g., time dependency and text), and groups are displayed after the attribute. This also appears with the indexes in the DSO.
The check for the authorization flag is a single-pass verification on the base system (not two passes). The program errs on the side of caution and highlights any new authorization flag that has been set. This may occur when a new InfoObject is added to an InfoProvider and the InfoObject is set to Authorization Relevant. Usually there are not many authorization-relevant InfoObjects, so it should be easy to manually verify. I plan to add a future enhancement to correct this feature.
The verification with InfoSets is more basic than with other InfoProviders. The program has the normal field name, F, with the F followed by a number and the InfoObject name added to help with identification. For example, a normal output shows F101, but it is cumbersome to look up F101. So, my program shows F101 (0MATERIAL). This allows for a comparison between the fields being added or removed. It excludes the join types, the number of joins, and which fields are contained in the join.
This tool reduces the risk that comes with moving transports by identifying changes before they are moved to the next system. The program does not look at specific changes in a transport, but uses the current version of the object in the system. This gives the user the opportunity to see which objects need to be added to a transport. The items highlighted in red are the ones that need to be researched, because they might require deleting data in the target system or could cause issues with reports that are dependent on the existing settings.
A good example of the usefulness of the program is when a mapping change is made to a MultiProvider. In this example, another user could have removed a particular mapping, and it’s difficult to see the change without this utility. Thus, using the InfoProvider Remote Comparison utility helps lower the number of errors during a cutover.
The output of the Remote InfoProvider Comparison utility helps with generating release notes, which describe the changes that are about to be applied to production. Using the local file button, you can export the results to a flat file (Figure 1). There should be two records for every InfoProvider showing the last changed by and time stamp of the change. I have found that these two records are beneficial for finding out who to contact for the history of the changes and when the last changes were made, but for release notes I would filter out these two records.

Figure 1
Downloading the output (choose the button in red)
Configuration Steps
The following steps take you through the complete set-up for the utility. You need to make sure that your authorizations for ABAP programs (transaction code SE38), function modules (SE37), and transaction codes (SE93) are allowed.
Function Module
Create a function group using transaction code SE37 (Figure 2).
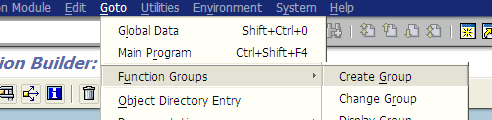
Figure 2
Create a function group
Enter a technical name in the Function group field (e.g., Z_REMOTE_COMPARISON) and a description in the Short text field (e.g., Remote Comparison) (Figure 3).
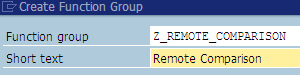
Figure 3
Function group prompt
Assign the function group to a package and create a transport (Figure 4). The transport is used to collect the next set of objects and move them to the next system.
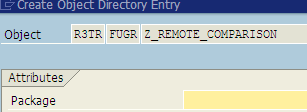
Figure 4
Package assignment
Create the function module. Use transaction code SE37, enter Z_GET_INFOPROV_INFO into the Function Module field, and click the Create button (Figure 5).
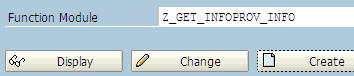
Figure 5
Create Z_GET_INFOPROV_INFO function
In the next pop-up window, type in the function group (Z_REMOTE_COMPARISON) and short text (Get InfoProvider Info) as shown in Figure 6. Then click the Save button.
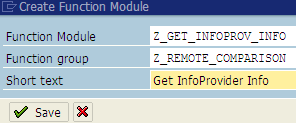
Figure 6
Enter function parameters
This next set of screen captures takes you through each function module tab and shows the parameters that need to be configured.
After saving the information in Figure 6, click the Attributes tab and make sure you select the Remote-Enabled Module radio button (Figure 7). This allows for the function module to be called from a different system.

Figure 7
Function module Attributes tab
Click the Import tab. Enter the parameters below for the various fields (Figure 8):
- Parameter Name: INFOPROVDER
- Typing: TYPE
- Associated Type: RSINFOPROV
- Pass Value: Checked
- Typing: TYPE
- Associated Type: RSOBJVERS
- Pass Value: Checked
The SAP system auto-populates the Short text column based on the associated type.

Figure 8
Function module Import tab
Next, click the Export tab. Enter the parameters below for the various fields (Figure 9):
- Parameter Name: SYSTEM_ID
- Typing: TYPE
- Associated Type: CHAR08
- Pass Value: Checked
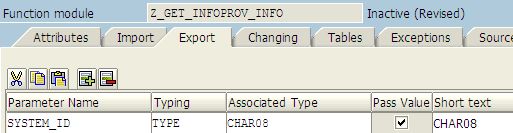
Figure 9
Function module Export tab
- Parameter Name: S_SYS_DTA
- Typing: TYPE
- Associated Type: RSD_S_DTA
- Pass Value: Checked
- Parameter Name: T_SYS_PRO
- Typing: TYPE
- Associated Type: RSD_T_DTA_PRO
- Pass Value: Checked
- Parameter Name: T_SYS_PART
- Typing: TYPE
- Associated Type: RSD_T_CUBE_PART
- Pass Value: Checked
- Parameter Name: T_SYS_MULTI
- Typing: TYPE
- Associated Type: RSD_T_MULTI_IOBJ
- Pass Value: Checked
- Parameter Name: T_SYS_INDX_IOBJ
- Typing: TYPE
- Associated Type: RSD_T_ODSO_INDX_IOBJ
- Pass Value: Checked
- Parameter Name: T_SYS_ATR
- Typing: TYPE
- Associated Type: RSDO_T_ATR
- Pass Value: Checked
- Parameter Name: T_SYS_ATR_NAV
- Typing: TYPE
- Associated Type: RSDO_T_ATR_NAV
- Pass Value: Checked
- Parameter Name: T_SYS_INDX
- Typing: TYPE
- Associated Type: RSD_T_ODSO_INDX
- Pass Value: Checked
- Parameter Name: T_SYS_VAL_IOBJ
- Typing: TYPE
- Associated Type: RSD_T_IC_VAL_IOBJ
- Pass Value: Checked
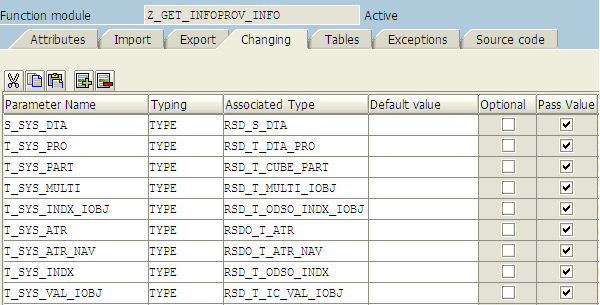
Figure 10
Enter parameters under the Changing tab
Under the Source code tab, copy and paste the code from the attachment Z_GET_INFOPROV_INFO, which available to download by clicking this link. The entire source code on the screen can be replaced with the downloaded version (Figure 11).
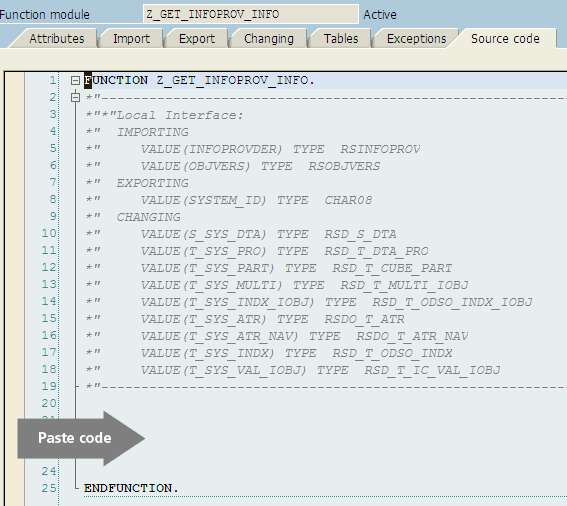
Figure 11
Paste the code under the Source code tab
Create an RFC Connection
Use transaction code SM59 (this step is usually performed by the Basis team). The Logon & Security tab is important because the settings force you to log in to the remote system using your ID and password (Figure 12). This makes the program run in the foreground and should be fine for a limited number of InfoProvider checks. However, for background executions, you might want to create a specific user who can log in using a populated password in the RFC. The user can be set to only access the function module Z_GET_INFOPROV_INFO.
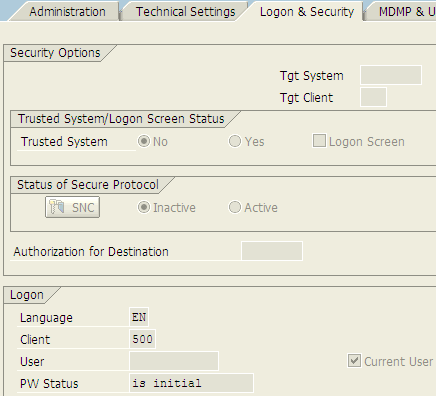
Figure 12
Create the RFC configuration
Create an InfoProvider Comparison
Create the program Z_INFOPROVIDER_COMPARISON using transaction code SE38. Enter the program name into the Program field and click the Create button (Figure 13).

Figure 13
Create a comparison program
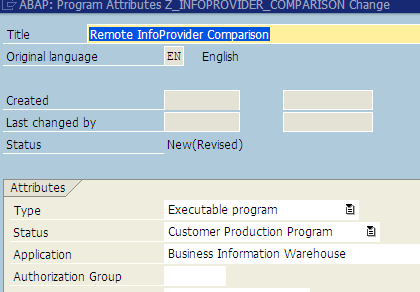
Figure 14
Enter program attributes
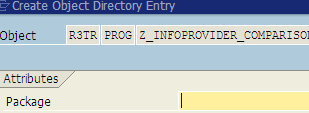
Figure 15
Package assignment
Copy and paste the code from the attachment Z_INFOPROVIDER_COMPARISON, which is available by clicking this link. Delete the default code and replace it with the downloaded version (Figure 16). Click the Activate button.
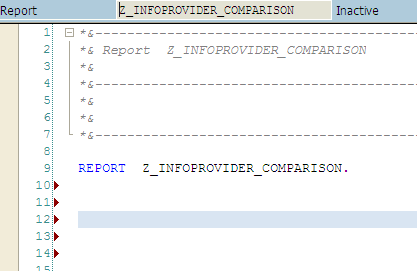
Figure 16
Add the comparison code
Program Export InfoProvider Information
Create the program Z_EXPORT_INFOPROVIDER using transaction code SE38.
Type in the program name and click the Create button (Figure 17). The program is used to copy the InfoProvider properties from a system to your PC. It is used when there is not an RFC connection between systems.

Figure 17
Create the export program
In the screen that appears, populate the Title, Type, Status, and Application fields (Figure 18). Click the Save button.
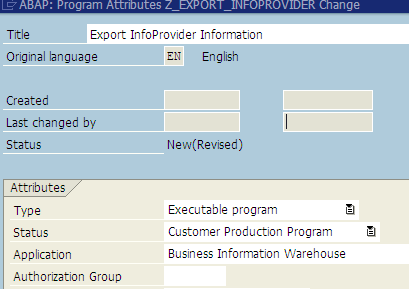
Figure 18
Enter the program attributes

Figure 19
Assign a package
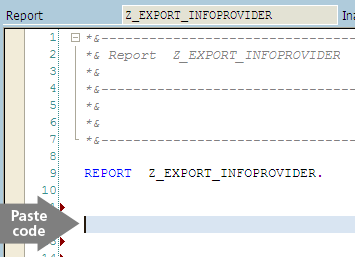
Figure 20
Add the export code
Transaction Codes
Using transaction code SE93, create the transaction code for the program Z_INFOPROVIDER_COMPARISON. Enter ZRIC into the Transaction Code field and click the Create button (Figure 21). This is the name of your new transaction code.

Figure 21
Create a new transaction code
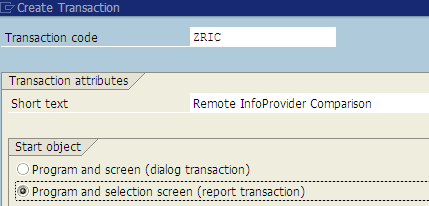
Figure 22
Configure the transaction code

Figure 23
Set the transaction properties for transaction code ZRIC
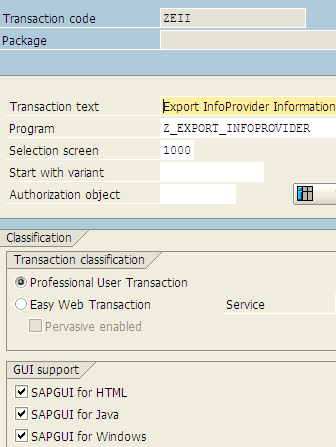
Figure 24
Set the transaction properties for transaction code ZEII
Executing the Programs
Now it’s time to run the utilities, but first you need to release the transport and move the objects to the next systems (e.g., QA, user acceptance, training, production). Test the export utility (transaction code ZEII) and make sure it downloads the properties from the system to a PC. Once complete, run the comparison utility (transaction code ZRIC) using the file option, and choose the location on the PC to which the files were saved. The final test is to use an RFC (if created). There can be a short delay or waiting period when the two systems initiate the link and transfer the data.
Remote InfoProvider Comparison
You can run the Remote InfoProvider Comparison program by executing transaction code ZRIC (Figure 25) or by using transaction code SE38 with the program Z_INFOPROVIDER_COMPARISON. The preferred method is to use ZRIC, but security policies may force you to use SE38.

Figure 25
Run the Remote InfoProvider Comparison program
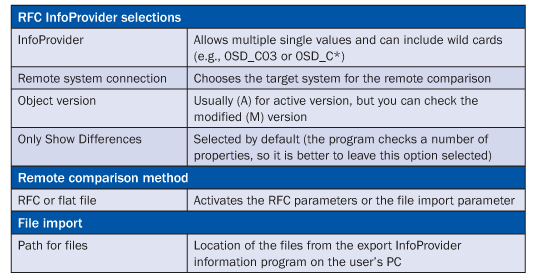
Table 1
Example of comparison inputs
Export InfoProvider Information
You can run the Export InfoProvider Information program by executing transaction code ZEII (Figure 26) or by using transaction code SE38 with the program Z_EXPORT_INFOPROVIDER. The preferred method is to use ZEII, but security policies may force you to use SE38.
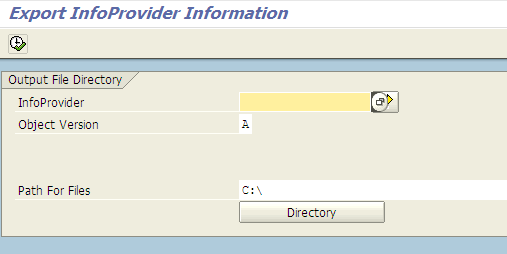
Figure 26
Running the Export InfoProvider program
Table 2 shows examples of the parameters that can be used in the export program.
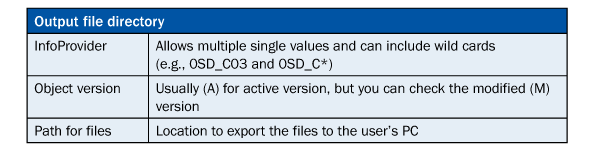
Table 2
Example of export inputs
Figure 27 shows the resulting comparison between InfoProviders using my custom program.
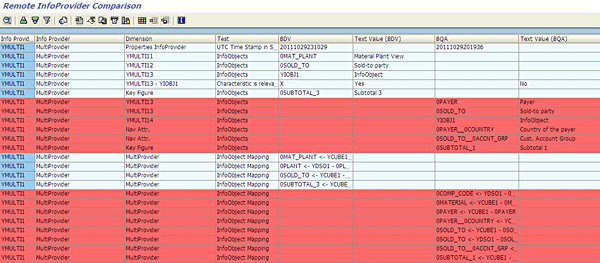
Figure 27
Review of two InfoProviders using my InfoProvider Remote Comparison program
Keith Corley
Keith Corley has 12 years of experience specializing in SAP NetWeaver BW, with projects ranging from version 1.2 to 7.01, including seven years as a senior consultant for SAP America. He has more than 16 years experience in the information technology industry as a team lead, architect, and developer, with extensive design and technical experience and various implementations in industries ranging from consumer products to mining, to the public sector.
You may contact the author at keith.corley8@gmail.com.
If you have comments about this article or publication, or would like to submit an article idea, please contact the editor.