Learn how to run your payroll process more smoothly and avoid time collisions and errors in payment by using time constraint classes assigned to the time infotypes.
Key Concept
Time constraints are assigned to infotypes and are used to control how the time entries in infotypes react to the other time entries with the same date.
Say an employee is scheduled for an eight-hour work day. A number of errors could potentially occur when recording an employee’s work, sick, and vacation time that cause time collisions. For example, the employee wants to record two absences for this day, four hours as sick time and four hours as vacation. The employee correctly enters four hours of sick time, but mistakenly enters five hours of vacation time. Or perhaps the employee records an attendance when a full-day absence has already been recorded. This is known as a time collision and can cause erroneous payments from your payroll system. SAP ERP HCM provides a mechanism that checks for and controls time collisions by displaying collision messages during time entry based on configuration settings.
I will show you how to configure these settings and explain the various collision checks available in the SAP system so you can take advantage of this feature and prevent overlapping time.
Configure Tables for Time Infotypes
The collision checks are assigned to the infotypes in table V_554Y_B. Access this table via IMG menu path Time management > Time data recording and administration > Specify system reaction to Overlapping time infotypes.
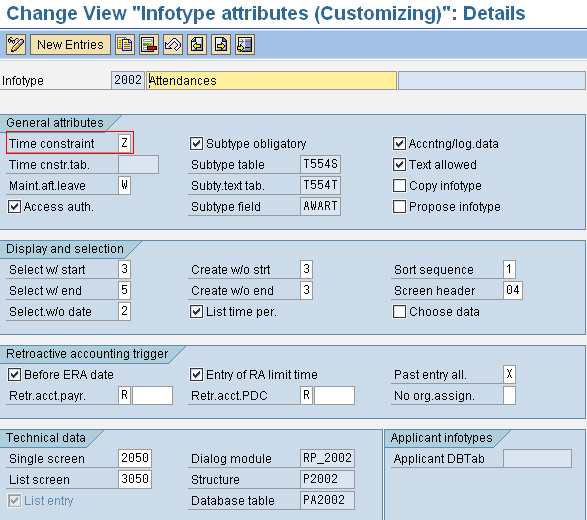
Before configuring table V_554Y_B, you need to configure table V_T582A for all the time infotypes in use at your organization: 2001, 2002, 2003, 2004, 2006, 2007, 2011, 2012, and 2013 (Figure 1). Access this table via IMG menu path Personnel management > Personnel Administration > customizing procedures > infotypes > Infotypes and then on the popup window …. You can use table V_T582A to specify the time constraint classes for all the infotypes, not just time infotypes. However, I am discussing just the time infotypes. For each time infotype, the time constraint field is set as Z. This specification tells the system to look at table V_554Y_B for the time constraint.

Figure 1
Time constraint specification for attendance infotype in table V_T582A
Assign Time Constraint Classes to Attendances/Absences
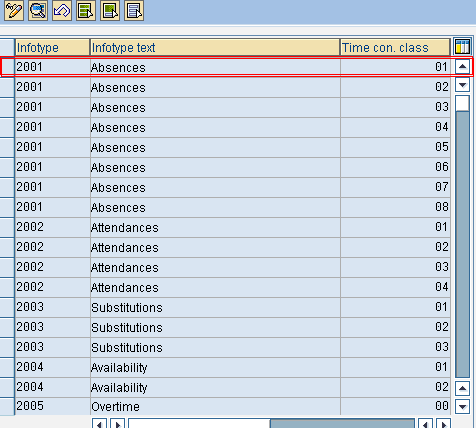
Before I discuss controlling collisions, you need to know how these time constraint classes are assigned to attendances/absences. Follow menu path Time management > Time data recording and administration > Absences > Absence catalog > Determine entry screens and time constraint classes. Double-click Determine Entry Screens and Time Constraint Classes. Choose the entry to which you want to assign the time constraint class. Figure 2 shows that time constraint class 01 (Time cstr. class 01) is assigned to the absence status SICK. You can also assign the time constraint class to other attendances/absences.

Figure 2
Assignment of the time constraint class to absence type SICK
Set Up Reactions to the Overlapping of Time Infotypes
You can specify time constraint classes in table V_554Y_B, which you can access by following IMG menu path Time management > Time data recording and administration > Specify system reaction to Overlapping time infotypes (Figure 3). Alternatively, you can use transaction SM30. The table has the time infotypes in column 1 and time constraint class (numerical value) in column 3.

Figure 3
Table V_554Y_B is where you control the collisions of time infotypes
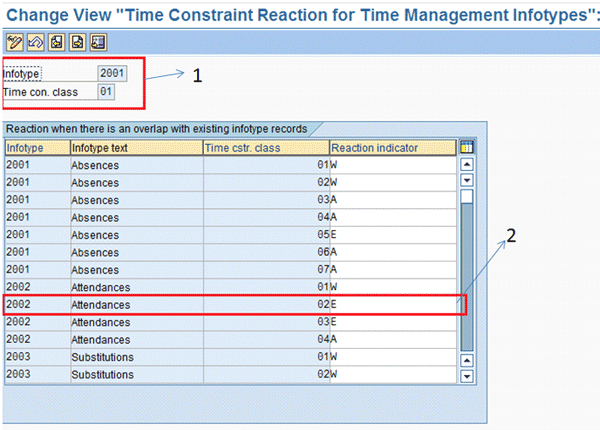
Click the first entry and you’ll see a screen like in Figure 4. Again you see all the time infotypes with the different time constraint classes. In the fourth column, you can specify how the system should react when there is an overlap of time infotypes on the same day.
For example, assume there is one absence type, sick leave (configured with the time constraint class 01), and one attendance type, BASE (configured with the time constraint class 02). If you try to record them on the same day, then the reaction set in the table is understood as follows:
- The first entry (infotype 2001, time constraint class 01) corresponds to the absence you have already recorded on that day – let’s say sick leave.
- The second entry corresponds to the attendance you want to record after recording the absence on the same day. If you try to record the attendance BASE, Reaction indicator E appears in the fourth column. Reaction indicator E is an error message that prevents you from recording the attendance. This is because BASE is configured with time constraint class 02, while sick leave is configured with time constraint class 01.
Now that I’ve shown you how to get the reaction specified in that table, I’ll explain the available options that you can specify in the Reaction indicator field:
- A: A new record is created but the old record is delimited. All collisions are displayed as a message.
- E: A new record cannot be created. The system gives an error message.
- W: A new record can be created without delimiting the old record, and a collision is displayed
- N: Works similarly to W, but collision messages are not displayed

Figure 4
Reaction indicator set up for the absence recorded with time constraint class 01
In Figure 4, you can specify the Reaction indicator for other time infotypes as well. For example, you can specify the attendance infotype when the absence of the time constraint class 01 is already recorded.
Venkat Dasika
Venkat Dasika is a certified senior SAP HR consultant. He has been consulting in the SAP HR Time/Payroll modules for more than nine years in private- and public-sector implementations.
You may contact the author at vrsdasika@yahoo.com.
If you have comments about this article or publication, or would like to submit an article idea, please contact the editor.


