Find out how you can use formula variables with hierarchies to define individual cells in a report. This six-step process offers a low-maintenance alternative to developing custom query structures in BEx Query Designer, a pre-requisite for the cell definition feature.
Key Concept
Variables are query parameters that you define in BEx Query Designer. They are filled with values when you execute the query or Web application. Formula variables represent numeric values that you can use in formulas. In addition, you can also use formula variables to select conditions and exceptions.
Often companies need to produce balance sheets and income statements as part of statutory, regulatory, and management reporting requirements. In many SAP implementations, companies typically use SAP NetWeaver BW (formerly SAP NetWeaver BI) to produce these statements. Two widely used approaches to produce these statements are:
- Using structures in BEx Query Designer: This approach has high development and maintenance cost
- Using a general ledger (GL) account hierarchy in BEx Query Designer: This approach has low development and maintenance cost
Companies typically need to define individual cell in these reports, based on the individual hierarchy node. In approach (a), you create a query structure to build the GL account structure and key figures are part of a second query structure. Using custom GL account structures can result in high maintenance costs in global implementations. For example, if you need to add a new structure element or GL account to the query structure, you need to make the changes in all the affected SAP NetWeaver BW queries.
Subsequent rollout to other countries causes the maintenance cost to increase even further. As you add more structure elements to the query structure, it becomes challenging to keep the SAP ERP Central Component (SAP ECC) Financial Statement Versions (FSVs) and SAP NetWeaver BW query structures in sync to avoid reconciliation issues.
However, in approach (b), you use a GL account hierarchy instead of a query structure to create the GL account structure. This allows you to avoid the fixed structures from approach (a). Changes to the reporting structure are handled in the SAP ECC FSV, which is extracted as a GL account hierarchy. No changes to the individual query structure are required. Because the changes originate from the FSV in SAP ECC, reconciliation between SAP ECC and SAP NetWeaver BW is not a major challenge. There is no standard way to define an individual cell based on hierarchy nodes, so I developed a way to handle this requirement using formula variables while still following the cost-effective approach (b). I’ll show you the step-by-step approach I used with SAP NetWeaver BW 7.0.
Business Example
In the retail industry, an income statement often displays % of Net Sales as a separate column. This column displays the percentage share of an individual node (text and posted nodes) in the GL account hierarchy to the Net Sales text node (Figure 1). Because Net Sales is also part of the GL account hierarchy, companies often compare the individual elements in an income statement against the Net Sales amount.

Figure 1
A sample income statement hierarchy
The % to Net Sales column has two separate requirements:
- The Net Sales (including the posted nodes) result should be 0
- For text and posted nodes, the result should be the percentage of the Net Sales text node
To meet this business requirement example I need to define an individual cell in a report.
The prerequisites for developing financial statements using approach (b) are:
- The FSV is created in SAP ECC per the company’s chart of accounts
- The FSV is extracted as a GL account hierarchy from SAP ECC to SAP NetWeaver BW
- The GL account hierarchy is used in the query to create the financial statement structure in SAP NetWeaver BW
Note
The technical design details of approach (b) are out of the scope of this article. This document focuses on addressing the challenge of defining an individual cell while still following best practices for producing financial statements.
The Six-Step Process
Step 1. Create the first formula variable using BEx Query Designer. Go to the Rows/Columns tab, right-click, and select New Formula from the context menu. Right-click the new formula, Formula 1, and select Edit. Create a formula variable in the General tab by right-clicking Formula Variables and selecting New Variable (Figure 2).
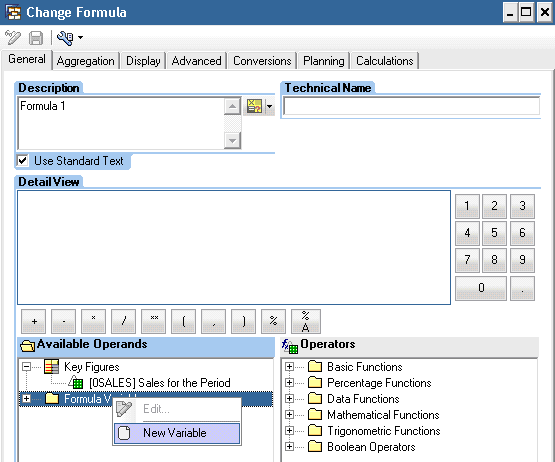
Figure 2
Create a new formula variable
Step 2. In the pop-up screen that appears after selecting New Variable, provide the technical name and description of the formula variable in the General tab (Figure 3). Then choose the Processing By and Reference Characteristic values shown in Figure 3.

Figure 3
Select values for the Processing By and Reference Characteristic fields
The formula variable is created for the GL account hierarchy. In a hierarchy, there are text nodes known as non-posted nodes (identified by folders in the GL account hierarchy in Figure 1) and actual GL accounts, known as posted nodes (identified as green triangles below the folders in the GL account hierarchy in Figure 1). Because this formula variable is created for the GL account hierarchy, I used G/L Account as the reference characteristic. I selected processing by Replacement Path because both non-posted (text nodes) and posted nodes (GL accounts) are required to define an individual cell.
Step 3. From the Replacement Path tab select the Replace Variable With, Replace With, and the offset values as shown in Figure 4. The formula variable replaces the text nodes with numeric values. Use the option InfoObject for Replace Variable With and External Characteristic Value Key for Replace With to replace the text nodes with numeric values.

Figure 4
Set up the replacement rule for the formula variable
SAP NetWeaver BW generates the technical name of the text nodes by concatenating the FSV technical name and a sequential random number. SAP NetWeaver BW uniquely assigns the numeric numbers to each text node, and thus no two text nodes have the same technical name. With the help of formula variables, you can replace the text nodes with the unique sequential numbers from the technical text node name.
Offset Start determines the start of the numeric value. I entered Offset Length as 4 because it is safe to assume that the income statement/balance sheet hierarchy will not have more than 9999 text nodes. If you apply this process to any other management report that has more than 9999 text nodes in a hierarchy, you need to select the offset length accordingly. In Figure 5, the technical name of the non-posted nodes follows the naming convention of four letters (the FSV technical name from SAP ECC) followed by a sequential random number.
Note
The 0HIER_NODE InfoObject (used for text nodes in a hierarchy) is treated as an external characteristic for the characteristic InfoObject with an active hierarchy. This is important because you can replace external characteristics using the replacement path processing type for formula variables.

Figure 5
A section of the GL account hierarchy showing technical names for text nodes
Step 4. Create the second formula variable for the posted nodes of the GL account hierarchy, using the settings shown in the General tab in Figure 6.

Figure 6
Set up the second formula variable
Step 5. From the Replacement Path tab select the Replace Variable With, Replace With, and the offset values as shown in Figure 7.
Note
If you select Interpret Result as Boolean Value, the formula variables are replaced either with 1 or 0 depending on whether the formula variable has been successfully populated or not. In my example of the formula variable ZHVAR_CK, if Interpret Result as Boolean Value is checked, then the formula variable returns 1 for the posted node and 0 for the text node.
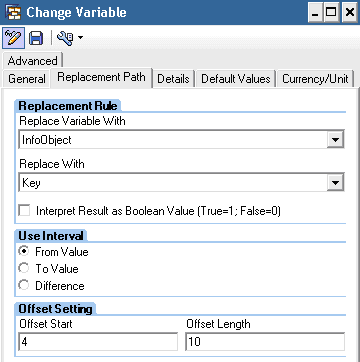
Figure 7
Set up the replacement rule for ZHVAR_CK
In this example, the formula variable ZHVAR_CK is replaced with Key instead of External Characteristic. This formula variable replaces the posted nodes with GL account master data values. Because the GL account is compounded with the chart of accounts, the technical names of the nodes are populated by concatenating the master data values of the chart of accounts and the GL account.
As shown in Figure 8, the technical name of the posted nodes follows the naming convention of four letters (LCOA from chart of accounts) followed by the master data value of the 0GL_ACCOUNT InfoObject. Offset start determines the start of the numeric value (e.g., after the four letters and defined as 4). In this example, the offset length is 10 because the 0GL_ACCOUNT InfoObject has a length of 10. The offset length is for the node technical name and not for the actual InfoObject.

Figure 8
A section of GL account hierarchy showing the technical values of posted nodes
Depending on the offset length, you can replace a portion of the GL account master data values with numeric values. For example, accounts starting with 22 are profit and loss (P&L) accounts and the identifier for sales accounts is 11. In this case, the first four letters of the sales GL account are always 2211. You can opt to choose the offset length as 4, so that all the sales accounts are replaced with the numeric value of 2211. This helps you identify sales accounts more quickly in the GL. Using 2211 also enables you to write a less complex formula if you have to perform anything specific to sales accounts in the BEx query. Depending on the design of the chart of accounts, you can change the formula variable offset length to handle the requirement more flexibly.
Step 6. Create the query using BEx Query Designer. I created a sample query to simulate the business scenario described in approach (b). The GL account InfoObject 0GL_ACCOUNT is restricted with the sample GL account hierarchy. I created two calculated key figures, Hier Var EC and Hier Var CK, to explain how the formula variables work with the sample hierarchy created for this example (Figure 9).
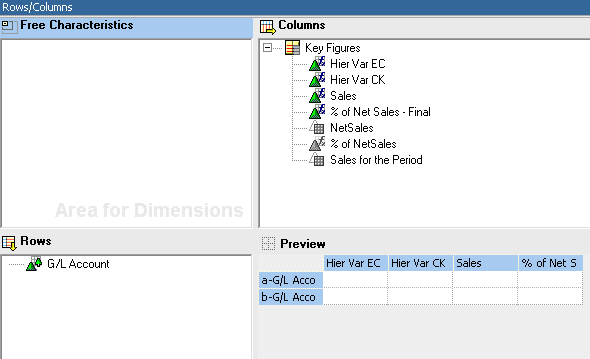
Figure 9
Sample query with two calculated key figures: Hier Var EC and Hier Var CK
In the Rows section in the sample query, I used G/L Account as the drill-down characteristic and restricted it with the financial statement version (extracted as a GL account hierarchy in SAP NetWeaver BW). In the Columns section, I used sample restricted and calculated key figures for the purpose of this business scenario. The following sections explain each restricted and calculated key figure in detail.
In Figure 10, refer to the first column highlighted in light green. The calculated key figure is created using the formula variable ZHVAR_EC (formula variable for text nodes). This formula variable returns the numeric values from the technical name of the text nodes. For the posted nodes (GL accounts), this variable returns X (error) because this variable is based on external characteristics.

Figure 10
Query results with the sample test data
Next, refer to the second column, highlighted in dark green. I created the calculated key figure using the formula variable ZHVAR_CK (for posted GL account nodes). This formula variable returns the GL account master data values, excluding the chart of account value. For the non-posted nodes (text nodes), this variable returns 0 because it is based on the characteristic key (the text nodes’ technical values are not available in 0GL_ACCOUNT master data).
Note
The first two dummy columns in the report should be hidden while creating the production query. These two columns are unhidden in the sample query to explain how the formula variables work with the hierarchy. Also, Figure 10 shows the technical name as the description because text master data was not loaded for the GL accounts for this example.
In Figure 10, the Sales column shows the basic key figure 0SALES from the InfoCube. The % of NetSales column shows the different components of the P&L hierarchy as a percentage of NetSales. This column has values populated in all the cells. However, as per the business requirement, all elements of NetSales, including the text node, shouldn’t display any value for % of NetSales. The % of Net Sales – Final column displays the same values as the % of NetSales column, except for the columns highlighted in orange (text node NetSales and all posted nodes under NetSales).
How to Create the NetSales Restricted Key Figure
The hierarchy node is restricted to the NetSales text node (refer to node ZFSV4 in the GL account hierarchy in Figure 1) and key figure is restricted by the basic key figure Sales. The % of NetSales calculated key figure is created by using the %A function available in BEx Query Designer. The % of NetSales calculated key figure is defined as (‘Sales’ %A ‘NetSales’). To create the calculated key figure % of Net Sales – Final use the definition in Figure 11.

Figure 11
Define the % of NetSales – Final calculated key figure
The definition has two parts:
- NOERR (((‘Hier Var EC’ <> 4) * ‘% of NetSales’))
The formula variable ZHVAR_EC replaces the text nodes with the corresponding numeric values from the technical name (as highlighted with light green in Figure 10). The technical name of the NetSales text node is ZFSV4. The formula variable ZHVAR_EC returns 4 for this text node. Condition (((‘Hier Var EC’ <> 4) returns 1 for all text nodes except NetSales. The result of the first part for a text node (except NetSales) is equal to the % of NetSales key figure. For a posted node, variable ZHVAR_EC returns X, which is converted to 0 by using the NOERR function. Thus, the result of this section of the formula for a posted node is 0.
- (‘Hier Var CK’ > 0) * ((‘Hier Var CK’ < 51) XOR (‘Hier Var CK’ > 60)) * ‘% of NetSales’
Formula variable ZHVAR_CK replaces the posted nodes with the corresponding numeric value from the technical name (as highlighted in dark green in Figure 10). Condition (‘Hier Var CK’ > 0) returns 0 for all text nodes because the formula variable ZHVAR_CK returns 0 for all text nodes (as highlighted in dark green in Figure 10). The result of this section of the formula for a text node is 0. For a posted node condition (‘Hier Var CK’ > 0) returns 1. Condition ((‘Hier Var CK’ < 51) XOR (‘Hier Var CK’ > 60)) returns 1 if one of the conditions is true. For example, for a node with GL Account 51, this condition returns 0 because both conditions used in the XOR statement are false.

Soumya Mishra
Soumya Mishra is a senior BI practitioner with a total of eight years of experience in the SAP BI space. He has been continuously focused on developing business enabling analytic strategies and solutions. He has extensive enterprise analytics assessment knowledge and has successfully played a key role in delivering large-scale finance transformation solutions that deliver actionable information and insight to users, giving them the ability to make informed decisions. He has deep knowledge of BI, and SAP ECC FI/CO configuration, as well as experience with implementations in several Fortune 500 companies in the consumer products and financial services industries. He is a certified SAP BI solution consultant with deep experience in development and integration of BI strategy; process redesign with information systems; and project planning and implementations with strong communication, organizational, and project management skills. You can view his LinkedIn profile at https://www.linkedin.com/profile/view?id=50199012&locale=en_US&trk=tab_pro.
You may contact the author at srmishra@us.ibm.com.
If you have comments about this article or publication, or would like to submit an article idea, please contact the editor.