Although users of SAP NetWeaver BI 7.0 can switch an InfoCube between load and plan modes, the process is manual in SAP BW 3.5 and earlier. Find out how you can mimic the SAP NetWeaver BI 7.0 functionality in four steps with the supplied ABAP program.
Key Concept
In SAP BW 3.5 and earlier, transactional InfoCubes allow you to write data to them. This differs from a standard InfoCube, which you use mainly for read-only access. In SAP NetWeaver BI 7.0, these InfoCubes are called real-time InfoCubes.
In some situations, you may need to load data into a transactional InfoCube for planning. This could be an approved budget coming from SAP ERP Central Component (ECC), a file upload of budget data created outside of SAP NetWeaver BI, or actual data that you use as the basis for plan data.
In SAP NetWeaver BI 7.0, you can switch the InfoCube in a process chain between load and plan modes automatically. For SAP BW 3.5, you can mimic this functionality by using a custom ABAP program. You insert the program into a process chain to switch the transactional InfoCube to batch mode before you load the data.
I'll show you a method to automate and schedule data loads to a transactional InfoCube. You can also use this method to close the open request on a transactional InfoCube on a periodic basis, such as nightly. Furthermore, by switching the InfoCube prior to and after the execution of a planning function, you can use this program to segregate results at certain stages in the planning process or to encapsulate the results of a planning function.
Note
In SAP NetWeaver BI 7.0, SAP added two new process types (switch to plan mode and switch to load mode) to switch the InfoCube between loading and planning. The process in this article applies only to SAP BW 3.5 and earlier releases.
The Four-Step Process
Step 1. Create an ABAP program to switch the InfoCube between load and plan modes
Step 2. Create the selection screen for your program
Step 3. Create the batch and planning variants. The batch variant switches the InfoCube to loading mode whereas the planning variant switches the InfoCube back to planning mode.
Step 4. Add the ABAP program to a process chain
Step 1. Create an ABAP program to switch the InfoCube between load and plan modes. Go to transaction SE38 and enter the name for your custom program, such as ZSWITCHCUBE. Click on the Create button.
In the Program Attributes screen that appears, enter the program Title, Type, and Application area (Figure 1). Set the program Type to Executable program and the Application area to Basis (this is a system program). You can enter an authorization group to restrict usage so that only users who have the authorization group can execute the ABAP program.

Figure 1
Enter the program attributes
When you’re finished, click on the enter icon to bring up the Create Object Directory Entry screen (Figure 2). In the Package field, assign the package zbw. The Person Responsible field defaults to the current user ID, but you can change it if someone else should be responsible. Original System and Original language contain default values that you cannot change. Click on the save icon to continue.
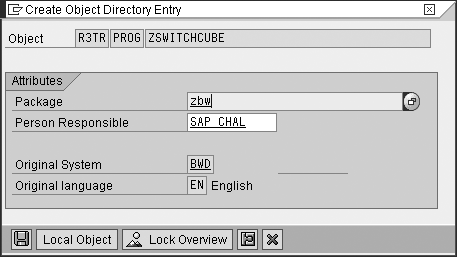
Figure 2
Assign the package zbw
Assign the program to a change request and click on the enter icon (Figure 3). This brings you to the ABAP Editor. Download the ABAP code to cut and paste into the ABAP Editor, as shown in Figure 4. You can download the code by clicking this link. When you’re finished, save the program by clicking on the save icon. Then click on the activate icon to generate the program.

Figure 3
Assign the program to a change request

Figure 4
Assign the program to a change request
Step 2. Create the selection screen for your program. In this step you provide text elements to the ABAP program you created. First, create the text symbols for the selection screen. Follow menu path Goto>Text Elements>Text Symbols and add the entries shown in Figure 5. I named the first text element 001, but you can use any three-character alphanumeric combination.

Figure 5
Enter the text symbols
Next, create the selection texts for the selection screen by clicking on the Selection texts tab (Figure 6). The system displays these texts on the selection screen where user input is required. Batch and Planning appear next to radio buttons and the InfoCube text appears next to the drop-down menu for selecting an InfoCube. When you’re finished, save and activate the texts and go back to the ABAP Editor (Figure 4).

Figure 6
Enter the selection texts
Step 3. Create the batch and planning variants. First, create the batch variant, which executes the program in a process chain. Press F8 or select Program>Execute. The selection screen you created in step 2 appears (Figure 7). Select Batch and then select the transactional InfoCube from the drop-down menu in the InfoCube field. Click on the save icon to save your selections.

Figure 7
Selection screen for the ABAP program
In the screen that appears, enter a technical name and description for the variant (Figure 8). The system selects the Only for background processing check box by default to prevent the system from using the variant when executing the program in the foreground. The ABAP program only has one selection screen, so enter 1,000 in the Selection Scrns field for each of the three selection inputs: InfoCube, Batch, and Planning. Click on the save icon to save your variant.

Figure 8
Set up the batch variant
Next, create the planning variant, which switches the InfoCube back to planning mode. Repeat the procedure you followed for the batch variant, but this time select Planning in Figure 7. Choose a different technical name and description for this variant, such as ZINVPLAN and Investment Plan.
Step 4. Add the ABAP program to a process chain. First you insert the ABAP process type with the batch variant. This switches the InfoCube to load mode just before the load begins. Go to transaction RSPC (process chain editor) and open the process chain for the data load by selecting it from the left side of the screen and double-clicking on it. The screen displays the process chain on the right side of the screen.
Next, add the ABAP process type to the process chain. From the left side of the screen, click on the process types icon. Under General Services, double-click on ABAP program. This brings up the pop-up screen in Figure 9 in which you create an ABAP program process variant. Enter a name for the process variant, such as SWITCHINVBATCH, and click on the create icon.
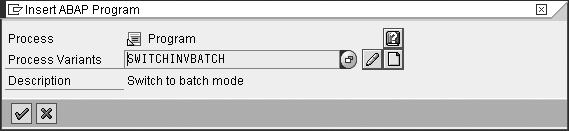
Figure 9
Insert the process type for the ABAP program
In the screen in Figure 10 enter the process variant details. This includes a description for the variant, the ABAP program name, and batch variant you created earlier. You can accept the other default values. Click on the save icon to save your work.

Figure 10
Enter the ABAP program name and variant in the process
When you save your variant, you return to the graphical view of the process chain (Figure 11). Here you can position the process you just created by dragging it. Position the process at the beginning of the load process. Connect the process by selecting it and dragging the cursor to the load process to which you want to connect it.

Figure 11
Complete process chain with the switch processes in place
Repeat this process for the planning variant. This switches the InfoCube back to planning mode. In this way, you can schedule the load to run overnight. Position the new process at the end of the load after any post-processing steps. Your completed process chain should resemble the one shown in Figure 11. Save and activate the process chain. Execute the process chain by pressing F8 or clicking on the execute icon.
Now you can automate loads to a transactional InfoCube by using a process chain and switching between batch and planning modes. You can use this same procedure to close open requests on a transactional InfoCube. You could also close the open request and run a planning function from a process chain. This allows you to capture the changes made by a planning function in a single request.
Note that planning cannot take place while the transactional InfoCube is in batch mode. If a user is planning as the process chain is kicked off, all unsaved work is lost. The system closes the open request and the load process begins.
Note
For more information about this topic, consider attending SAP Education class BW360: BW Performance and Administration for SAP BW 3.5.
Charles Hall
Charles Hall is a certified SAP NetWeaver BI solution consultant with more than 10 years of experience working with SAP solutions. Charles has been working with BW and SEM for the past five years and specializes in Integrated Planning and Business Planning and Simulation. Charles currently lives in Atlanta, Georgia.
You may contact the author at chall@bisolutionsandbeyond.com.
If you have comments about this article or publication, or would like to submit an article idea, please contact the editor.