Learn how to migrate your custom SAP NetWeaver 3.x ABAP code used in rules to SAP NetWeaver BW 7.0 without additional coding, thereby saving time and protecting your investment as you upgrade your system landscape.
Key Concept
The Enterprise Data Warehouse (EDW) layer allows you to design your warehouse so that performance does not suffer. You can easily archive and then if you need to make changes, they are easily manageable.
Many companies have vast amounts of custom ABAP code that needs to be migrated to the latest version of SAP NetWeaver. However, since SAP does not provide a tool for migration of custom code I have developed a step-by-step procedure that you can implement to migrate your data flow. It contains custom ABAP routines from the Enterprise Data Warehouse (EDW) layer to the final data targets, including InfoCubes and MultiProviders without manual coding.
Figure 1 depicts the objects that you need to create for the migration and the order in which you should develop them as part of the migration process. Although the data flows in the order that it appears in the figure, the order of the development of the objects must be followed as shown. This is the key for this process to work appropriately.
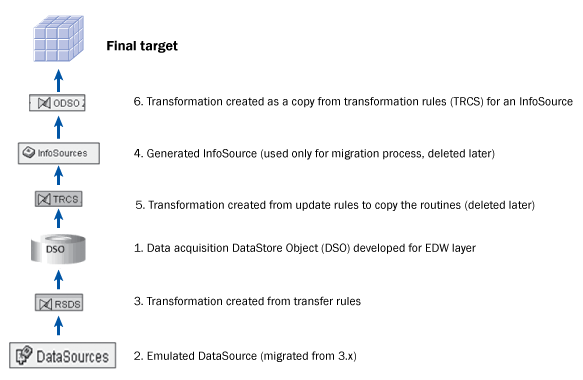
Figure 1
Overview of the objects for a successful data flow migration
Before you begin this procedure, be sure that you have activated your business content 3.x data flow. Because the EDW has multiple layers, such as Acquisition, Propagation, and Reporting, you must also make sure the DataStore Object (DSO) layer is active. I developed this procedure using the EDW concept; however, you can implement the steps in other scenarios. Note that most of these steps cover the standard method to migrate a DataSource. I have included them here only in the interest of thoroughness.
To begin you need to select the data source that you need to migrate and choose the migration option. I recommend selecting the With Export option so that you can roll back if necessary. You rarely need to roll back to the old technology. However, that need could come. For example, you might need to use an InfoSource for flexible staging.
1. Right-click the data source that you need to migrate, and then choose Migrate on the menu.
2. Choose the migration option With Export (Figure 2).
Figure 2
Migrating of the DataSource With Export to ensure roll back if needed
The next phase in the process is migrating the transfer rules. To do this, you need to create a transformation. A transformation is the SAP NetWeaver BW 7.0 vehicle into which the transfer rules move, protecting and readying them for migration.
3. In the Data Warehousing Workbench, right-click Transfer Rules, choose Additional Functions, and then click Create Transformations (Figure 3). You can also just create transformations by right-clicking the DataSource if there are no routines in the transfer rules.

Figure 3
Create a transformation to migrate transfer rules
4. When first created, the transformation icon appears in white, indicating that it needs to be activated. The transformation name appears under RSDS, which is the former technical name for update rules. A transformation from the DataSource to the DSO in the EDW architecture should be mapped automatically one to one without any rules applied. Right-click the transformation and then choose Change in the context menu. Activate the transformation icon (Figure 4).
Figure 4
Activated transformation with source and target information
Figure 5 shows the active transformation in the Data Warehousing Workbench.

Figure 5
Newly created transformation for the DataSource
5. You now need to create a Data Transfer Process (DTP) to load data from the DataSource into the DSO. Right-click the DataSource and choose Create Data Transfer Process (Figure 6).
Figure 6
Create a DTP for loading the DataSource
6. Activate the DTP by clicking the Activate button which is located in every BW object that one creates.
7. During activation of a DTP, the system generates the name of the proposed source and the target. You can keep the name or change it according to your company’s naming standards (Figure 7).
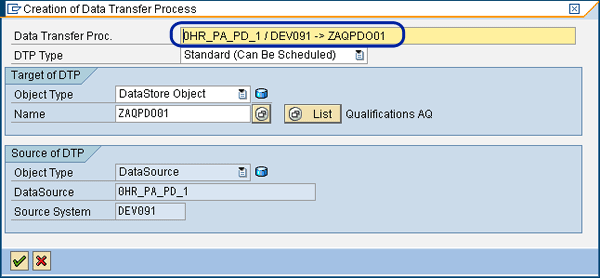
Figure 7
DTP created with target and source
8. The next phase is migration of the Update Rules. In this particular example you use 0PAPD_C01_0HR_PA_PD_1. Right-click Update Rules, choose Additional Functions, and choose Create Transformations (Figure 8).
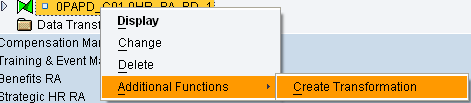
Figure 8
Create a transformation for the update rules
9. Select the Copy InfoSource 3.x to New InfoSource option (Figure 9). This option ensures that the transfer rules will not change.
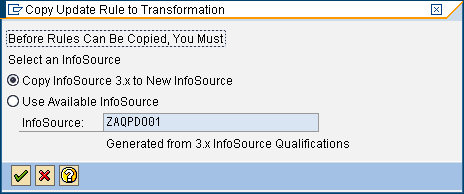
Figure 9
Create a transformation for Update Rules from the InfoSource
Enter the DSO name that you have developed as the InfoSource. In this example, it is ZAQPD001, as shown in Figure 10. The system creates an InfoSource automatically by copying the structure of the DSO and applying all the necessary routines from the update rules.
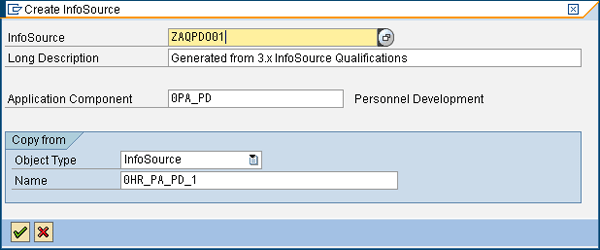
Figure 10
Create an InfoSource
The new transformation rules icon appears in white (Figure 11), indicating they need to be activated.

Figure 11
New transformation rules
10. Right-click the rules and activate them. Notice that the rules have the necessary routines (Figure 12).
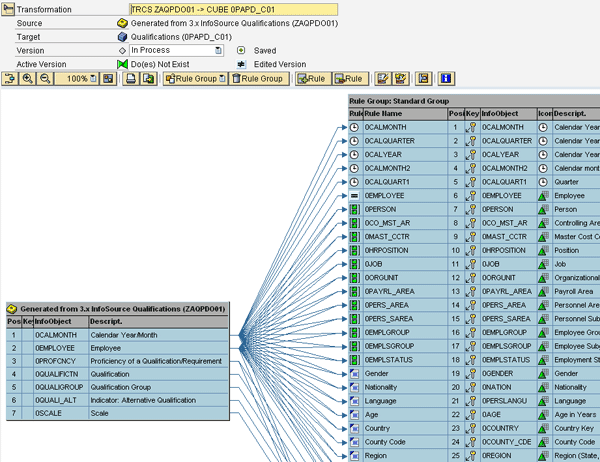
Figure 12
Rules with routines
11. Now you have a transformation between the new generated InfoSource and the final InfoCube with all the routines and the transformation rules between the DSO and the InfoCube. You need to copy these rules and apply all the routines. Here is the trick: You need to swap the source. Right-click the newly created transformation and choose Copy (Figure 13).
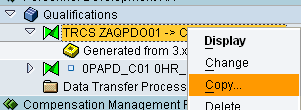
Figure 13
Select the Copy option
12. Enter the DSO name and then choose the green checkmark.
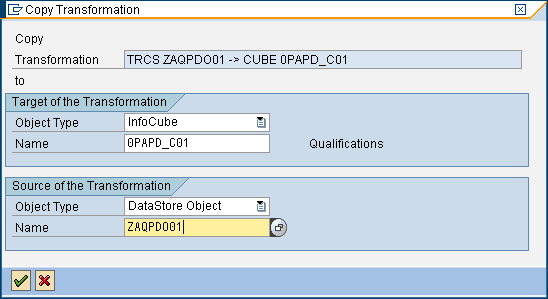
Figure 14
Enter the DSO name
The new transformations for the DSO and the InfoCube are created keeping all the routines intact.
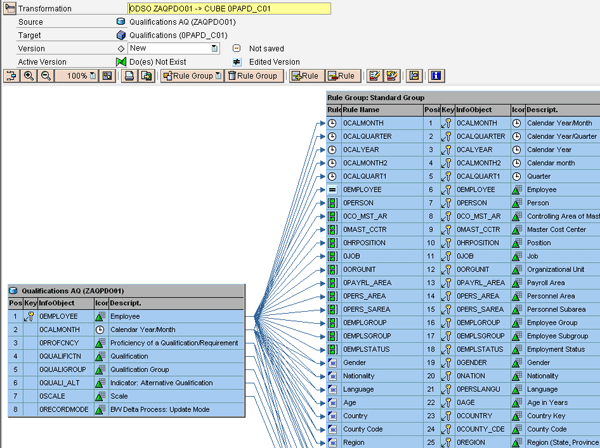
Figure 15
New transformations created
13. Create a DTP to load from the DSO and InfoCube and load the data.
14. The last step is deleting the transformation from the InfoSource and InfoCube because you will not need them. They are only necessary as a transition object so that you can migrate the update rules without any manual intervention.
Anna Vladi
Anna Vladi is an SAP senior consultant with more than 12 years in the SAP area, focusing on BI, SAP BusinessObjects, SAP BPC, Public Budget Formulation (PBF), FI, and CO. As a functional lead for many global-scale SAP NetWeaver BW implementations and upgrades for Fortune 500 companies, Anna solves problems with a strategic approach to business modeling. She is also an interim SAP America consultant and instructor. Anna speaks at various SAP conferences on topics related to financial planning and reporting. Her current area of expertise is IFRS.
You may contact the author at annavladi@lzar.com.
If you have comments about this article or publication, or would like to submit an article idea, please contact the editor.