Become familiar with the concept of credit management hierarchies and how to set them up in SAP Credit Management. Learn how the assignment of credit rules and credit segments works and how these settings affect the credit limit utilization of business partners. Understand some of the key concepts of SAP Credit Management and their differences compared with the classic R/3 credit management.
Key Concept
SAP Credit Management is an application that allows you to detect credit risks in the sales process and to take all necessary actions to prevent your company from lost receivables. The system manages all credit-relevant master data and enables you to monitor multifaceted account hierarchies by assigning granular credit limits to them and using sophisticated credit rules.
Many corporations today are challenged by a growing uncertainty regarding the settlement of their outstanding receivables. Enterprises of every size use terms of credit as a way to substitute bank loans by vendor-financed trade credits — and often delay payments as long as possible. In some cases they don’t even pay at all, thereby jeopardizing the financial survival of their business partners. This behavior affects key performance indicators (KPIs) such as Days Sales Outstanding (DSO) and debts aging percentage.
SAP Credit Management is an application that enables corporations to implement a company-wide and consistent credit policy mitigating the risks associated with receivables management. Unlike in classic R/3 credit management, you can use this SAP ERP component to set up a central credit management within a distributed system landscape. This enables the monitoring of a customer’s credit exposure in one central system. Although Credit Management belongs to SAP ERP Financials, you can combine it with lower releases such as R/3 4.6C or higher. The system integration requires SAP NetWeaver Process Integration (SAP NetWeaver PI, formerly known as Exchange Infrastructure). With SAP NetWeaver PI, you can transfer documents between Sales and Distribution (SD) or FI and Credit Management.
I’ll describe one of the tricky topics during the configuration of Credit Management: the design of customer credit hierarchies. Credit Management allows you to set up complex relationships between credit accounts. It is essential for you to understand how they are correlated and influenced during certain business incidents. In addition, I’ll show you how you can use some core settings in Credit Management — credit segments and credit rules — to influence their impact on these business partner relationships. First I’ll go over some key differences between Credit Management and the R/3 credit management capabilities.
Differences in Capabilities
Credit Management is in many ways different from the classic R/3 credit management. Here are two of the major differences between these two components:
- Credit Management makes use of the SAP Business Partner and not the Accounts Receivable (AR) account, which means that master data is replicated to SAP Credit Management. If your SAP system is running on release SAP ERP 6.0 you can use Customer-Vendor Integration (CVI), which I described in detail in my article, “Improve Your Receivables Management by Synchronizing AR and SAP Collections Management.” The business partner role for SAP Credit Management, delivered by SAP in the standard, is called UKM000.
- While credit limits and risk categories are directly assigned to a customer in the classic R/3 credit management, they are derived dynamically from the calculation of customer score values in Credit Management. This dynamic deduction provides you with much more flexibility to cluster your existing customer base from a credit risk perspective.
I won’t cover all the settings of classic R/3 credit management, but I’ll show you some key configurations. In the classic R/3 credit management you have to define credit control areas and assign them to your customers. These credit control areas are organizational entities that you use to monitor a customer’s credit limit. They can include one or more company codes, and you can define them in the IMG by following menu path Enterprise Structure > Definition > Financial Accounting > Define Credit Control Area. You can perform the remaining R/3 credit management configuration by following menu path Financial Accounting > Accounts Receivable and Accounts Payable > Credit Management or Sales and Distribution > Basic Functions > Credit Management/Risk Management.
The automatic credit control in the IMG menu path Sales and Distribution > Basic Functions > Credit Management/Risk Management > Credit Management > Define Automatic Credit Control provides the following credit checking options (Figure 1):

Figure 1
Automatic credit control in classic R/3 credit management
- Static credit limit check (the credit exposure depends on the total value of open orders, deliveries, billing documents, and open items)
- Dynamic credit limit check (the credit exposure is also determined by all outstanding order values, which are not yet delivered or only partially delivered)
- Maximum sales order or delivery value
- Change of critical credit-relevant document fields so that they differ from the default values proposed from the customer master record (e.g., terms of payment)
- Next scheduled review date
- Ratio between overdue open items that exceed a defined number of days and the customer’s balance
- Oldest overdue open item (within a certain number of days)
- Maximum allowed dunning level of the customer
- Customer-specific credit checks (defined in a user exit)
To each credit control area you’d normally assign different risk categories, which are classifications that allow you to control all the credit checks mentioned before. You can define the risk category (abbreviated RkC on the credit control screen) under menu path Financial Accounting > Accounts Receivable and Accounts Payable > Credit Management > Credit Control Account > Define Risk Categories. You can assign it to a customer master record in a second step via menu path Accounting > Financial Accounting > Accounts Receivable > Credit Management > Master Data > Change. Credit limits in classic R/3 credit management are specified in the individual customer master records as well (Figure 2).

Figure 2
Credit management master data in classic R/3 credit management
You can also define default credit limits and risk categories for each credit control area, which the system automatically chooses when a customer is created in the respective company code. In both cases you’ve probably noticed the limitations of this concept: Neither credit limits nor risk categories are dynamically calculated but are assigned manually by the users. This is fundamentally different from the procedure by which these KPIs are calculated in Credit Management.
Now that you know the basic configuration in R/3 credit management (which is useful in understanding the differences in Credit Management), I’d like to focus on the settings in Credit Management. You activate this component by using the Business Add-In (BAdI) in the IMG menu path Financial Supply Chain Management > Credit Management > Integration with Accounts Receivable Accounting and Sales and Distribution > Integration with Accounts Receivable Accounting > BAdI: Activation of SAP Credit Management. After you have done this and called up the automatic credit control configuration in the IMG, you immediately notice some differences (Figure 3).

Figure 3
Automatic credit control in Credit Management
While the credit control area and a risk category are still visible, almost all the automatic credit check options are gone (besides the Document value and Critical fields option). Because SAP Credit Mngt. is activated in this example, there is a new option indicated by the A parameter, which designates that the system reacts with a warning when someone performs a credit check. To better understand these differences, I’ll look at some of the core attributes of Credit Management.
Core Attributes of Credit Management
To determine credit limits in Credit Management you need to define credit segments, which are organizational units that you can define by product type or business area, grouping a company’s business transactions. These segments replace the credit control areas from classic R/3 credit management. They are currency dependent and are required for calculating the credit limit. The credit segments enable you to carry out detailed checks at the business partner level. They have a similar relationship to the business partner in Credit Management, such as the company code to the customer in FI. You can define your credit segments in the IMG under menu path Financial Supply Chain Management > Credit Management > Integration with Accounts Receivable Accounting > Define Credit Segment and Financial Supply Chain Management > Credit Management > Integration with Sales and Distribution > Define Credit Segment (Figure 4). Later I’ll show you how to define these credit segments in the business partner master records of Credit Management.

Figure 4
Definition of credit segments
Credit segments in Credit Management allow you to manage several credit limits for one business partner (maintaining one credit limit for each credit segment). Usually, each credit segment belongs to a main credit segment, which you can use to define an overall credit limit for the business partner in addition to the individual credit limits at the sub-segment level. During a credit limit check the system now not only takes into consideration the credit limit utilization of the individual credit segments, but also adds up all liabilities of a business partner in the main credit segment. You can configure this dependency in the IMG menu path when you define your credit segments (Figure 5). There is one limitation though: A sub-segment cannot be divided into further sub-segments.

Figure 5
Assignment of credit segments to a main segment
Let’s go through an example of how this relationship between credit segments would look. Imagine you create a business partner in Credit Management with two credit segments for your business areas (1000 and 2000) and one main credit segment (0000). You assign a credit limit of $200,000 USD for credit segment 1000 and another credit limit of $300,000 USD for credit segment 2000. The overall credit limit of $600,000 USD for the entire organization could be set at the main credit segment. If the total liabilities are $100,000 USD at sub-segment level 1000 and $200,000 USD at sub-segment level 2000, the system accumulates them at the main segment level. That results in a total liability of $300,000 USD provided that there are no liabilities on the main segment level (Figure 6).

Figure 6
Example for credit segment hierarchy
The configuration of credit segments is incomplete until you assign them to the credit control areas. The reason is that both AR and SD use the credit control area as an organizational unit. As a result, you need to map the new attribute credit segment introduced by Credit Management in both components AR and SD. In the IMG, you can do this by following menu paths Financial Supply Chain Management > Credit Management > Integration with Accounts Receivable Accounting > Assign Credit Control Area and Credit Segment and Financial Supply Chain Management > Credit Management > Integration with Sales and Distribution > Assign Credit Control Area and Credit Segment (Figure 7).

Figure 7
Assignment of credit segments to credit control areas
Credit Management dynamically derives the credit limit assigned to a credit segment by analyzing the calculated result of credit rules. You can define these rules in the IMG by following menu path Financial Supply Chain Management > Credit Management > Credit Risk Monitoring > Master Data > Create Rule for Scoring and Credit Limit Calculation. You can see in the credit profile of a business partner the rules that you define here. The SAP standard delivery already includes four examples: one each for new and existing customers for both business and private customers. You can copy these sample rules to design your own. To calculate the credit limit and the score (a numeric value which represents the creditworthiness of a customer), you have to define formulas. I won’t cover the Credit Management formula editor in this article, but you can access it in the IMG using menu path Financial Supply Chain Management > Credit Management > Credit Risk Monitoring > Master Data > Define Formulas. Besides the credit limit and the score, you can also define external credit rating procedures (e.g., Dun & Bradstreet), which you should take into consideration if you don’t want to rely entirely on internal credit information. You can define them under Financial Supply Chain Management > Credit Management > Credit Risk Monitoring > Master Data > Define Rating Procedure.
The final attribute in Credit Management on which I want to explore is the risk class. It is Credit Management’s equivalent to the risk category in classic R/3 credit management, but it is derived from the score value as well (Figure 8). In the IMG activity Financial Supply Chain Management > Credit Management > Credit Risk Monitoring > Master Data > Create Risk Classes, six risk classes are defined in the SAP standard settings. You can again copy and modify these sample classes. Be aware though that you need to use identical keys for the risk classes and risk categories because otherwise the control of the credit checks won’t work.

Figure 8
Definition of risk classes in Credit Management
Maintaining Credit Check Rules
I’d like to return to the comparison of the automatic credit control screens in Figures 1 and 3. In Credit Management, you maintain all the credit check options in the IMG menu path Financial Supply Chain Management > Credit Management > Credit Risk Monitoring > Credit Limit Check > Define Checking Rules (Figure 9). A check rule can consist of several individual check steps and for each you can define which parameters or threshold values the system uses to execute the individual steps. You can maintain additional settings in this customizing transaction, but I’ll focus on the check steps instead.
Note
The check rules and the associated individual credit check steps are very important because you can assign them in the business partner master records, thereby determining how the system should evaluate a business partner. You could even decide that a business partner should not be checked at all and assign a corresponding empty rule to the business partner.
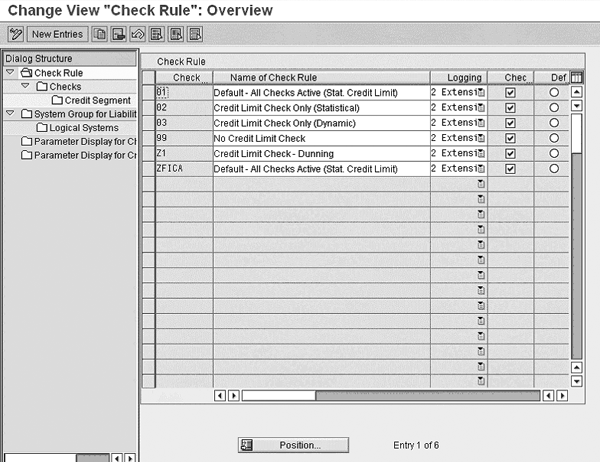
Figure 9
Maintenance of check rules in Credit Management
For each check rule you can define one or more individual credit check steps that the system should conduct. SAP delivers the following individual steps in the standard system:
- Statistical check of credit limit utilization
- Check for the maximum document value
- Dynamic limit check with credit horizon
- Maximum dunning level
- Oldest open item
- Payment behavior index (e.g., DSO)
In addition, you can define and implement your own additional check steps using the BAdI UKM_CHECK_STEP.
For each check step, you see those parameters that you have assigned to the individual check steps on the right side of the configuration screen. Because some values are currency specific, they are maintained on the credit segment level. In the example screen shown in Figure 10 you can see that the dunning level shouldn’t exceed level 2 and that the oldest open item should not be overdue for more than 180 days (individual steps 100 and 110). The parameter for the maximum document value (step 020) is not maintained on the same level but on credit segment level — that’s why the parameter value on the right is 000.
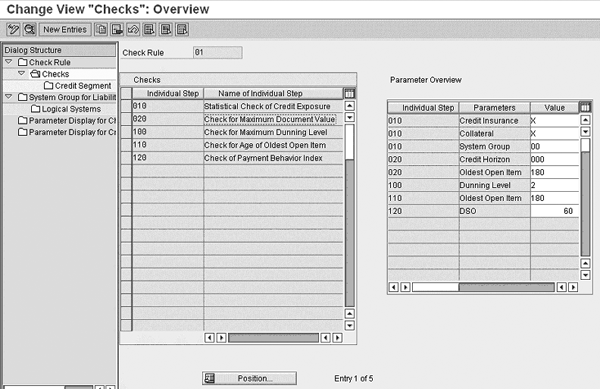
Figure 10
Definition of credit check steps and threshold values
Defining Credit Account Hierarchies
You now are familiar with the most important attributes and configurations in Credit Management. I would like to demonstrate, with an example, how you can use these settings to maintain your own credit account hierarchies in Credit Management and how to influence the outcome of your credit checks.
In Credit Management you can maintain relationships between business partners in the master records under the Relationships button (Figure 11). Credit Management provides as standard some relationship categories. The two that are relevant for my example are called Higher-level Credit Management Account of and Lower-level Credit Management Account of.

Figure 11
Credit account hierarchy in the SAP Business Partner
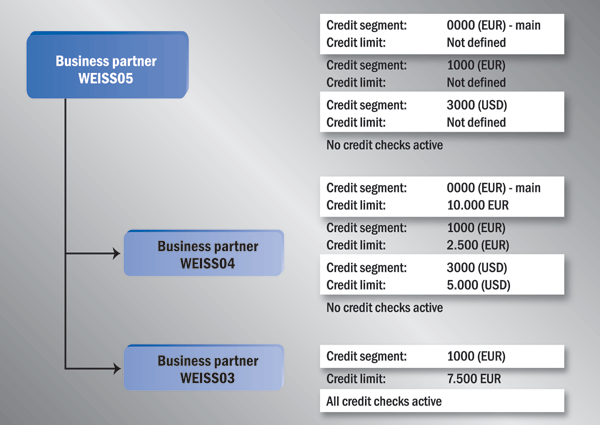
Figure 12
Example for relationships in Credit Management
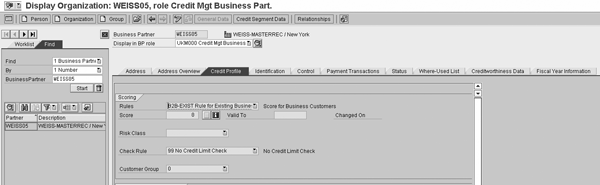
Figure 13
Credit profile with no credit checks
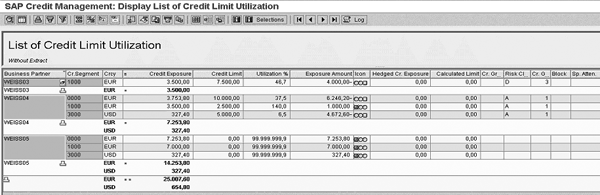
- 3.500 EUR for business partner WEISS03 in credit segment 1000
- 3.500 EUR for business partner WEISS04 in credit segment 1000
- 327.40 USD (equals 253,80 EUR) for business partner WEISS04 in credit segment 3000
Call up the credit limit utilization report from menu path Accounting > Financial Supply Chain Management > Credit Management > List Displays > Credit Limit Utilization. For all three business partners you can see the following: The individual credit limit utilizations are correctly added up for business partner WEISS04 to the main credit segment 0000 (3.753,80 EUR) while they are accumulated on a group level to 7.253,80 EUR in the main credit segment 0000 of business partner WEISS05 (Figure 14). The credit limit exposures of business partner WEISS05 are for statistical purposes only because the system does not consider any credit limits during the credit checks.
Juergen Weiss
Juergen Weiss works in the functional area of SAP Financial Supply Chain Management. As part of SAP’s product management team, he was globally responsible for the Financial Supply Chain Management applications, including Electronic Bill Presentment and Payment, Dispute Management, Collections Management, Credit Management, Treasury and Risk Management, Bank Relationship Management, and In-House Cash as well as Accounts Payable and Receivable.
You may contact the author at juergen.weiss@sepa-now.de.
If you have comments about this article or publication, or would like to submit an article idea, please contact the editor.