Find out how you can build lean offline scenarios to support your mobile workforce without implementing a full offline CRM solution. Instead, you can combine some of the standard tools in SAP CRM 2007, such as the Web service tool and Document Template Designer, to enable this functionality.
Key Concept
SAP CRM 2007 offers standard tools such as the Web service tool and Document Template Designer that allow you to flexibly extend your standard processes. By combining several of these tools, you can, for instance, support your mobile workforce with the necessary data at its fingertips. In addition, the use of SAP Interactive Forms by Adobe allows you to support the creation of documents in an offline environment, such as a sales manager creating a customer visit report while waiting in an airport lounge.
Imagine you are a sales representative who spends most of the week on the road visiting customers. Certainly you want to document your interactions with your customers after meeting them. If you are not using an enterprise mobile CRM system, you currently have to write the visit reports in your file book or on a piece of paper, and then enter the reports into the CRM system when you are back at your office at the end of the week.
In SAP CRM 2007 you can streamline the process by creating lean offline SAP CRM functionality using the Web service tool and Document Template Designer. The process involves an SAP Interactive Form by Adobe that you use to store your customer visit report and to update it in the CRM system later. This reduces redundant work, enhances the data quality, and speeds up the process.
After you create a customer appointment in SAP CRM, you attach a customer visit report template to it. SAP CRM pre- fills the form automatically with all relevant data by using a Web service. Next, you synchronize your SAP CRM calendar with your Microsoft (MS) Outlook or Lotus Notes calendar. You now have the appointment, including the customer form, offline on your laptop. After you meet with your customer, you can open the form, update the customer visit report offline, and store it locally on your laptop.
When you are back in the office, you can open the form, update it, and then update the SAP CRM system by using another Web service. Thus you need to enter the data only once into the form and can update SAP CRM with just one click. Now let me show you the three steps to implement this functionality:
Step 1. Create the Web services
Step 2. Create the Adobe Form template
Step 3. Set up groupware integration
You can implement the described scenario with standard SAP CRM 2007. However, an additional license for SAP Interactive Forms by Adobe is required for the Interactive Form capability that you use to create the interactive customer visit report.
Step 1. Create the Web Services
First you need to create the Web services for your scenario. In my example, I need only two services. The first Web service reads the data from the CRM back end into the SAP Interactive Form by Adobe. It pre-fills the form with the most important data from the customer meeting. This includes all the data that you need in the customer visit report, such as the description of the meeting, account and contact name, location, category, and priority.
The second service creates the customer visit report in the CRM back-end system. The required attributes are basically the same as in the read service above, plus the attribute for the visit report text that you need later to store the report text.
To create the Web services, start the Web service tool from SAP CRM and build a new service object. You can start the Web service tool and Document Template Designer from several roles in the first-level navigation on the left side of the CRM WebClient user interface (UI). For instance, in the sales professional role, you can start them from the Sales Operations tab. Click on the New button to start the creation wizard. In step one, name your service object, choose the component and root object (business transaction), and select the flags for the read and create operation. The Web service tool allows you to create several operations at the same time, so you can develop the necessary services in one step, which speeds up the process. These two services then share the same attributes.
Click on Next to go to the second step of the wizard and choose the necessary attributes for your service. For my example, I need the following attributes: description, location, business partner description, business partner number and function, category, priority, and text related attributes (Figure 1).
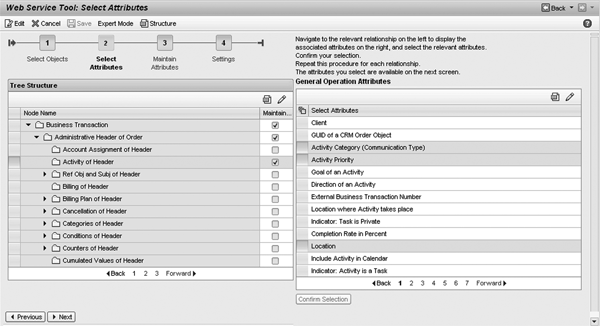
Figure 1
Select the attributes for your Web services
Before you finish creating the services, you should provide default values to the selected attributes. This reduces your work later when you need to assign the Interactive Form fields to the Web service structure. You can then ignore the mandatory fields completely because the Web service tool assigns the respective defaults to them.
As shown in Figure 2, assign a standard partner function (00000009) to indicate that the business partner is a customer contact. Then assign text ID A002 to indicate that the text is a note. Finally, set the language key to En (English) for the text entry.
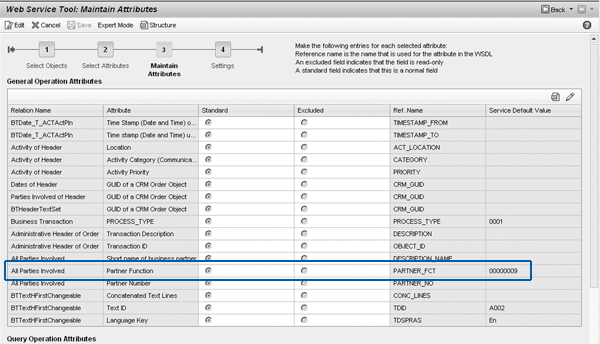
Figure 2
Set the default values for the attributes
Now, you can finalize your service and test it with the standard SAP NetWeaver testing tool. After the successful test, set the service to productive. This is a prerequisite for using the service in the next steps with Document Template Designer. In addition, make sure to store the Web service’s WSDL file locally on your computer because you will need it later. You can do both of these steps in the Settings step in the creation wizard.
Step 2. Create the Adobe Form Template
After you finalize your services, start Document Template Designer from the CRM WebClient UI. In my example, I start Document Template Designer in the sales professional role from the Sales Operations tab. The template you create becomes available as a template in the attachment assignment block of your appointment, which a salesperson can use to create the customer visit report.
Note
You can also create templates with MS Word. However, for this interactive scenario I chose an SAP Interactive Form by Adobe.
Click on the New button to create a new template, and then choose Adobe XML Form File as the file type (Figure 3). Provide a technical name and a description to the template.

Figure 3
Document Template Designer
Next you need to assign the template to a business object. This assignment ensures that the template only appears in the selection list in the desired business object. For my example, the correct business object is BUS2000126 (business activity). If you wanted the template to appear in the business partner application, you would choose BUS1006 (business partner).
After you select the business objects, assign your Web service to the template. Access the value help in the Web service entry field by clicking on the icon in the field. A pop-up screen appears with all the available Web services. Choose your service (in this case, the read service). If your service is not available in the list, double-check to see if you set it to productive in the Web services tool.
Now you need to download the schema of the service by clicking on the Download Schema button. In my example you download the schema of your read Web service. The Web service schema specifies the structure and data type for each of the Web service’s attributes. It binds the attributes used in the SAP Interactive Form by Adobe with the Web service.
After you download the schema to your hard disk, start Adobe LiveCycle Designer, which is part of the SAP NetWeaver stack, by clicking on Start Designer. In LiveCycle Designer you create a new form that later becomes your template with two new data connections. The first data connection reads the appointment data from the CRM back end into the Interactive Form. Later, you implement the second data connection to create the customer visit report. Let’s focus on the first connection.
To create a new data connection, go to File>New Data Connection. Choose XML Schema, give a name to the connection, and click on Next. Then provide the path of the schema you just downloaded from the CRM system and click on Finish.
The new data connection appears in the left window of LiveCycle Designer. Now you can start to design your form by dragging and dropping the necessary attributes from the Data Connection structure to the Adobe Body Pages (Figure 4). When a salesperson later assigns the template as an attachment to the appointment, the system pre-fills the attributes automatically from Document Template Designer. To give the right look- and-feel to your form you can use the standard LiveCycle Designer layout features, such as different background colors, additional text, pictures, font style, font size and color, and separators.
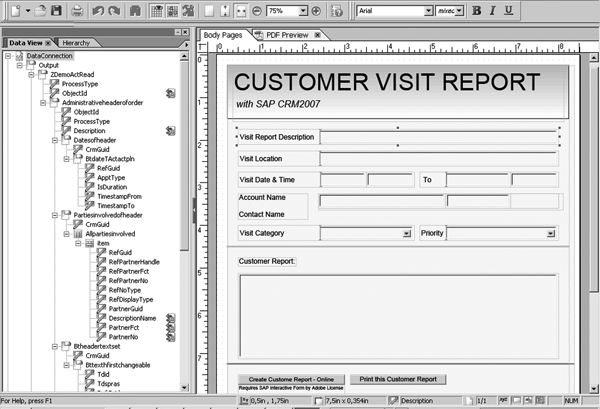
Figure 4
Create a new template in LiveCycle Designer
Furthermore, LiveCycle Designer allows you to implement drop-down lists or check boxes that you can combine with your service. Figure 5 shows a drop-down menu with values provided by the CRM back end/Web service. In my example, the technical value from the CRM back end system for a Very High priority is 1 and for High it is 3.
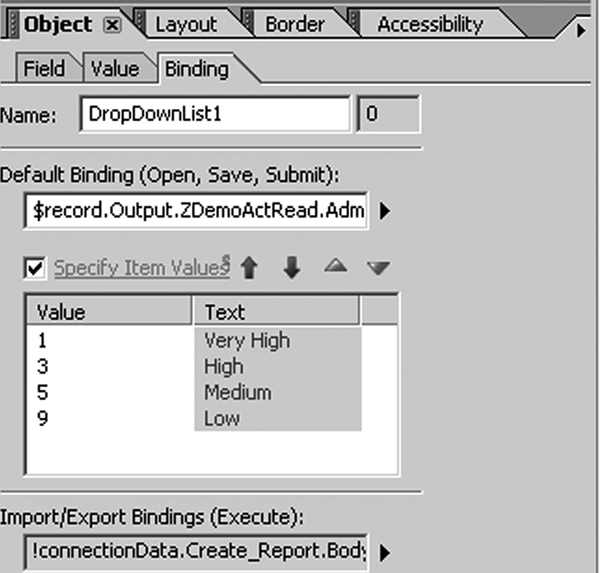
Figure 5
Create a drop-down menu with the priority descriptions
To include features such as a drop-down menu in the form, you first define the respective feature and then bind it to your Web service. To do this, drag and drop the attribute from the service structure on the feature in the body page. LiveCycle Designer automatically binds the feature and the Web service attributes. You can view the binding in the Import/Export Bindings field shown in Figure 5.
Tip!
If you are curious about how your template looks at this point, you can upload the form to the system and test it. To do this, skip to the “Upload Your Template to SAP CRM” section. You’ll need to return here, however, before you release your template.
From here, you work on the second part of the form in which you build the second data connection that creates the customer visit report in the back end. This time when you create the data connection, select WSDL File instead of XML Schema. Provide the path of the stored WSDL file of your service. Finally, you need to choose the right service operation (in my example, the create operation) to create the customer visit report in the CRM back end.
In this part of the form you drag and drop the fields from the new data connection of the create service operation to the fields of the form that you’ll use to create the customer visit report. LiveCycle Designer indicates the connections with small arrow icons, as shown in Figure 4.
In some cases the CRM back-end system needs additional input data to create the respective business documents (e.g., the business partner or transaction type). You can avoid this by assigning the values in the Web service tool as a default value.
However, sometimes you need the data from the Adobe form. As an easy workaround, you can drag and drop the attribute field of the create data connection to the form. Then assign the requested value as a default to it and set it to Invisible in the form. To provide a default value, go to the Value tab under the Object settings.
To hide a field, go to the Field tab and change the Presence setting to Invisible. You can also use the Invisible setting if you have fields that contain data from the read service that you want to use for the create service, but you don’t want them to appear in the form. Just drag them to a corner of the form and set them to invisible. You can use them to pass the needed data from the read to the create service, but they do not appear in the form.
Finally, you have to drag and drop the Execute button located at the end of the service structure (create service) to the form. You can change the given technical name of the button to, for instance, Create Customer Visit Report. This button is required to trigger the final creation of the customer visit report in the back end.
Upload Your Template to SAP CRM
After saving your form on your computer, upload it to SAP CRM. Go back to Document Template Designer and click on the Browse button to assign the path of your form. Click on Upload and then the Back button to confirm your work.
Your form is now available in the attachment assignment block for all activities with type Meeting. To assign it to a meeting, go to the Attachments assignment block and click on the With Template button to select your form (Figure 6). The template is filled automatically by calling your Web service against the back end, not the UI, so you first have to save your appointment before you assign the template.
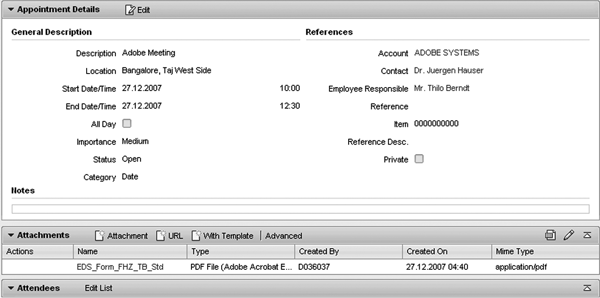
Figure 6
Attachment with template
If you want to change your form later, you can open your local copy and make the changes. After you are done, go back to Document Template Designer, choose your form in the search result list, and click on the Edit button. Then upload the changed form and confirm it by clicking on the Back button.
Step 3. Set Up Groupware Integration
In the last step you have to set up the groupware integration to get the appointments, including the SAP Interactive Forms by Adobe, synchronized with your MS Outlook or Lotus Notes calendar. Alternatively you can store them manually on your laptop.
To set up the groupware you have two options: client- or server-based integration. With client-based groupware integration, the system synchronizes the groupware, such as MS Outlook or Lotus Notes, which runs on the client with SAP CRM directly. In the server-based integration, synchronization runs on the server. The system administrator typically performs this activity, so I will just provide a brief overview of how to set up the client-based integration.
The system administrator accesses the personalization settings by clicking on Personalize in the upper right corner in the header navigation area of the CRM WebClient UI. From here you need to install the required software on your laptop by clicking on Install Synchronization Software. Then you adjust the necessary server settings by clicking on Edit Synchronization Settings. Your IT administrator should have the required server settings.
After you complete these steps, you can create an appointment in SAP CRM, and attach an SAP Interactive Form by Adobe that contains the data provided by your read Web service. The groupware integration takes care of the synchronization with MS Outlook or Lotus Notes and the form is available offline on your laptop (Figure 7). Now, you can visit your customers and later write the customer visit report offline. Store it locally on your laptop and update SAP CRM when you are online again by clicking on the Execute button in the form to call your create Web service (Figure 8).

Figure 7
Adobe Form available offline after groupware synchronization

Figure 8
Created customer visit
You could replace the last step — triggering the system update manually — with an automated process to make the whole scenario even simpler. However, you should check your entries again before you trigger the update.
LiveCycle Designer includes a JavaScript development workbench that allows you to program into the form, to combine services, calculate data, and add further logic to the form. In my example, I used only two services, but you can use many more and even combine them by providing additional logic.
For more details about the processes described in the article, take a look at my video blog, “SAP CRM 2007: It is so easy to create lean offline scenarios #7,” on the new CRM SAP Community Network (SCN), at https://www.sdn.sap.com/irj/sdn/bpx-crm. Click on Blogs and in the Search box, enter Thilo Berndt.
Thilo Berndt
Thilo Berndt is a solution manager for SAP CRM Solution Management in Bangalore. He is a graduate of the business school at the University of Mannheim, Germany. Thilo has worked at SAP since 2002. Currently, he is responsible for the SAP CRM enterprise service-oriented architecture strategy and the Web service tool.
You may contact the author at thilo.berndt@sap.com.
If you have comments about this article or publication, or would like to submit an article idea, please contact the editor.


