/Solution Manager
The next time your system behaves differently, use Change Diagnostics to uncover and analyze what’s changed.
Key Concept
Change Diagnostics, which is part of Solution Manager Diagnostics, provides information about changes that were made to a system landscape and when these changes were made. It provides a change history and a comparison tool so you can compare the technical configurations between systems or time stamps. This helps you quickly identify what has changed in your system landscape from the moment a particular error starts occurring.
How many times have you logged on to a system that worked perfectly fine yesterday, but today the performance of the system is slow and the programs or processes are terminating with errors? Perhaps the program that you were executing is different today in terms of its function or interface, or perhaps an important program is no longer available. In a complex landscape, how do you quickly find out what changes have occurred over the last 24 hours or within a specific time frame? The answer is through Change Diagnostics, which is made up of two components: End-to-End Change Analysis and the Change Reporting application.
End-to-End Change Analysis helps you identify and analyze what changes have occurred in the systems across your landscape according to various change groups for a particular time frame. A related application is Change Reporting, which allows you to compare the technical configuration (e.g., changes to technical parameters between systems or between time stamps). This allows you to identify what has changed and revert to a previous value if necessary.
End-to-End Change Analysis
Start by accessing Change Analysis through the Root Cause Analysis Work Center. Select End-to-End Analysis, select the system you are interested in, and click the Change Analysis button (Figure 1). Each product instance of the selected system has its own tab. A tab is also available for the Hosts (Figure 2).
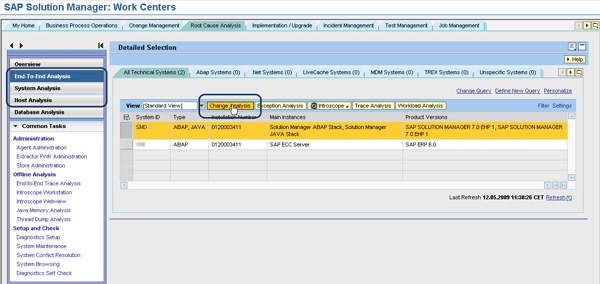
Figure 1
Access End-to-End Change Analysis
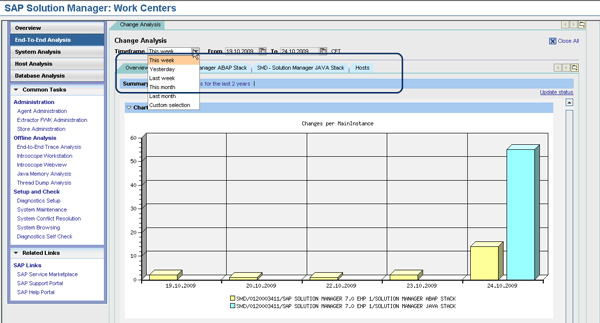
Figure 2
Select a time frame
As you can see in Figure 2, you can change the time frame to this week, yesterday, last week, this month, last month, or to a specific time frame — for example, the last two days. Another option allows you to display the history of changes for the last two years. This option displays the data of the current quarter and the last eight quarters, provided the End-to-End Change Analysis was set up and has been collecting data for that time frame.
After you select an appropriate time frame, you can review the chart. In this example, a number of changes occurred on 24.10.2009 for the instance SOLUTION MANAGER JAVA STACK for the product SAP SOLUTION MANAGER 7.0 EHP1 (Figure 3). A table under the chart displays the number of changes per date in the time frame selected. In the event of a problem in the system, you should investigate the product instance with the most number of changes or the most recent changes first.
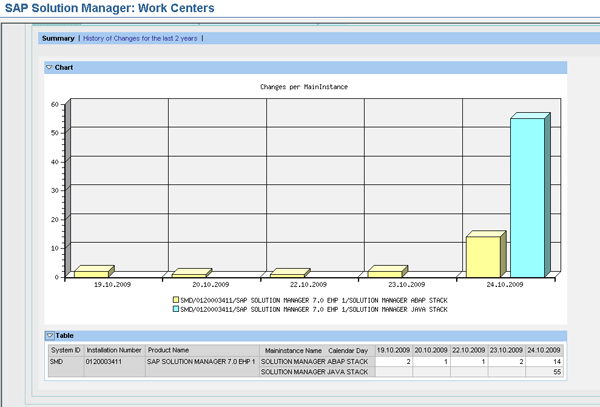
Figure 3
Overview of the number of changes
Click the tab for the instance with the most changes (SMD – Solution Manager JAVA Stack in this example). As you can see in Figure 4, changes are displayed in various change groups. The change groups for this particular Java stack are Dispatcher Configuration, Server Configuration, Node Type Independent Configuration, and Software Maintenance. Figure 4 shows that there were 36 technical configuration changes to the server node on the 24.10.2009.
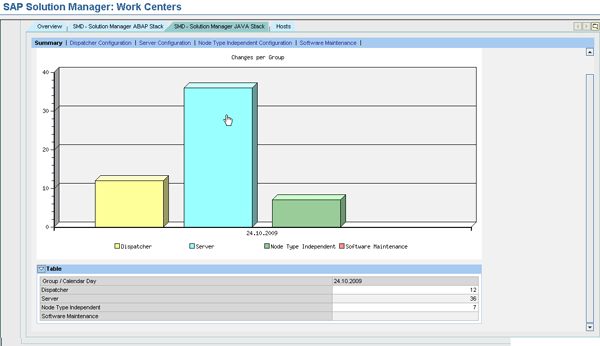
Figure 4
Changes in the Java stack
You can then click the Server Configuration link to display more details about the changes (Figure 5). The changes are listed according to the instance and the various store groups where the configuration information is collected and stored. The green background on the lowest level of each tree structure indicates a link that takes you to the details of the selected configuration. You can see this information in the Change Reporting viewer by clicking this link (Figure 6).

Figure 5
Server configuration changes for the Java stack
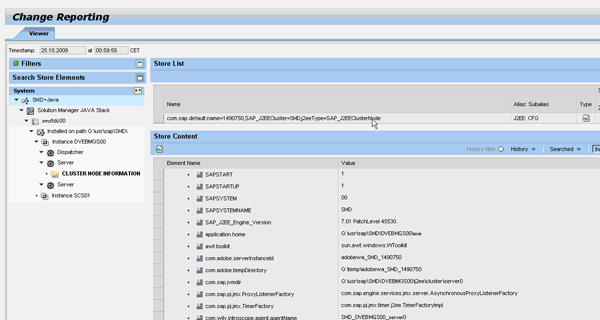
Figure 6
Store group information for the server cluster node in the Java stack
The Change Reporting Viewer allows you to view all the parameters that are collected and stored as part of a store group (e.g., CLUSTER NODE INFORMATION in this example). After you select a store group on the left side of the screen, the store content is displayed on the right. You can also search and filter information in the store content.
If a technical configuration parameter has changed, an icon appears under the History column on the right side of the screen (Figure 7). Click the history icon to review the changes that have taken place for that parameter, listed according to time stamps and parameter value.
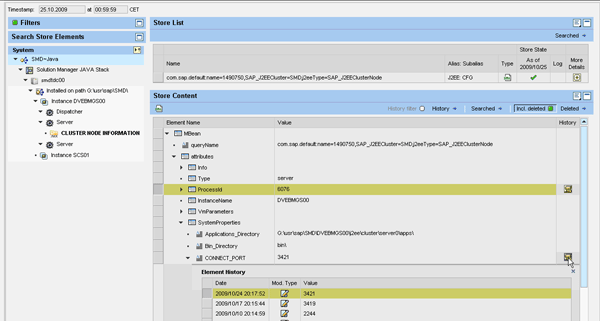
Figure 7
Display of history
This information is particularly important for the Java stack. Technical configuration changes that are made on the Java stack cannot be easily identified because there is no version management of the parameter files. Therefore, the information displayed in the Change Reporting viewer helps an administrator quickly identify what changes were made to the system and what the previous values were for a particular parameter.
Change Reporting
You also go to the Root Cause Analysis Work Center to access the Change Reporting application. Select System Analysis on the left side of the screen, select the system you are interested in, and click the Change Reporting button (Figure 8).
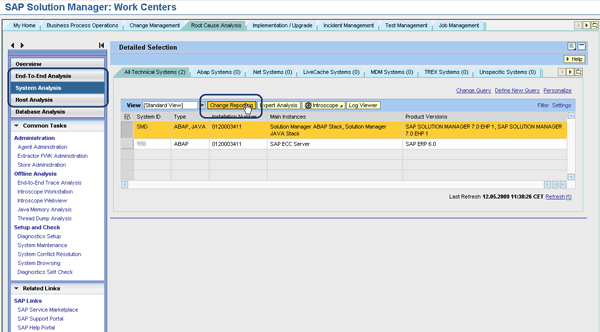
Figure 8
Access Change Reporting
Change Reporting has two sections: a data viewer in the Viewer tab (Figure 9) and a comparison tool in the Compare tab (Figure 10). The data viewer allows you to analyze the contents of a store group and use the search and filter options on the left side of the screen to find information about a particular parameter. The comparison tool allows you to compare details between different technical systems or time stamps. You can diagnose why a system is behaving differently by analyzing any changes that occurred.
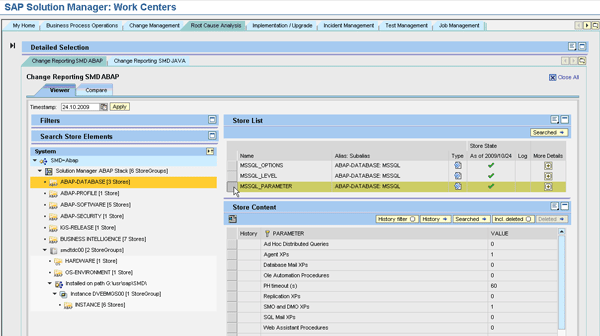
Figure 9
Data viewer
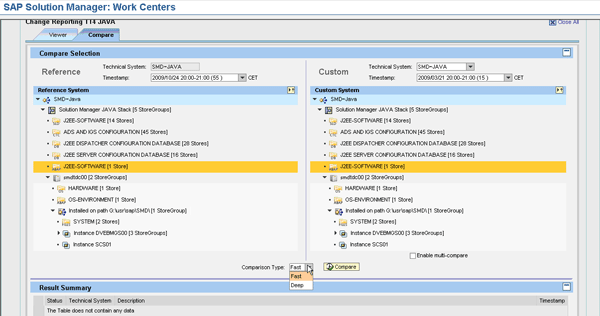
Figure 10
Comparison tool
In the Compare Selection area at the top of the comparison tool, select the technical systems or time stamps you want to compare. You can set a system or time stamp as a reference in the left panel, and another system or time stamp as a custom selection in the right panel. After you select the systems for comparison, you can restrict the comparison to a particular store group (as opposed to the entire system). Under the left and right panels, there is a Comparison Type drop-down menu in which you can choose a Fast compare or a Deep compare. The fast compare only displays changes between store groups and skips any identical elements. The deep compare compares all entities, even if they are identical. Select the type of comparison and click the Compare button. The comparison run is triggered and the results are displayed in the Results Summary section at the bottom of the screen (Figure 11). To see the details, select the comparison system on the second line of the Results Summary. The Result Details section is then displayed.
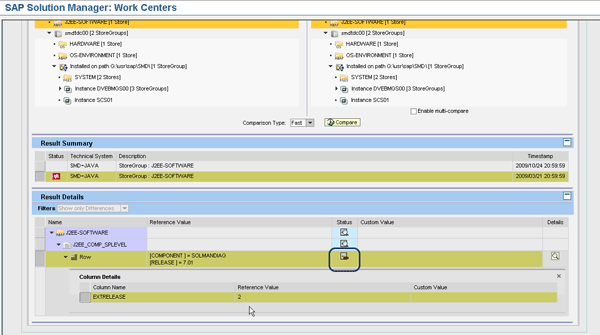
Figure 11
Comparison results summary
The Result Details show you which parameter details between the reference system and custom system are different. The icon in the Status column indicates if an item has been added, removed, or changed. In the example in Figure 11, an item exists in the reference system that does not exist in the custom system for an earlier time stamp. This indicates that a parameter or component that was added may have caused a problem in the application. Now that you have identified the change, you and your team can perform further targeted analysis on your system.

Shanthi Sivasubramaniam
Shanthi Sivasubramaniam is an independent trainer and consultant based in the United Kingdom with more than 13 years of SAP experience. During this time, she has held positions as a technical consultant and trainer with KPMG Malaysia, Logica, and SAP UK. She has worked on numerous SAP projects in Europe and Asia and has delivered SAP training courses all over Europe, South Africa, and the Middle East, focusing specifically on SAP administration and SAP Solution Manager courses. Shanthi has been working with SAP Solution Manager from the time it was first introduced and has helped numerous customers install and configure the various functionalities available. She has a degree in information technology and business information systems and is an SAP-certified technology professional and associate for platform technology with SAP NetWeaver 7.0, a solution consultant for SAP Solution Manager 7.0 operations, E2E application management expert in Root Cause Analysis, change control management, process integration, and automation optimization, and has a number of other SAP certifications.
You may contact the author at info@sustainsystems.com.
If you have comments about this article or publication, or would like to submit an article idea, please contact the editor.