Manager
In the second half of this series on setting up the integration between SAP Solution Manager and SAP Quality Center by HP, find out how to set up and finalize the connection between the two systems.
Key Concept
The integration between SAP Solution Manager and SAP Quality Center by HP enables quality assurance teams to use this Web-based test management platform to manage software quality assurance processes.
The first step to start the configuration of the SAP Solution Manager Adapter, which connects the SAP Solution Manager system to the SAP Quality Center by HP, is to define the logical port.
The logical port specifies the server on which SAP Quality Center is installed, and it is used to transfer data to the SAP Quality Center. In transaction SPRO, follow menu path SAP Solution Manager > Scenario-Specific Settings > Third Party Integration > SAP Quality Center by HP > Integration Test Management > Specify Logical Port. The SAP NetWeaver Application Server (SAP NetWeaver AS) HTTP or HTTPS port is used, depending on the values in the URL that opens. Click the execute icon next to the Specify Logical Port node to open the service-oriented architecture (SOA) management configuration page (Figure 1).
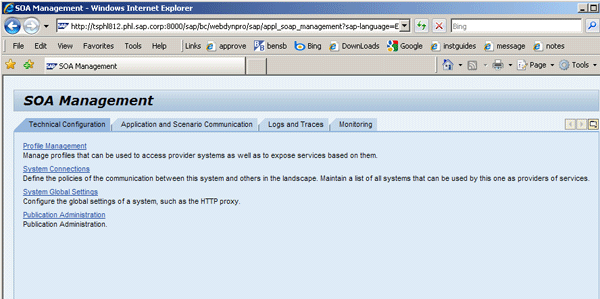
Figure 1
Start the process on the SOA Management page
Next, click the Application and Scenario Communication tab, click Service Administration, and then click Single Service Administration. In the screen that appears (Figure 2), enter the following data by using the individual drop-down menus:
- Search by: Consumer Proxy
- Search Pattern: CO_AGS_HPQCSMBLUEPRINT_HANDLER
- Field: Internal Name

Figure 2
Management for Web service administration
Note that the in System value is defaulted. After entering all the required data, click the Go button to start the search. Select the External Name SMBlueprintHandlerSEI when it appears and then click the Apply Selection button.
Next, click the Configurations tab and then click the Create Logical Port button (Figure 3). This opens a new window where you can create a new logical port.
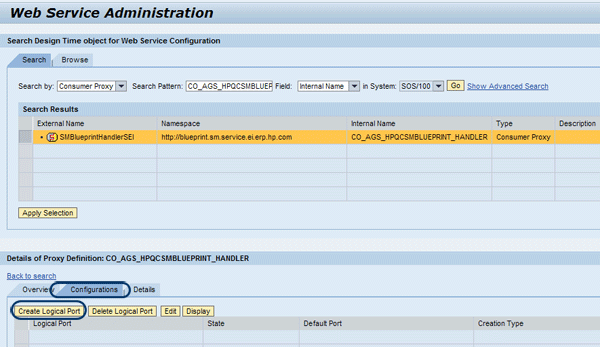
Figure 3
Create the logical port
In the new window, enter the required data using my example as a guide (Figure 4). As I stated earlier, the logical port specifies the server on which SAP Quality Center is installed. Here is the data you should enter:
- Logical Port Name: QC_Logical_port
- Select the Logical Port is Default check box
- Description: Your logical port description
- URL for WSDL Access: https://<SAP Quality Center Server>:8080/EIServer/SMBlueprintHandler?wsdl
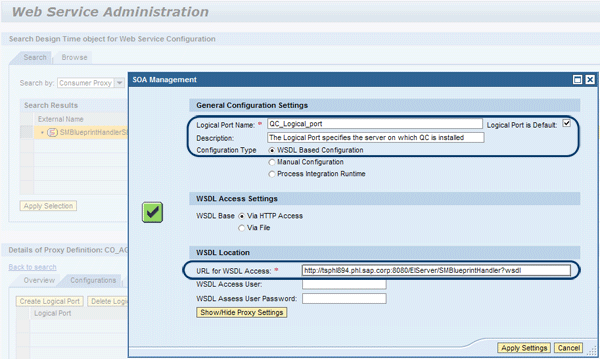
Figure 4
Create logical port screen
Click the Apply Settings button when finished. When you click the Save button in the next screen (Figure 5), the logical port is created and activated in SAP Solution Manager. This is now the default port for communication with SAP Quality Center for the Test Management module.

Figure 5
Save the logical port you created
Now, you must set up a user in SAP Quality Center and assign it to projects for communication with SAP Quality Center. This technical user is necessary for the SAP Solution Manager system to connect the SAP Solution Manager project to the SAP Quality Center project. To start, go to the system administrator page and log in with site administrator access rights (Figure 6).
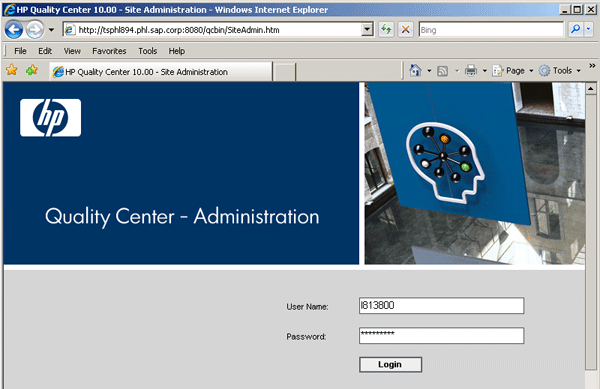
Figure 6
SAP Quality Center by HP administrator login page
In the Site Administrator page that opens, select the Site Users tab and click the add user icon (Figure 7). This opens a new pop-up dialog window. Enter the appropriate data in the required fields and click OK to create the user.

Figure 7
Create a new user
Set the user password for the user name you have just created (QC_Transfer_User in this example) by clicking the Password button (Figure 8).
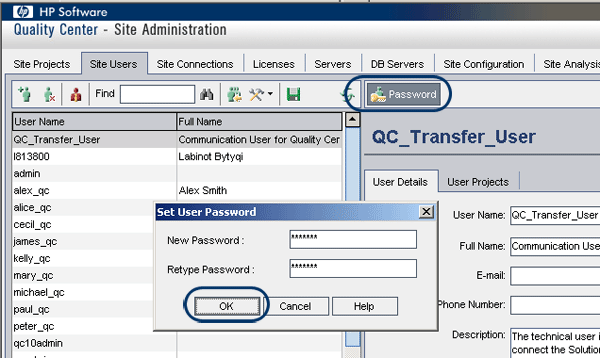
Figure 8
Set up the user password
You only need to perform the next IMG activity if you use the same technical user for communication in all projects and want to make it your default communication user. If you set this up, you are no longer asked for a user in the SAP Quality Center when you link an SAP Solution Manager project to a test project. Start the setup of the communication user for SAP Quality Center by using transaction SPRO and following menu path SAP Solution Manager > Scenario-Specific Settings > Third Party Integration > SAP Quality Center by HP > Integration Test Management > Set Up Communication User for Quality Center. Click the execute icon next to Set Up Communication User for Quality Center to open the user maintenance screen.
Enter the communication user and password in the screen that appears to enable a default communication user for SAP Solution Manager projects and then save your work (Figure 9). Now you have to assign this user to every project in SAP Quality Center to enable integration between SAP Solution Manager and SAP Quality Center.
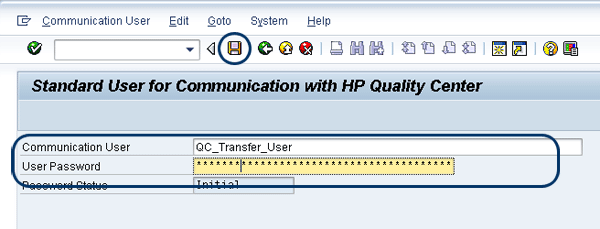
Figure 9
Set up the communication user for SAP Quality Center
Set Up the Technical User for Web Services
The next IMG activity is to create a technical user with restricted authorization. SAP Quality Center uses the technical user for Web services to send test results to SAP Solution Manager. These results are displayed in the SAP Solution Manager project business requirements.
Create this user in SAP Solution Manager by following menu path transaction code SPRO > SAP Solution Manager > Scenario-Specific Settings > Third Party Integration > SAP Quality Center by HP > Integration Test Management. Click the execute icon next to Set Up Technical User for Web Services. This takes you to the user maintenance screen. Specify a user name of your choice and click the create icon (Figure 10).
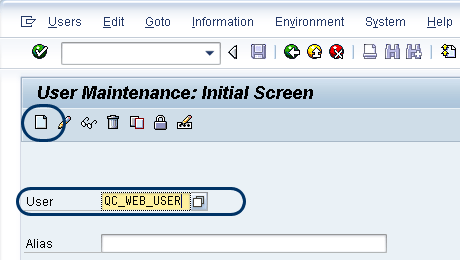
Figure 10
User maintenance initial screen
You are taken to the user maintenance screen (Figure 11). In the Address tab, specify a name (in this example, only a last name is necessary).
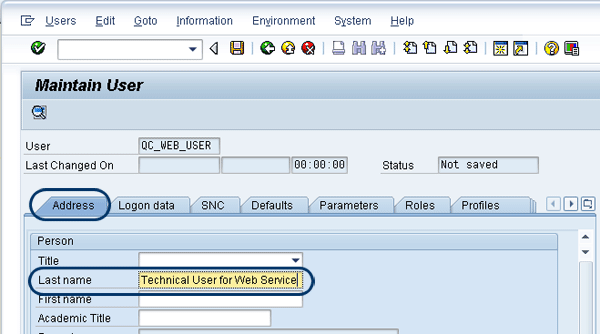
Figure 11
Address maintenance screen
In the Logon data tab, select the Service user type and set up a password (Figure 12). Make sure that you remember this password because you will need it later on during the setup I describe in "Release Web Service for Test Results."
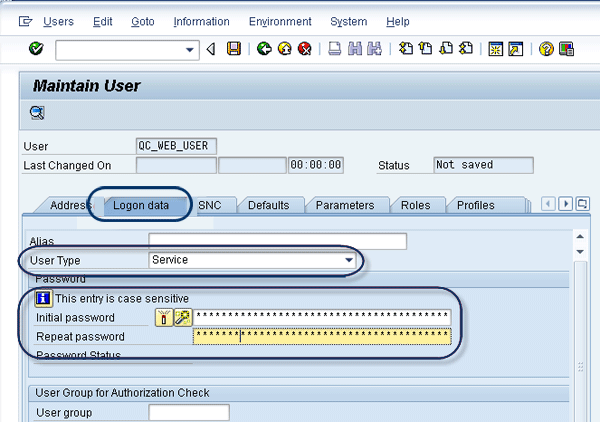
Figure 12
User logon data requirements
Next, select the Roles tab. Assign SAP role SAP_QC_INTERFACE to your user by entering it under Role Assignments and save the data (Figure 13). You have now set up the technical user for Web services.
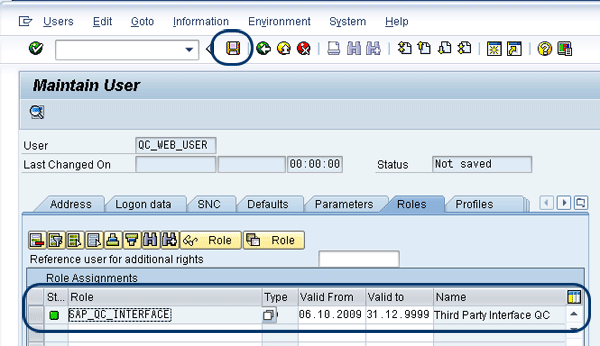
Figure 13
Assign the appropriate role to the technical user
Create a Technical User for Alias
In SAP Solution Manager, you must next create a technical user for the alias and assign it the SAP-delivered role SAP_QC_WSDL_ACCESS. This user is used for Web Services Description Language (WSDL) access between SAP Quality Center and SAP Solution Manager. WSDL allows services to communicate between applications. Getting into the details of aliases is beyond the scope of this article, but you should know that they allow you to call Web services using an appropriate non-technical name.
The process for creating this user is similar to the process you just performed for the technical user for Web services. Navigate to SAP Solution Manager > Scenario-Specific Settings > Third Party Integration > SAP Quality Center by HP > Integration Test Management. Once again, click the execute icon next to Set Up Technical User for Web Services. You are taken to the user maintenance screen, where you should specify a user name (e.g., QCALIAS) and click the create new user icon (Figure 14). Similar to what you did before, specify a user name in the Address tab (Figure 15). In the Logon data tab, choose the user type System and set up a password (Figure 16). Save your work.
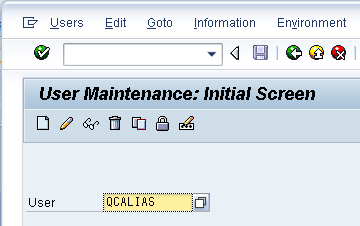
Figure 14
Enter the name of the technical user for alias

Figure 15
Fill out the Address tab for the technical user
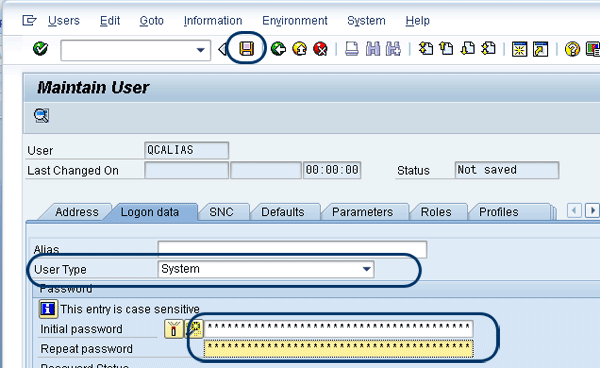
Figure 16
Set up a password and specify the user type
Copy the role SAP_QC_WSDL_ACCESS that is already in the Roles tab. It is automatically assigned to the user you created. Ensure that the profile for this role is generated and save your work (Figure 17). You have now successfully set up the technical user for alias.
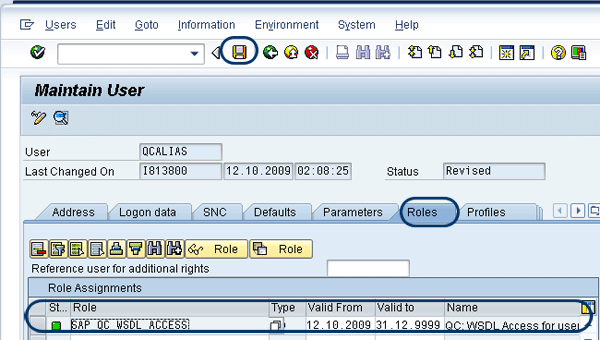
Figure 17
Assign the SAP_QC_WSDL_ACCESS role
Release the Web Service for Test Results
Next, enable the Web service that permits users to send test results from SAP Quality Center to SAP Solution Manager projects. Follow menu path SAP Solution Manager > Scenario-Specific Settings > Third Party Integration > SAP Quality Center by HP > Integration Test Management. Click the execute icon next to Release Web Service for Test Results to open the SOA Management configuration page (Figure 18).
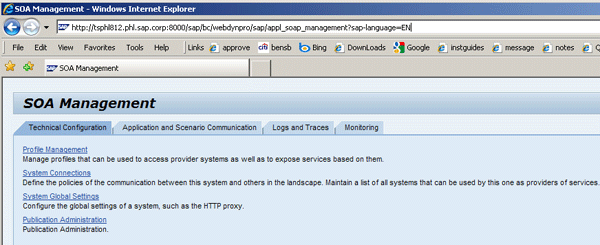
Figure 18
Start at the SOA Management page
Click the Application and Scenario Communication tab and select Service Administration > Single Service Administration. Enter the following data using the drop-down menus:
- Search by: Service
- Search Pattern: AGS_WBS_SOLAR_IF_MERCURY
- Field: External Name
Again, the in System value is defaulted. Start your search by clicking the Go button. Select the External Name AGS_WBS_SOLAR_IF_MERCURY that appears and then click the Apply Selection button (Figure 19).
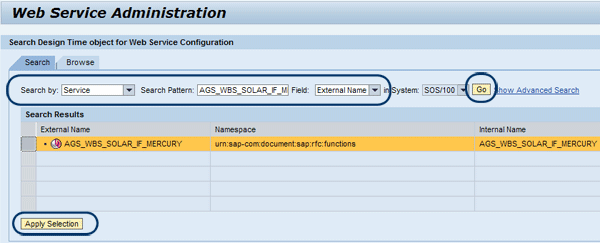
Figure 19
Web Service Administration page
A new window opens. Select the Configurations tab in the details section. Create a Web service by clicking the Create Service button (Figure 20). Enter the following data in the pop-up dialog window that appears:
- Service name: AGS_WBS_SOLAR_IF_MERCURY
- Description: AGS_WBS_SOLAR_IF_MERCURY
- Binding name: AGS_WBS_SOLAR_IF_MERCURY

Figure 20
Enter the Web service information
Then, click the Apply Settings button and a Web Service Configuration of Service Definition: AGS_WBS_SOLAR_IF_MERCURY page appears under the Details of Service Definition section (Figure 21). Mark the check box for No Authentication under Authentication Settings. Then enter the user name and password under the ABAP Service User section to assign the technical user you created in the Create Technical User for Alias section (Figure 21, which is an extension of the screen shown in Figure 20).

Figure 21
Authentication method selection
After you click the Save button, a message should appear at the top of your screen reading “Binding 'AGS_WBS_SOLAR_IF_MERCURY' activated in service ‘AGS_WBS_SOLAR_IF_MERCURY’”. The names may vary according to your earlier specifications. This message means the Web service for test results is activated in SAP Solution Manager (Figure 22).
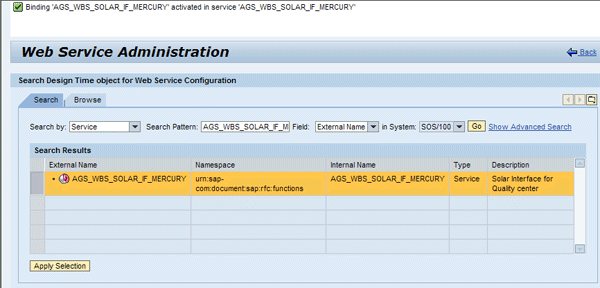
Figure 22
Web service binding message
Activate the Web Service and Create the Alias
To allow SAP Quality Center to send test results back to SAP Solution Manager, you must activate the WSDL service and the alias. Follow menu path SAP Solution Manager > Scenario-Specific Settings > Third Party Integration > SAP Quality Center by HP > Integration Test Management. Click Specify Logical Port and then click the execute icon next to Activate Service and Create Alias to open the Maintain service page (Figure 23).
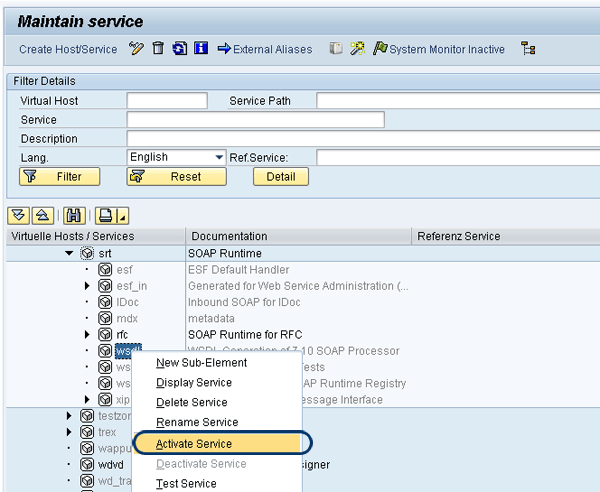
Figure 23
WSDL service activation
To activate the WSDL service or check whether it is already active, do the following:
- Select the hierarchy type SERVICE
- Click the Execute button
- Find the service /sap/bc/srt/wsdl
- Right-click it and select Activate Service from the context menu (Figure 23)
To set up the alias in the Maintain service screen, follow menu path Goto > External Aliases > Wizard - External Alias (Figure 24). To start the external alias service setup with the wizard, click the Continue button (Figure 25).
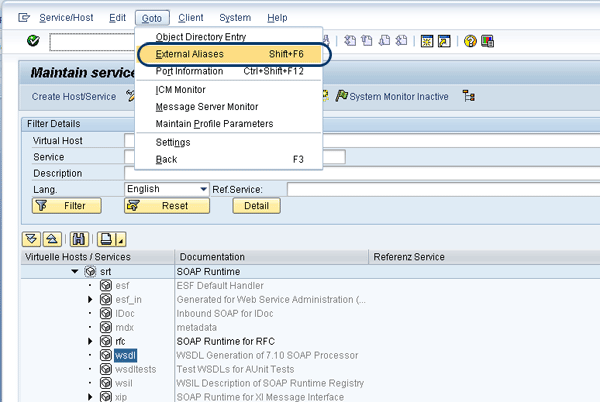
Figure 24
External alias service
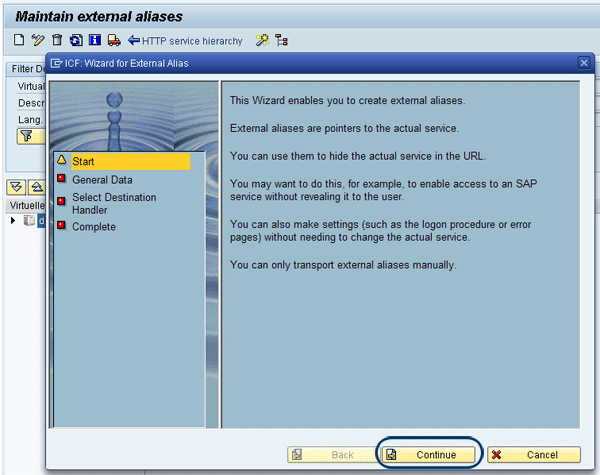
Figure 25
Wizard for external aliases
Run the wizard and enter the following in the General Data screen (Figure 26):
- External Alias: /sap/bc/srt/wsdl
- A description, such as HP Quality Center Management
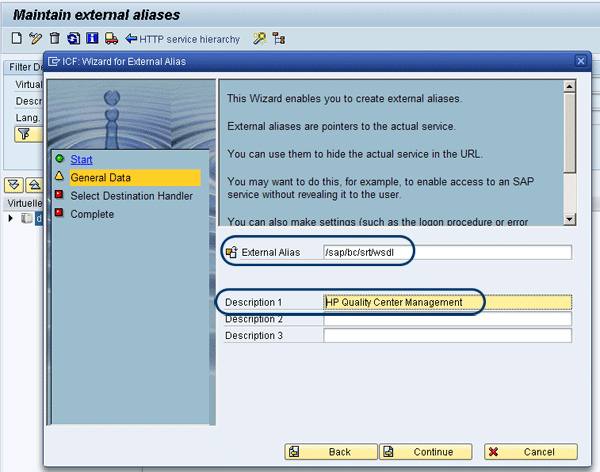
Figure 26
Enter the general data
Click the Continue button. In the next screen, Select Destination Handler, select the handler /default_host/sap/bc/srt/wsdl from the Documentation list shown in Figure 27. All the items circled in Figure 27 are required elements.
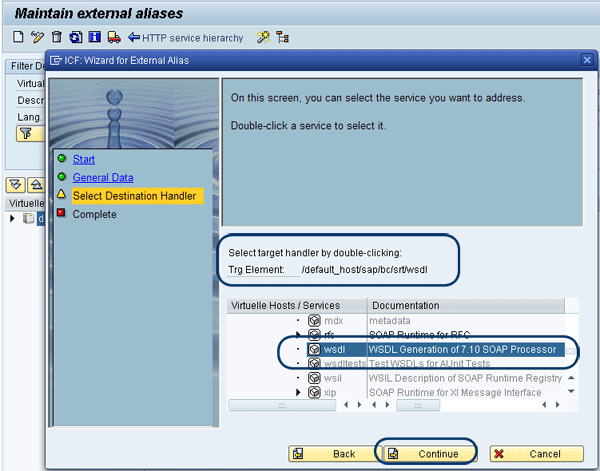
Figure 27
Wizard selection of external handler
After you click the Continue button, clicking the Complete button shown in Figure 28 finishes the external alias setup.

Figure 28
Complete the wizard setup of the external alias
Display SAP Solution Manager Documents in SAP Quality Center
Next, enable users to select which documentation can be transferred as a link to SAP Quality Center. These documents can be displayed by a link in the SAP Quality Center requirements module. You must activate a service to make this possible.
Return to the Maintain service page. Select the services of hierarchy type Service and navigate to node /default_host/sap/bc/solman/SolmanDocuments. Right-click SolmanDocuments and select Activate Service in the context menu (Figure 29). Confirm the service activation by clicking the second Yes button, as this is the option that activates the parent service and all the child services underneath it (Figure 30).

Figure 29
Figure 29

Figure 30
Confirm SolmanDocuments service activation
Connect to SAP Quality Center
To synchronize the test prerequisites and results between SAP Solution Manager and SAP Quality Center, you must create a connection between your SAP Solution Manager project and SAP Quality Center project. Each SAP Solution Manager project is connected to one SAP Quality Center project.
Follow menu path SAP Solution Manager > Scenario-Specific Settings > Third Party Integration > SAP Quality Center by HP > Integration Test Management and click Connection to HP Quality Center. Select the SAP Solution Manager project by double-clicking the project’s name (Figure 31).

Figure 31
Select an implementation project
Then, select Connection to HP Quality Center from the Edit drop-down menu (Figure 32). A dialog box with all the data required for the connection to SAP Quality Center appears. Expand Communication Data and check the communication user data. You can also specify a different default user if you wish (as I said earlier, this is not very common). Select the project in SAP Quality Center to which you want to establish the connection. Save your work.
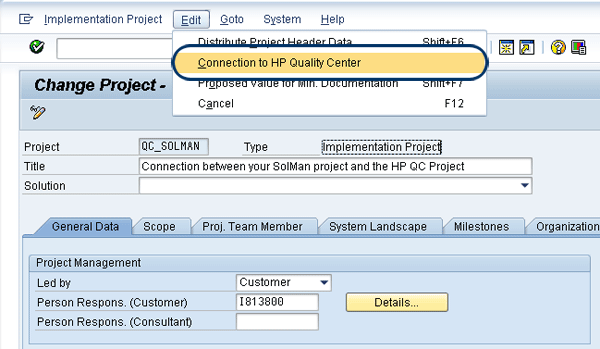
Figure 32
Find the Connection to HP Quality Center option
The final step is to select the project in SAP Quality Center to which you want to establish the connection (Figure 33). This is a very straightforward process. The SAP Quality Center project that you select binds to the SAP Solution Manager project. This creates the full connection between SAP Solution Manager and SAP Quality Center.
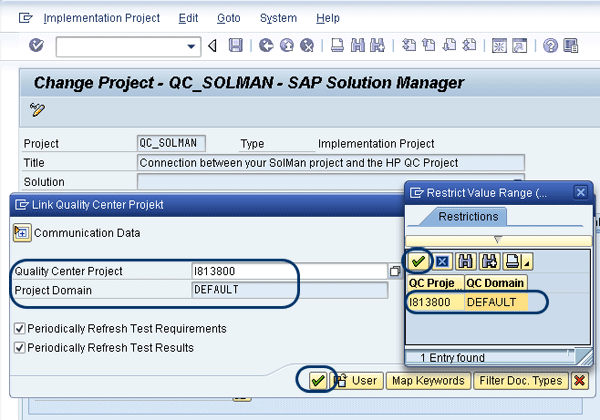
Figure 33
Find the appropriate project in SAP Quality Center
Labinot Bytyqi
Labinot Bytyqi graduated with a degree in computer science and business management and a minor in economics from George Fox University in 2005. Currently, he is pursuing a master’s degree in information technology management. Labinot joined SAP in 2007 as a technical consultant with more than eight years of information technology experience and SAP consulting, particularly in the application lifecycle management area, where he was a lead for an SAP Solution Manager and extensions practice in the West region. Labinot currently is responsible for field services software sales portfolio business development and strategy, as well as for SAP Extended Diagnostics by CA Wily.
You may contact the author at labinot.bytyqi@sap.com.
If you have comments about this article or publication, or would like to submit an article idea, please contact the editor.