Manager
SAP Solution Manager 7.0 with SAP enhancement package 1 provides a guided procedure to help you set up your SAP Solution Manager system and connect to the satellite systems in minutes after it is installed.
Key Concept
SOLMAN_SETUP is a transaction that allows you to make initial and basic configurations of SAP Solution Manager in minutes using a step-by-step wizard. These configuration settings are required after installation in order for certain functionalities to work. SOLMAN_SETUP also lets you run guided procedures for every managed system that will connect to SAP Solution Manager.
Once an SAP Solution Manager system is installed, you need to make a number of basic settings so the initial functionality is available for use. These activities are normally accessed through the IMG in transaction SPRO — there are several activities under the Basic Settings menu and other activities under Cross-Scenario Settings and Scenario-Specific Settings that need to be set up (Figure 1). However, going through all these activities can sometimes be confusing and time consuming. In addition, many companies do not require the setup of all these activities, depending on the SAP Solution Manager functionality they intend to use.
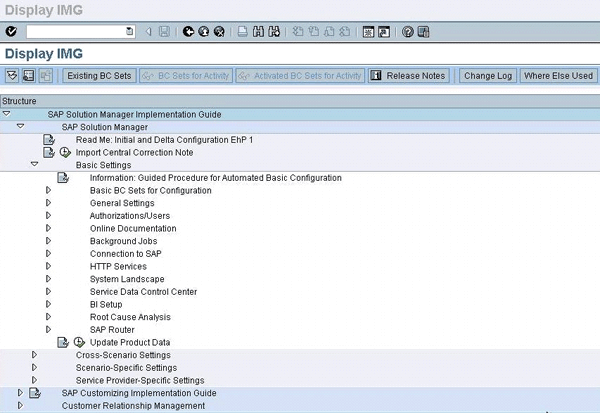
Figure 1
The SAP Solution Manager IMG
As of SAP Solution Manager 7.0, SAP enhancement package 1, a new guided procedure was introduced to help simplify this process. You can call a Web Dynpro application via transaction SOLMAN_SETUP. A new step-by-step guide allows you to set up SAP Solution Manager quickly by providing easy navigation, a help section, a list of activities that need to be performed, and a log of each activity once completed (Figure 2). All the activities in the configuration wizard are linked to the corresponding IMG activity, and it can save you the time and trouble of trying to work out which ones to set up for your particular organization. Note that there may be some additional configuration that you need to set up manually for certain functionalities (but that is beyond the scope of this article).
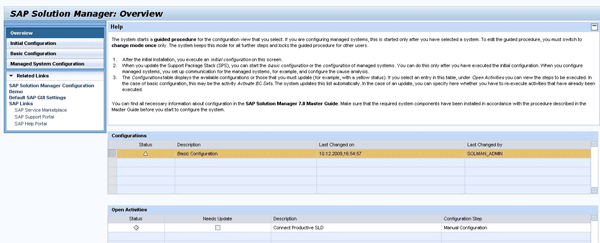
Figure 2
Initial screen of transaction SOLMAN_SETUP
Initial Configuration
You only need to perform the initial configuration once after the system is installed. It prepares the system for configuration by setting up an administrative user in SAP Solution Manager and creating a business partner for this user (Figure 3).

Figure 3
Initial configuration for setting up a user
Once the administrative user has been created, the next step under technical configuration ensures that the appropriate entries are set up in transaction SMSY for SAP Solution Manager. The screen shown in Figure 4 allows you to start the System Landscape Directory (SLD) configuration so that transaction SMSY can obtain all the system information from the local SLD. SAP Solution Manager uses its own SLD to read the technical information required for all systems defined in transaction SMSY.
You are required to log on to the local SLD with the administrative user that was set up in the previous step when you click the Start SLD link. Clicking the Read SLD button starts reading technical information from the local SLD by scheduling a background job called RSGET_SMSY. This updates the information in transaction SMSY. Once this job has been set up, the initial configuration is complete.

Figure 4
SLD configuration
Basic Configuration
You can now move on to the basic configuration, where there is a series of mandatory and optional activities you need to perform. You might only need to set up certain steps depending on the functionality you plan to use in SAP Solution Manager, so make sure to read through the IMG documentation in advance to get an idea of what needs to be set up.
The first step sets up an implementation project, a logical component, and a solution landscape for you (Figure 5). This enables you to get started with some of the implementation, operational, and monitoring tools in SAP Solution Manager.
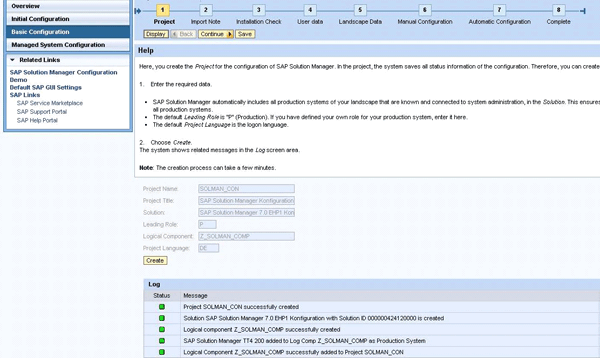
Figure 5
Basic configuration
Once you have completed a step, click the Save button and then the Continue button to move on to the next step. After you do this in Figure 5, the system asks you to implement an important central correction note for SAP Solution Manager, and there is a link to download and implement the note using the SAP Note Assistant (Figure 6). There may be some manual steps required. You should always download the latest version of the note and read the details provided there.
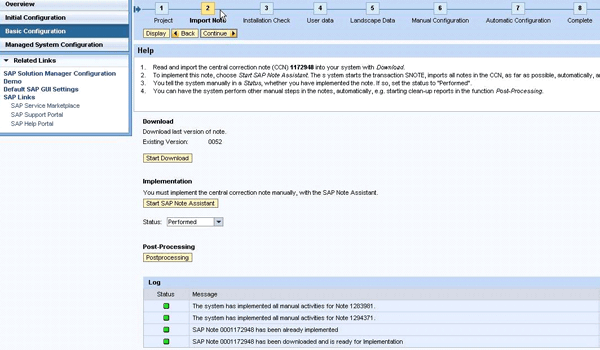
Figure 6
Import the note
Once this is completed, set the Status dropdown menu to Performed and move on to the next step. The subsequent steps automatically go through installation checks to ensure that all the prerequisites for SAP Solution Manager are in place (Figure 7). For each step, you can choose to execute, postpone, or perform the step manually. You can select this in the Execution Status column. You can also see the corresponding documentation for each step under the IMG Documentation column.
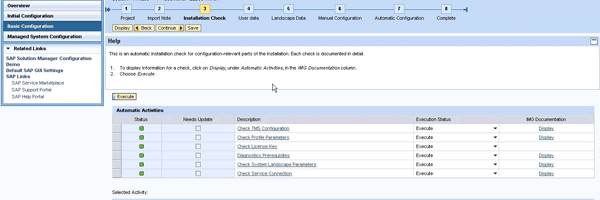
Figure 7
Installation Check step
In the next step, provide the appropriate logon information for the Service Marketplace S-user that will be used for communication between the SAP Solution Manager system and the SAP Support Portal (Figure 8). BI components are used for certain SAP Solution Manager Diagnostics and reporting functionalities. Select the Client? check box if you intend to use a separate BI client other than the default client (Client 001) for SAP Solution Manager. Select the System? check box if you want to use the BI components on a separate system other than SAP Solution Manager. If you intend to use the default options, you can leave both of these check boxes unselected.
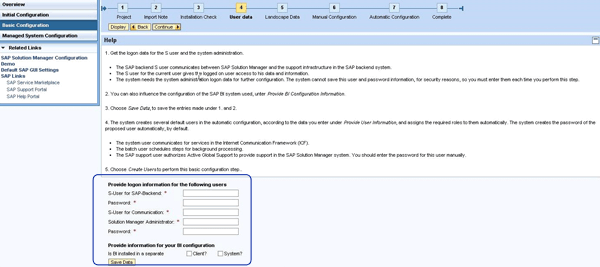
Figure 8
User data step
Continue to the next step, where you enter information about your system landscape, such as the server details for Wily Introscope Enterprise Manager. This information is required if you are planning to use Solution Manager Diagnostics and Wily Introscope. The next few basic configuration steps cover a series of manual configurations that you can perform later if needed. These include activating the BI source system (as well as its content, and authorizations), importing the agent required for Wily Introscope, and setting up the online documentation. These steps are shown in Figure 9.
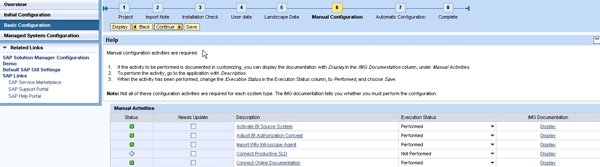
Figure 9
Manual Configuration step
The last part of the basic configuration guided procedure contains several steps that you can perform automatically, manually, or postpone until later depending on your requirements (Figure 10). If the option is set to Execute for the step under Execution Status column, then the system performs the step for you automatically when you click the Execute button. If you set the option to Manual, you can perform the step manually. If you set it to Postpone, you can delay using that particular option for now. For example, you might not want to activate all the customizing for Service Desk. If you perform the step manually, you can choose what you want to activate.
Some of the options you can set as manual, automatic, or postponed include:
- Activating the Business Configuration (BC) sets that are required for the Service Desk and Maintenance Optimizer
- Activating services required for the Web Dynpro screens called from the work centers
- Configuring Solution Manager Diagnostics
- Generating the business partners required for the Service Desk
- Setting up the connection to the SAP system
- Scheduling housekeeping jobs required for SAP Solution Manager
The next step (Complete) simply completes the basic configuration and you can move on to the next area of configuration: managed systems.
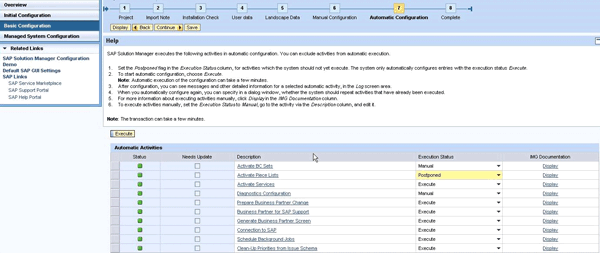
Figure 10
Automatic Configuration step
Managed System Configuration
After the initial and basic configuration of SAP Solution Manager, you are now ready to start the configuration of the managed systems. You need to do this for every system that you want to connect to SAP Solution Manager.
The first step covers setting up the required Remote Function Call (RFC) connections so SAP Solution Manager can communicate with the managed system (Figure 11). The Help section at the top of screen explains the different RFC connections and when they are used. Just like before, click the Save button and then the Continue button to move on to the next step.
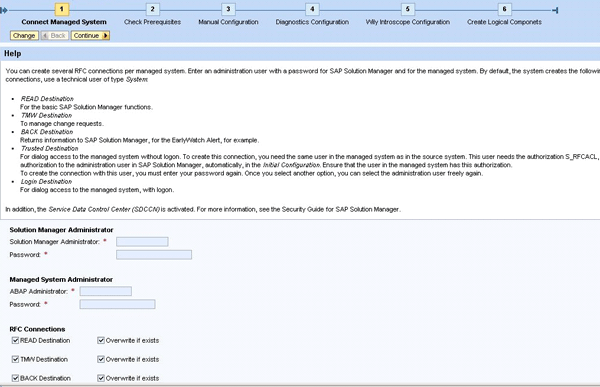
Figure 11
RFC connections
In the next step, the system automatically checks the prerequisites for the configuration of Solution Manager Diagnostics (Figure 12). Specifically, it checks that the managed system has the appropriate Support Packages and software components to allow it to connect to Solution Manager Diagnostics.
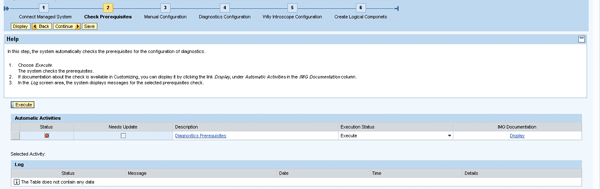
Figure 12
The system automatically checks for Diagnostics prerequisites
The red stop light icon under the Status column for this step indicates that some of the prerequisites required for the connection to Solution Manager Diagnostics are missing. Therefore, you might need to implement the appropriate Support Packages or SAP Notes in the managed system. You can click the Diagnostics Prerequisites link to be taken directly to the SAP Note in the SAP Service Marketplace.
The subsequent step shown in Figure 13 consists of a series of manual configurations that you might need to perform if the particular functionality is required (such as installing a diagnostics agent or maintaining the SAP router data).
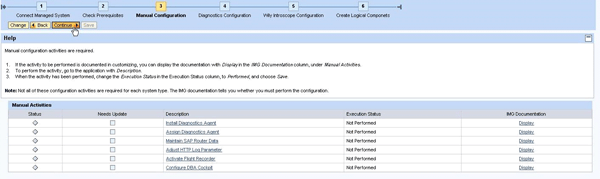
Figure 13
Manual Configuration step
In the next step, not all the activities are required for each managed system (Figure 14). Depending on the type of managed system you are connecting to SAP Solution Manager — for example, it could be Duet, Master Data Management (SAP MDM), SAP NetWeaver Business Warehouse Accelerator (shown as SAP BIA in Figure 14), or SAP NetWeaver Process Integration (shown as SAP NW-PI) — you can then perform the appropriate activity. The last step on that list, Configure Diagnostics, is the one that you need to perform on each managed system, regardless of the type of system, if you intend to use Solution Manager Diagnostics.
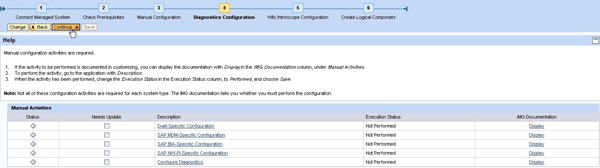
Figure 14
Diagnostics Configuration step
Similarly, for the next steps, if you plan to use Solution Manager Diagnostics, then you need to set up the appropriate parameters for Wily Introscope (Figure 15).
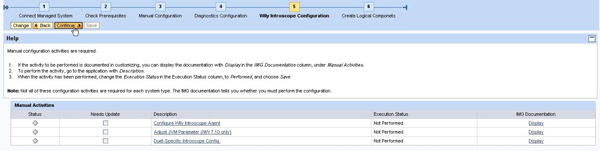
Figure 15
Wily Introscope Configuration step
The last part of the managed system configuration setup allows you to add the satellite system to a logical component if one already exists for that particular product version. If not, you have to option to create a new logical component (Figure 16).

Figure 16
Create Logical Components step

Shanthi Sivasubramaniam
Shanthi Sivasubramaniam is an independent trainer and consultant based in the United Kingdom with more than 13 years of SAP experience. During this time, she has held positions as a technical consultant and trainer with KPMG Malaysia, Logica, and SAP UK. She has worked on numerous SAP projects in Europe and Asia and has delivered SAP training courses all over Europe, South Africa, and the Middle East, focusing specifically on SAP administration and SAP Solution Manager courses. Shanthi has been working with SAP Solution Manager from the time it was first introduced and has helped numerous customers install and configure the various functionalities available. She has a degree in information technology and business information systems and is an SAP-certified technology professional and associate for platform technology with SAP NetWeaver 7.0, a solution consultant for SAP Solution Manager 7.0 operations, E2E application management expert in Root Cause Analysis, change control management, process integration, and automation optimization, and has a number of other SAP certifications.
You may contact the author at info@sustainsystems.com.
If you have comments about this article or publication, or would like to submit an article idea, please contact the editor.