Manager
Faced with the bewildering array of monitors available in the Computing Center Management System (CCMS), it is not an easy task to define an acceptable range of monitors to provide a general picture of the health of your SAP systems. With SAP Solution Manager 7.0 systems up to enhancement package 1, Support Package 26, learn how to build a range of monitor elements using rules that help define an alerting infrastructure that does just that — monitor and alert on the base elements of your SAP system. Step through the setup and structure of the monitoring infrastructure.
Key Concept
The Computing Center Management System (CCMS) allows you to assess the well-being of SAP systems. It is fast, easy to configure, reliable, and — if correctly configured — highly effective. It has saved many SAP Basis technologists from embarrassment by providing advance warning of problems in their landscape. Using centralized monitoring in transaction RZ20 in the SAP Solution Manager system is a must in any SAP environment, even if you use only the basics, such as availability monitoring. You can neatly organize your monitor trees and receive advance warning of system failure, system slowdowns, interface problems, or system crashes.
The core of system monitoring lies in providing you with an understanding of how well your system is performing. Of course, to implement effective monitoring, you need the system to be able to understand all the elements involved. Using the Computing Center Management System (CCMS), you can do just that. By setting up the proper monitoring elements, you can be sure that the alerts in your system are acting properly. For instance, with critical batch job monitoring, when a critical job fails, an automated process is triggered that informs the responsible person.
If you look at a basic SAP ABAP system and try to understand what makes it tick, it simplifies the task of setting up the monitors. There are six basic areas:
- Operating system
- Database
- R/3 online tasks (referring to all online tasks in the ABAP stack)
- R/3 batch tasks (referring to all batch tasks in the ABAP stack)
- Printing and emailing
- Interfaces
I’ll show you how to set up a monitoring environment based on these six elements so that for each defined system you can quickly see where faults may lie. In this article, I’ll focus on the method of how to monitor and in part 2 I’ll cover what to monitor. This article is intended for system administrators and technical managers, and requires no prerequisites beyond using an SAP Solution Manager system prior to 7.1.
Note
There is a new monitoring, alerting, and reporting infrastructure starting from SAP Solution Manager 7.1 Support Package 01 called Technical Operations. Go to
https://service.sap.com/solutionmanager and select the Release Notes for SAP Solution Manager complete overview link to get an idea of the new functionality in the 7.1 release. It explains what Technical Operations is and how it differs from previous versions. If you have already installed the latest version of SAP Solution Manager, then this article is not relevant for you, but if you already have an SAP Solution Manager system installed up to SAP Solution Manager 7.0 enhancement package 1, Support Package 26, and your monitoring is not effective, then this article provides some help for you.
Tip!
If you already have a defined CCMS monitoring structure in transaction RZ20 on your SAP Solution Manager system, then I suggest — if you follow these guidelines — that you start a new one. Do not try to adapt the old one. Any associated link, such as an automatic reaction method to the monitoring tree element (MTE), is displayed when you use the Method Allocation detail from the main menu of transaction RZ20.
Here are the steps to setting up base monitoring:
- Understand your landscape and determine which systems require monitoring
- Build a spreadsheet of your base monitors and decide on the thresholds
- Ensure all your agents are correctly installed, updated, stable, and running
- Create your monitor sets based on the spreadsheet and set the permissions for them
- Expand on each monitor set, creating rule nodes and virtual nodes to accurately describe the monitors
- Create your automatic reaction methods for alerting
- Use alert management to allow flexibility for sending out alerts
- Use the Generic Request and Message Generator (GRMG) for Java monitoring
I’ll discuss the first four steps in this article.
1. Understand Your Landscape and Determine Which Systems Require Monitoring
This step may seem pretty obvious, but it is often neglected. It pays to spend some time going over your landscape identifying each system and understanding its purpose before you begin monitoring. Use transaction SMSY to start with, provided it has been configured correctly. Failing this, speak to your system architect.
Each system has its own range for capacity that should be factored in when setting alerting thresholds. For instance, a development system is neither as large nor as important as a production system. It is not necessary for you to be as strict with defining your alert settings for development or user testing systems as you would be when defining settings for production systems.
2. Build a Spreadsheet of Your Base Monitors and Decide on the Thresholds
Using the heading shown in Table 1, begin to build your monitor sets under the following broad headings: operating system, database, SAP online processing, SAP background processing, printing and emailing, and interfaces. Don’t forget to include system availability, which falls into its own unique category for monitoring. Table 1 shows just an excerpt of what should be included in this spreadsheet; I’ll show a more detailed version in part 2.
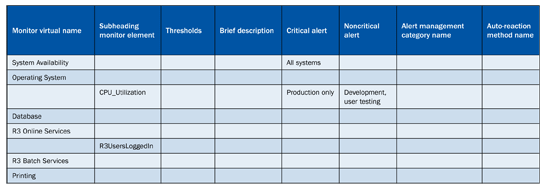
Table 1
Example of spreadsheet used to define base monitors of the landscape
The headings are also contained in the group MTE for Entire System Monitoring. You can find the details of these monitoring tree elements here. You do not need to use exactly the same MTEs as I do, but if you are struggling to identify which ones work for you and which ones do not, then use mine as a guide. The MTE technical names are outside the scope of this article, but there is a lot of work you can do to set up the structure of monitoring your environment before, as explained in step 4.
Note
There will always be specific monitors for specific applications that should be included after the base set of monitors is implemented. For instance, on SAP NetWeaver Business Warehouse (SAP NetWeaver BW), you can include a monitor for process chains, but this monitor set is specific to SAP NetWeaver BW, and not to SAP ECC, for instance.
3. Ensure All Your Agents Are Correctly Installed, Updated, Stable, and Running
CCMS agents are installed on all your satellite systems and registered with the central monitoring system (CEN). The CEN does not necessarily need to be the SAP Solution Manager system, although it makes sense that it is. In brief, CCMS agents can be either sapccm4x agents (for ABAP systems) or sapccmsr agents (for everything else, including Java).
The first monitor that you should create is the one that monitors the CCMS agents themselves. It makes sense to monitor the agents and be informed if they go down, because if they are down they cannot inform you of a fault.
Using transaction RZ20, create a monitoring node called CCMS Agent Monitoring. Expand and select the MTE for CCMS_Selfmonitoring, CCMS Agents. Doing this quickly informs you if your agents are registered correctly and if they are working.
4. Create Your Monitor Sets Based on the Spreadsheet and Set the Permissions for Them
The look and feel of the created monitor sets in transaction RZ20 must reflect the SAP landscape. A technician should be able to quickly and easily navigate to the system that requires attention — and not waste a lot of time expanding a vast number of trees searching for the monitor element in question. To ensure that your monitor sets reflect the SAP landscape, set up a combination of virtual nodes and rules nodes in transaction RZ20. This procedure involves five steps:
Step 1. Create a monitor set for SAP NetWeaver BW. You could call it Acme — BW Systems, for example. To create a monitor set, use transaction RZ20. Highlight the link My Favorites under the CCMS monitor sets. Go to Monitor (set), which is in the top left corner and then select Create. Name the monitor set (e.g., Acme — BW — BWD/BWQ/BWP — ABAP) and then save.
Step 2. Create another monitor subtree below that monitor set for each SAP system in the SAP NetWeaver BW landscape. An example would be Acme — BW Development System.
Step 3. In each subtree, create a rule node for just the SAP system itself. Define in the rule node the system ID of the system concerned. In this way, all downstream rules within downstream virtual nodes in the tree pick up this system ID. An example rule note could be CCMS_DEFINE_R3_SYSTEM, R3System = BWD.
Step 4. Within this system ID rule node, create a virtual node of one of the six basic elements, such as Operating System, including a specific virtual node for the type of system. Example virtual nodes could include:
- Operating System
- Database
- R3 Online Services
- R3 Batch Services
- R3 Print Services
- Interfaces
- Process chains
Step 5. Create a rule node under the virtual node using the rule CCMS_GET_MTE_BY_CLASS to define the monitor that you want to monitor. Note that this rule node now picks up the system ID defined in the header rule node for the system. For example, under the virtual node for Operating System, define the rule node for CCMS_GET_MTE_BY_CLASS to be CPU_Utilization.
The format of the CCMS monitoring tree should be as follows:
CCMS monitor sets
<Company Name> – <System Type> – <SID1/SID2/SID3> – ABAP or Java
A specific example could be:
- Acme – BW – BWD/BWQ/BWP – ABAP
- BW 1 – BWD – <BWSERVERNAMEDEV>
- BW 2 – BWQ – <BWSERVERNAMEQA>
- BW 3 – BWP – <BWSERVERNAMEPRD>
Then under each monitor, split the monitor up into the following categories by creating the following virtual rules. (Make sure you have already created a header rule node for the system ID.) Schematically, it would look like this:
Monitor name: BW 1 – BWD – <BWSERVERNAMEDEV>
- Rule node: CCMS_DEFINE_R3_SYSTEM, R3System = BWD
- Virtual node: Operating System
- Virtual node: Database
- Virtual node: R3 Online Services
- Virtual node: R3 Batch Services
- Virtual node: R3 Print Services
- Virtual node: Interfaces
- Virtual node: Process chains
Now create under each of the virtual nodes a rule node for the monitoring element described in the spreadsheet. (I’ll discuss this topic in detail in part 2). Note that the legend displays a gray cross if the node is a virtual node because a virtual node has no meaning except to help categorize your configured monitors.
Figure 1 shows a screenprint from a test system of what the setup should look like in change mode.
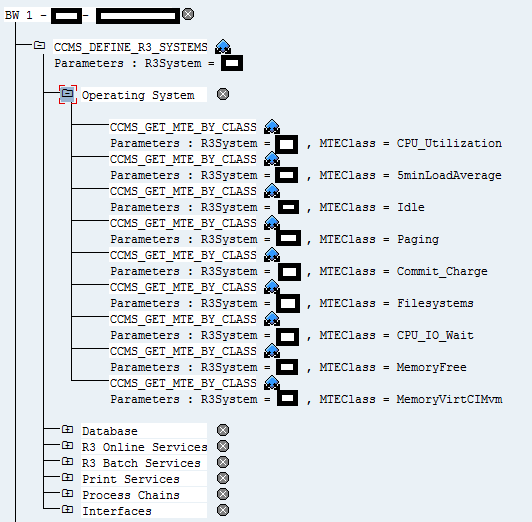
Figure 1
The setup in change mode
For example, for Operating System, set up the following rules node using the CCMS_GET_MTE_BY_CLASS rule. Note that the system ID is always the default in this because it is ruled by the header class already defined in CCMS_DEFINE_R3_SYSTEM.
Operating System
- CPU_Utilization
- 5minLoadAverage
- Idle
- Paging
- Commit_Charge
- Filesystems
- CPU_IO_Wait
- MemoryFree
- MemoryVirtCIMvm (if you have a virtual environment)
In real-time mode (i.e., when you display the values of the monitor set), you should see what is shown in Figure 2, except in this case I display an example of R3 Online Services. It is quick and helpful to be able to view at a glance all the important metrics that control the operation of an SAP R/3 ABAP system.
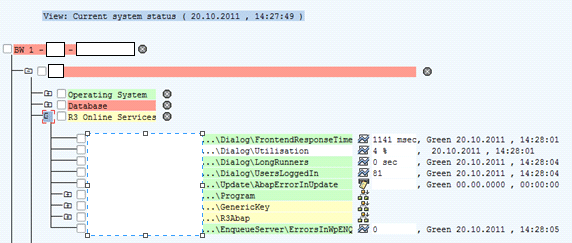
Figure 2
Screen output from transaction RZ20
Jim Baxter
Jim Baxter is an independent SAP Basis consultant with a wide variety of experience in SAP Solution Manager setup and functionality. He is certified in the Implementation Tool and Root Cause Analysis and has worked on Service Desk setup for SAP value-added resellers.
You may contact the author at jim.baxter@ulapha.co.za.
If you have comments about this article or publication, or would like to submit an article idea, please contact the editor.