Partial payments are sometimes difficult to process in an SAP system. Learn how to set editing options to automatically link partial payments to the invoices to which they belong.
Key Concept
By setting editing options correctly, you can automatically link an original invoice and partial payments. An SAP system can also automatically calculate partially paid amounts. Because of the automatic linking, it is very unlikely that incorrect postings will be made. Editing options must be set per user. They contain the personal preferences of the user within the FI module of the SAP system.
The method for handling partial payments in an SAP system is not always clear and may sometimes lead to incorrect postings. When looking at a customer invoice, you cannot easily see how much the customer already has paid.
However, a very simple accounting editing option for incoming payments can make it automatically clear how much the customer paid. Let’s look at an example of how this process works with and without the option.
A customer has received an invoice of €1.069,54 and the customer has made two partial payments on this invoice: one payment of €400 and one of €450. The partial payments have been received previously and have already been posted in the system. Now a payment for the remaining amount is received. The payment is processed using transaction code F-28, which is the standard SAP transaction code for incoming payments.
Note
The option in this example works not only for transaction code F-28 but also for other transactions that clear documents. For example, during the post-processing of bank statements the transaction FB05 is used to allocate an incoming payment to an invoice. The option has the same effect on transaction FB05 as it has on transaction F-28.
First, I describe the process of allocating incoming amounts to an invoice without the accounting editing option switched on.
In transaction code F-28 I have selected all open items of customer 1457. The selection screen of transaction code F-28 is not included in this article as this lies outside the scope of the article; only the open items found are shown in Figure 1. The payment concerns invoice number 90670336. I selected the original invoice with the amount €1.069,54 as the invoice for which an amount has been received; all other documents have been deselected. In other words, the amount received is to be allocated to this document. Selecting this document automatically changes the color of the amount to blue; the color for all the other lines is black. There are two other lines for invoice 90670336. Those lines are the partial payments that were registered before. These lines can be found at the bottom of the overview shown in Figure 1.
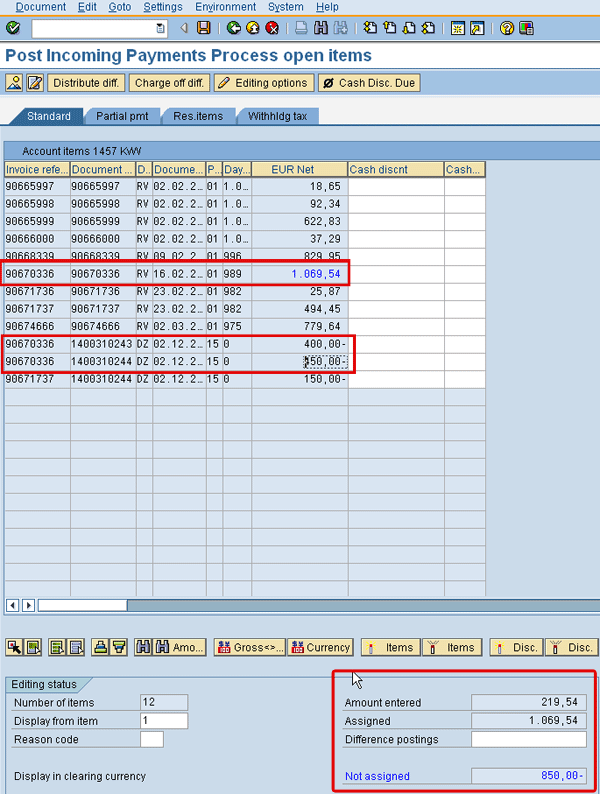
Figure 1
All open items customer 1457 (option not switched on)
At the bottom of the screen in Figure 1 you can see the amount that is not assigned. This amount is €850, the total of the two partial payments. To be able to post the incoming payment, the not assigned amount must be zero. To get rid of the unassigned amount, you need to select the documents of the partial payments as well. In this example the number of lines is limited, but often there are many open items, and it is difficult to find the other documents that need to be selected.
Now let’s see what Figure 1 looks like when the indicator to link partial payments to the original invoice has been set. I explain how the indicator is to be set later in this article. Again, the customer pays the remaining amount of the invoice (€219.54). Now the screen of transaction code F-28 looks different. There is an additional column with the partial paid amount and a column called status (St…), which is shown in Figure 2. Again, I have selected the original invoice; therefore, the amounts in the EUR net and Partial Payment Amount columns are in blue. When you look at the bottom of the screen, you can see that the unassigned amount is 0 (zero) because whenever you select an invoice that has partial payments, the partial payments are selected as well.
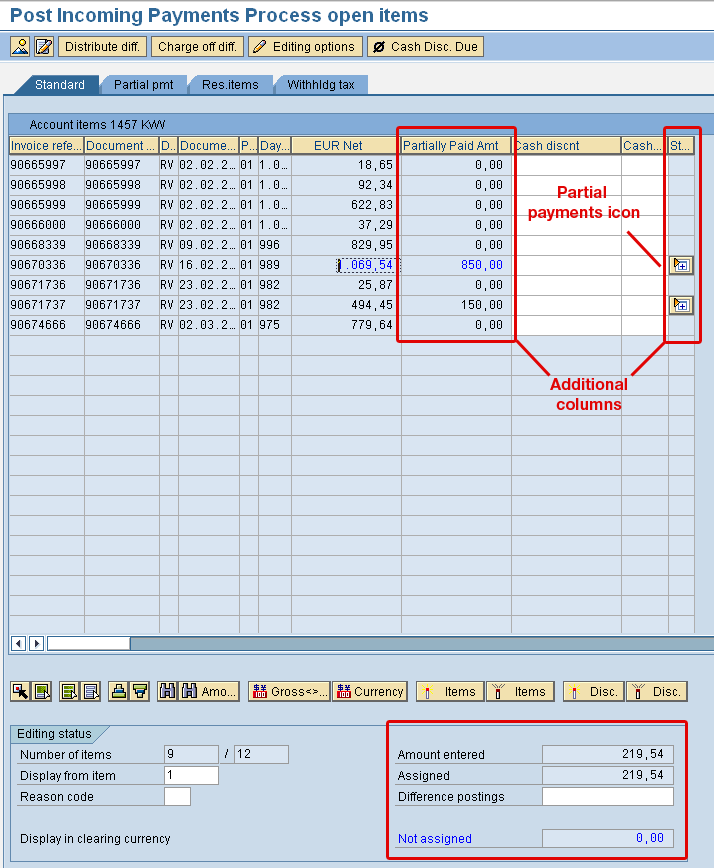
Figure 2
All open items customer 1457 (option switched on)
To explain an additional effect of setting the indicator to link partial payments to the original invoice, go to the partial payments (Partial pmt) tab of transaction F-28. You normally only need to go to the partial payments tab in case part of an invoice amount is paid; alternatively, you could also go to the residual items (Res.items) tab. The effect of setting the indicator is the same for both the partial payment tab and the residual items tab. The difference between the two tabs lies in the way the incoming payment is posted; however, postings are not influenced by the setting of the indicator.
In Figure 2 you can see two partial payments icons  . When you click these icons, the lines behind where the icons are located will be split into the original invoice and any allocated partial payments. For example, in Figure 2 click the icon at the end of the line starting with Invoice reference 90670336. Two additional lines become visible (Figure 3). Those additional lines have the same Invoice reference number because they are payments related to invoice 90670336.
In Figure 3, if you look at the three lines with amounts in blue, you can see that in the Payment amount column the first line has a white background, whereas the other two lines have a blue background. Although the colors may differ depending on your personal settings, they indicate that an amount can be entered only on the first line. The first line is the original invoice, and the two other lines are the partial payments that the customer made previously. Thus, if the indicator has been set, an additional effect is that you cannot allocate partial payments to existing partial payments. (You usually do not enter amounts on partial payments, but this is just to show that by setting the indicator, you cannot even do this by accident.)
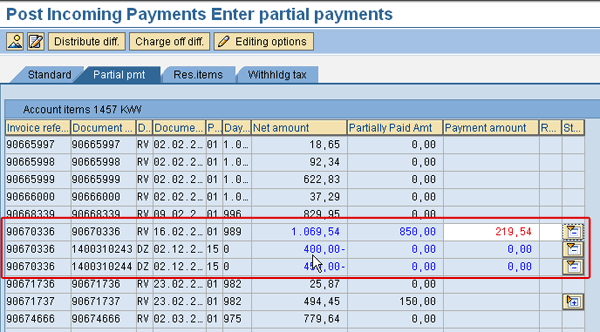
Figure 3
The Partial pmt tab (option switched on)
When you select the original invoice, the partial payments are also selected automatically as the blue color of the amounts indicates. Because the unassigned amount now is zero, you can post the document. This posting clears the original invoice as well as the two partial payments. Figure 4 shows an overview of all customer items that have been cleared by the posting. The screen is from transaction code FBL5N. The selection screen is not shown in this article, but I selected only the documents that were cleared by the incoming payment.

Figure 4
The incoming payment clears the invoice and partial payments
How to Set the Indicator
The indicator to allocate partial payments to the invoices to which they belong is set in the editing options. You can set the accounting editing options by clicking the Editing options button that can be found on all screens of transaction code F-28; for example, Figure 3. You can also use transaction code FB00 to set the options. When you use transaction code FB00, you go to the tab named Open items. This tab is exactly the same as the one shown in Figure 5. Set the Include invoice reference indicator and save the settings by clicking the save icon. When you click the button in transaction code F-28, after clicking the save icon, you return to transaction code F-28.

Figure 5
Set the indicator to allocate partial payments to the invoice
Here are a few points to consider:
- In addition to partial payments, down payments made or received are also automatically shown under the invoices to which they belong.
- The indicator works not only on the accounts receivable side but also on the accounts payable side. However, on the accounts payable side, the indicator is less relevant because the standard payment program automatically takes any partial payments and also down payments made into consideration. Setting the indicator is only useful when you make manual payments. In that case it also helps you prevent paying vendor invoices twice because the payment is automatically linked to the invoice.
- Because of legal requirements, this indicator for Argentina is automatically set.
- The indicator is an individual setting that is to be set per user by the user.
- There is an additional way to set the indicator by using the so-called user parameters. User parameters can be maintained using transaction codes SU2 or SU3 or on every SAP screen via the menu System > User profile > Own Data. Maintain the parameter ID F02 and put an X in the seventh space of this field. If required the security team can make this a general setting by inserting this parameter setting for every user. However, be aware that the parameter settings also influence other editing options settings as shown in Figure 5.
Kees van Westerop
Kees van Westerop has been working as an SAP consultant for more than 25 years. He has an MBA degree in mathematics and a degree in finance. Kees has been concentrating on the financial modules, especially in general ledger accounting, cost center accounting, and consolidation. He also has a great deal of experience with rollouts of kernel systems and integrating finance and logistics.
You may contact the author at keesvanwesterop@hotmail.com.
If you have comments about this article or publication, or would like to submit an article idea, please contact the editor.