By adding FI and CO tables that are not in the standard Report Writer/Report Painter library, you can give yourself more options for creating queries using these tools.
SAP delivers several tables in the standard R/3 system that work with the Report Painter/Report Writer tools. If you’ve used Report Painter, then you know that you can use it to create queries against only those tables included in its library. However, a lot of interesting FI and CO tables are not in the standard delivered library (see Figure 1). A couple of examples of key tables are Customer Open Item and Customer Master tables (BSID and KNB1, respectively). A Report Painter report could be created to include the open receivables and discounts by customer and company code if these tables were included in the Report Painter library. Fortunately, you can easily add your own tables through standard SAP transactions in the Logistics Information System called Flexible Analysis. All you need is a technical and a functional team member to work together.
You can add any table or view in the system that has an amount field and is not a cluster table (unfortunately, the popular financial line-item table BSEG is a cluster table) directly to the Report Writer control tables. You can also combine tables into a view and add the view to the control tables. What follows is a set of steps using release 4.6c to walk you through combining two popular FI tables into a view and adding them to the control tables for reporting.

Figure 1
The Report Writer’s Unmodified Standard Library of FI and CO Tables
Creating a View
As the first step in this example, you’re going to combine the customer master data table KNB1 (company level) with line-item table BSID (customer open items) into a view using the data dictionary.
Follow the menu path: Tools>ABAP Workbench>Development>Data Dictionary, or transaction code SE11. Next, follow these steps:
1. Select the View option and enter a name for the view. Use ZTEST_RW.
2. Click on the Create button.
3. At the pop-up window, select Database View, which is the default.
4. Enter a short text for the view Report Writer View Test.
5. Enter tables KNB1 and BSID in the Tables section.
6. Press Enter.
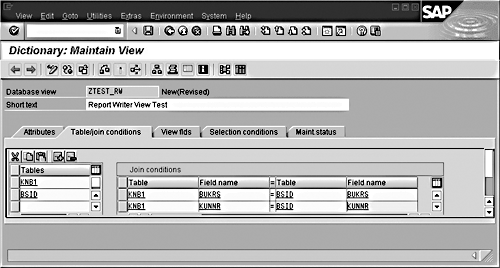
7. In the Join Conditions section, enter the conditions under the Table and Field Name columns as shown in Figure 2.
| KNB1 |
BUKRS |
BSID |
BUKRS |
| KNB1 |
KUNNR |
BSID |
KUNNR |
8. Click on the View Fields tab.
9. To select fields from the tables to include in the view, click on the Table Fields button. Double-click on the table KNB1 and select the following fields:
MANDT – Client
BUKRS – Company Code
KUNNR – Customer Number
BUSAB – Accounting Clerk
10. Press Enter and the fields will populate into the view screen.
11. You still need to select fields from BSID, so click on the Table Fields button again and double click on BSID. Select the following fields:
GJAHR – Fiscal Year
BELNR – Document Number
BUZEI – Line Number
BUDAT – Posting Date
XBLNR – Reference Document
BLART – Document Type
DMBTR – Local Currency Amount
12. Press Enter and the fields will populate into the view screen as shown in Figure 3.
13. Save and activate the view. You will be prompted to save with a transport or as a local object. If you do not plan to transport this across your environment, save it as a local object.

Figure 2
The Join Conditions for Creating a View with the KNB1 and BSID Tables

Figure 3
The Completed View with the KNB1 and BSID Fields Populated
Adding the View to the Report Writer/Report Painter Control Tables
You can perform this step on any table or view that includes an amount field as long as the table is not a cluster table. You will use the view you just created. There isn’t really a trick to this; you’re just adding it as an evaluation structure in the logistics information system.
Follow the menu path: Logistics>Logistics Controlling>Logistics Information System>Flexible Analysis>Evaluation Structure>Create, or transaction code MC27. Now follow these steps:
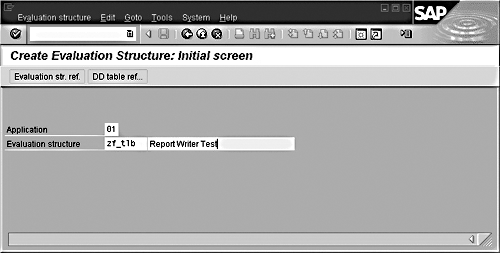
1. In the Application field (Figure 4), you will assign your structure.1 Use 01 for Sales and Distribution for this example.
2. Enter a name for the Evaluation Structure fields. The name must begin with a ZF. Use ZF_TLB, Report Writer Test.
3. Click on the DD Table Ref button. See Figure 4.
4. At the Choose DD Table pop-up window, enter the view you created in Figure 3, ZTEST_RW.
5. Press Enter.
6. The next step is to select the characteristics (fields) and key figures (amount fields) you will include in the evaluation structure. Click on the Characteristics button. Select all the fields in the list and click on the Copy and Close button. This will copy them to your selection list. Click on the Close button for population into the evaluation structure.
7. Click on the Key Figure button. Select the one amount field from your view and then click on the Copy and Close button. This will copy the characteristics and key figures to your selection list. Click on the Close button for population into the evaluation structure.
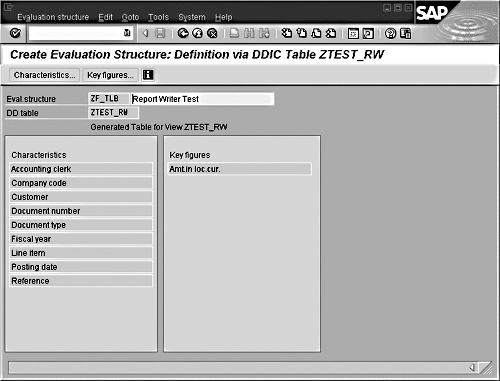
8. The fields will populate into the screen as in Figure 5.
9. Notice that the Save button is not active. You must click on the green arrow icon (Back button) to continue.
10. At the pop-up window, select Yes to generate your evaluation structure.
11. To include the structure in a transport, click on Yes at the next pop-up window if you would like to transport this through your landscape. If not, click No.
This automatically adds the evaluation structure to the Report Writer/Report Painter control tables and creates a library for you to use.

Figure 4
Initial Screen for Adding a Table as an Evaluation Structure in Flexible Analysis

Figure 5
The Characteristic and Amount Fields Populated to the Report Writer/Report Painter Control Tables
Verifying the Setup
To verify all this worked, view the library using the menu path:
Accounting>Financial Accounting>Special Purpose Ledger>Tools>Report Painter> Report Writer>Library>Display, or transaction code GR23. Then follow these steps:
1. The libraries will always begin with a "2." Enter 2* in the Library field and click on the lookup button next to the Library field.
2. Find your library by looking for your evaluation structure name in the table column ZF_TLB.
3. Double-click on your library.
4. Click on the Characteristics button and you will see all the fields available for reporting.
That’s it! You are all set to report on this view.
A word of warning when using this functionality: The Report Writer/Report Painter tools can be system resource hogs. When adding evaluation structures, try to select the key fields of the tables whenever possible and try to include them in your reports.
This is not a requirement, but a strong recommendation. Key fields are the fields in a table that must be unique for each record. When the system searches for records for a report, it is most efficient to begin the search with key fields. To determine what the key fields are in a table, go to the data dictionary (transaction code SE11). Enter your table and display the fields. The top fields with the Key box checked are the key fields for the table.
By selecting specific values for the key fields (i.e., company code and customer number in your example) when building your reports, you will make the system and the technical team much happier.
1Logistics General>LIS>Logistics Data Warehouse>Data Basis>Applications
Tami Becker
Tami has been working with SAP R/3 for about eight years and really enjoys the software and its constant challenges. Her focus has been with reporting, FI, SPL, SAP Enhancements, Euro, DART, Conversions, and now Contract Accounting. There’s never a dull moment with each new release — she hopes you find it as interesting as she does!
If you have comments about this article or publication, or would like to submit an article idea, please contact the editor.


