Get the details behind eight add-ons to SAP BusinessObjects Dashboards that can help you with printing dashboards, importing data from CSV files, integrating dashboards with Google Maps, and other functions.
Key Concept
SAP BusinessObjects Dashboards add-ons are plugins that extend the functionality of the standard toolset. Add-ons can be additional components or connectivity options.
This article was originally published on BusinessObjects Expert.
SAP BusinessObjects Dashboards (formerly known as Xcelsius) features dozens of components to create charts, filters, tabs, sliders, buttons and interactive components. The connectivity options let you fill a dashboard with data via SAP NetWeaver BW Business Explorer queries, XML Web services, and SAP BusinessObjects 4.0 universes, and through Live Office connections to Crystal Reports and Web Intelligence reports.
However, all these built-in options might not fulfill your needs in dashboard development. What if you need a specific chart type that is not included in the standard set of components? Or you want to use maps with advanced custom layers that give users more detail than the standard maps, like Google Maps does? You might want to load your data from a text or CSV file instead of using a live connection to a database environment. And what if you need to include a huge amount of records in your dashboard and enable a user to interact with them without getting into performance issues?
With the SAP BusinessObjects Dashboards Software Development Kit, Adobe Flex developers can create their own custom components — for example, new data connections, data visualizations, navigational controls, and functions and formulas that are not supported by SAP BusinessObjects Dashboards.
I introduce you to what I think are the most interesting add-ons for SAP BusinessObjects Dashboards available on the market.
Installing and Uninstalling Add-Ons for SAP BusinessObjects Dashboards
Before you can use these additional features for dashboards, you have to install the add-ons. This is easy: Start SAP BusinessObjects Dashboards and go to File > Add-On Manager (Figure 1). Click the Install Add-On button and browse to the .XLX file of the add-on. After selecting the .XLX file, the add-on is available to the Add-On Manager. Now click the Close button and restart BusinessObjects Dashboards to activate the add-ons. Uninstalling an add-on works in the same way, only you have to use the Remove Add-On button.

Figure 1
The Add-On Manager screen
Most of the add-ons are components and can be found between the default components in the Components menu (Figure 2). I also discuss some add-ons that provide additional connectivity features and these can be found in the Data Manager.
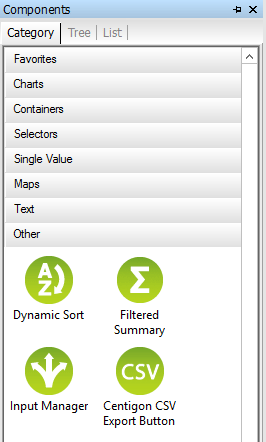
Figure 2
Third-party add-ons in the Components menu
The CSV Connector
SAP BusinessObjects Dashboards comes with a wide set of connectivity options to get live data from external sources into the dashboards. Also, you can still use the built-in Microsoft Excel spreadsheet to contain the data. The problem with this approach is that you have to deploy and distribute a whole new version of your dashboard each time the data changes.
The CSV Connector add-on by Centigon Solutions can be positioned between the Excel spreadsheet and the default connectivity options in SAP BusinessObjects Dashboards. This product is useful when the static dashboard data solution requires too much manual work to update the data and the live connectivity options require a database system that might be not available or accessible.
CSV (comma-separated value) files are text files with a record on each line. The columns are separated from each other by a character, most commonly a comma or a semicolon (Figure 3). You can easily create CSV files with Excel by saving your spreadsheet as the CSV type.

Figure 3
An example of a CSV file
Once you install the CSV Connector, it can be found in the Data Manager and is easy to set up. First, put the location of the CSV file into one of the spreadsheet cells. Then bind this cell to the CSV Connector (CSV data URL) and bind the data destination to the spreadsheet cells that are to be filled with the data from the CSV file. Finally select the correct delimiter. In the Data Preview tab, you can check if everything is set up correctly (Figure 4). If you are unfamiliar with binding, talk to your dashboard designers.

Figure 4
The Data Preview tab
The Definition tab has features that let you dynamically select the rows and columns to use, which means that logic or user input can change the value of these cells. In the example in Figure 5, the values for the Column and Row indices are taken from a cell in the Excel spreadsheet. Because you can influence the value of this Excel cell, it is considered dynamic (i.e., not fixed). Also, you can use filters to select only those records with specific values. Further, this add-on has Column Calculation options that can list the values, count the number of rows, and calculate the sum and average of the column values.

Figure 5
Features of the Definition tab
The CSV Connector comes with a bonus in the latest version 3 release: the CSV Export Button. This component does the opposite of the connector and lets you export data from the spreadsheet to a CSV file (comma or tab delimited) or to the clipboard (Figure 6).

Figure 6
The CSV Export Button properties
Click here for more information about the CSV Connector and a trial version.
Xcelsius Dashboard Printer
The standard print button component that comes with SAP BusinessObjects Dashboards is basic: It prints your complete dashboard through the standard Microsoft Windows print window. The only setting that you can make is whether the print should be scaled to fit the page or to a certain percentage. So, in the past, if you wanted to make screenshots or prints of a specific section of the dashboard, you had to switch to a desktop capturing tool.
However, the Xcelsius Dashboard Printer add-on by Data Savvy Tools is a printing component that lets you capture screenshots of the whole dashboard or just a certain section — for example, only one of the charts (Figure 7). It has a queue feature that lets you make a number of screenshots before you print. You can preview and arrange the screenshots from this queue to change the print order and set some layout and formatting options.

Figure 7
Capture a dashboard screenshot
With the annotation tools, you can add comments, arrows, lines, drawings, and icons to the screenshots to add some context to them (Figure 8). Finally, you print the screenshots and also export them to various file formats.
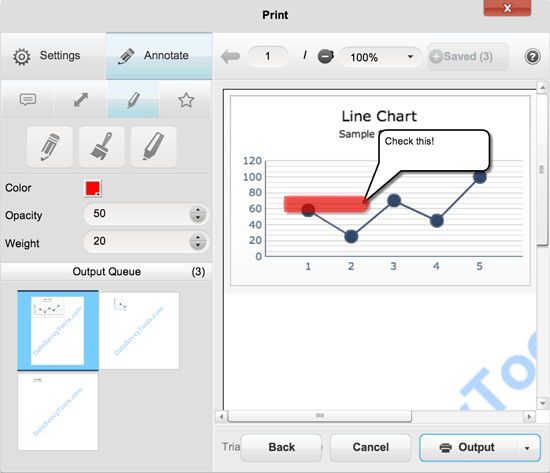
Figure 8
A comment inserted into a dashboard screenshot
Xcelsius Dashboard Printer requires no setup to get started. Just drag it into a dashboard and you are ready to go. In the component’s properties (Figure 9), you can change the image of the print button or just use a text button. You can also set default printing options, such as print margins, orientation, and page layout.

Figure 9
Xcelsius Dashboard Printer properties
Click here for more information about the Xcelsius Dashboard Printer and a trial version.
Essentials Bundle
The Essentials Bundle by Centigon Solutions is a collection of add-on components that are designed to improve the dashboard creation process and improve dashboard performance by eliminating complex Excel logic. The Essentials Bundle consists of the following four components:
- Filtered Summary
- Dynamic Sort
- Background Builder
- Input Manager
Let’s look at each in more detail:
Filtered Summary
Filtered Summary takes off from where SAP BusinessObjects Dashboards default Filtered Rows data insertion option ends. You can find Filtered Rows in most of the components from the Selectors category. Filtered Rows comes in handy when you want to select multiple rows from a data set based on a value in one of the columns — for example, you only want to use the records from Germany (Figure 10).

Figure 10
An example data set
Filtered Summary goes some steps further than Filtered Rows. Besides filtering, it can also perform calculations on column values. In the General tab of the component, you can select the source data range from the spreadsheet and a range to place the results in. Also, SAP BusinessObjects BI 4.0 queries from the query browser can be used as input. You can dynamically determine which column or columns are used for aggregation. For each column, a calculation type can be defined (i.e., a list all values, count, sum, or average), which eliminates the need for complex Excel logic or using multiple source queries (Figure 11).
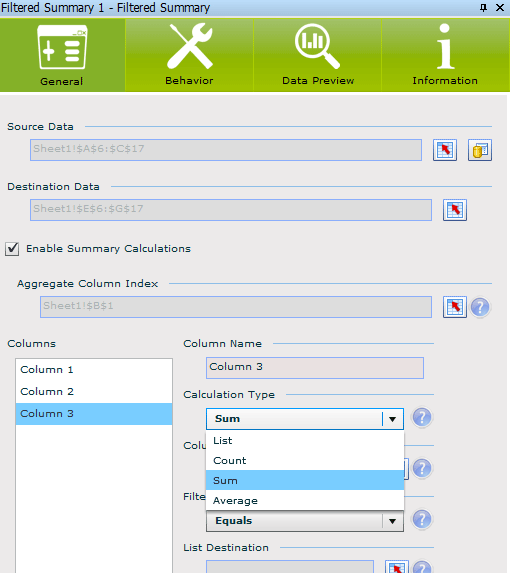
Figure 11
Defining a calculation type
A development productivity feature in Filtered Summary is the Data Preview tab. Here you can quickly check how the data result will look. Figure 12 shows the result preview with the Aggregate Column Index set on the first column and calculation type sum on the third column.

Figure 12
A preview of a data result
Note
Filtered Summary is a hidden component that runs in the background of the dashboard. You’ll need other components to display the data result from this component.
Dynamic Sort
Dynamic Sort can sort a data set by one or more columns. This is not possible by default in SAP BusinessObjects Dashboards. The component has a clickable sorting icon, but you can also control it from the spreadsheet and hide the icon.
The set-up of this component is easy. You can select a data range from the spreadsheet or use a SAP BusinessObjects BI 4.0 query from the query browser as source. With the sort option, you can decide whether to sort the data range itself or put the sorted data set in a destination data range (Figure 13). You can determine the order of sorted columns (first sort column 1, second sort column 2, etc.) and set the sorting type (ascending or descending). These options are read from the spreadsheet, so they can be changed by other components or user input.

Figure 13
The General tab for the Dynamic Sort component
Background Builder
Background Builder lets you can create more elaborate layouts for your dashboards. It looks like the standard background components you can find in the Art and Backgrounds category of the Components menu in SAP BusinessObjects Dashboards, but with more customization options. You can select one of the 40 background images (Figure 14), alter texture patterns, control the color, and set the transparency. Furthermore, you can add a header and a footer and show shadow, bevel edge, and even the corner radius (Figure 15). There are 20 layout templates available.

Figure 14
Select background images
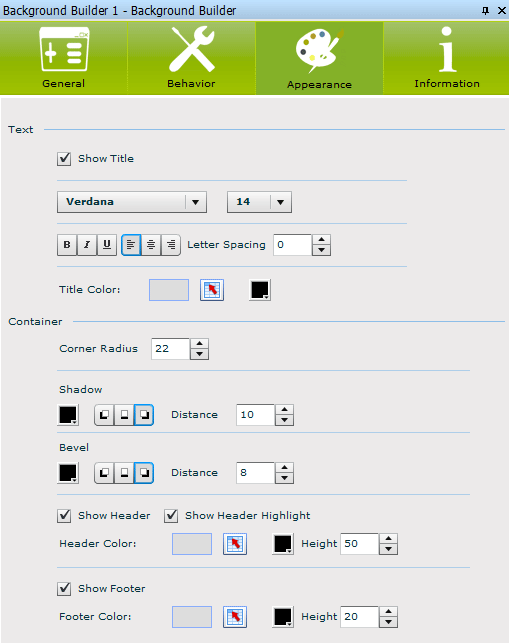
Figure 15
Adjust elements, such as corner radius and shadow
Input Manager
Input Manager is a hidden component that you won’t see when you run a dashboard. It is designed specifically for what-if scenarios. With this component, you can move values from a cell into a dynamically specified target cell, based on a row and column index number. In the example in Figure 16, I use the Input Manager to move the source value (25) into the cell on row 3 of column 2. I control these indexes with the standard Spinner component in SAP BusinessObjects Dashboards.
You can use this Input Manager to enhance single-value components, such as a slider or a spinner, to control multiple values. This lowers the amount of needed components and Excel logic and, thus, shortens development time.

Figure 16
Move a value to a targeted cell
Click here for more information about the Essentials Bundle and a trial version.
DashConn
If you are a Salesforce.com customer, the DashConn add-on by IdeaCrop might interest you. With DashConn, you can use Salesforce.com reports as a direct data source for your dashboards to present and analyze sales activities. With this integrated solution, there is no more need for data exports from Salesforce.com, and you can reuse existing Salesforce.com reports.
This add-on is delivered in twofold: as the DataViewer component and as a data connectivity option in the Data Manager. The DataViewer component presents the data in an interactive table based on the selected report (Figure 17). In this component, you can drill down or up through the data, open the details page on Salesforce.com for the selected item, set filters, and aggregate data.

Figure 17
The DataViewer
The component has a Data Output tab (Figure 18) in which you can select a spreadsheet cell range to export the results to so they can function as a data source for other components again (e.g., charts). The component also works as a selector, which lets you make multiple row selections. Also, these selected rows can bind to a spreadsheet cell range for re-use in other components. Furthermore, you can use other selector components as a prompt selector to limit the data shown in the DataViewer component table.
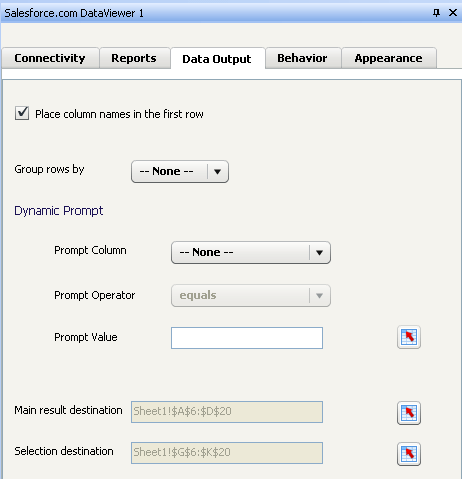
Figure 18
DataViewer properties
If you don’t want to use the DataViewer, you can use the Data Manager connection option (Figure 19). The connection has the same features as the DataViewer component, but also has a Usage tab similar to other connectivity options, so you can specify the refresh rate of the Salesforce.com report data.
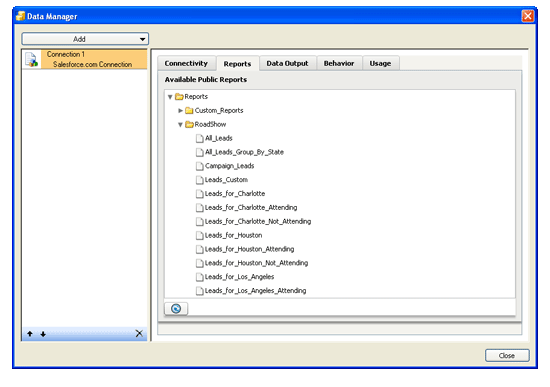
Figure 19
A connection in the Data Manager
Click here for more information about DashConn and a trial version.
Visualization Add-On
The charts in the Visualization Add-ons by Graphomate are based on the so-called SUCCESS rules for data visualization and business communication by Rolf Hichert (https://www.hichert.com/en/success). When presenting data and information, a clear message should be told. Unfortunately, SAP BusinessObjects Dashboards doesn’t really help you follow this rule. It can quickly trap a developer into creating dashboards that consist of colorful and shiny pie charts, which are nice to look at, but not always effective to use. Dashboards need to present data so that users can make good analyses, compare values, and see what is going well. Comparing values in pie charts is difficult, and colors must be used with care; (i.e., only for information that is important).
The Visualization Add-ons include up to six charts (depending on the version): Bars & Columns, Pins, Deviation, Line, Stacked, and Waterfall. These charts tend to look at bit minimalistic and clean (no axis, little color) at first sight, but they will enable you to create Stephen Few-like dashboards.
All charts can be configured from the same component. In the Chart tab of the General view, you can choose which chart type to use and whether it is horizontal or vertical (Figure 20). The measures can be bound to a range of cells in the spreadsheet from the Data tab (Figure 21). You can also bind the target values here. An interesting feature is double category labels: The component can split the years from months, quarters, and weeks by putting them in separate lines in the chart. With this feature, a lot of redundant labeling can be eliminated (e.g., repeating the year in each quarter label).

Figure 20
Select a chart type and orientation

Figure 21
Setting up a chart
Click here for more information about the Visualization Add-ons and a free version.
GMaps Plugin
SAP BusinessObjects Dashboards includes a large set of mapping components (Figure 22). These maps show the continents, countries, and regions. These components function as a selector, display data in mouse-overs, and use alerting colors.
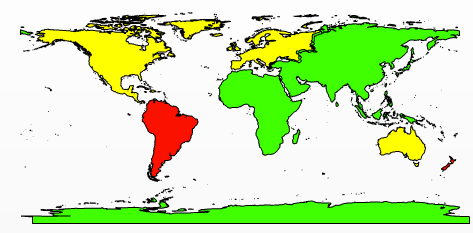
Figure 22
The default SAP BusinessObjects Dashboards mapping components
The problem with the BusinessObjects Dashboards mapping components is that not all countries are included (e.g., no African countries are available), some maps are hopelessly outdated (Serbia and Montenegro are still a one-country map component, but the nations split up back in 2006), and the world map can only identify continents, not individual countries. If you want to use custom areas or plot geographical points on a map, these standard components can’t help you.
The GMaps Plugin add-on by Centigon Solutions eliminates these boundaries by fully integrating Google Maps into SAP BusinessObjects Dashboards. With this add-on, you can use familiar Google Maps graphical features (e.g., show maps, satellite, hybrid, terrain) and zoom in or out on a map. You can make selections from a region or a point on a map, and display alerts, single points (e.g., factory or customer locations), and even heat maps.
What I think is the most appealing feature of the GMaps Plugin is that you can put your own layers on top of Google Maps. This enables you to use specific regional areas. In Figure 23, Europe is divided into four regions. You can even use multiple layers on top of each other and dynamically control which layer is on top. Using multiple layers allows to you see different selections for regions (e.g., Western Europe versus individual countries).
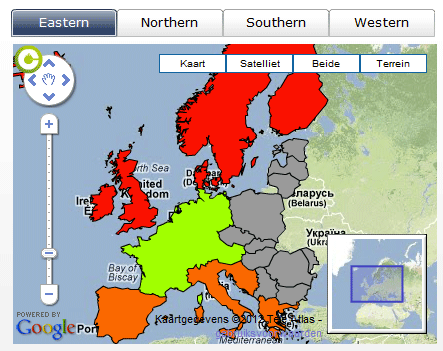
Figure 23
A European map divided into regions
To display these layers, Esri shapefiles (.shp) are used. These files inhabit points or polygon shapes that form geographical areas. On the Web, a wide variety of shapefiles are freely available covering the standard mapping needs (e.g., countries, rivers, cities, etc.). If you need a custom layer, you can create your own shapefiles.
In the General tab of GMaps Plugin, you can set up the layer series. Here you bind the labels and values and set up the insertion features (Figure 24).
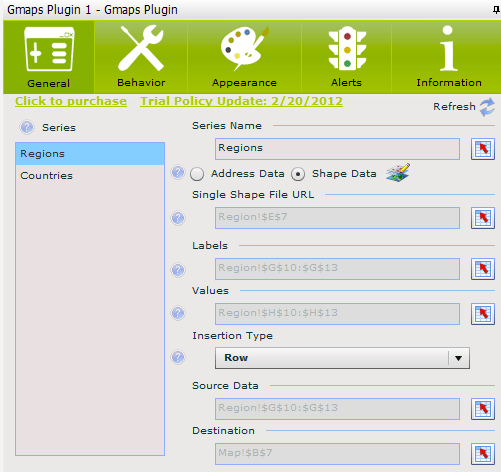
Figure 24
GMaps Plugin properties
The Behavior tab determines the initial location and zoom level of the map (Figure 25). Also, you can configure the visibility of a multiple series. This works in the same way as dynamic visibility; for each series, the program checks a spreadsheet cell, and when the value in that cell corresponds with the key value, the series is shown.
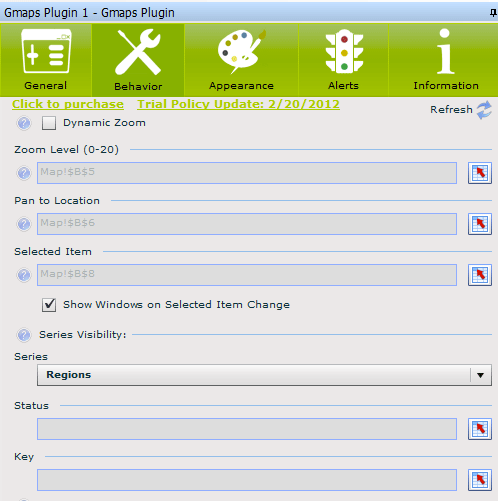
Figure 25
The Behavior tab lets you set up map features
In the Appearance tab, you can adjust visual settings on labels and, when using a layer series with geographical points, the icon (Figure 26). Also, you can configure some settings for Google Maps, such as navigation controls or showing a small map (Figure 27).

Figure 26
The Appearance tab lets you adjust visual settings

Figure 27
Map Options in the Appearance tab
Finally, the Alerts tab looks similar to alerting options you know from standard SAP BusinessObjects Dashboards components (Figure 28). Alerting can be set up for each series separately.

Figure 28
The Alerts tab
Click here for more information about the GMaps Plugin and a trial version.
SVG Controller
The SVG Controller add-on by Inovista can turn SVG files into an interactive component of your dashboard (Figure 29).
SVG (Scalable Vector Graphics) is a file format for two-dimensional vector graphics, which can be static, interactive, or animated. These SVG files are widely available on the Web, or you can create your own. Examples of useful SVG files include a geographic map with several regions and a store floor plan with several product sections.

Figure 29
A dashboard with the SVG Controller
After dragging the component to the canvas, you can load up to 10 SVG files into it. This allows you to use multiple layers, which can change upon user interaction to create a drill-down. Furthermore, clickable hotspots can be created and data can be shown in mouse-over tooltips (Figure 30). Also, alerting and highlighting are possible so you can give a particular region or section a color based on certain value.
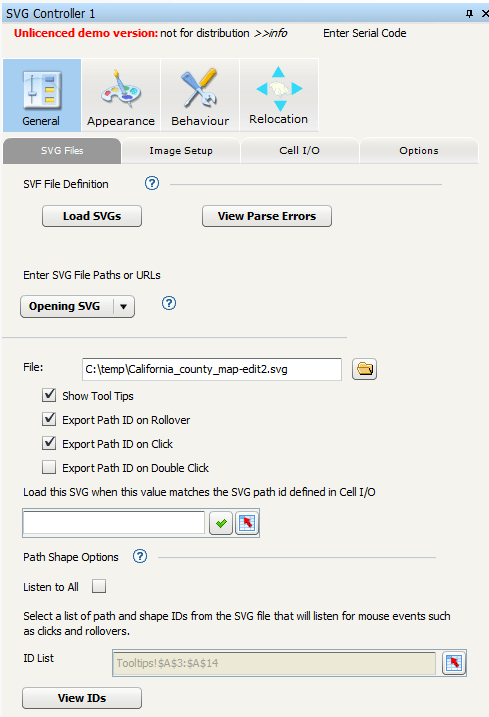
Figure 30
SVG file properties
Click here for more information about the SVG Controller and a trial version.
XWIS Advantage
With XWIS Advantage by Antivia, you can connect your dashboards to SAP BusinessObjects Web Intelligence documents, Crystal Reports, SQL databases and OLAP cubes. It includes a number of components to directly display and analyze the data it retrieves from these data sources.
Re-using existing BusinessObjects documents as data sources and bypassing the spreadsheet to bind the data to standard SAP BusinessObjects Dashboards charting components is a fast way to develop dashboards. Since the data doesn’t need to load into a spreadsheet, dashboard users can scroll and drill through thousands of records without performance issues.
The XWIS Advantage Table component displays the data in an interactive table, in which the dashboard user can drill down. In Figure 31, by clicking on a value in the Year column, you explore quarterly data.

Figure 31
Drill from yearly data into quarterly data
In the General tab, you can pick the source data report from the SAP BusinessObjects BI environment (Figure 32). The Content tab specifies the layout of the table. Here you can also bind the output to spreadsheet cells if necessary.
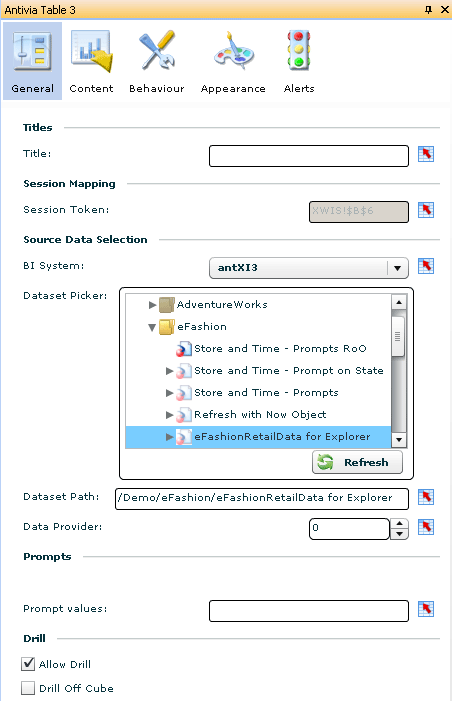
Figure 32
Pick report sources
The Auto Wire feature (Figure 33) binds the output data from this component directly into standard charting elements in dashboards without having to use a spreadsheet.
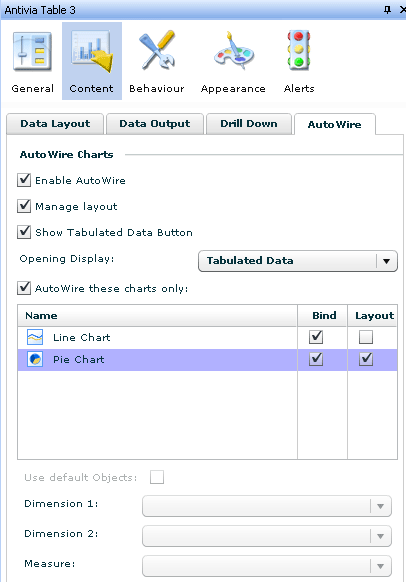
Figure 33
Set up AutoWire
Besides the Table component, XIWS Advantages also comes with Crosstab, Drill, Quick View, List of Values, Export, and Slice-and-Dice components. In the Slice-and-Dice component (Figure 34), the dashboard user can create a report layout by drag-and-drop.
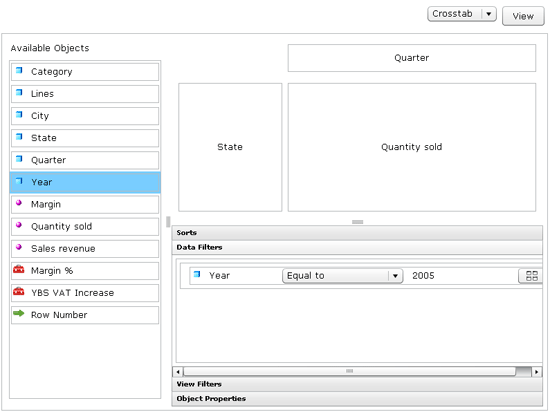
Figure 34
The Slice-and-Dice component
Click here for more information about XWIS Advantage.
Xavier Hacking
Xavier Hacking is a SAP BI specialist from Eindhoven, The Netherlands, working as a consultant for Interdobs. He has a Master’s degree in Industrial Engineering and Management Science from the Eindhoven University of Technology. He has worked with a wide range of products from the current SAP BW and SAP BusinessObjects toolset, with a focus on dashboard and application development within SAP environments. Xavier is the co-author of four SAP BI-related books, including SAP BusinessObjects Design Studio – The Comprehensive Guide and SAP BusinessObjects Dashboards 4.1 Cookbook. He blogs on all sorts of BI-related topics at HackingSAP.com and you can follow him on Twitter at @xjhacking.
You may contact the author at post@xavierhacking.nl.
If you have comments about this article or publication, or would like to submit an article idea, please contact the editor.