Configure foreign taxes in your SAP system by setting up the foreign country as a region within your home country.
Key Concept
In the standard SAP system, the only tax procedure that you use in a specific company code is the one that is attached to the country associated with that company code. It may be necessary, however, to deal with cross-border shipments, which involve foreign tax procedures and rates.
Imagine a scenario in which a US company with a plant in Canada ships goods to Canadian customers either from the Canadian plant or directly from a US plant. Normally you run a Canadian company code in your system to address this, but it leads to a greater amount of effort in terms of system setup and legal and fiscal reporting requirements. I worked on a tightly scheduled implementation project and learned through trial and error a seven-step process to enable your system to properly calculate foreign taxes without needing to set up the additional company code, simplifying your processes and saving you time and effort.
- Step 1. Attach Canadian tax to the US tax procedure
- Step 2. Insert Canadian regions into the US
- Step 3. Set up a Canadian tax jurisdiction structure similar to the US structure
- Step 4. Set up Canadian tax jurisdictions in TAXUSJ and TAXCAJ
- Step 5. Set up Canadian tax codes in Canada and the US
- Step 6. Maintain Canadian tax codes in the US condition record
- Step 7. Enter Canadian and US tax conditions into the Sales and Distribution (SD) pricing procedure
Step 1. Attach Canadian tax to the US tax procedure. Go to transaction OBQ3, select the Canadian tax procedure (TAXCAJ), and click on the Control folder (Figure 1).
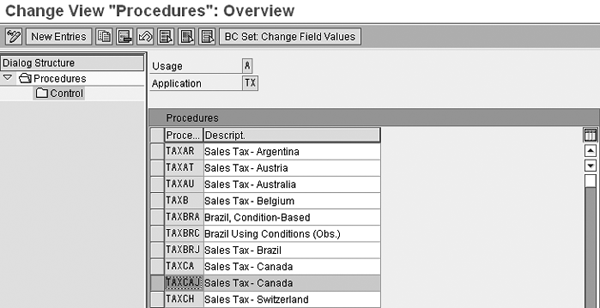
Figure 1
Select the Canadian tax procedure
Note
Although Canada is the receiving tax country addressed in this scenario, this procedure also works for other non-US countries that use a tax jurisdiction structure, for example, Brazil. However, it does not work for systems that use tax interface software such as Vertex and Taxware. For countries that do not use tax jurisdiction structures, there is a standard SAP solution called Plants Abroad, which handles tax requirements for companies with tax registration in different countries. For more information about Plants Abroad functionality, see Kees van Westerop’s article
“Plants Abroad Eases Country-Specific Tax Reporting.” Copy the section of the tax procedure relating to the type of tax that you’ll use. To do this, hold down the Ctrl key and press Y until the cursor becomes a cross sign, then hold down the Ctrl key and press C. For example, I have copied A/R and SD GST (goods and services tax for Canada) and QST (Quebec sales tax) (Figure 2).

Figure 2
Copy the tax procedure that relates to your type of tax
Click on the left arrow icon  to go back to the Procedures screen, select the US tax procedure (TAXUSJ), and click on the Control folder. Then click on the New Entries button and paste your data in the screen that appears. The bottom part of the US tax procedure then looks like the screen shown in Figure 3. Save the entries.
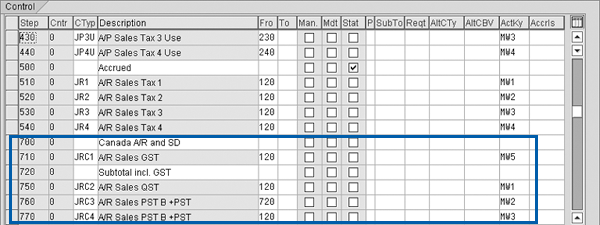
Figure 3
Control screen with new data
This scenario assumes that the country assignments to tax procedures have been made as follows: Country US: TAXUSJ and Country CA: TAXCAJ. You can check transaction OBBG to make sure that this is the case.
Step 2. Insert Canadian regions into the US. For the intercompany transactions between the US and Canada to work successfully, treat the Canadian regions as if they are part of the US. However, be certain that the two- digit code that represents the Canadian region is not already defined as a US region. In the standard SAP system none of the Canadian regional codes clash with the US codes. Go to transaction OVK2 and scroll down to country CA (Figure 4).

Figure 4
Canadian regions in transaction OVK2
Copy the Canadian Region and Description columns and click on the New Entries button. Click on the first field in the Region column and paste your data in the screen that appears. Then enter US in all the lines of the Country column (Figure 5).

Figure 5
Canadian regions in the US country column
Step 3. Set up a Canadian tax jurisdiction structure similar to the US structure. This allows the tax rates to pull the correct jurisdiction code structure (state, county, and city) for Canada as it does for the US. Go to transaction OBCO and change the structure for Canada (for example 2, 3, 4) to match that of the US (Figure 6). The numbers 2, 3, and 4 in the Lg columns represent the number of characters of the first, second, and third hierarchy levels of the tax jurisdiction structure. Taking an example in the US, for a jurisdiction structure NY0010001, NY (two characters) can represent New York state, 001 (three characters) can represent Westchester County, and 0001 (four characters) can represent the city of White Plains.
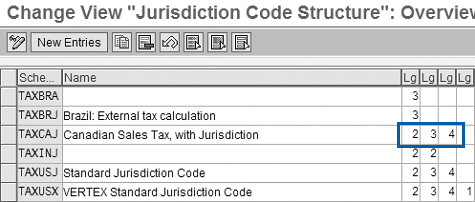
Figure 6
Match the Canadian structure with the US structure
Step 4. Set up Canadian tax jurisdictions in TAXUSJ and TAXCAJ. Now you can set up the Canadian jurisdiction codes for each region. Note that for tax jurisdiction purposes, Canada is being treated as a state within the US. The first two digits of the jurisdiction code (state) should represent Canada, the next three (county) should represent the Canadian province, and the last four (city) can be left as 0000. In Figure 7, you can see that the first two letters (representing state) of the jurisdiction code are CD. This is because in the US tax procedure, CA represents California, so CD represents Canada without conflicting with the existing state. Go to transaction OBCP, enter the appropriate tax procedure (TAXUSJ), and enter the jurisdiction codes for Canada. Now you can set up this same jurisdiction structure in the Canadian tax procedure (TAXCAJ).

Figure 7
Enter the Canadian jurisdiction codes
Step 5. Set up Canadian tax codes in Canada and the US. Go to transaction FTXP, enter the Country Key US, and then enter a new Tax Code (e.g., S1) and the state level Tax Jurisdiction for Canada (e.g., CD0000000) (Figure 8).
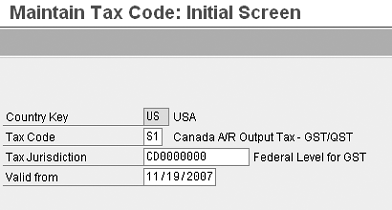
Figure 8
Enter tax information in transaction FTXP
Press Enter, give the Tax Code a description and type, and scroll down to the part of the screen that contains the part of the Canadian tax procedure (A/R Sales GST) that you entered in the first step. Then enter the rate for Federal Level for GST, which is 6.000 in this example (Figure 9).
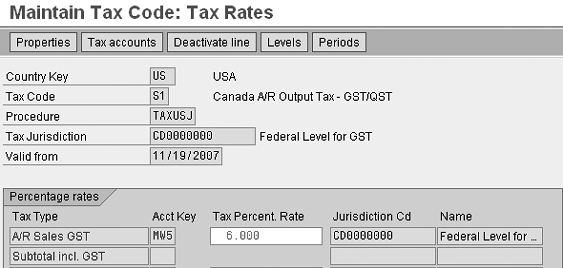
Figure 9
Enter the federal GST rate
You also need to set up the same tax code for Canada. Choose the menu option Tax Code > Other Country. Enter CA for Canada and create the same tax code, tax jurisdiction, and tax rate. Maintain the relevant account assignments for the tax codes in transaction OB40 by linking the account key relevant to your tax rate (e.g., MW5) to the appropriate
tax account.
Step 6. Maintain Canadian tax codes in the US condition record. You need to enter the Canadian region tax codes in the SD condition record that you use for sales orders and billing. Go to transaction VK11 and enter the US tax condition UTXJ (Figure 10). Then choose the access sequence, which is the order that the system goes through when selecting condition records. In this example, I have used the Country/State/Customer Classif. 1/Material Classification 1 option so I can decide which customer and material combinations are taxable based on the relevant tax classifications in the master data. Enter all the Canadian regions that you created in step 2, the appropriate tax classifications and validity periods, and the tax code that you created earlier (S1 in this case). Save your entries.

Figure 10
Enter Canadian regions and tax information in transaction VK11
In the customer master data (transaction VD02), go to the Billing Document tab and make sure that any taxable customer’s tax classification is as shown in Figure 11. In the Address tab of the customer master, enter the relevant Canadian region and tax jurisdiction as shown in Figure 12. In the material master (transaction MM02), go to the Sales: Sales Org. Data 1 tab and make sure that any taxable material’s tax classification is set as shown in Figure 13.

Figure 11
Customer classification data

Figure 12
Enter Canadian region and jurisdiction code

Figure 13
Set tax classification data
Step 7. Enter Canadian and US tax conditions into the SD pricing procedure. This is needed for the system to pick up the appropriate tax procedure during billing, as long as the relevant conditions have been met. If you have already been including sales tax in invoices to US customers, then you most likely already have a US tax condition set up here. In transaction V/08, I’ve entered tax conditions UTXJ and CTXJ as well as tax jurisdiction levels such as JR1, JR2, JRC1, and JRC2 into the SD pricing procedure (Figure 14).

Figure 14
Enter tax conditions into the SD pricing procedure
When you enter a billing document in SD for goods shipped from the US to the relevant Canadian customer, the system pulls in the Canadian tax conditions (JRC1) and the relevant rate that is linked to the US condition UTXJ. Figure 15 shows that the system has applied a GST tax of 6% on a billing document that has a net price of $67,095.15, and hence calculated a tax amount of $4,025.71.

Figure 15
The system calculates the tax amount
After completing this process, you can now apply US or Canadian taxes on goods shipped to customers in any of the Canadian provinces. You can use transaction S_ALR_87012394 (record of sales and use tax) to report the tax amount to be paid over to the authorities.
Paul Ovigele
Paul Ovigele is the founder of ERPfixers, an online micro-consulting platform (https://www.erpfixers.com). He has worked as an ERP financials consultant since 1997 in both North America and Europe, specializing in implementing the FI and CO modules along with their integrated areas for companies in industries such as consumer goods, chemicals, logistics, pharmaceuticals, apparel and entertainment. Paul has delivered numerous training sessions to finance professionals at both the functional and managerial levels, and he has presented at various SAP financials conferences around the world.
You may contact the author at paul@ovigele.com.
If you have comments about this article or publication, or would like to submit an article idea, please contact the editor.


